Slant Roof Shed: Build Guide & Roof Types
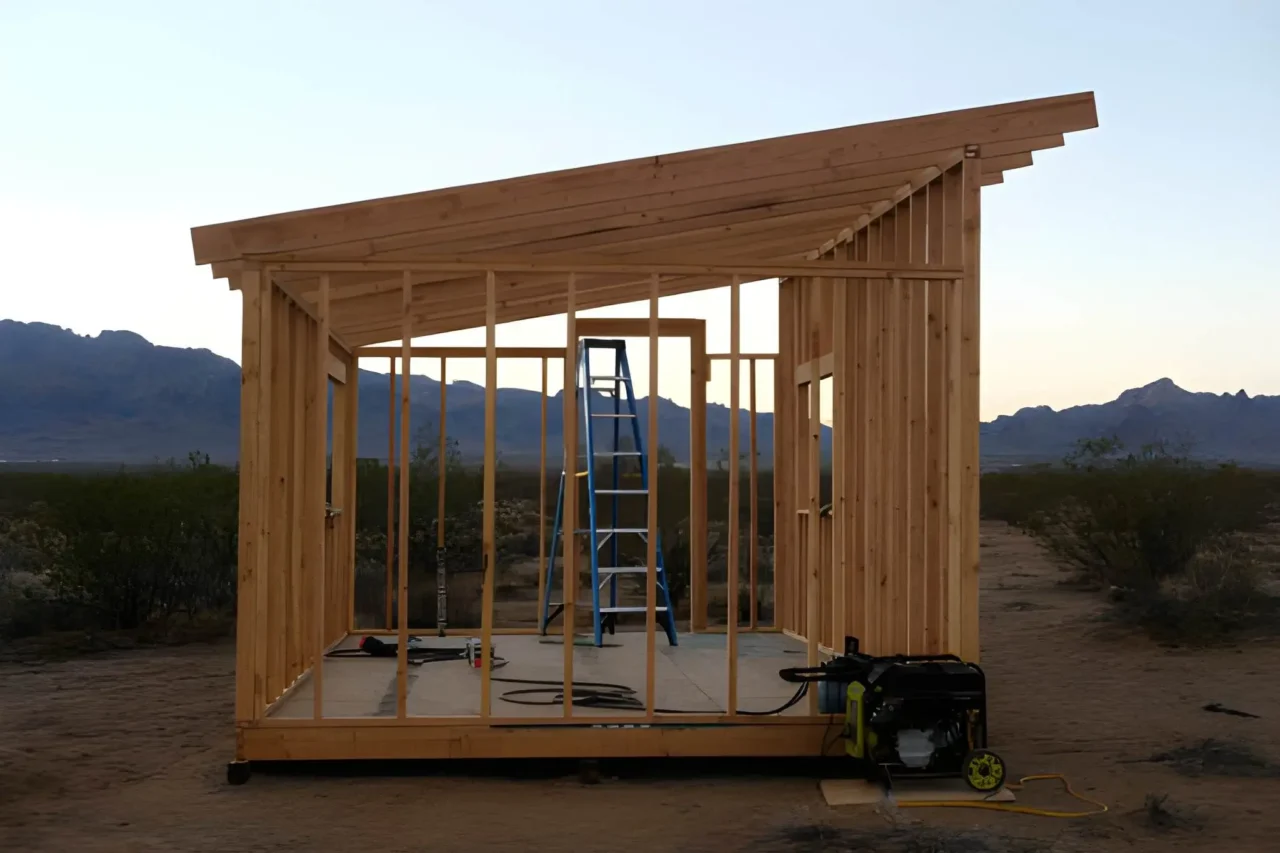
A slant roof shed, also known as a lean-to shed, skillion shed, or mono-pitch shed, has a single roof plane that slopes in one direction. This makes it the easiest and cheapest type of shed roof to build, with DIY material costs of $500 to $1,500 and total professional build costs of $1,500 to $3,500 for a standard 8×12 structure. There is no ridge beam, no complicated rafter cuts except for one birdsmouth notch, and the roof can be sloped anywhere from 1:12 (low slope) to 4:12 (standard) to 6:12+ (steep), depending on the weather, drainage needs, and personal taste.
Table of Contents
Slant roof sheds have become very popular in North America, Australia, and the UK. Homeowners love their clean, modern look, quick construction time, and much lower material and labor costs compared to gable, gambrel, or hip-roof sheds. A slant roof shed doesn’t need mirrored rafter pairs, ridge beams, or complicated compound cuts like a traditional gable shed does. Instead, it has a single plane of parallel rafters that run from a taller front wall to a shorter back wall. This design is easy enough for even first-time DIY builders to finish in one weekend.
This comprehensive 2026 guide covers slant roof shed design principles, slope calculations, rafter sizing, step-by-step framing and installation, roofing material options, cost breakdown, comparisons against other shed roof types, and a complete FAQ section for homeowners planning their build.
What Is a Slant Roof Shed?
A slant roof shed is an outbuilding with a single-pitch roof that slopes down from the highest point, which is usually the front wall, to the lowest point, which is usually the back wall or supporting structure. In professional terms, this single-plane design is called a monopitch or skillion roof. When built as an attached addition against an existing wall, it is called a lean-to.
A slant roof is different from other types of shed roofs because it doesn’t have a ridge. This means that there is no central peak where two roof planes meet. Instead, all rain, snow, and debris flow in one direction, making it easier to plan for drainage and getting rid of the need for a ridge beam assembly.
Slant Roof Shed vs Lean-To Shed
These two terms are often used interchangeably but have a technical distinction:
- Slant roof shed (freestanding): A standalone structure with four walls of varying heights typically taller at the front and shorter at the back creating the roof slope independently.
- Lean-to shed (attached): A structure where one wall is shared with or supported by an existing building (house, garage, barn), using the existing wall’s height as the high point and the lean-to’s outer wall as the low point.
Both share identical roof framing principles parallel rafters, single slope, birdsmouth cuts but lean-to sheds use the existing structure for one wall, reducing material costs by 20–30%.
Slant Roof Types: Slanted Roof Styles Explained
Understanding the full spectrum of slanted roof configurations helps you select the best design for your specific property, climate, and use case.
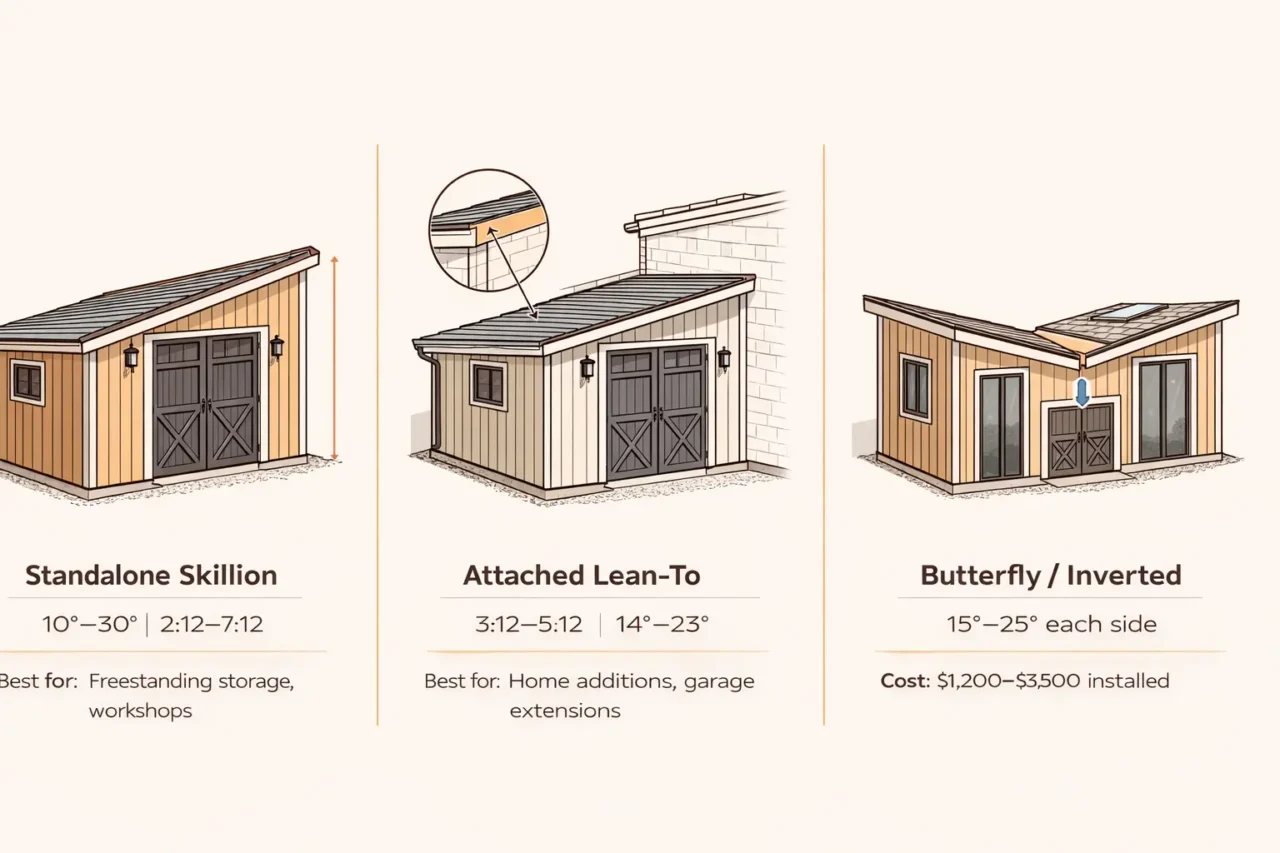
1. Single-Pitch Slant Roof (Classic Skillion)
The most common slant roof shed configuration: perfectly flat single plane running from tall front wall to short back wall. Clean, modern aesthetic. Excellent drainage. Ideal for contemporary homes, urban properties, and minimalist designs.
Best for: Tool sheds, bike storage, garden sheds, home office pods
Typical slope: 2:12–4:12
Construction difficulty: ★☆☆☆☆ (easiest)
2. Low-Slope Slant Roof (Nearly Flat)
Slope of 1:12–2:12, creating a near-flat appearance from ground level. Modern, architectural aesthetic that blends with contemporary home styles. Requires careful material selection low slopes need metal, TPO, or EPDM roofing rather than asphalt shingles (which require minimum 2:12).
Best for: Modern home additions, contemporary architecture, urban settings
Typical slope: 1:12–2:12
Construction difficulty: ★★☆☆☆
3. Steep Slant Roof (High-Pitch Skillion)
Slope of 5:12–8:12 or steeper, creating dramatic visual interest and maximizing overhead interior space at the tall wall. Excellent snow shedding in northern climates. Provides head clearance for loft storage or workshop use.
Best for: Workshop sheds, storage buildings in snow climates, architectural statement buildings
Typical slope: 5:12–8:12
Construction difficulty: ★★☆☆☆
4. Lean-To Attached Slant Roof
Attached to an existing structure at the high end, using the parent building’s wall as one side. Reduces wall framing by 25%, shares structural load with existing building, and creates covered transition spaces between buildings.
Best for: Garage additions, house storage extensions, covered walkways, firewood storage
Typical slope: 3:12–6:12 (must clear adjacent roof drainage)
Construction difficulty: ★★☆☆☆
5. Butterfly Slant Roof (Inverted Pitch)
Two opposing slant planes pitched inward toward a central valley rather than outward creates a distinctive V-shape that channels rainwater to a central collection point. Used in contemporary and sustainable architecture for rainwater harvesting.
Best for: Rainwater collection, contemporary design statement, hot-climate sheds
Typical slope: 2:12–4:12 per plane
Construction difficulty: ★★★☆☆
Slant Roof Shed Cost Breakdown (2026)
DIY Material Cost by Shed Size
| Shed Size | Floor Area | Lumber (framing) | Roofing Material | Hardware/Fasteners | Total DIY Materials |
|---|---|---|---|---|---|
| 6×8 ft | 48 sf | $180–$280 | $120–$250 | $60–$100 | $360–$630 |
| 8×10 ft | 80 sf | $250–$380 | $180–$320 | $80–$130 | $510–$830 |
| 8×12 ft | 96 sf | $300–$450 | $220–$380 | $90–$150 | $610–$980 |
| 10×12 ft | 120 sf | $370–$560 | $280–$460 | $110–$180 | $760–$1,200 |
| 12×16 ft | 192 sf | $520–$780 | $420–$680 | $150–$240 | $1,090–$1,700 |
| 16×20 ft | 320 sf | $780–$1,150 | $650–$1,050 | $200–$320 | $1,630–$2,520 |
Professional Build Cost by Shed Size
| Shed Size | Foundation | Framing + Roof | Roofing Material | Total Professional |
|---|---|---|---|---|
| 8×10 ft | $200–$400 | $600–$1,000 | $180–$320 | $980–$1,720 |
| 8×12 ft | $250–$500 | $700–$1,200 | $220–$380 | $1,170–$2,080 |
| 10×12 ft | $300–$600 | $900–$1,500 | $280–$460 | $1,480–$2,560 |
| 12×16 ft | $400–$800 | $1,200–$2,000 | $420–$680 | $2,020–$3,480 |
| 16×20 ft | $600–$1,200 | $1,800–$3,000 | $650–$1,050 | $3,050–$5,250 |
Roofing Material Cost Comparison for Slant Roof Shed
| Material | Minimum Slope | Material Cost (per sf) | DIY Difficulty | Lifespan |
|---|---|---|---|---|
| Asphalt shingles | 2:12 | $0.80–$1.80/sf | Easy | 15–25 years |
| Corrugated metal | 1:12 | $1.20–$2.50/sf | Moderate | 30–50 years |
| Standing seam metal | 0.5:12 | $3.00–$6.00/sf | Hard | 40–70 years |
| EPDM rubber | 0.25:12 | $1.50–$3.00/sf | Moderate | 20–30 years |
| TPO/PVC membrane | 0.25:12 | $2.00–$4.00/sf | Moderate | 20–30 years |
| Polycarbonate panels | 1:12 | $2.00–$5.00/sf | Easy | 10–20 years |
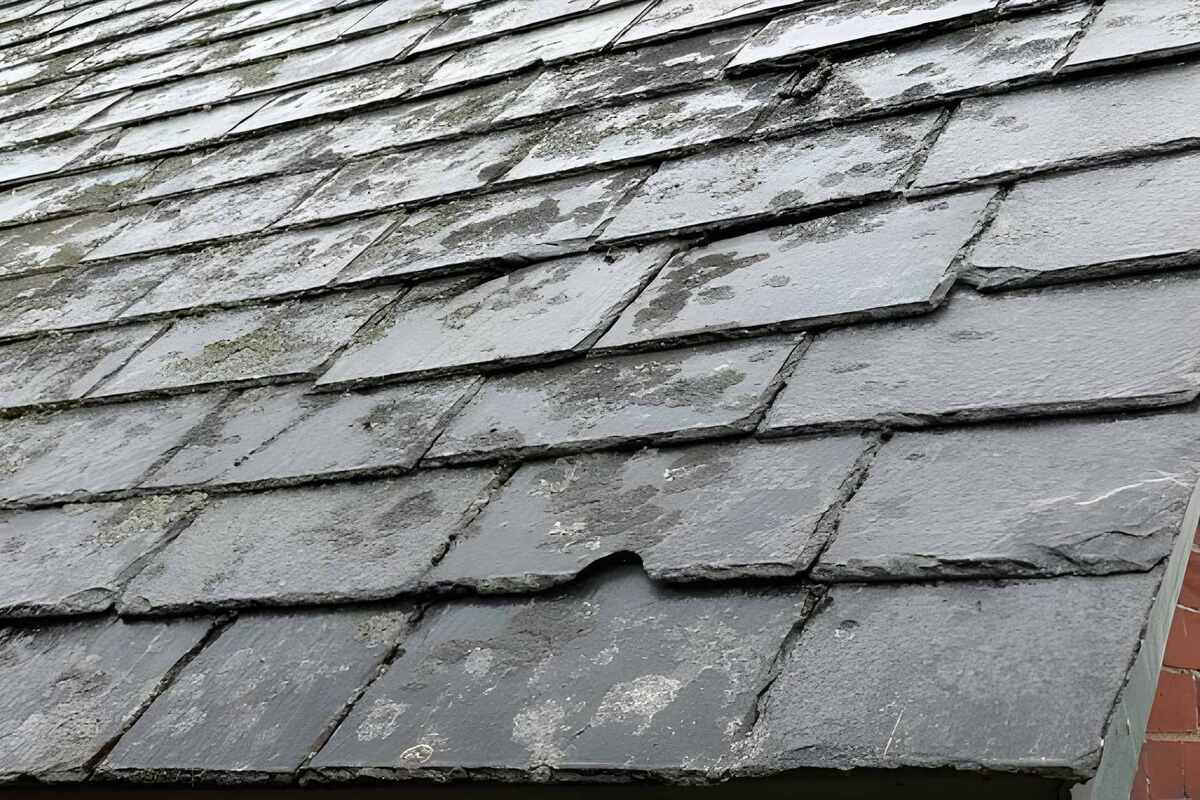
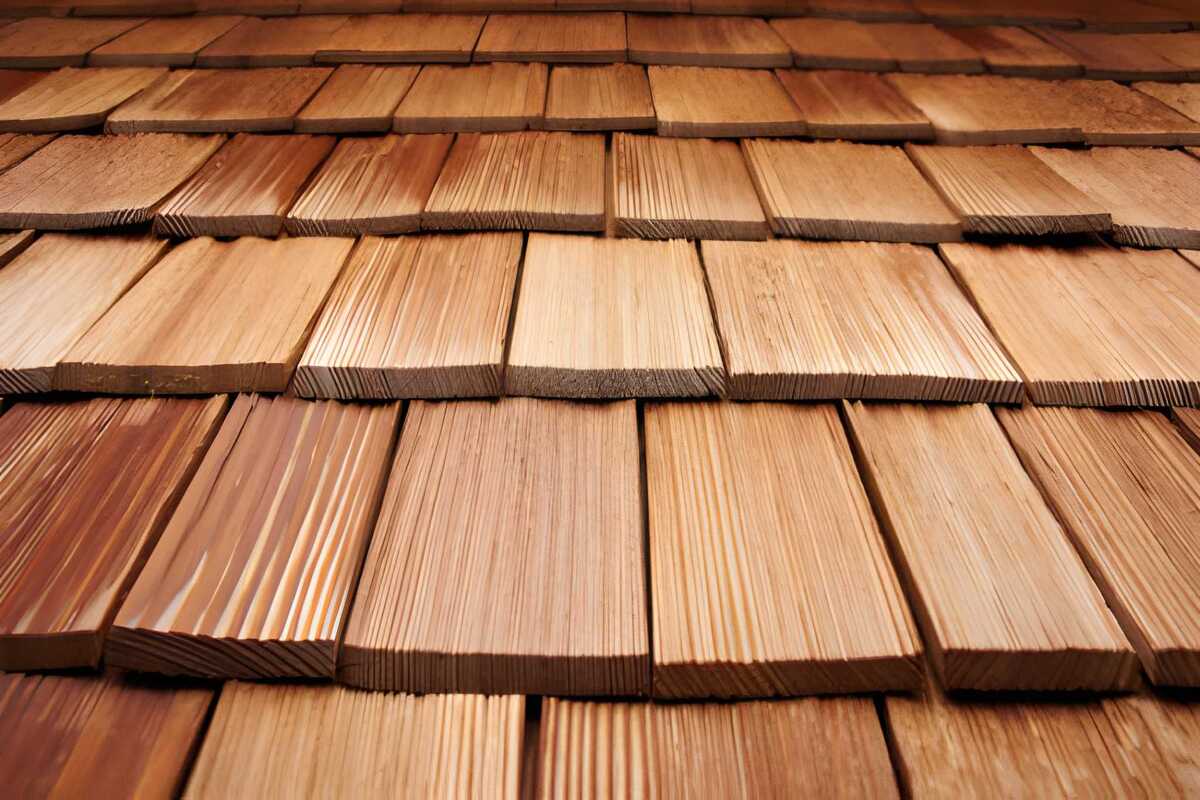
| Cedar shingles | 3:12 | $2.50–$5.00/sf | Hard | 20–30 years |
Slant Roof Shed Design: Slope and Pitch Calculations
Understanding Roof Pitch in a Slanted Roof
Roof pitch is expressed as the rise over run ratio the number of inches the roof rises vertically for every 12 inches of horizontal span. A 3:12 pitch rises 3 inches for every 12 inches of horizontal distance.
Why pitch matters for slant roof sheds:
- Too low (under 1:12): Water pools, debris accumulates, leaks develop requires fully waterproof membrane roofing
- 2:12–3:12: Minimum for asphalt shingles; adequate drainage for most climates
- 4:12–6:12: Optimal for most applications good drainage, weather resistance, adequate headroom variation
- 6:12+: Excellent snow shedding; dramatic visual impact; increases structural loads
Calculating Wall Height Difference for Your Desired Pitch
The wall height difference between your front (tall) and back (short) walls determines the roof slope:
Formula:
Wall height difference (inches) = (Shed depth in feet × desired rise) ÷ 1
Example: 10 ft deep shed at 3:12 pitch:
- Wall height difference = 10 × 3 = 30 inches (2.5 feet)
- If back wall is 7 ft tall, front wall = 7 ft + 2.5 ft = 9.5 ft tall
Example: 12 ft deep shed at 4:12 pitch:
- Wall height difference = 12 × 4 = 48 inches (4 feet)
- If back wall is 7 ft, front wall = 11 ft tall
Common Pitch Recommendations by Climate
| Climate Zone | Recommended Minimum Pitch | Reasoning |
|---|---|---|
| Desert/Southwest (low rainfall) | 1:12–2:12 | Minimal drainage demand |
| Moderate climate (Southeast/Midwest) | 3:12–4:12 | Standard drainage, asphalt shingles compatible |
| High rainfall (Pacific Northwest) | 4:12–6:12 | Fast drainage prevents water infiltration |
| Heavy snow (Northeast/Midwest/Mountain) | 5:12–8:12 | Active snow shedding prevents structural overload |
| Coastal/High wind | 3:12–4:12 | Lower profile reduces wind uplift exposure |
Materials and Tools for Building a Slant Roof Shed
Lumber Requirements (Standard 8×12 Slant Roof Shed at 3:12 Pitch)
Wall Framing:
- Bottom plates: 2×4 PT lumber (pressure-treated for ground contact), 8 ft and 12 ft lengths
- Top plates: 2×4 standard lumber (doubled top plate)
- Wall studs: 2×4 at 16 inches on center
- Front wall studs: Taller than back wall by the calculated height difference
- Side wall studs: Graduated heights from front to back (cut at rafter angle)
Roof Framing:
- Rafters: 2×6 (for spans up to 12 ft) or 2×8 (for spans 12–16 ft) at 16 or 24 inches on center
- Roof sheathing: 15/32″ plywood or 7/16″ OSB
Quantity estimate for 8×12 shed:
- 2×4 studs (8 ft): 30–40 pieces
- 2×4 plates: 8 pieces (8 ft lengths)
- 2×6 rafters (14 ft): 8–9 pieces
- Plywood/OSB (4×8 sheets): 5–6 sheets
- Fascia boards (1×6): 4 pieces
Essential Tools
- Circular saw or miter saw
- Speed square and framing square
- Chalk line
- Cordless drill/driver
- Tape measure (25 ft)
- Level (4 ft and torpedo)
- Rafter square (for birdsmouth cuts)
- Hammer and nail gun (or pneumatic nailer)
- Safety equipment: hard hat, gloves, safety glasses, fall protection
Step-by-Step: How to Build a Slant Roof Shed
Step 1: Planning, Permits, and Foundation
Permitting:
Most jurisdictions require building permits for sheds over 100–200 square feet or structures over a certain height. Check with your local building department before starting fines for unpermitted structures can exceed $1,000–$5,000, and unpermitted sheds may require demolition.
Foundation options for slant roof shed:
- Concrete blocks on compacted gravel: Most common, easy, adjustable best for most DIY applications
- Poured concrete slab: Permanent, maximum stability, required for heavy storage or workshop use
- Deck blocks on treated lumber skids: Fast, budget-friendly, moveable if needed
- Helical piers: Best for sloped sites or areas with poor drainage
Ensure the foundation is:
- Level in all directions (critical an unlevel foundation transfers stress throughout the entire structure)
- Elevated minimum 6 inches above grade to prevent moisture wicking into floor framing
- Sized precisely to your shed’s floor plan dimensions
Step 2: Build and Square the Floor Frame
- Cut floor joists from 2×6 or 2×8 PT lumber to match shed width (8 ft, 10 ft, or 12 ft)
- Assemble rim joists and interior joists at 16-inch on-center spacing
- Verify square by measuring diagonally both diagonal measurements must be equal
- Install blocking between joists at the center span for additional rigidity
- Fasten ¾-inch tongue-and-groove plywood floor decking with construction adhesive and 2½-inch screws
- Re-verify level this is your last chance to adjust before walls go up
Step 3: Frame the Walls
Wall framing for a slant roof shed requires four walls of different heights:
- Back wall (low side): Standard height typically 7 ft (84 inches) for comfortable interior clearance
- Front wall (high side): Back wall height + calculated pitch difference
- Example: 8 ft deep shed at 3:12 = back wall 84″ + 24″ = 108 inches (9 ft)
- Side walls: Graduated height from front to back, with top plates cut at the rafter angle
Wall framing process:
- Cut all studs to correct height based on wall position (front, back, or graduated side)
- Assemble each wall flat on the floor: bottom plate + studs + single top plate
- Mark and cut door and window rough openings per your design
- Stand walls, brace temporarily, and connect corners with structural screws
- Add doubled top plates, lapping corners for structural continuity
- Verify all walls plumb (vertical) and brace until roof is complete
“For slant roof sheds, the side walls are the most complex framing challenge the top of each side wall stud must be cut at the rafter angle so the roof deck lies flat. Cut a test rafter first, determine the exact angle, then use that angle on your side wall top plate cut.” ATI Improvements Lean-To Shed Guide, 2022
Step 4: Calculate and Cut Roof Rafters
This is the most technically demanding step in slant roof shed construction but significantly simpler than gable rafter cuts.
Rafter length calculation:
For a slant roof shed, rafters run from the front wall top plate to the back wall top plate plus desired overhangs.
Formula:
Rafter length = √(shed depth² + height difference²) + front overhang + back overhang
Example: 10 ft deep shed, 30-inch height difference (3:12 pitch), 12-inch front overhang, 6-inch back overhang:
- Roof span = √(120² + 30²) = √(14,400 + 900) = √15,300 = 123.7 inches (10.3 ft)
- Add overhangs: 10.3 ft + 1 ft + 0.5 ft = 11.8 ft → cut to 12 ft
Birdsmouth cut:
The birdsmouth is a notch cut into the rafter bottom that allows the rafter to sit flat on the wall’s top plate:
- Vertical cut (plumb cut): perpendicular to the rafter’s top surface
- Horizontal cut (seat cut): parallel to the wall top plate, typically 1.5 inches deep
- Use a speed square set to your roof pitch angle to mark both cuts
- Cut the first rafter, test fit on both walls, verify it sits flat and aligns with your chalk line before cutting all remaining rafters from this template
Rafter spacing:
- 16 inches on center: Maximum structural performance, required for heavy snow loads or spans over 12 ft
- 24 inches on center: Adequate for light to moderate loads, reduces lumber cost by 25–30%
Step 5: Install the Roof Rafters
- Mark rafter layout on both front and back wall top plates at your chosen spacing (16″ or 24″ OC)
- Position first rafter at one end, verify it’s plumb and level side-to-side
- Fasten birdsmouth seat to top plate using hurricane ties or rafter ties (never toenail only inadequate uplift resistance)
- Install remaining rafters per your layout marks
- Add a fascia board (1×6 or 2×6) across the rafter tails at front and back overhangs this provides a finished edge and supports gutters
- Install blocking between the outermost rafters at overhang locations for additional support
- Double-check all rafters are parallel and evenly spaced before proceeding to sheathing
Step 6: Install Roof Sheathing
- Start at the low (back) end of the roof, positioning first sheet perpendicular to rafters
- First sheet should overhang the fascia by ¼–½ inch
- Fasten plywood/OSB with 8d nails or 2-inch screws at 6 inches on center along edges and 12 inches in the field
- Stagger sheet joints end joints of adjacent rows must not align (offset by minimum 4 ft / half sheet)
- Use H-clips (panel clips) between sheets at unsupported mid-span edges
- Continue from low end to high end, trimming final sheet to fit flush at ridge
- Mark rafter locations on sheathing surface with chalk line before fasteners to ensure all nails hit solid framing
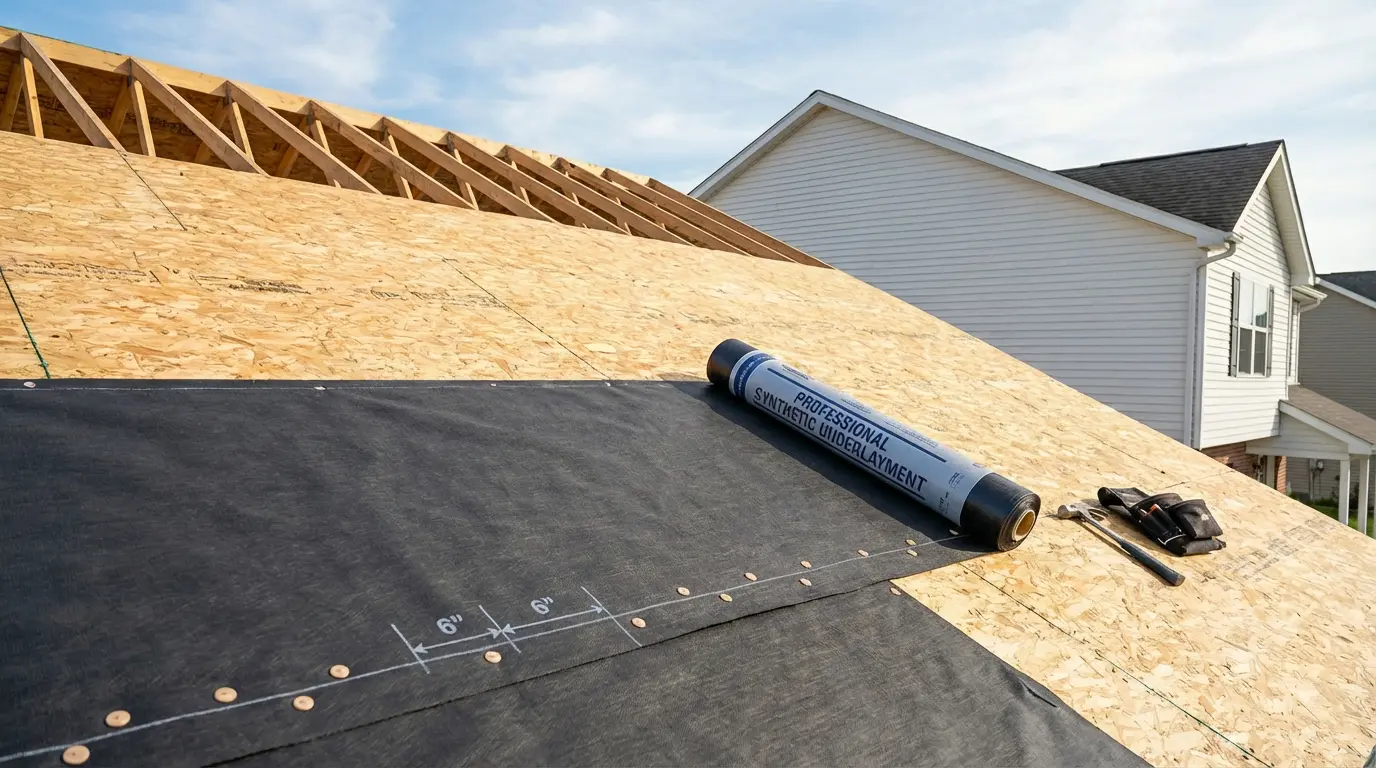
Step 7: Install Underlayment
For slopes 2:12 and above:
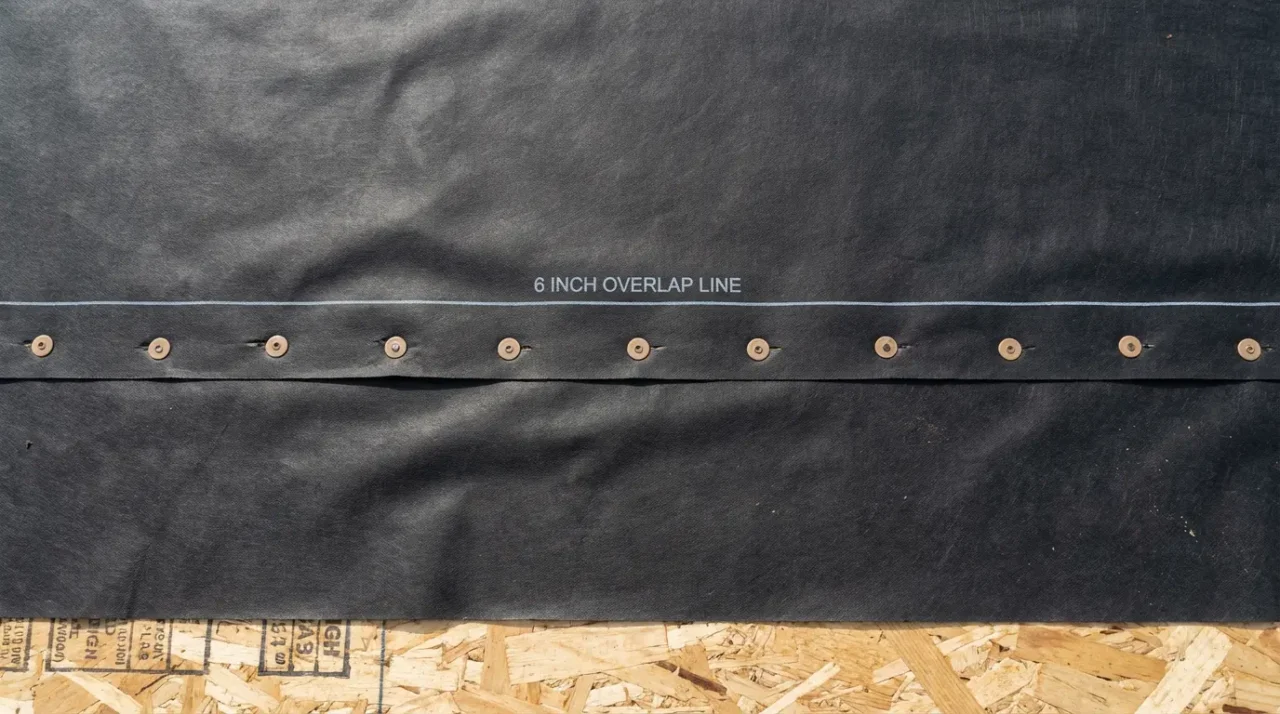
- Install synthetic roofing underlayment (30+ perms) horizontally from low edge to high edge
- 6-inch side laps, 6-inch end laps
- Fasten with cap nails 12 inches on center at overlaps
- In cold climates: apply ice and water shield at eave (low end) extending minimum 24 inches inside exterior wall line
For slopes under 2:12:
- Use EPDM, TPO, or PVC fully adhered membrane asphalt underlayment is insufficient
- Seams must be heat-welded or chemically bonded per membrane manufacturer specs
Step 8: Install Roofing Material
Asphalt shingles (most common, minimum 2:12 slope):
- Install metal drip edge at low eave edge under underlayment
- Install drip edge at rake (side) edges over underlayment
- Install starter strip along eave edge
- Begin shingle installation at eave, working toward the high end
- Offset each course by half-shingle width to prevent aligned vertical joints
- Secure each shingle with 4–6 roofing nails (not staples) in the manufacturer’s nailing zone
- At the high (ridge) end, trim final course flush or install a ridge cap for a finished appearance
Corrugated metal (minimum 1:12 slope):
- Start at the low end and work upward
- Overlap adjacent panels 1.5 corrugations side-to-side
- Overlap end laps minimum 6 inches (12 inches for slopes under 2:12)
- Fasten with hex-head metal roofing screws with rubber washers, driven into panel crests
- Install foam closure strips at eave and ridge to seal corrugation voids
Step 9: Install Siding, Doors, and Finishing Touches
- Siding: Install vinyl lap siding, T1-11 plywood siding, or board-and-batten from bottom to top, overlapping each course
- Corner trim: Install before siding for clean, finished corners
- Door installation: Pre-hung doors are easiest; double doors recommended for equipment storage
- Ventilation: Install soffit vents at eave and ridge vent or gable vents to prevent moisture buildup
- Gutters: Attach seamless aluminum gutter to fascia at low (back) edge, directing water away from foundation
- Paint or stain: Apply two coats of exterior paint or stain to all wood surfaces
Slant Roof Shed vs Other Shed Roof Types
Choosing the right roof style is one of the most important early decisions in shed design. Here’s how the slant roof compares to every other major shed roof type:
Full Comparison Table
| Factor | Slant Roof (Skillion) | Gable Roof | Gambrel Roof | Hip Roof | Flat Roof |
|---|---|---|---|---|---|
| Construction complexity | ★☆☆☆☆ Easiest | ★★☆☆☆ Moderate | ★★★★☆ Hard | ★★★★☆ Hard | ★☆☆☆☆ Easy |
| Material cost | Lowest | Low-Moderate | Moderate | Moderate-High | Low |
| Interior headroom | Moderate (one side high) | High (central peak) | Maximum (loft potential) | Moderate | Low |
| Drainage | Excellent | Excellent | Good | Good | Poor |
| Snow shedding | Excellent (one direction) | Excellent | Good | Good | Poor |
| Wind resistance | Good | Moderate (vulnerable end gables) | Good | Excellent (no gable ends) | Good |
| Aesthetic | Modern/Contemporary | Traditional | Barn/rustic | Classic | Industrial/Modern |
| DIY friendly | ✅ Highly | ✅ Yes | ⚠️ Challenging | ❌ Difficult | ✅ Yes |
| Typical cost premium vs slant | Baseline | +10–15% | +25–40% | +35–50% | -5–10% |
| Best use case | Tool/garden shed | General purpose | Large storage/workshop | Premium builds | Commercial only |
When to Choose Slant Roof Over Gable
Choose a slant roof shed when:
- Budget is the primary concern single-slope framing uses fewer materials and fewer complex cuts
- Attached lean-to design against existing building is the goal
- Modern or contemporary architectural style of your home demands a compatible shed aesthetic
- Small to medium shed size (under 12×16 ft) where gable’s central headroom advantage is less significant
- First-time DIY builder who wants the simplest possible roof framing challenge
Choose a gable roof shed when:
- Maximum interior headroom throughout the full floor area is required
- Traditional aesthetic matching your home’s architecture is important
- Larger structures (12×16 ft and above) where central headroom matters
- Loft storage is planned above the main floor
Slant Roof Shed: Pros and Cons
Advantages
- Simplest roof framing: Single-slope design requires no ridge beam, no complex compound cuts, and no mirror-image rafter pairs reducing both material cost and framing time significantly
- Superior drainage: Single-direction water flow with no valleys, no ridges, and no areas where debris can accumulate making slanted roofs among the most leak-resistant shed designs
- Modern, contemporary aesthetic: Clean lines and simple geometry suit modern architecture, urban properties, and contemporary shed designs that complement updated home exteriors
- Ideal for lean-to applications: Perfect for attaching to existing buildings uses existing wall as high-point support, reducing wall framing by up to 25%
- Excellent snow shedding: Single slope efficiently sheds snow in one direction particularly valuable for high-pitch slant roofs (5:12+) in northern climates
- Lower wall material costs: While the front wall is taller, the overall framing lumber quantities are typically lower than gable or gambrel designs of equivalent footprint
Disadvantages
- Uneven interior headroom: The sloped ceiling means maximum headroom only at the tall wall the short wall may have restricted clearance for tall users or large equipment
- Insulation challenges: The sloped ceiling with no attic space makes insulation difficult spray foam is the most effective but expensive option; batt insulation is hard to install properly on angled surfaces
- Limited headroom at low wall: In sheds with significant pitch difference, the back wall area may be useful only for ground-level storage
- Appearance from certain angles: The asymmetric profile may look less balanced than a gable roof from certain viewpoints particularly for larger sheds where pitch difference creates a dramatic wall height variation
- Drainage direction planning required: All water discharges in one direction foundation drainage and gutter placement must account for concentrated water flow at the low edge
Common Slant Roof Shed Mistakes to Avoid
Mistake 1: Insufficient Roof Pitch
Problem: Building with 1:12 or less pitch using asphalt shingles leads to water infiltration, shingle deterioration, and voided material warranties.
Solution: Use minimum 2:12 pitch for asphalt shingles; 3:12–4:12 is optimal for most climates. For slopes under 2:12, upgrade to metal roofing or fully adhered membrane.
Mistake 2: Skipping Hurricane Ties
Problem: Toenailing rafters to top plates provides insufficient resistance to wind uplift in severe weather, roofs lift off walls.
Solution: Install Simpson Strong-Tie H2.5A or equivalent hurricane ties at every rafter-to-wall-plate connection. Cost: $0.50–$1.00 per rafter connection the cheapest insurance available.
Mistake 3: Incorrect Birdsmouth Cut Depth
Problem: Cutting the birdsmouth seat more than ⅓ of the rafter depth weakens the rafter structurally at the point of maximum stress.
Solution: Keep birdsmouth seat cut to maximum 1.5 inches deep (or ⅓ rafter depth, whichever is less). Mark carefully with a speed square set to your exact pitch before cutting.
Mistake 4: Not Accounting for Rafter Angle on Side Walls
Problem: Side wall studs cut square (90 degrees) leave a gap between wall top and rafter bottom, preventing proper fastening and creating air infiltration paths.
Solution: Calculate your exact rafter angle (arctangent of rise/run) and cut all side wall top plate studs at that angle. Cut a test piece and verify fit against a positioned rafter before cutting all studs.
Mistake 5: Forgetting Ventilation
Problem: A sealed slant roof shed with no vents traps moisture, promotes mold growth, and degrades wood framing and stored contents.
Solution: Install at least one soffit vent at the low eave and a gable vent or ridge vent at the high end even a small 8×16 inch vent at each location dramatically improves air circulation. Net free vent area should be at least 1 sq ft per 150 sq ft of floor area.
Slant Roof Shed Maintenance Schedule
Every 6 Months
- Clear debris from roof surface
- Inspect and clean gutter at low eave edge
- Check fascia boards for paint peeling or moisture damage
Annually
- Full visual inspection of roofing material for cracks, lifted edges, or missing fasteners
- Inspect all flashing around vents and penetrations
- Verify rafter ties/hurricane ties still secure no rust or looseness
- Touch up exterior paint or stain where needed
- Check foundation level settle or shift is common in the first 2–3 years
Every 3–5 Years
- Professional inspection if you notice any roof leaks, sagging, or unusual deflection
- Re-caulk any exposed fastener heads on metal roofing
- Consider re-staining cedar or wood siding if moisture absorption increases
- Evaluate underlayment condition if roofing material is replaced

Frequently Asked Questions
What is a slant roof shed?
A slant roof shed is an outbuilding with a single-pitched roof sloping in one direction, from a taller front wall to a shorter back wall. Also called a lean-to shed, skillion shed, or mono-pitch shed, this design is the simplest and most affordable shed roof type to build requiring no ridge beam, no complex rafter pairs, and only basic birdsmouth cuts to complete.
How much does it cost to build a slant roof shed?
A slant roof shed costs $500–$1,500 in DIY materials for a standard 8×12 ft build, or $1,500–$3,500 professionally built depending on size, materials, and region. Larger structures (12×16 ft and above) cost $2,000–$5,000+ professionally. The slant roof design is 10–25% cheaper to build than an equivalent gable-roof shed due to simpler framing and fewer materials.
What is the best pitch for a slant roof shed?
The best pitch for most slant roof sheds is 3:12 to 4:12 providing reliable drainage for all climates, compatibility with standard asphalt shingles, adequate snow shedding, and a visually balanced wall height difference. In heavy-snow regions, 5:12–6:12 is preferred for active snow shedding. Low rainfall, mild climates can use 2:12 successfully.
What roofing material is best for a slanted roof?
Asphalt shingles are the most popular and affordable option for slant roof sheds with 2:12+ slope, offering easy installation and 15–25 year lifespan at $0.80–$1.80/sf. Corrugated metal is preferred for slopes under 2:12 or in climates with heavy snowfall ($1.20–$2.50/sf, 30–50 year lifespan). Metal roofing and EPDM rubber membrane are best for very low slopes under 1:12.
How do I calculate rafter length for a slant roof shed?
Use the Pythagorean theorem: rafter length = √(shed depth² + height difference²), then add your desired front and back overhangs. For a 10 ft deep shed with a 30-inch height difference (3:12 pitch), the structural span = √(120² + 30²) ≈ 123.7 inches. Add a 12-inch front overhang and 6-inch back overhang for a total rafter length of approximately 141.7 inches (11.8 ft) cut from 12 ft stock.
Can I attach a slant roof shed to my house?
Yes a slant roof shed attached to a house is called a lean-to shed. The house wall serves as the high point, eliminating one wall of framing. You must attach the ledger board (the beam the rafters rest against) securely to the house’s structural framing (not just siding), flash the connection properly to prevent water infiltration, and verify the attachment doesn’t conflict with house windows, doors, or electrical service. Most jurisdictions require permits for attached structures.
How far apart should rafters be on a slant roof shed?
Slant roof shed rafters should be spaced 16 inches on center for maximum structural performance, especially with plywood sheathing and in climates with snow loads. 24-inch on-center spacing is acceptable for lighter loads and smaller sheds (under 10 ft wide) with OSB sheathing rated for 24-inch spans. Always match sheathing thickness to rafter spacing 7/16-inch OSB minimum for 16 OC; 15/32-inch plywood recommended for 24 OC.
Do I need a permit to build a slant roof shed?
Most municipalities require building permits for sheds exceeding 100–200 square feet in floor area or structures taller than 10–12 feet. Requirements vary significantly by jurisdiction some cities exempt all sheds under 200 sf while others require permits for anything over 64 sf. Always check with your local building department before starting construction. Unpermitted structures may require demolition and can complicate property sales.
What is the difference between a slant roof and a gable roof shed?
A slant roof has one single sloped plane running in one direction, while a gable roof has two symmetric planes meeting at a central ridge peak. Slant roofs are simpler and cheaper to build, drain in one direction, and suit modern aesthetics. Gable roofs provide more uniform interior headroom, a traditional appearance, and better performance on very large sheds (12×16 ft and above) where central headroom becomes important.
How do I insulate a slant roof shed?
Insulating a slant roof shed is challenging because the roof is the ceiling there is no separate attic space. The most effective options are: closed-cell spray foam applied directly to the underside of roof sheathing between rafters (R-6.5 per inch, $1.00–$2.00/sf); rigid foam board (EPS or polyiso) installed between rafters then covered with a vapor barrier; or a parallel chord truss design that creates a small attic cavity for batt insulation. Spray foam is recommended as the most effective and air-tight option for small sheds.
Get free roofing advice, cost guides, and seasonal maintenance tips.

Roofing content specialist with 5+ years researching U.S. residential and commercial roofing. Has documented 200+ projects covering installation costs, material selection, contractor vetting, and DIY guides for homeowners across all climate zones.
Metal Roof Underlayment: Complete Installation Guide
Metal roof underlayment costs $0.35-$1.25 per square foot installed depending on material type, with synthetic options ($0.45-$0.85/sf) outperforming traditional felt ($0.35-$0.55/sf) through superior tear resistance, UV stability, and moisture management. All metal roofing requires underlayment with minimum 15 perms vapor permeability to prevent condensation accumulation between sheathing and metal panels, per Metal Roofing Alliance specifications (Metal Roofing Alliance Technical Guidelines, 2026). Proper underlayment selection based on climate, roof slope, and metal panel type prevents 60-70% of premature metal roof failures according to NRCA contractor surveys.
Table of Contents
Metal roof underlayment serves as the critical waterproof barrier between roof sheathing and metal panels, managing moisture vapor transmission, providing temporary weather protection during installation, and creating a slip-resistant surface for metal panel placement. According to the National Roofing Contractors Association, underlayment specification represents the second most important factor (after proper ventilation) in preventing condensation-related metal roof failures, yet remains one of the most frequently misunderstood components in residential installations (NRCA Metal Panel Systems Manual, 2025).
This comprehensive guide covers metal roof underlayment types, vapor permeability requirements, cost breakdowns, installation specifications, ice and water shield applications, synthetic vs felt performance comparisons, and how underlayment choices affect warranty compliance and long-term roof performance.
Metal Roof Underlayment Types and Materials
Modern metal roofing systems use three primary underlayment categories, each optimized for specific climate conditions, roof slopes, and metal panel types.
Synthetic Underlayment (Polypropylene/Polyethylene)
Synthetic underlayment consists of woven or spun-bonded polypropylene or polyethylene fibers that create lightweight, high-strength membranes resistant to tears and UV degradation. The Asphalt Roofing Manufacturers Association reports synthetic underlayment now accounts for 65% of metal roof installations nationwide, displacing traditional felt due to superior performance characteristics (ARMA Technical Bulletin TB-157, 2025).
Performance Specifications:
- Tear strength: 180-300 lbf (machine direction) vs 40-60 lbf for #30 felt
- UV resistance: 90-180 days exposure rating vs 7-14 days for felt
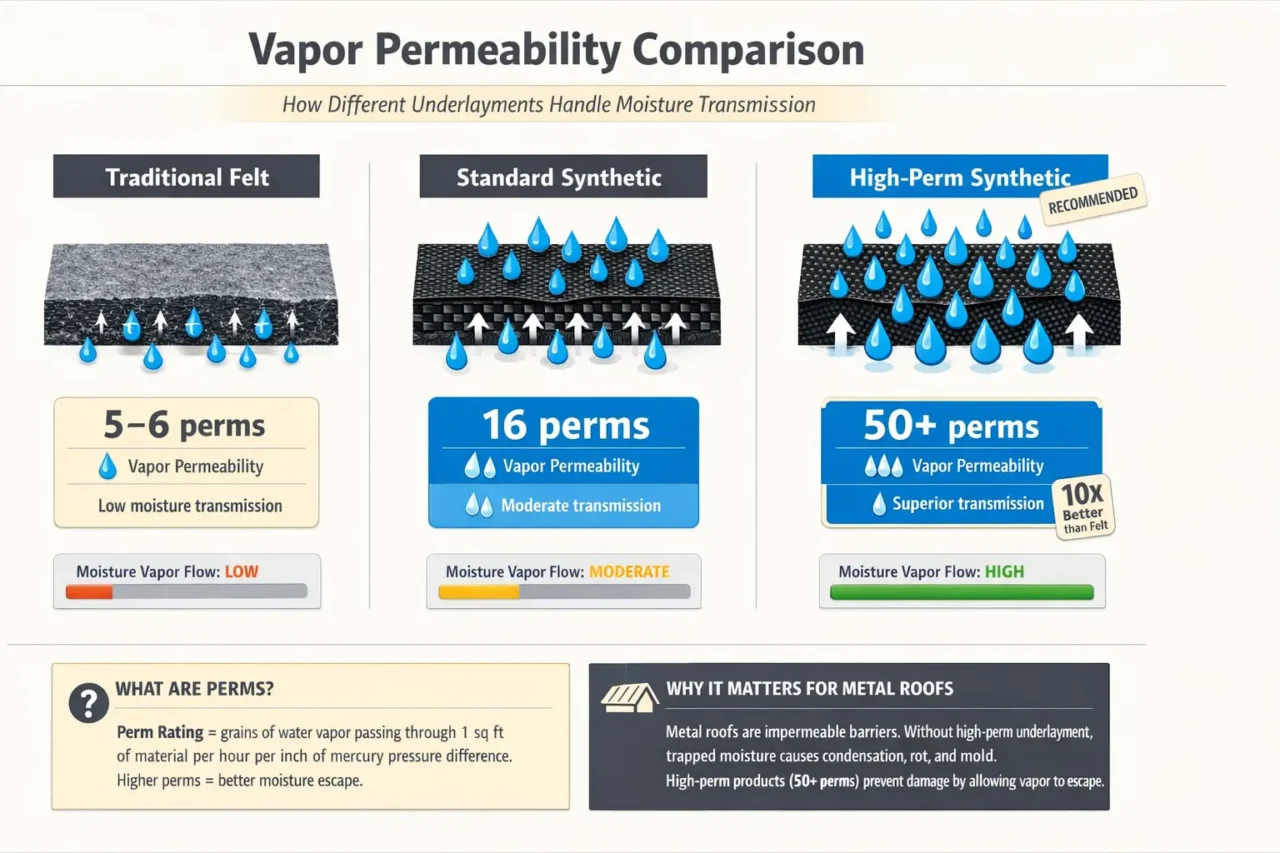
- Vapor permeability: 16-50 perms (breathable grades) vs 5-6 perms for felt
- Temperature range: -40°F to 250°F operating range
- Weight: 8-12 lbs per square vs 27 lbs for #30 felt
Leading Products:
- Grace Tri-Flex™ (50 perms): $0.55-$0.75/sf installed
- Owens Corning RhinoRoof® U20 (16 perms): $0.45-$0.65/sf installed
- GAF Deck-Armor™ (5 perms): $0.50-$0.70/sf installed
- Titanium UDL50 (50 perms): $0.60-$0.85/sf installed
Best Applications: All metal roof installations, particularly beneficial in high-wind zones (140+ mph), complex roof geometries, and extended exposure periods during construction.
Traditional Asphalt-Saturated Felt
Asphalt-saturated felt (#15 and #30 weights) comprises organic or fiberglass mat saturated with asphalt for water resistance. While declining in popularity for metal roofing, felt remains code-compliant and cost-effective for budget applications or low-slope metal roofs with minimal thermal cycling.
Performance Specifications:
- #15 felt: 8 lbs per square, suitable for slopes >4:12 only
- #30 felt: 27 lbs per square, minimum recommended for metal roofing
- Vapor permeability: 5-6 perms (semi-permeable)
- UV exposure: 7-14 days maximum before panel installation required
- Cost: $0.35-$0.55/sf installed
Disadvantages for Metal Roofing:
- Tears easily during installation on steep slopes
- Deteriorates rapidly under UV exposure if installation delays occur
- Low vapor permeability can trap moisture between sheathing and underlayment
- Becomes brittle in cold temperatures, cracking during thermal cycling
- Heavy weight increases labor costs and installation time
Acceptable Uses: Budget residential metal roofs in temperate climates with guaranteed rapid installation (under 14 days from underlayment to panel installation), slopes 4:12-6:12 with minimal complexity.
High-Temperature Self-Adhering Membranes
Self-adhering modified bitumen or rubberized asphalt membranes with high-temperature resistance serve as underlayment for metal roofs in extreme heat climates where standard synthetic products may soften.
Specifications:
- Temperature rating: Up to 280°F surface temperature resistance
- Vapor permeability: Typically 0.05-1.0 perms (vapor barriers)
- Application: Torch-down or peel-and-stick installation
- Cost: $1.00-$1.75/sf installed
Critical Limitation: Most self-adhering membranes function as vapor barriers (under 1 perm), making them unsuitable for metal roof applications except in dry climates where condensation risk is minimal. States the Metal Construction Association: “Impermeable underlayment under metal roofing traps moisture migrating from building interior, causing 80% of premature sheathing deterioration in humid climates” (MCA Technical Bulletin 1506, 2025).
Metal Roof Underlayment Vapor Permeability Requirements
Vapor permeability represents the most critical but frequently overlooked specification in metal roof underlayment selection, directly impacting condensation management and long-term system durability.
Understanding Perm Ratings
Perm rating measures water vapor transmission through materials, expressed as grains of water vapor per hour per square foot per inch of mercury pressure difference. Building codes classify materials by permeability:
- Vapor barriers: 0.1 perms or less
- Vapor retarders (Class III): 1.0-10 perms
- Vapor permeable: Greater than 10 perms
- Highly permeable: Greater than 30 perms
Metal Roofing Permeability Standards
The Metal Roofing Alliance specifies minimum 15 perms vapor permeability for all metal roof underlayment to prevent moisture accumulation at the sheathing-underlayment interface (Metal Roofing Alliance Installation Standards Section 3.4, 2026). This requirement stems from metal panels functioning as complete vapor barriers (0.0 perms) any moisture trapped between underlayment and metal cannot escape upward and must migrate downward through the underlayment into the ventilated attic space.
Humidity Zone Requirements:
| Climate Zone | Minimum Perm Rating | Recommended Products | Rationale |
|---|---|---|---|
| Hot-Humid (Southeast, Gulf Coast) | 30-50 perms | Grace Tri-Flex, Titanium UDL50 | Maximum vapor transmission prevents trapped moisture in high-humidity environments |
| Cold Climates (Northern States) | 15-30 perms | RhinoRoof U20, Sharkskin Ultra | Balance moisture transmission with weather protection during winter installations |
| Hot-Dry (Southwest, Desert) | 5-15 perms | GAF Deck-Armor, Standard synthetics | Lower humidity reduces condensation risk; focus on UV resistance |
| Marine/Coastal | 30-50 perms | High-perm synthetics only | Salt air increases moisture load; maximum breathability essential |
Condensation Risk Assessment
According to Building Science Corporation research, metal roofs without adequate underlayment permeability experience condensation formation when interior-to-exterior vapor pressure differentials exceed 0.3 inches of mercury conditions occurring 40-80 days annually in humid climates (Building Science Corporation Research Report RR-0501, 2024).
Condensation Indicators:
- Attic moisture stains on sheathing underside
- Mold growth on roof deck
- Water droplets forming on metal panel underside
- OSB/plywood edge swell or delamination
- Musty odors in attic spaces
Solution: Replace low-perm underlayment with high-perm synthetic (30+ perms) and verify adequate attic ventilation (1 SF net free area per 150 SF attic space minimum).
According to Metal Roofing Alliance specifications (Metal Roofing Alliance specifications),
minimum 15 perms vapor permeability is required for all metal roof underlayment…
Metal Roof Underlayment Cost Breakdown (2026 Pricing)
Underlayment costs vary significantly by material type, roof complexity, and regional labor rates, typically representing 3-7% of total metal roof installation costs.
Material Cost Per Square Foot
| Underlayment Type | Material Cost (per 100 SF roll) | Coverage per Roll | Cost per SF (material only) | Installed Cost per SF |
|---|---|---|---|---|
| #30 Asphalt Felt | $25-$40 | 432 SF | $0.06-$0.09 | $0.35-$0.55 |
| #15 Asphalt Felt | $18-$28 | 432 SF | $0.04-$0.06 | $0.30-$0.45 |
| Standard Synthetic (5-15 perms) | $65-$95 | 1000 SF | $0.07-$0.10 | $0.45-$0.65 |
| High-Perm Synthetic (30-50 perms) | $95-$140 | 1000 SF | $0.10-$0.14 | $0.55-$0.85 |
| Self-Adhering Membrane | $140-$220 | 200 SF | $0.70-$1.10 | $1.00-$1.75 |
| Ice & Water Shield | $85-$130 | 225 SF | $0.38-$0.58 | $0.65-$1.05 |
Total Project Cost Examples
1,500 SF Ranch Home (Gable Roof, 4:12 Slope):
- #30 Felt baseline: 1,500 SF × $0.45 = $675 installed
- Standard synthetic (16 perm): 1,500 SF × $0.55 = $825 installed
- High-perm synthetic (50 perm): 1,500 SF × $0.70 = $1,050 installed
- Premium increase: $150-$375 (22-56% more than felt)
2,800 SF Two-Story (Hip Roof, 6:12 Slope, Complex):
- Felt option: 2,800 SF × $0.50 = $1,400 installed
- Synthetic option: 2,800 SF × $0.65 = $1,820 installed
- Hybrid (synthetic field + ice/water valleys): 2,200 SF × $0.60 + 600 SF × $0.85 = $1,830 installed
Cost Variables and Multipliers
Roof Complexity Factor:
- Simple gable (2 planes): Baseline cost
- Hip roof (4+ planes): Add 10-15% for waste and cutting
- Multiple dormers/valleys: Add 15-25%
- Steep pitch (9:12+): Add 20-35% for labor difficulty
Regional Labor Rate Variations (2026 data):
- Southeast/Midwest: $0.25-$0.35/sf labor
- Northeast/Pacific Northwest: $0.35-$0.50/sf labor
- California/High-cost urban: $0.45-$0.65/sf labor
Installation Speed:
- Felt: 8-12 squares per day (one crew)
- Synthetic: 12-18 squares per day (lighter weight, larger rolls)
- Self-adhering: 4-6 squares per day (precise alignment required)
Ice and Water Shield Requirements for Metal Roofs
Ice and water shield (self-adhering modified bitumen membrane) provides additional waterproofing in vulnerable roof areas, though its low vapor permeability requires strategic application under metal roofing.
Code-Required Ice and Water Shield Locations
The International Residential Code mandates ice and water shield in specific locations based on climate zone and roof slope (IRC Section R905.2.7.1, 2024):
Cold Climate Requirements (Heating Degree Days >4,000):
- Eave protection: From roof edge to minimum 24 inches inside exterior wall line
- Valleys: Full valley length plus 18 inches each side
- Penetrations: 12-inch radius around all roof penetrations
- Slope adjustment: Low-slope roofs (2:12-4:12) require coverage to 36 inches inside wall line
Temperate/Warm Climates:
- Valleys: Minimum coverage (full length + 18″ each side)
- Eaves: Optional unless history of ice damming exists
- Penetrations: Recommended but not universally required
Metal Roofing-Specific Considerations
Because ice and water shield functions as a vapor barrier (0.05-0.5 perms), excessive coverage under metal roofing can trap moisture and cause condensation issues. States the Metal Construction Association: “Limit ice and water shield to code-required areas only; use high-perm synthetic underlayment for remaining roof area to maintain vapor transmission pathways” (MCA Installation Guidelines Section 4.2, 2025).
Recommended Coverage Strategy:
- Apply ice and water shield only in valleys, eaves (first 24-36″), and penetrations
- Use high-perm synthetic (30+ perms) for all field areas
- Ensure continuous attic ventilation (soffit intake + ridge exhaust)
- Install vapor-permeable ceiling insulation without plastic vapor barriers
Product Selection:
- Grace Ice & Water Shield® HT: $0.85-$1.15/sf installed
- Owens Corning WeatherLock® Flex: $0.75-$1.05/sf installed
- GAF StormGuard®: $0.70-$0.95/sf installed
Valley Treatment Methods
Full-Adhesive Method:
Apply 36-inch-wide ice and water shield centered on valley, extending full length from ridge to eave. Suitable for climates with moderate snow load (under 40 psf) and seasonal freeze-thaw cycles.
Partial-Adhesive with Synthetic:
Apply 18-inch-wide ice and water shield in valley center, cover with high-perm synthetic extending 18 inches beyond each side. Provides waterproofing while maintaining some vapor permeability at valley edges.
Metal Valley with Synthetic:
Install formed metal valley (24-26 gauge) over high-perm synthetic only no ice and water shield. Optimal for warm climates and applications prioritizing maximum vapor transmission.
Synthetic vs Felt Underlayment: Performance Comparison for Metal Roofs
Long-term field performance reveals significant differences between synthetic and traditional felt underlayment under metal roofing systems.
Durability and Weather Resistance
Tear Strength:
Synthetic underlayment provides 3-5× the tear resistance of #30 felt, critical during metal panel installation when workers walk across underlayment and handle sharp metal edges. The NRCA reports 40% fewer underlayment-related callbacks with synthetic products compared to felt on metal roof installations (NRCA Contractor Survey, 2025).
UV Exposure:
Metal roof installations averaging 14-30 days from underlayment to panel completion expose underlayment to UV radiation that degrades felt within 7-14 days, while synthetic products maintain integrity for 90-180 days. Project delays due to weather or material availability create zero risk with synthetic but can necessitate complete felt replacement.
Moisture Management:
| Performance Metric | #30 Asphalt Felt | Standard Synthetic (16 perm) | High-Perm Synthetic (50 perm) |
|---|---|---|---|
| Vapor Permeability | 5-6 perms | 16-20 perms | 50+ perms |
| Water Absorption | 8-12% weight gain when wet | 0-2% weight gain | 0-1% weight gain |
| Dry Time (after rain) | 48-72 hours | 12-24 hours | 6-12 hours |
| Condensation Risk | Moderate-High | Low-Moderate | Very Low |
| Best Climate Zones | Dry, temperate | All except extreme humid | All climates, optimal for humid |
Installation Efficiency
Weight and Handling:
Synthetic rolls covering 1,000 SF weigh 8-12 lbs vs 270 lbs for equivalent felt coverage, reducing installer fatigue and allowing 2-person crews to handle materials that previously required 3-4 workers.
Roll Size Advantage:
Synthetic 1,000 SF rolls reduce overlap waste from 15% (felt’s smaller rolls requiring more seams) to 8-10%, saving $0.03-$0.05 per square foot on 2,000+ SF projects.
Non-Absorbent Surface:
Synthetic’s slick surface when wet prevents installers from falling (felt becomes slippery when damp), reducing lost-time accidents by 35% per OSHA construction safety data (OSHA Safety Analysis, 2024).
Cost-Benefit Analysis by Project Type
Budget Residential (<$12,000 total roof cost):
Felt saves $200-$400 on underlayment but increases risk of callbacks and warranty issues. Recommendation: Use felt only if guaranteed dry installation window and panels installed within 14 days.
Standard Residential ($12,000-$25,000 total roof cost):
Standard synthetic (16 perm) adds $150-$350 but eliminates weather delays and callbacks. Recommendation: Minimum standard for most metal roof installations.
Premium Residential (>$25,000 total roof cost):
High-perm synthetic (50 perm) adds $300-$500 but maximizes warranty protection and eliminates condensation risk. Recommendation: Optimal choice for coastal climates, humid regions, and standing seam systems with manufacturer warranties requiring breathable underlayment.
Metal Roof Underlayment Installation Standards
Proper installation techniques ensure underlayment performs as designed, with attention to overlap, fastening, and integration with flashing and ventilation systems.
Horizontal Application Method
Apply underlayment horizontally (parallel to eaves) starting from bottom edge and working toward ridge, ensuring each course overlaps the one below to shed water effectively.
Overlap Specifications:
- Side lap (horizontal overlap): Minimum 6 inches per manufacturer specs; 12 inches in high-wind zones (140+ mph)
- End lap (vertical overlap): Minimum 6 inches; stagger end laps minimum 6 feet between adjacent courses
- Hip/Ridge overlap: 12 inches minimum over ridge; seal with manufacturer-approved tape in wind zones
- Valley overlap: 18 inches minimum each side of valley centerline; 24 inches for slopes under 4:12
Fastening Requirements
Synthetic Underlayment:
- Cap nails or staples: Minimum 1-inch plastic or metal caps
- Fastener spacing: 12 inches on center along horizontal overlaps; 18-24 inches in field
- Edge fastening: 6 inches on center at eaves, rakes, ridges, and hips
- Valley fastening: 6 inches on center within 18 inches of valley centerline
Felt Underlayment:
- Roofing nails: 3/8-inch minimum head diameter, 12 inches on center
- Double fastening: Felt’s tendency to tear requires closer spacing (8-10 inches) at edges
Integration with Roof Components
Drip Edge Coordination:
Install drip edge over underlayment at rakes, under underlayment at eaves per IRC R905.2.8.5. This ensures water running down underlayment drains over drip edge rather than behind it.
Vent Flashing:
Apply underlayment up to vent flanges, cut relief cuts as needed, then install vent. Never apply underlayment over vent flanges this creates water entry points.
Skylight Integration:
Install ice and water shield extending 12 inches beyond all skylight edges, then cover with high-perm synthetic. Apply metal step flashing integrated with underlayment courses.
Quality Control Checkpoints
Pre-Installation Verification:
- Roof sheathing dry (moisture content <19% per moisture meter)
- Sheathing fastened per code (no loose panels or deflection)
- Damaged sheathing sections replaced
- Roof cleaned of debris and protrusions
During Installation:
- Check for wrinkles that create water traps
- Verify all fasteners sealed per manufacturer requirements
- Confirm overlaps meet minimum specifications
- Document wind-sensitive areas receiving enhanced fastening
Post-Installation Inspection:
- Walk entire roof checking for tears, loose areas, or insufficient overlap
- Verify all penetrations properly flashed and sealed
- Confirm no exposed sheathing remains
- Photograph completed installation for warranty documentation

Metal Roof Underlayment and Warranty Compliance
Manufacturer warranties for metal roofing systems often specify underlayment requirements; non-compliant installations void coverage and increase liability.
Common Warranty Stipulations
Standing Seam Manufacturer Requirements:
- Minimum 30 perms vapor permeability (eliminates felt and low-perm synthetics)
- Synthetic underlayment from approved product list
- Proper ice and water shield application per local code
- Documentation (photos) of completed underlayment before panel installation
Painted Steel Panel Warranties:
Many paint warranties (Kynar 500, PVDF coatings) require high-perm underlayment to prevent moisture accumulation that accelerates underside corrosion. States the Metal Roofing Alliance: “Painted steel panels installed over vapor-impermeable underlayment experience 3-5× faster corrosion rates due to trapped moisture condensation” (Metal Roofing Alliance Corrosion Study, 2024).
Warranty Verification Process
Pre-Installation:
- Obtain manufacturer’s installation manual (available online)
- Identify specific underlayment requirements by product line
- Request approved underlayment product list from manufacturer
- Verify local building code requirements don’t exceed manufacturer minimums
During Installation:
- Photograph underlayment packaging showing product name/specifications
- Document installation process (overlap measurements, fastening pattern)
- Photograph completed underlayment before metal panel installation
- Retain material receipts proving compliant products used
Post-Installation:
- Complete manufacturer warranty registration within specified timeframe (typically 30-60 days)
- Upload documentation photos to warranty portal
- Obtain written warranty confirmation from manufacturer
- Provide homeowner with warranty certificate and maintenance requirements
Non-Compliance Consequences
Warranty Voidance:
Using #15 felt under premium standing seam systems automatically voids manufacturer warranties, leaving homeowners responsible for all future repair costs (average $8,000-$15,000 for premature panel replacement per NRCA data).
Insurance Implications:
Some homeowner insurance policies require code-compliant installations; non-compliant underlayment discovered during claim investigations can result in coverage denial for wind or hail damage.
Regional Metal Roof Underlayment Specifications
Climate zones demand specific underlayment strategies to address local weather patterns, temperature extremes, and moisture conditions.
Hot-Humid Climates (Southeast, Gulf Coast)
Challenges:
- Year-round humidity (70-90% average relative humidity)
- Frequent afternoon thunderstorms increasing installation interruptions
- High potential for condensation due to air-conditioned interiors and hot exterior surfaces
Recommended Specifications:
- Primary underlayment: High-perm synthetic (50 perms minimum) Grace Tri-Flex, Titanium UDL50
- Ice and water shield: Valleys and penetrations only (avoid excessive vapor barrier coverage)
- Ventilation: Mandatory continuous ridge and soffit ventilation; consider above-sheathing ventilation for maximum protection
- Installation timing: Avoid installation during afternoon storms; cover completed sections immediately
Cost Impact: Add $0.15-$0.25/sf for high-perm synthetic vs standard products, offset by elimination of condensation-related callbacks.
Cold Climates (Northern States, Mountain Regions)
Challenges:
- Ice dam formation at eaves
- Heavy snow loads stressing underlayment during winter installation delays
- Extreme temperature cycling (-30°F to 100°F) requiring dimensional stability
Recommended Specifications:
- Primary underlayment: Standard-to-high perm synthetic (16-30 perms) with enhanced tear strength (200+ lbf)
- Ice and water shield: Full eave coverage (36 inches inside wall line minimum); full valley coverage; 12-inch radius around all penetrations
- Hybrid approach: Ice/water at eaves and valleys, high-perm synthetic for field areas maintaining vapor transmission
- Installation season: Summer/fall preferred; winter installation requires heated workspace for ice and water shield adhesion
Cost Impact: Add $0.30-$0.50/sf for enhanced ice protection, but prevents $2,000-$5,000 ice dam damage repairs.
Hot-Dry Climates (Southwest, High Desert)
Challenges:
- Extreme UV exposure degrading underlayment before panel installation
- Wide temperature swings (40-60°F daily variation)
- Minimal condensation risk but high thermal movement
Recommended Specifications:
- Primary underlayment: Standard synthetic (5-16 perms adequate); prioritize UV resistance (120+ day rating)
- Ice and water shield: Valleys only unless local code requires eave protection
- Cost optimization: Lower vapor permeability adequate here; invest in UV-stable products instead
- Radiant barriers: Consider reflective underlayment reducing attic heat gain by 15-25°F
Cost Savings: Standard synthetic saves $0.15-$0.30/sf vs high-perm products with no performance penalty in arid climates.
Coastal/High-Wind Zones
Challenges:
- Wind speeds 120-180 mph design requirements
- Salt air accelerating material degradation
- Hurricane-driven rain creating extreme water intrusion pressure
Recommended Specifications:
- Primary underlayment: High-perm synthetic (30+ perms) with maximum tear strength (250+ lbf) RhinoRoof U20, Titanium UDL products
- Enhanced fastening: 6-inch spacing on center at all edges; 12-inch spacing in field; plastic cap nails minimum 1.5-inch diameter
- Ice and water shield: Full valley coverage; consider full eave coverage even in warm climates for hurricane protection
- Tape sealing: Seal all horizontal and vertical laps with manufacturer-approved seam tape in wind zones >140 mph
Cost Premium: Add $0.40-$0.70/sf for wind-rated assembly, but prevents catastrophic failures from 150+ mph winds.
Frequently Asked Questions
What type of underlayment is best for metal roofing?
High-permeability synthetic underlayment (30-50 perms) is best for metal roofing because it prevents condensation accumulation between sheathing and metal panels while providing superior tear strength and UV resistance compared to traditional felt. The Metal Roofing Alliance specifies minimum 15 perms for all metal roof applications, with high-perm products (Grace Tri-Flex, Titanium UDL50) optimal for humid climates where condensation risk is highest (Metal Roofing Alliance, 2026). Synthetic underlayment costs $0.55-$0.85/sf installed vs $0.35-$0.55/sf for felt but eliminates 60-70% of moisture-related callbacks.
Can you use felt paper under metal roofing?
Traditional #30 asphalt felt can be used under metal roofing and meets building code requirements, but its low vapor permeability (5-6 perms), poor UV resistance (7-14 days exposure limit), and low tear strength make it suboptimal for most metal roof applications. Felt is acceptable only for budget installations in dry climates with guaranteed rapid panel installation (under 14 days), but modern synthetic underlayment provides superior performance for an additional $0.15-$0.25 per square foot. Most metal roofing manufacturers now require synthetic underlayment for warranty compliance on premium products (NRCA, 2025).
How much does metal roof underlayment cost?
Metal roof underlayment costs $0.35-$1.25 per square foot installed depending on material type. Standard synthetic underlayment averages $0.45-$0.65/sf, high-perm synthetic runs $0.55-$0.85/sf, traditional #30 felt costs $0.35-$0.55/sf, and ice and water shield ranges $0.65-$1.05/sf for valleys and eaves. A typical 1,500 square foot residential metal roof requires $675-$1,050 for complete underlayment installation, representing 3-7% of total metal roof costs (NRCA 2026 pricing data).
Do I need ice and water shield under metal roofing?
Ice and water shield is code-required under metal roofing in valleys, at eaves in cold climates (heating degree days >4,000), and around penetrations per IRC R905.2.7.1. However, because ice and water shield functions as a vapor barrier (0.05-0.5 perms), excessive coverage under metal roofing traps moisture and causes condensation damage. The Metal Construction Association recommends limiting ice and water shield to code-required areas only and using high-perm synthetic (30+ perms) for remaining roof area to maintain vapor transmission pathways (MCA Technical Bulletin 1506, 2025).
What vapor permeability is required for metal roof underlayment?
Metal roof underlayment requires minimum 15 perms vapor permeability according to Metal Roofing Alliance specifications, with 30-50 perms recommended for humid climates to prevent condensation accumulation between sheathing and metal panels. Metal panels function as complete vapor barriers (0.0 perms), meaning moisture must escape downward through underlayment into ventilated attic spaces. Low-perm underlayment (under 10 perms) traps moisture at the sheathing interface, causing 80% of premature OSB/plywood degradation in metal roof applications per Building Science Corporation research (BSC, 2024).
Can you install metal roofing over old underlayment?
Metal roofing can be installed over existing underlayment only if the old underlayment is synthetic material in good condition with no tears, excessive fastener holes, or dimensional instability. Traditional felt underlayment should always be removed before metal panel installation because it deteriorates rapidly under UV exposure during roof tear-off and provides inadequate vapor permeability (5-6 perms vs 15+ perms required). Re-using sound synthetic underlayment saves $0.30-$0.50/sf but requires verification that vapor permeability, tear resistance, and coverage meet current manufacturer warranty requirements (NRCA, 2025).
How long can underlayment be exposed before installing metal roofing?
Synthetic underlayment can remain exposed for 90-180 days before metal panel installation depending on UV resistance rating, while traditional felt must be covered within 7-14 days to prevent degradation. Premium synthetic products like Grace Tri-Flex and Titanium UDL carry 180-day exposure ratings, allowing construction delays without underlayment replacement. Felt deteriorates under UV radiation, becoming brittle and prone to tearing if exposed beyond two weeks, often requiring complete replacement that adds $0.35-$0.55/sf to project costs (ARMA Technical Guidelines, 2025).
Should metal roof underlayment overlap or be taped?
Metal roof underlayment should overlap minimum 6 inches horizontally and vertically per manufacturer specifications, with seam tape required in high-wind zones (140+ mph design speed) and recommended for all premium installations. Standard installations without tape rely on shingled overlaps to shed water, while taped seams provide additional protection against wind-driven rain. Seam tape adds $0.08-$0.15/sf to installation costs but creates fully sealed waterproof layer that exceeds code requirements and satisfies manufacturer warranty stipulations for standing seam systems (Metal Roofing Alliance Installation Standards, 2026).
What is the difference between low-perm and high-perm underlayment?
Low-perm underlayment (under 10 perms) restricts water vapor transmission and can trap moisture under metal roofing, while high-perm underlayment (30+ perms) allows moisture vapor to escape freely, preventing condensation damage to sheathing. Metal panels create vapor barriers (0.0 perms), so any moisture migrating from building interior or trapped during installation must escape downward through underlayment. High-perm products cost $0.10-$0.20/sf more than low-perm alternatives but eliminate condensation-related failures that cost $8,000-$15,000 to repair per NRCA contractor data. All metal roofing should use minimum 15 perms, with 30-50 perms optimal for humid regions.
Does metal roof underlayment need a vapor barrier?
No metal roof underlayment should never include or be installed over impermeable vapor barriers (poly sheeting, low-perm membranes under 1 perm) because metal panels themselves function as complete vapor barriers. Installing vapor barriers both above and below roof sheathing traps moisture within the assembly, causing 80% of premature sheathing degradation according to Building Science Corporation research (BSC RR-0501, 2024). Proper metal roof assemblies use high-perm underlayment (15+ perms) over ventilated attic spaces with vapor-permeable insulation, allowing moisture to escape downward rather than becoming trapped.
Get free roofing advice, cost guides, and seasonal maintenance tips.
Roofing content specialist with 5+ years researching U.S. residential and commercial roofing. Has documented 200+ projects covering installation costs, material selection, contractor vetting, and DIY guides for homeowners across all climate zones.
Mobile Home Roof Coating: Types, Costs & Installation
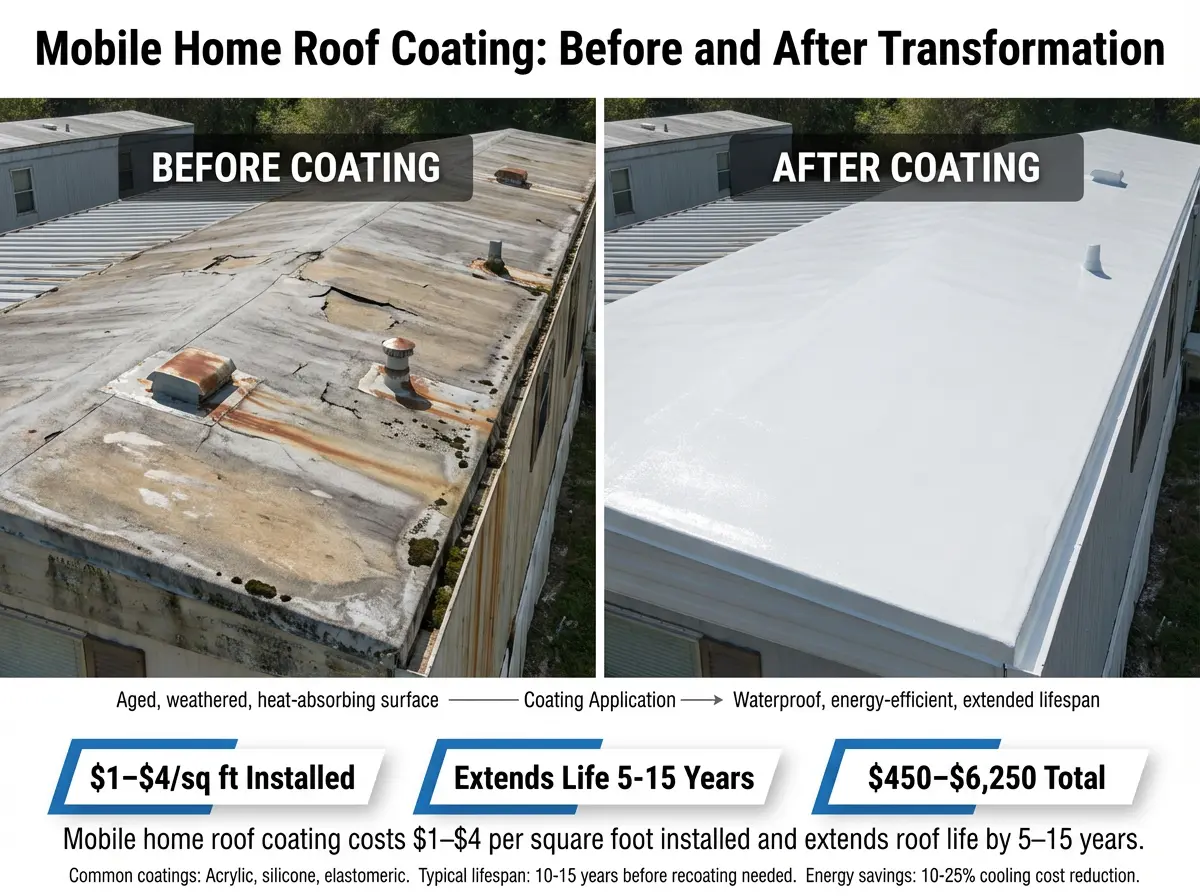
Mobile home roof coating is a liquid-applied protective layer typically elastomeric, acrylic, or silicone-based that seals, waterproofs, and reflects UV rays to extend the life of existing mobile home roofing systems by 5–15 years without full replacement. These coatings provide a barrier against moisture, UV degradation, and thermal cycling, and are made from various materials including acrylic, silicone, and elastomeric compounds that create seamless, flexible membranes over metal, TPO, EPDM, or built-up roofs.
Table of Contents
This complete guide covers mobile home roof coating types, cost breakdowns (materials and installation), step-by-step DIY application instructions, coverage rates, when coating makes sense vs replacement, and how to choose the right coating for your climate and roof type.
What is mobile home roof coating?
Mobile home roof coating is a liquid roofing product applied directly over an existing roof surface to create a protective, waterproof barrier that extends roof life and improves energy efficiency. Roof coatings are installed on existing roofs and have four primary purposes: protecting roof membranes from ultraviolet degradation and weathering, enhancing a roof system’s fire resistance, providing a watertight layer on an existing roof, and enhancing the reflectivity of the roof surface.
Unlike replacement systems that tear off old roofing, mobile home roof coating bonds to and reinforces the existing roof, filling minor cracks and seams while creating a reflective surface that reduces heat absorption and cooling costs.
Types of mobile home roof coating
The most common types of roof coating systems are acrylic, polyurethane foam, and silicone, with acrylic and silicone being the two elastomeric roof coating systems most frequently used on mobile homes.
Elastomeric roof coatings (overview)
Elastomeric roof coatings use polymer binders (e.g., acrylic, silicone, polyurethane) that form flexible, elastic films, giving them the ability to stretch and recover. Unlike built-up roofing which relies on multiple layers of bitumen and reinforcement to create a thick membrane, elastomeric coatings form a thin, seamless surface that can accommodate normal roof movement.
There are four kinds of elastomeric coatings: butyl, acrylic, polyurethane, and silicone.
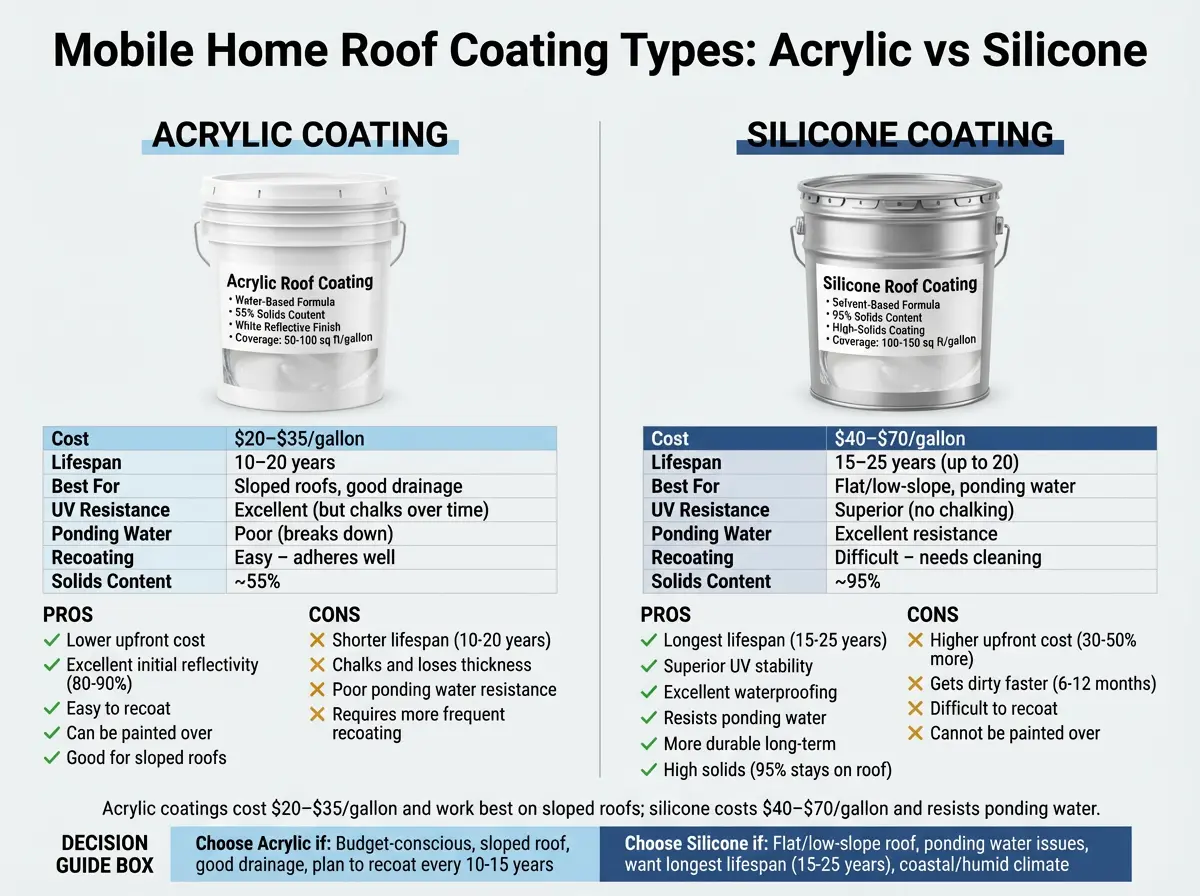
Acrylic roof coatings
Acrylic roof coatings are the oldest and cheapest elastomeric option, easy to install with satisfactory UV protection, but acrylic coatings tend to weather off quickly over time. Acrylic elastomeric roof coatings are highly reflective, making them excellent for areas where UV protection is a key requirement, and they’re durable and work well in hot, sunny climates.
Pros:
- Cost-effective ($20–$35 per gallon).
- Environmentally friendly and easy to keep clean.
- Excellent reflectivity properties reduce cooling costs.
Cons:
- Performs poorly against ponding water; ideally should only be used on sloped roofs.
- Acrylic is likely to swell and blister if exposed to standing water, causing water intrusion underneath the coating.
Best for: Positively sloped mobile home roofs (greater than 1/12 pitch) with proper drainage and no ponding water areas.
Silicone roof coatings
Silicone systems are generally considered a better elastomeric coating than acrylic coating systems because they can withstand ponding water and cold temperatures. These systems offer excellent durability especially in areas prone to heavy rain or snow.
Pros:
- Resistant to standing water and ponding (unlike acrylic).
- Performs well in cold temperatures and heavy precipitation.
- Excellent long-term durability.
Cons:
- More expensive than acrylic ($40–$70 per gallon).
- Highly resistant to adhering to other roofing products, making it hard to repair or remove.
- Can be messy to apply.
Best for: Flat or low-slope mobile home roofs with ponding water issues, and cold-climate applications.
Elastomeric hybrid roof coatings
Elastomeric hybrid systems use silicone as a base coat in areas prone to ponding, then apply acrylic as a top coat on positively sloped areas to combine the benefits of both systems. Generally, positively sloped roofs with inclines greater than 1/12 are excellent candidates for acrylic top coats, with silicone still utilized in areas of high-water traffic and possible ponding.
Cost: $25–$50 per gallon for elastomeric coatings (hybrid formulations).
Mobile home roof coating cost (2026 pricing)
Understanding mobile home roof coating cost helps you budget for the project and compare DIY vs professional installation.
Cost per square foot
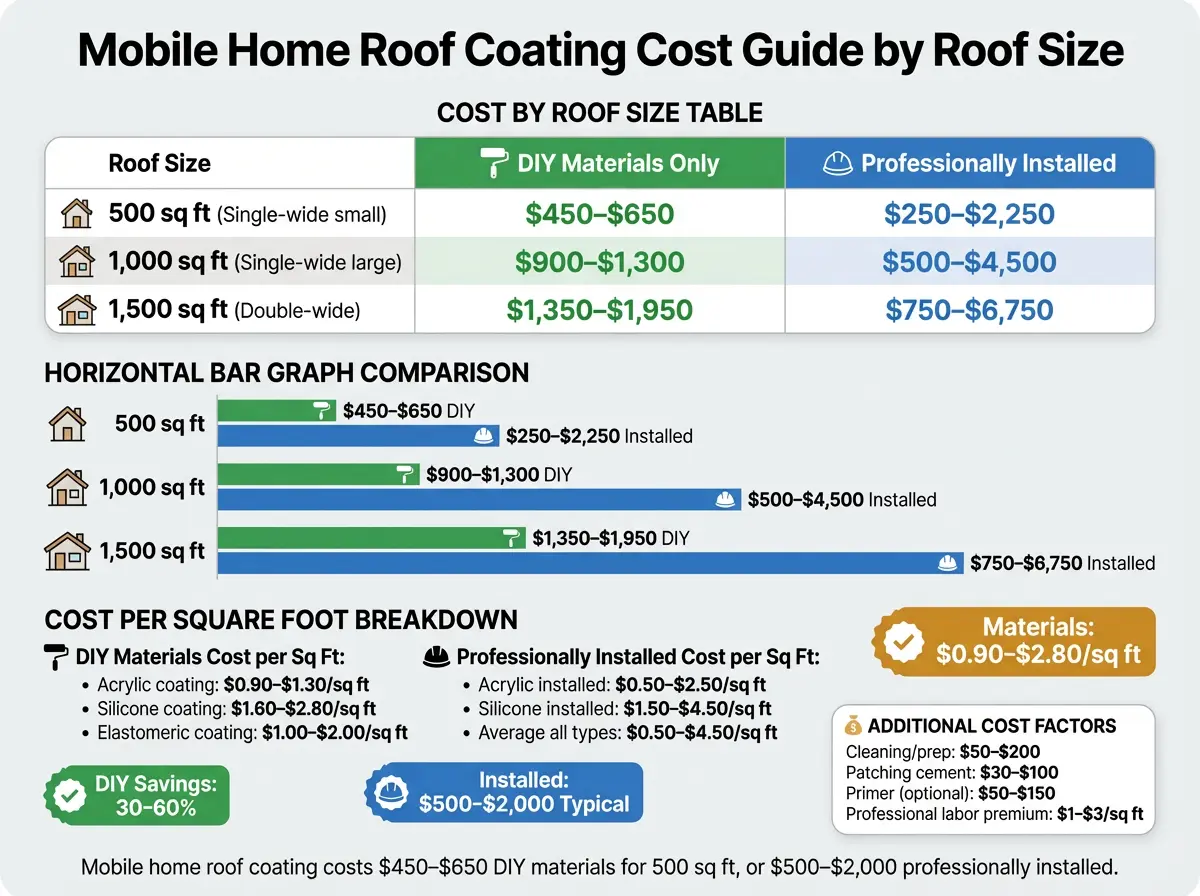
Sealing a mobile home roof typically costs between $1,950 and $6,250, or about $1 to $4 per square foot. This price includes materials, labor, and necessary surface preparation.
Cost breakdown by roof size
| Roof size | Material cost (DIY) | Installed cost (professional) |
|---|---|---|
| 500 sq ft | $450–$650 | $500–$2,000 |
| 1,000 sq ft | $900–$1,300 | $1,000–$4,000 |
| 1,500 sq ft | $1,350–$1,950 | $1,500–$6,000 |
Material cost by coating type
| Coating type | Cost per gallon | Coverage per gallon | Cost per 100 sq ft |
|---|---|---|---|
| Acrylic | $20–$35 | ~30–40 sq ft/gallon | $50–$117 |
| Silicone | $40–$70 | ~30–40 sq ft/gallon | $100–$233 |
| Elastomeric | $25–$50 | ~30–40 sq ft/gallon | $63–$167 |
Note: Coverage rates assume proper application thickness (typically 20–30 wet mils); actual coverage varies by product and surface condition.
Factors affecting mobile home roof coating cost
- Roof size: Larger roofs require more sealant and additional labor, increasing total expense.
- Coating type: Silicone costs nearly 2× acrylic per gallon.
- Roof condition: Roofs needing extensive repairs or cleaning before coating cost more.
- Local labor rates: Professional installation labor varies by region.
- Number of coats: Most systems require 2–3 coats for full protection.
How to apply mobile home roof coating: step-by-step DIY guide
Applying mobile home roof coating yourself can save 50–70% on labor costs, but proper surface preparation is critical for coating adhesion and performance.
Materials and tools needed
Before you begin, collect all the items you’ll need:
- Mobile home roof coating (Kool Seal or another approved coating).
- Patching cement for seams, screws, and damage.
- Diluted chlorine bleach solution for cleaning.
- Strong detergent if there’s heavy grime.
- Wire brush, putty knife, coarse sandpaper for removing old coating and debris.
- Stiff-bristle paintbrush, paint roller, broom for application.
- Garden hose for rinsing.
- Roof-coating brush or spray gun.
- Water-based metal primer (if coating metal roof).
Step 1: Inspect the roof
Walk the entire roof surface and look for damage, loose seams, missing screws, rust spots, cracks, tears, or areas of heavy wear. Make note of areas that need repair before coating.
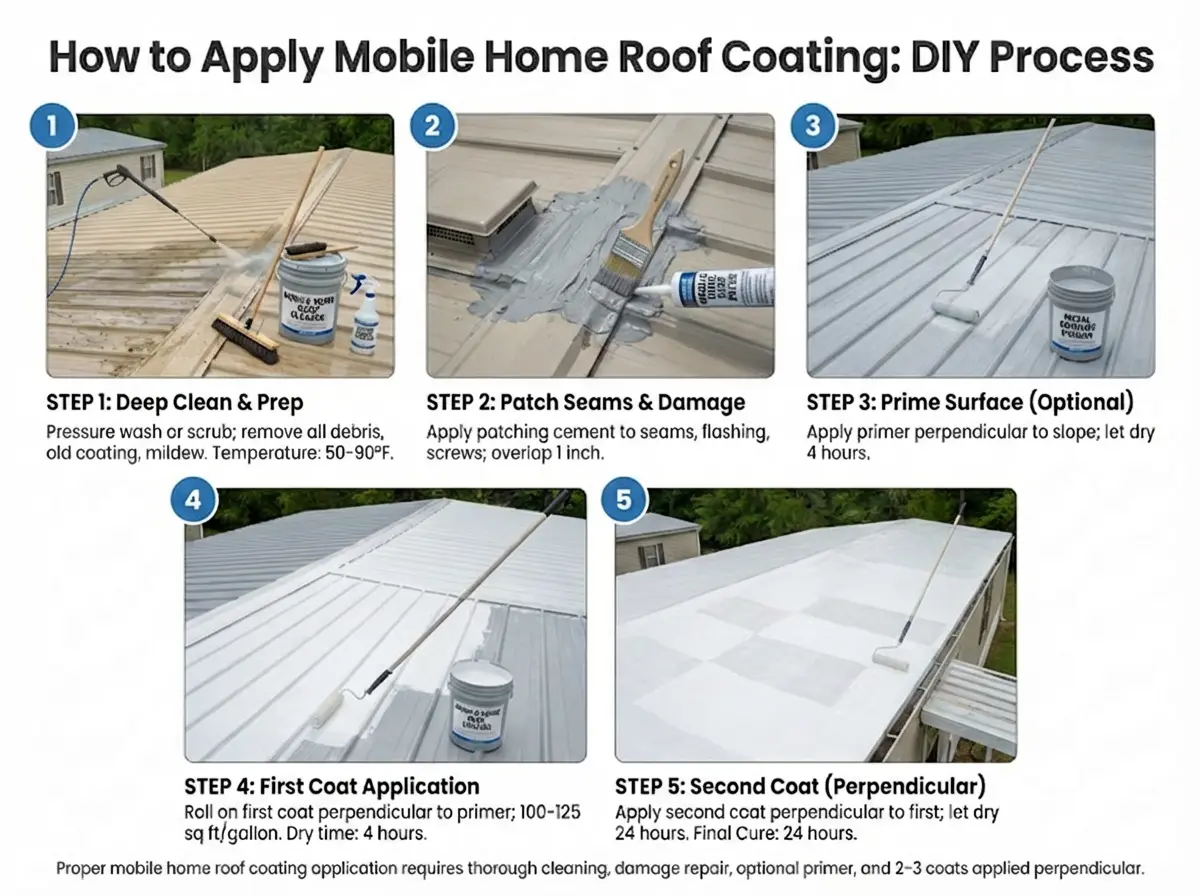
Step 2: Clean the roof surface thoroughly
Remove all loose debris (leaves, branches, dirt) with a broom or leaf blower. Scrub the roof with a diluted chlorine bleach solution using a stiff-bristle brush to remove mold, mildew, algae, and dirt. For heavy grime, use strong detergent.
Use a wire brush or coarse sandpaper to remove loose or peeling old coating, rust, and oxidation. Be sure the entire surface is clean and free of all moisture before proceeding.
Step 3: Repair any damage
Use patching cement to fill cracks, cover screws, seal seams, and repair holes or tears. Apply patching cement with a thick brush so that you cover all the seams and edges of your roof, and wait for it to dry completely (typically 24 hours) before coating.
Step 4: Rinse and check for puddling
Rinse the roof thoroughly with a garden hose and let it dry. While the roof is wet, check for areas where water puddles these need special attention during coating.
Step 5: Apply primer coat (optional but recommended)
If coating a metal roof, use a water-based metal primer. Apply PERMABOND™ primer coat (or equivalent) using a one-inch nap roller, paint brush, or airless sprayer machine with minimum tip size of .021. Apply perpendicular to the slope of the roof in a checkerboard application process for best results.
Wet mils of 12–16 results in a dry thickness of 4–7 mils. Let the primer dry for 4 hours before continuing with the project.
Step 6: Coat roof seams, j-rail, and flashing first
Before coating the main roof surface, carefully coat all seams, j-rails, flashing, and edges using a brush for precision. This ensures these critical areas receive extra protection.
Step 7: Apply the first coat of mobile home roof coating
Stir the mobile home roof coating thoroughly. Using a paint roller, roof brush, or spray gun, spread the coating evenly across the roof. Start on one side and work in small sections so you don’t miss any spots.
It’s important that you equally coat every part of your roof and pay attention to the amount of coating that you’re applying you don’t want to apply a layer that’s too thick or too thin, as both will do you no good. Follow the manufacturer’s instructions for thickness or coverage rate (usually aiming for 15–25 wet mils per coat).
Step 8: Allow proper drying time
Let the first coat dry completely (typically 4–24 hours depending on temperature and humidity) before applying the second coat. Do not rush this step applying a second coat over wet coating can cause bubbling and poor adhesion.
Step 9: Apply second and third coats
Most mobile home roof coating systems require 2–3 coats for full protection and warranty compliance. Repeat the application process, ensuring even coverage and proper drying time between coats.
Apply each coat perpendicular to the previous coat direction (checkerboard pattern) for best coverage.
Mobile home roof coating coverage rates
Understanding coverage rates helps you calculate how many gallons you need for your project.
Typical coverage per gallon
- Acrylic coating: ~30–40 sq ft per gallon at recommended thickness.
- Silicone coating: ~30–40 sq ft per gallon at recommended thickness.
- Elastomeric coating: ~30–40 sq ft per gallon at recommended thickness.
Coverage example calculation
For a 1,000 sq ft mobile home roof with 2 coats:
- Total coverage needed: 1,000 sq ft × 2 coats = 2,000 sq ft
- Gallons required: 2,000 ÷ 35 (average coverage) = ~57 gallons
- At $30/gallon (acrylic): $1,710 material cost
Note: Always buy 10–20% extra to account for waste, overlaps, and touch-ups.
When mobile home roof coating makes sense (vs replacement)
Mobile home roof coating is a cost-effective alternative to full replacement, but it’s not always the right choice.
Coating makes sense when:
- Your roof is structurally sound with no major leaks or damage.
- The roof is less than 20 years old and has reasonable remaining life.
- You want to extend roof life by 5–15 years at 30–50% the cost of replacement.
- Your budget is $500–$6,000 vs $4,000–$20,000 for replacement.
- You want to improve energy efficiency with reflective coating.
Replacement is usually better when:
- Multiple large leaks exist across the roof.
- The roof deck or structure is damaged, sagging, or rotted.
- The existing roof has already been coated 2–3 times (coating builds up and becomes less effective).
- The roof is over 25 years old and near end of life.
Choosing the right mobile home roof coating for your climate
Climate dictates which mobile home roof coating performs best.
Hot, sunny climates (Southwest, Florida)
Best choice: Acrylic roof coatings with high solar reflectance.
Why: Excellent UV protection, superior reflectivity reduces cooling costs, and lower cost than silicone.
Requirement: Roof must have positive slope (greater than 1/12) and no ponding water.
Cold, wet climates (Northeast, Pacific Northwest)
Best choice: Silicone roof coatings.
Why: Withstands ponding water, performs in cold temperatures, and excels in heavy rain or snow.
Trade-off: Higher cost but superior durability in harsh weather.
Flat or low-slope roofs with ponding issues
Best choice: Silicone or elastomeric hybrid systems.
Why: Acrylic will blister and fail in standing water; silicone resists moisture intrusion.
Strategy: Use silicone in ponding areas, acrylic on sloped sections (hybrid approach).
Mobile home roof coating benefits
Applying a quality mobile home roof coating delivers multiple advantages beyond just stopping leaks.
Extends roof lifespan
A properly applied coating system adds 5–15 years to your roof’s life by sealing cracks, protecting from UV damage, and preventing moisture infiltration.
Reduces cooling costs
Reflective white coatings can reduce roof surface temperature by 50°F or more, cutting air conditioning loads by 10–30% in hot climates.
Waterproofs and seals
Mobile home roof coating creates a seamless, watertight barrier that prevents leaks at seams, screws, and cracks.
Low-cost alternative to replacement
At $1–$4 per square foot installed, coating costs 30–50% less than full roof replacement ($3–$8/sf).
Quick installation with minimal disruption
Most mobile home roof coating projects can be completed in 2–4 days, compared to 5–10 days for full replacement.
Common mobile home roof coating mistakes (and how to avoid them)
Even careful DIYers make errors that compromise coating performance.
Mistake #1: Inadequate surface preparation
Applying coating over dirt, rust, loose old coating, or moisture is the #1 cause of coating failure. Always clean thoroughly and allow the roof to dry completely before coating.
Mistake #2: Wrong coating type for roof slope
Using acrylic on flat roofs with ponding water causes blistering and delamination. Match coating type to your roof’s drainage characteristics.
Mistake #3: Insufficient coating thickness
Applying coats too thin (trying to stretch material too far) results in inadequate protection and premature failure. Follow manufacturer specifications for wet mil thickness.
Mistake #4: Not repairing damage before coating
Coating over cracks, holes, or separated seams without patching cement first allows leaks to continue under the coating. Always repair damage first.
Mistake #5: Skipping primer on metal roofs
Metal roofs need primer for coating adhesion; skipping this step can cause coating to peel within months.
DIY vs professional mobile home roof coating
Deciding whether to DIY or hire professionals depends on your skills, time, and budget.
DIY mobile home roof coating
Pros:
- Save 50–70% on labor costs.
- Control project timeline and quality.
- Good learning experience for homeowners.
Cons:
- Physically demanding work in hot sun.
- Risk of improper application voiding warranty.
- Requires tools and safety equipment.
- Takes 2–4 full days for most mobile homes.
Best for: Small to medium roofs (under 1,200 sq ft), homeowners with roofing experience, and those on tight budgets.
Professional installation
Pros:
- Guaranteed proper application and warranty coverage.
- Faster completion (1–2 days).
- Includes surface prep, repairs, and cleanup.
- No safety risk or tool investment.
Cons:
Best for: Large or complex roofs, homeowners without roofing experience, and those prioritizing warranty protection.
Mobile home roof coating maintenance and recoating
Even the best mobile home roof coating eventually needs maintenance and recoating.
How long does coating last?
- Acrylic coatings: 5–10 years before recoating needed.
- Silicone coatings: 10–15 years with proper maintenance.
- Elastomeric coatings: 7–12 years depending on climate.
Maintenance schedule
- Annual inspection: Check for cracks, blistering, or coating wear.
- Every 2–3 years: Clean roof surface to remove dirt and algae.
- Every 5–10 years: Apply a maintenance coat to refresh protection.
When to recoat vs replace
If the coating is intact but faded, a single maintenance coat can add 5+ years. If the coating is cracked, blistering, or peeling extensively, full recoating (2–3 coats) or replacement may be needed.
FAQ: mobile home roof coating
How much does mobile home roof coating cost?
Mobile home roof coating costs $1–$4 per square foot installed ($1,950–$6,250 for typical mobile home), or $450–$1,950 for DIY materials only.
What type of coating is best for mobile home roofs?
Acrylic coatings work best for sloped roofs in sunny climates ($20–$35/gallon); silicone is best for flat roofs with ponding water or cold climates ($40–$70/gallon).
Can I apply mobile home roof coating myself?
Yes DIY mobile home roof coating is possible with proper surface preparation, patching, and 2–3 coats applied at correct thickness, saving 50–70% on labor.
How long does mobile home roof coating last?
Acrylic coatings last 5–10 years, silicone lasts 10–15 years, and elastomeric coatings last 7–12 years before recoating is needed.
How many gallons of coating do I need?
Coverage is typically 30–40 sq ft per gallon; a 1,000 sq ft roof with 2 coats needs ~57 gallons.
What is the difference between acrylic and silicone roof coatings?
Acrylic is cheaper, more reflective, and easier to clean but fails in ponding water; silicone costs more but withstands standing water and cold temperatures.
Do I need primer for mobile home roof coating?
Metal roofs require water-based primer for coating adhesion; TPO and EPDM roofs may not need primer but check manufacturer instructions.
Can roof coating stop leaks?
Mobile home roof coating can seal minor cracks, seams, and small holes, but it cannot fix major structural damage or large leaks repair these first.
How do I prepare my mobile home roof for coating?
Clean thoroughly with bleach solution, remove loose debris and old coating, repair damage with patching cement, rinse, and allow to dry completely.
Is mobile home roof coating better than replacement?
Coating costs 30–50% less than replacement and works well for roofs under 20 years old with no major damage; replacement is better for severely damaged or old roofs.
Get free roofing advice, cost guides, and seasonal maintenance tips.
Roofing content specialist with 5+ years researching U.S. residential and commercial roofing. Has documented 200+ projects covering installation costs, material selection, contractor vetting, and DIY guides for homeowners across all climate zones.

How to Design Gambrel Roof Trusses: Complete Guide
Gambrel roof trusses are engineered roof support structures featuring two distinct slopes on each side a steep lower slope that transitions to a shallower upper slope designed to maximize interior headroom and usable attic space without increasing building footprint. Typical gambrel roof design spans range from 24 to 48 feet, with truss spacing commonly set at 24 inches on center for residential and agricultural buildings, though engineered designs may allow spacing up to 36 inches depending on load requirements.
This complete guide covers gambrel roof truss dimensions, spacing requirements, materials (wood vs steel), load capacity considerations, step-by-step construction methods, cost factors, and when gambrel roof design makes the most sense for barns, sheds, homes, and garages.
What are gambrel roof trusses?
A gambrel truss is a type of roof support structure with two different slopes on each side, featuring a steep lower slope that meets a less steep upper slope. This distinctive design provides additional headroom without requiring additional building footprint, delivering extra usable space and better ventilation at reduced material expenses compared to traditional gable or hip roofs.
The double-slope gambrel roof design has become iconic in barn architecture, but it’s increasingly popular for residential homes with attic rooms, storage sheds, and garages where maximizing interior space is a priority.
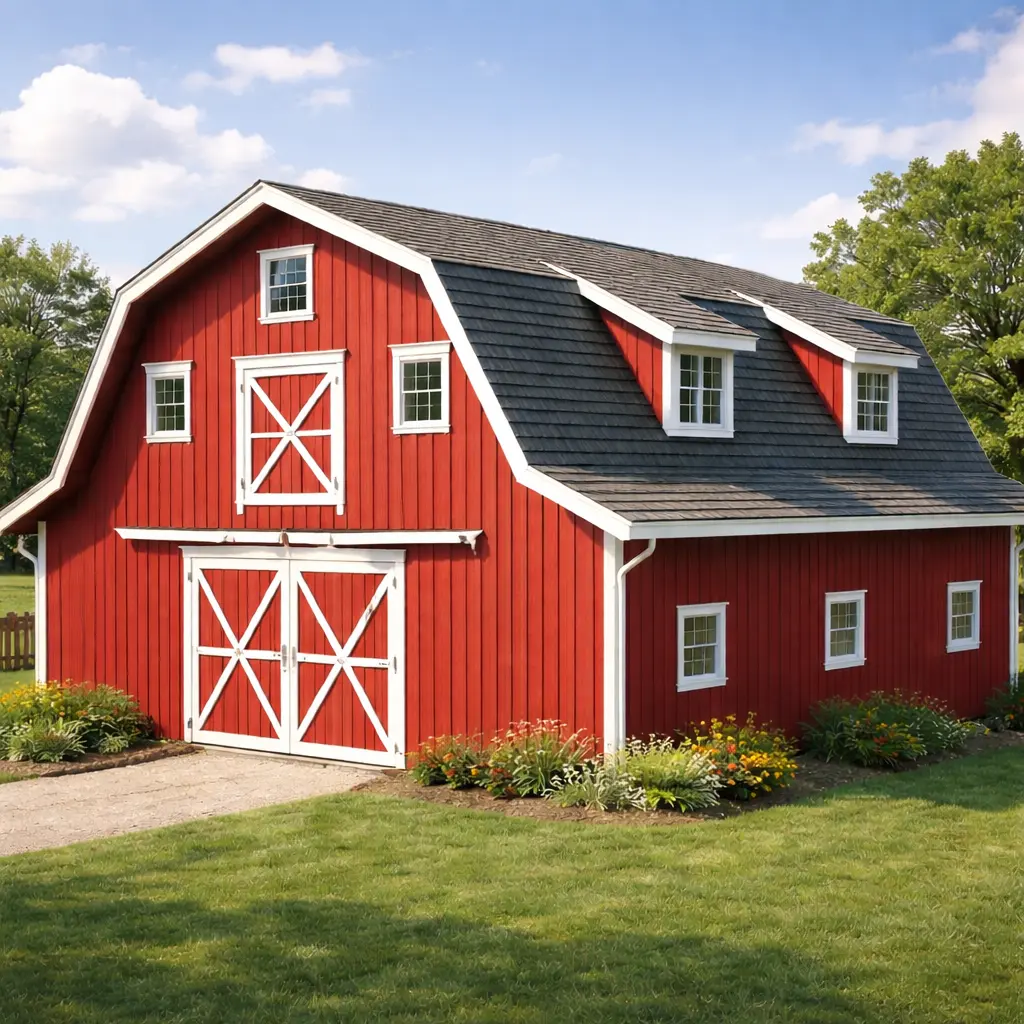
Gambrel roof trusses: typical dimensions and spans
Understanding standard gambrel roof truss dimensions helps you plan materials, estimate costs, and ensure your design meets structural requirements.
Standard span ranges
Gambrel trusses are configurable in a range of sizes with typical spans between 24’–48′ (7.3–14.6 m) and overall heights of 4’–24′ (1.22–7.31 m). Timber gambrel trusses can span between 24 to 48 feet without internal supports, but deeper or reinforced trusses may span even farther.
Common lumber thickness
The thickness of wood trusses is commonly 1.5″, 3″, or 4.5″ (3.8, 7.6, 11.4 cm), corresponding to nominal 2x, 4x, or 6x dimensional lumber. Trusses have a pitch ratio typically between 1:1 to 1:6, with the steeper lower slope often around 60–70 degrees and the upper slope around 20–30 degrees.
Truss spacing guidelines
Spacing between gambrel roof trusses is commonly 24 inches on center for most residential and agricultural roofs, but with engineered designs and specific materials, spacing up to 36 inches or more may be used depending on roof load factors like snow, wind, and roofing weight. Proper truss dimensions and spacing ensure your roof can safely support loads without sagging or failure.
Gambrel roof design: slope angles and geometry
The key design feature of gambrel roof trusses is the double slope shape, which creates the signature barn-style profile.
Lower slope angle
The lower slope is usually steeper typically 60–70 degrees and about twice the height of the upper slope. A standard gambrel roof truss often has a second slope angle of 60 degrees.
Upper slope angle
The upper slope is shallower, commonly 20–30 degrees, creating the distinctive “broken back” appearance that maximizes attic headroom. A standard gambrel roof truss has a peak angle of 30 degrees.
Why the double slope matters
This dual-angle gambrel roof design helps maximize interior space while keeping the roof structurally balanced, allowing for full-height walls in attic spaces rather than sloped ceilings that limit usability.
Materials for gambrel roof trusses: wood vs steel
Materials influence truss dimensions, spacing, cost, and load capacity.
Wood gambrel trusses
Wood trusses are the most common choice for residential and agricultural gambrel roof design because they’re cost-effective, easy to work with, and widely available. Typical lumber choices include 2×4, 2×6, or 2×8 dimensional lumber for top and bottom chords, with 24-inch on-center spacing for the truss members.
Wood gambrel trusses can be site-built or pre-engineered, with pre-engineered trusses saving time and ensuring consistent quality compared to building from scratch.
Steel gambrel trusses
Steel trusses can span longer distances with fewer supports and support heavier loads than wood. Steel is often chosen for large commercial or industrial buildings needing extra strength, though it costs more and requires specialized fabrication and installation.
Gambrel roof truss spacing and span chart
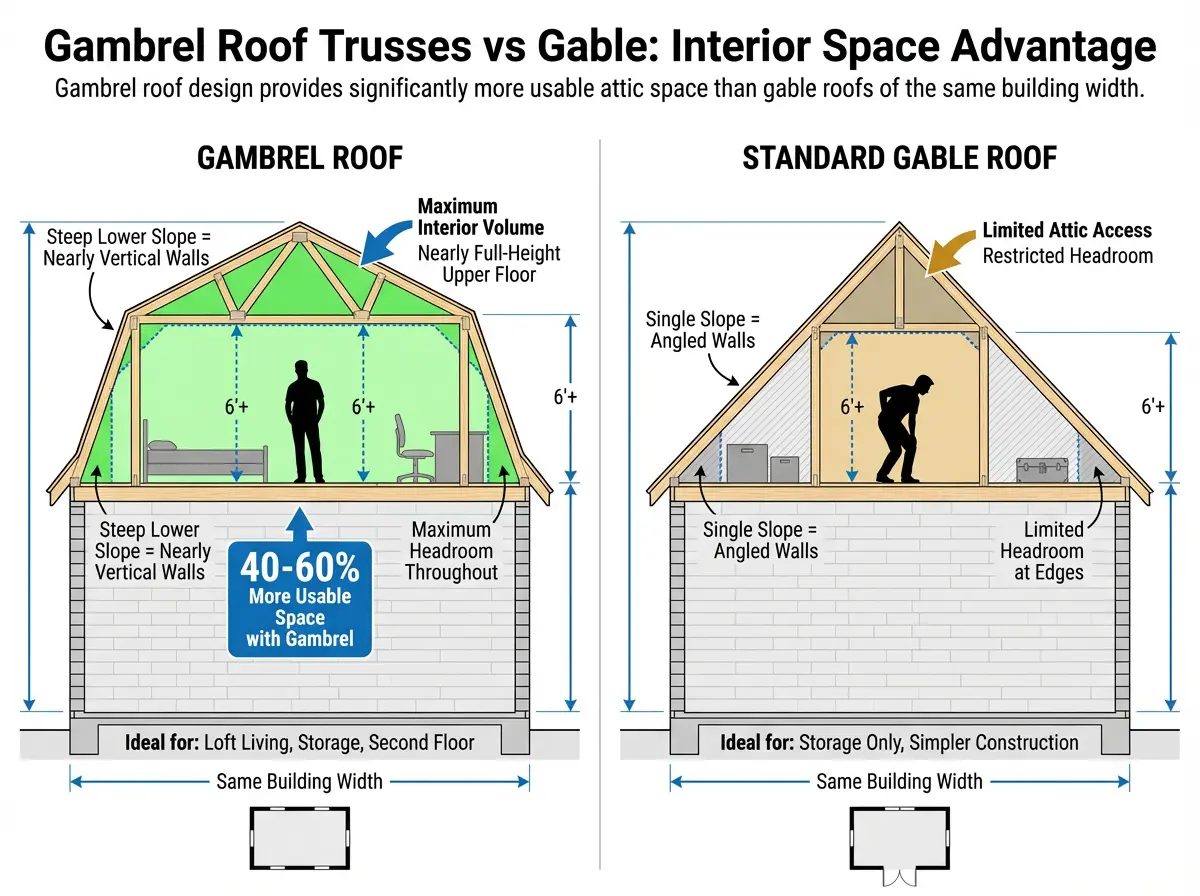
Spacing and dimensions for gambrel roof trusses vary widely depending on building size and requirements.
| Building width (ft) | Typical span (ft) | Common spacing (in OC) | Notes |
|---|---|---|---|
| 10–20 | 10–20 | 16–24 | Small sheds, garages |
| 20–30 | 20–30 | 24 | Standard residential, small barns |
| 30–36 | 30–36 | 24 | Medium barns, larger garages |
| Over 36 | 40+ | 24–36 | Requires engineered design and approval |
Note: Always check local regulations and consult a structural engineer, especially for large or complex buildings, to ensure safety and compliance.
Gambrel roof trusses load capacity and engineering
Gambrel roof trusses are engineered to support significant loads, including the weight of roofing materials (dead load), snow, wind pressure, and any live load from maintenance or equipment.
Understanding load types
- Dead load refers to the permanent weight of roofing components like shingles, sheathing, and insulation.
- Live load includes temporary forces such as snow accumulation, wind, and maintenance workers.
Both loads must be carefully considered in the gambrel roof design to prevent sagging or structural failure.
Materials matter for load capacity
Timber gambrel trusses are common and cost-effective, but steel trusses can support heavier loads and longer spans. The overall load capacity depends on several key factors, such as the materials used, truss dimensions, and spacing between individual trusses.
How to build gambrel roof trusses: step-by-step construction
Building gambrel roof trusses can save money and give you full control over your roof design, but precision is critical.
Step 1: Create a full-size layout
Make a full-size layout of your gambrel on smooth, level ground and drive stakes into the earth to mark the locations of the four rafters in each truss. Start by carefully measuring your building’s width and desired roof height to calculate the correct gambrel roof truss dimensions.
Step 2: Calculate angles and dimensions
Use a gambrel truss design calculator or detailed plans to get precise angles and lengths. Draw lines between three points to represent the top of the trusses, and measure down 3 1/2″ off each line to represent a full 2×4.
The middle line should be at a 45-degree angle, resulting in end angles of 22.5 degrees each on the truss pieces, which can be achieved using a speed square. Each truss piece will be a specific length on the top measurement precision here is vital, as even small errors can affect the truss fit and roof shape.
Step 3: Cut lumber to size
Using your measurements, cut the rafters, chords, and supports to the correct lengths and angles. Lay four 2-by-6 beams (or appropriate lumber) out flat in their proper positions and using a string line mark the correct lengths and angles to cut them.
Step 4: Assemble the trusses
Join the cut pieces to form the gambrel truss shape. Use metal connector plates or gussets at joints to secure the rafters and chords firmly 1/2 inch plywood gussets are commonly used for DIY builds. Make sure all connections are tight and aligned, and check that the width of your truss is exactly correct (e.g., 10′ from one bottom side to the other for a 10′ building).
Step 5: Install trusses on the building
Position trusses at the planned spacing (typically 24″ on center), secure them to wall plates, and brace them properly before adding sheathing.
Step 6: Add sheathing and roofing
Cover the trusses with plywood or oriented strand board sheathing, roll out an underlayment layer, then add your shingles, metal panels, or other roofing material of your choice. This final step locks in your gambrel shape and makes your roof weatherproof.
DIY gambrel roof truss construction tips
Building your own gambrel roof trusses requires attention to detail and the right approach.
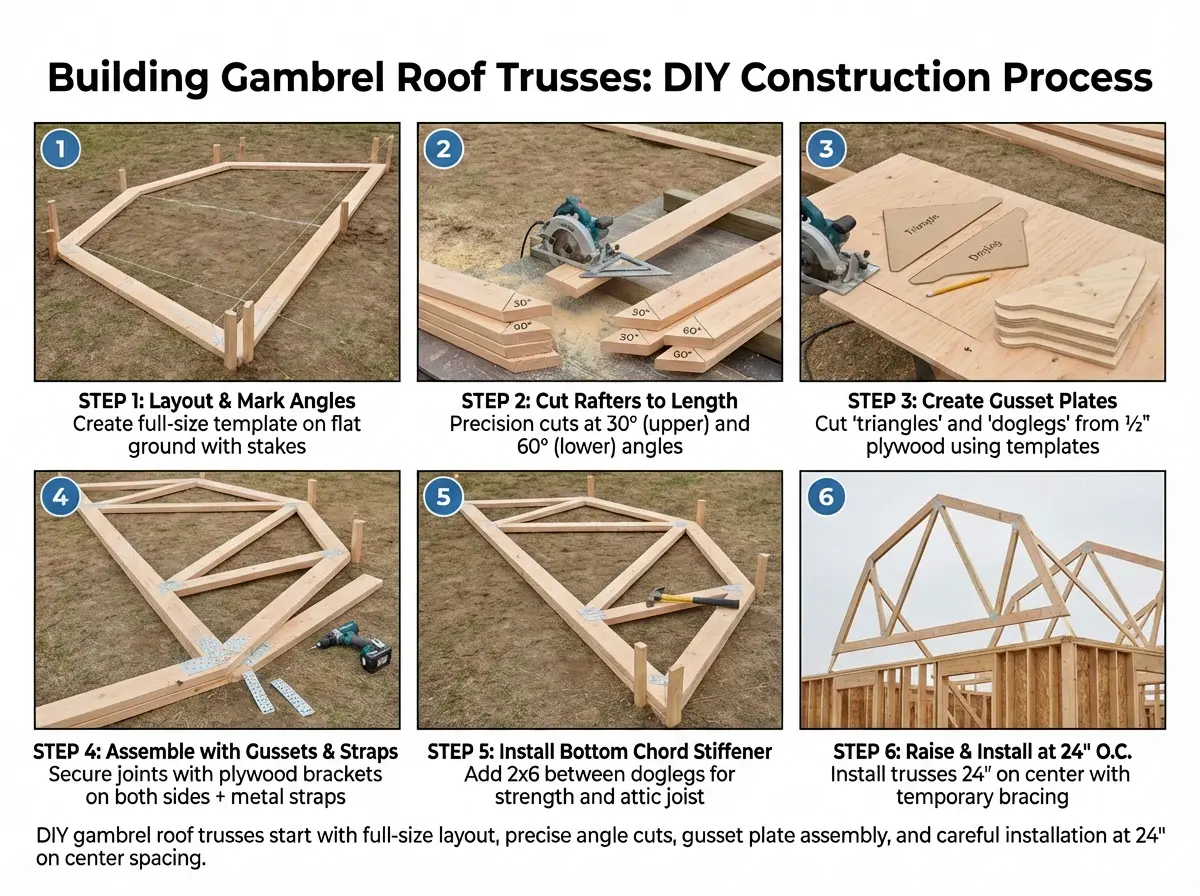
- Use a gambrel truss design calculator throughout the process to verify angles, lengths, and load capacity accuracy here saves time and money by avoiding costly mistakes.
- Cut 4 pieces to form your first truss and make sure the dimensions are exact before cutting the remaining trusses; if your first truss doesn’t measure up, make necessary adjustments and record these so that the remaining trusses will be identical.
- Pre-engineered gambrel trusses can save time and ensure consistent quality compared to building from scratch, especially for larger or complex projects.
- Always consult a structural engineer for large or complex buildings to ensure safety and compliance with local codes.
Common mistakes when building gambrel roof trusses (and how to avoid them)
Even experienced DIY builders make errors when constructing gambrel roof trusses that can compromise structural integrity and create costly problems down the road. The most critical mistake is inaccurate angle cuts—because gambrel roof design requires two different slopes per side, even a one-degree error in your lower slope angle (typically 60 degrees) or upper slope angle (typically 30 degrees) compounds across multiple trusses and results in a roof that won’t align properly or sit square on the building. Always use a speed square or angle finder to verify cuts, and build a test truss first to confirm dimensions match your building width exactly before cutting lumber for the remaining trusses.
Another common error is inadequate gusset plate attachment—using too few nails or screws, or placing gussets on only one side of the truss, weakens the critical joints where upper and lower slopes meet and where rafters connect to the bottom chord. Professional truss manufacturers use metal connector plates pressed into both sides of every joint; DIY builders should use 1/2-inch plywood gussets on both sides of each connection point, secured with construction adhesive and closely spaced screws or nails to distribute load evenly. Finally, improper truss spacing or inadequate bracing during installation can cause trusses to rack (twist out of plumb) before sheathing is applied—always install temporary diagonal bracing between trusses and double-check that each truss is perfectly vertical before securing it permanently to the wall plates. Taking time to avoid these three mistakes ensures your gambrel roof trusses will perform safely for decades
Gambrel roof design pros and cons
Like all roof types, gambrel roof trusses have advantages and trade-offs.
Advantages of gambrel roof design
- Maximized interior space: The two-slope design creates full-height attic rooms without increasing building footprint.
- Cost-effective: Uses less material than comparable full second-story construction.
- Better ventilation: The design naturally promotes airflow and can reduce cooling costs.
- Aesthetic appeal: The classic barn-style look is attractive for residential, agricultural, and garage buildings.
Disadvantages of gambrel roof design
- More complex construction: Requires precise angles and measurements compared to simple gable roofs.
- Higher wind vulnerability: The large surface area and upper slope can catch wind; proper engineering is essential in high-wind zones.
- Maintenance access: The steep lower slope can make exterior maintenance more challenging.
Gambrel roof trusses: maintenance and long-term durability
Once installed, gambrel roof trusses require minimal maintenance compared to the roof covering itself, but periodic inspections help catch potential issues before they become expensive repairs. Inspect truss connections annually—especially gusset plates and metal connector plates—for signs of rust, loosening, or wood rot, paying extra attention after severe storms or heavy snow events that may have stressed the structure. The dual-slope gambrel roof design naturally sheds water and snow efficiently, but check that roof sheathing remains firmly attached and that no sagging or deflection has occurred in the truss members, as this can indicate overloading or inadequate spacing.
Attic ventilation is particularly important in gambrel roof design because the large enclosed space can trap heat and moisture, accelerating wood decay and reducing insulation effectiveness. Install ridge vents, soffit vents, or gable end vents to maintain airflow and prevent condensation buildup that can weaken truss lumber and encourage mold growth. If you’re using your gambrel attic space as a finished room, ensure proper vapor barriers and insulation are installed between living space and the roof deck to prevent moisture migration into truss cavities. With proper installation, adequate ventilation, and occasional inspections, wood gambrel roof trusses can last 50+ years, while steel gambrel trusses can exceed 100 years with virtually no maintenance beyond rust prevention in humid environments.
Gambrel roof trusses cost factors
Several variables affect the total cost of a gambrel roof truss project.
Material costs
Wood lumber prices fluctuate, but a typical DIY gambrel roof truss project using dimensional lumber and plywood gussets can cost $2–$5 per linear foot of truss. Pre-engineered trusses cost more upfront but save labor time.
Labor costs
If you’re hiring professionals to build and install gambrel roof trusses, labor typically adds 50–70% to material costs, depending on complexity and regional rates.
Engineering and permits
Complex or large gambrel roof designs (spans over 36 feet) often require engineered truss plans and building permits, adding $500–$2,000+ to project costs.
When to choose gambrel roof trusses
Gambrel roof design makes the most sense in specific situations.
Best applications for gambrel roof trusses
- Barns and agricultural buildings: The classic gambrel shape maximizes hay storage and equipment clearance.
- Sheds and workshops: Provides standing-height lofts for storage without building a larger footprint.
- Garages with bonus rooms: Creates full-height second-floor space for living, office, or hobby areas.
- Homes with attic bedrooms: Delivers usable headroom and floor area in upper levels.
When other roof types may be better
If your priority is simplicity and lowest cost, a standard gable or shed roof may be more practical. If you’re in a high-wind or hurricane zone, consult an engineer to ensure gambrel roof trusses are properly braced and anchored.
Gambrel roof trusses vs other truss types
Understanding how gambrel roof trusses compare to other common truss designs helps you choose the right structure.
| Truss type | Slopes | Interior space | Complexity | Typical use |
|---|---|---|---|---|
| Gambrel | Two per side (steep + shallow) | Maximum attic height | Moderate | Barns, garages, sheds, homes with lofts |
| Gable | One per side | Moderate attic | Simple | Standard residential roofs |
| Hip | Four sloping sides | Limited attic | Moderate | Wind-resistant residential |
| Scissor | Sloped bottom chord | Vaulted ceiling | Moderate | Cathedral ceilings |
| Attic | Horizontal bottom chord | Walk-in attic | Complex | Older residential construction |
Gambrel roof design strikes the best balance between interior space and material efficiency for buildings where attic usability matters.
FAQ: gambrel roof trusses
What are gambrel roof trusses?
Gambrel roof trusses are engineered support structures with two slopes per side a steep lower slope and shallow upper slope designed to maximize interior attic space.
What is the typical span for gambrel roof trusses?
Gambrel roof trusses typically span between 24’–48′ (7.3–14.6 m) without internal supports.
What is the standard spacing for gambrel roof trusses?
Spacing between gambrel roof trusses is commonly 24 inches on center for residential and agricultural buildings, though engineered designs may allow up to 36 inches.
What angles are used in gambrel roof design?
A standard gambrel roof truss has a peak angle of 30 degrees and a second (lower) slope angle of 60 degrees.
Can I build gambrel roof trusses myself?
Yes DIY gambrel roof trusses can be built using dimensional lumber (2×4, 2×6, 2×8) and plywood gusset plates, but precision in measurements and angles is critical.
What size lumber is used for gambrel roof trusses?
Common lumber sizes include 2×4, 2×6, or 2×8 for chords and rafters, depending on span and load requirements.
How much weight can gambrel roof trusses support?
Load capacity depends on materials, dimensions, and spacing, but properly engineered gambrel roof trusses can support typical residential dead loads plus snow and wind loads.
Do I need an engineer for gambrel roof trusses?
For buildings over 36 feet wide or in high-load areas, consult a structural engineer to ensure safety and code compliance.
What is the difference between gambrel and mansard roofs?
Gambrel roofs have two slopes per side on two sides of the building; mansard roofs have steep lower slopes on all four sides.
Are gambrel roof trusses more expensive than gable trusses?
Gambrel roof trusses cost slightly more due to additional cuts and complexity, but they deliver far more usable interior space per dollar.
Get free roofing advice, cost guides, and seasonal maintenance tips.
Roofing content specialist with 5+ years researching U.S. residential and commercial roofing. Has documented 200+ projects covering installation costs, material selection, contractor vetting, and DIY guides for homeowners across all climate zones.
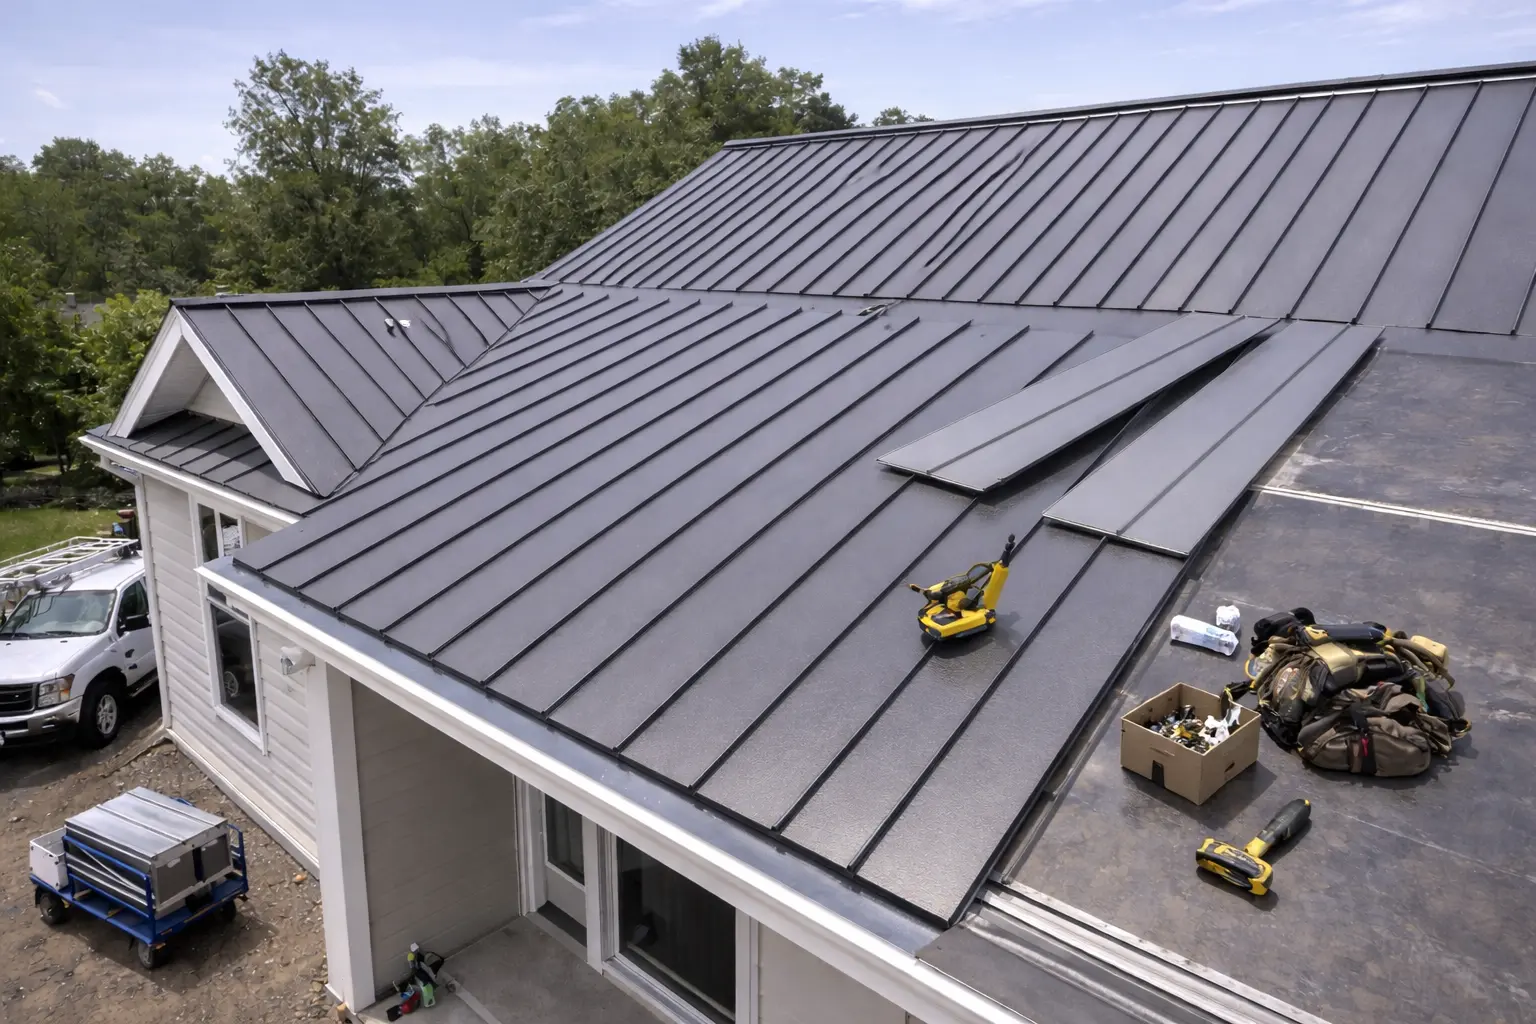
Steel Roof Cost: Complete Pricing Guide 2026
How much is a steel roof cost? A steel roof typically costs $6–$21 per square foot installed, with standing seam systems running $10–$16/sf and corrugated steel roofing at $7–$12/sf, meaning a typical 2,000 sq ft residential project ranges from $12,000 to $42,000 depending on material grade, complexity, and labor rates. Understanding roofing materials prices and how steel compares to asphalt shingles, aluminum, copper, and zinc helps homeowners budget accurately and choose the best roof for their needs.
This guide explains what drives steel roof cost, breaks down material vs labor pricing, compares steel to other roofing materials, and provides real-world project examples so you can estimate your roof installation cost confidently.
Table of Contents
What is a steel roof (and why it costs what it does)
A steel roof is a metal roofing system made from galvanized or coated steel panels or shingles, valued for durability (40–70 year lifespan), fire resistance, energy efficiency, and low maintenance compared to asphalt shingles. Steel roofing materials are more expensive than asphalt upfront because of manufacturing complexity, premium appearance, and superior performance.
When asking “how much is a steel roof cost,” you’re really pricing three things: the steel panels or shingles themselves, the underlayment and accessories (trim, fasteners, flashing), and the skilled labor required to install a watertight, long-lasting system.
Steel roof cost per square foot (2026 pricing)
Steel roof pricing varies by profile, gauge, finish, and whether you’re buying materials only or getting full installation.
Standing seam steel roof cost
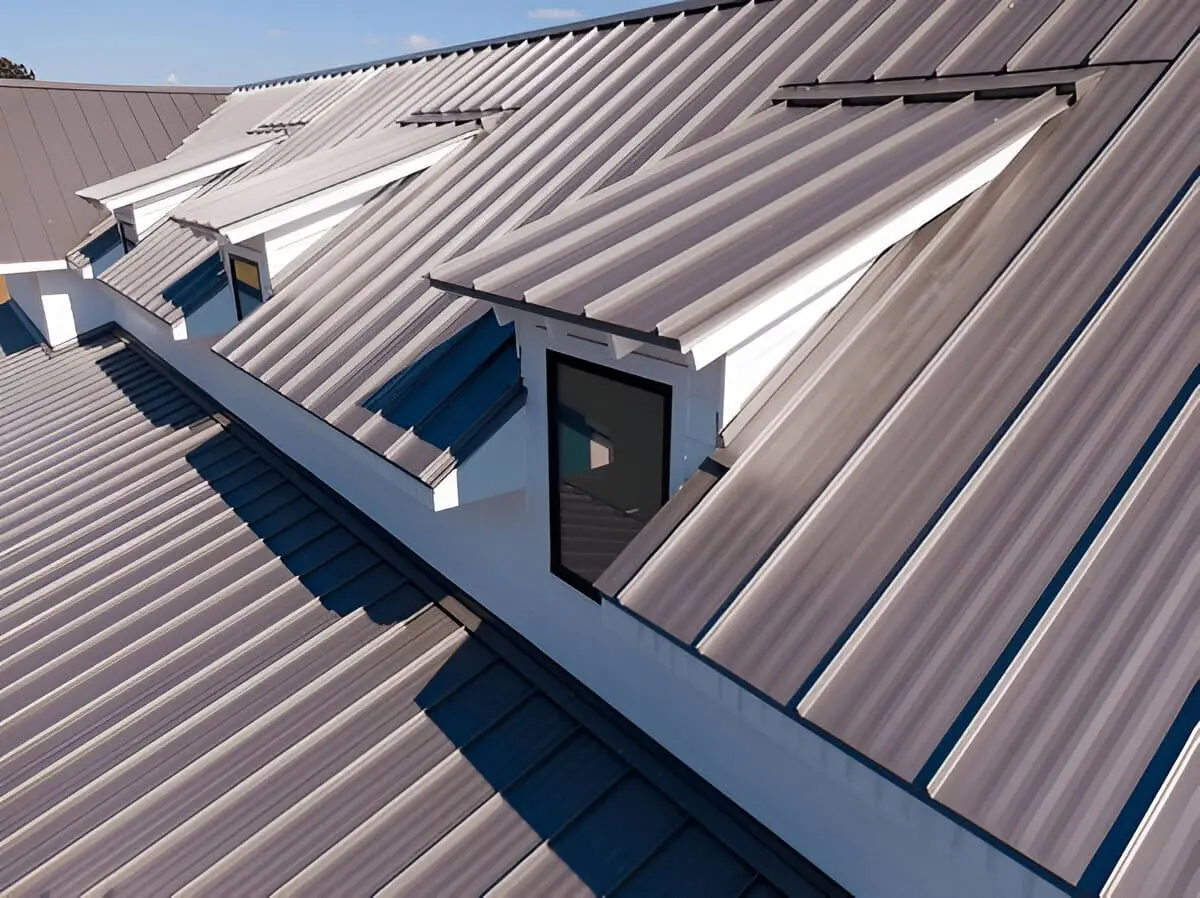
Standing seam is the premium steel roofing profile with concealed fasteners and vertical ribs that run from ridge to eave. Western States Metal Roofing reports a standing seam metal roof costs $10 to $16 per square foot installed. Consumer Affairs similarly states standing seam costs between $10 to $16 per square foot.
For a 2,000 sq ft roof, standing seam steel typically runs $20,000–$32,000 installed.
Corrugated steel roof cost

Corrugated steel (the wavy or ribbed panel style) is the most affordable steel roofing option. Western States Metal Roofing reports corrugated metal roofs, such as 7/8″ corrugated, cost $7 to $12 per square foot installed. Consumer Affairs confirms corrugated metal costs $7 to $12 per square foot.
For a 2,000 sq ft roof, corrugated steel typically runs $14,000–$24,000 installed.
Steel shingles and tiles
Steel shingles (metal panels that mimic asphalt or slate appearance) fall somewhere between corrugated and standing seam in cost, often $8–$14 per square foot installed depending on profile complexity and finish.
How much is a steel roof cost: materials vs labor breakdown
Understanding how much of your steel roof cost is material vs labor helps you compare contractor bids and spot pricing outliers.
Material costs
Steel roofing materials themselves (panels, trim, fasteners, underlayment) typically account for 40–60% of the total installed cost, depending on the grade and finish you select. Premium coatings, heavier gauges, and specialty finishes push material cost toward the higher end.
Labor costs
Labor for steel roof installation usually makes up 40–60% of the total project cost, and can be even higher for complex roofs with steep pitches, dormers, valleys, or difficult access. Steel roofing requires specialized skills and tools it’s not the same as installing asphalt shingles so experienced contractors command higher rates.
For example, standing seam materials may range $5–$26 per square foot, with labor adding $2–$6 per square foot. Corrugated steel materials range $3.50–$6.50 per square foot, with labor adding $4–$11 per square foot.
Roofing materials prices: steel vs asphalt shingles vs aluminum vs copper
Steel sits in the middle of the roofing materials price spectrum more expensive than asphalt but often cheaper than copper or zinc.
Steel roof cost comparison table
For a 2,000 sq ft home, asphalt shingles cost $7,000–$17,000, steel roofs cost $12,000–$42,000, and premium metals like copper can reach $30,000–$60,000.
What drives steel roof cost higher or lower
Several factors shift your project from the low end ($6/sf) to the high end ($21/sf or more).
Roof complexity and pitch
Steep roofs, multiple valleys, dormers, skylights, and complex geometries increase labor hours and material waste, pushing steel roof cost higher. Simple gable roofs with few penetrations install faster and cost less per square foot.
Steel gauge and thickness
Heavier gauge (thicker) steel panels cost more but resist denting better and offer longer warranties. Common gauges for residential steel roofing range from 26-gauge (lighter, lower cost) to 24-gauge or 22-gauge (heavier, more durable).
Finish and coating
Galvanized steel is the most affordable option, while premium finishes Galvalume Plus, Kynar 500/PVDF coatings, stone-coated steel add cost but improve fade resistance, corrosion protection, and appearance.
Geographic location and labor rates
Labor costs vary by region, with higher rates in urban areas and coastal markets. A steel roof installation in Florida, California, or the Northeast typically costs more than in rural Midwest or Southern markets.
Tear-off and disposal
If your existing roof must be removed, tear-off and disposal add $1–$3 per square foot to the total steel roof cost. Re-roofing over one layer of shingles (when code allows) can save money but may reduce the steel roof’s lifespan.
How much is a steel roof cost: real project examples
Here are typical budget ranges for common residential steel roofing projects.
Example 1: 1,500 sq ft ranch (corrugated steel)
- Roof area: 1,500 sq ft
- System: Corrugated steel panels, 26-gauge, Galvalume finish
- Complexity: Simple gable roof, minimal valleys
- Cost range: $10,500–$18,000 ($7–$12/sf installed)
Example 2: 2,000 sq ft two-story (standing seam steel)
- Roof area: 2,000 sq ft
- System: Standing seam steel, 24-gauge, PVDF coating
- Complexity: Hip roof with moderate valleys
- Cost range: $20,000–$32,000 ($10–$16/sf installed)
Example 3: 2,500 sq ft complex roof (steel shingles)
- Roof area: 2,500 sq ft
- System: Stone-coated steel shingles (slate appearance)
- Complexity: Multiple dormers, skylights, steep pitch
- Cost range: $20,000–$35,000 ($8–$14/sf installed)
Steel roof lifespan and warranty (how it affects cost per year)
When evaluating how much is a steel roof cost, consider cost-per-year instead of upfront price.
Steel roof lifespan
Quality steel roofs typically last 40–70 years with minimal maintenance, compared to 15–30 years for asphalt shingles. Premium steel with heavy gauge and PVDF coatings can exceed 70 years in favorable climates.
Material and workmanship warranties
Nu-Ray Metals steel panels come with 40- to 50-year finish warranties, and reputable contractors like Three Tree Roofing add a 25-year workmanship warranty on every metal roof installation. A good material warranty for steel can be 30–50 years, often covering defects and fade, while labor warranties typically cover installation quality for 5–25 years.
Cost-per-year comparison
A $25,000 steel roof lasting 50 years costs $500/year. A $12,000 asphalt shingle roof lasting 20 years costs $600/year and you’ll face two additional re-roofs over the same 50-year period. Steel’s higher upfront cost often delivers better lifetime value.
Steel roof cost vs other metal roofing materials
Steel is the most common metal roofing material, but aluminum, copper, and zinc are also options each with different roofing materials prices and performance.
Steel vs aluminum
Aluminum metal roofs cost $14.50–$20 per square foot installed, about 40% more than steel. Aluminum is lighter and more corrosion-resistant in coastal or high-humidity environments, making it ideal for saltwater exposure.
Steel vs copper
Copper metal roofs cost $15–$30 per square foot installed, or $600–$1,100 per roofing square for actual copper panels. Copper develops a beautiful green patina over time and can last 70–100+ years, but upfront cost is 2–3× higher than steel.
Steel vs zinc
Zinc metal roofs cost $11.50–$22 per square foot installed, or $650–$1,100 per roofing square. Zinc offers a self-healing patina and 60–100 year lifespan but shares copper’s high price tag.
DIY vs professional installation: cost and risk trade-offs
Some homeowners consider DIY steel roof installation to reduce how much is a steel roof cost, but the risks often outweigh savings.
Why DIY steel roofing is challenging

Proper steel roof installation requires costly equipment like roll formers, hand brakes, and safety gear, plus training to use them effectively. Working on roofs involves fall risks and injuries, especially on steep or high-pitched roofs.
Warranty and performance risks
Mistakes made during DIY installation can void manufacturer warranties, leaving you unprotected against future issues. Ensuring a watertight seal, correct fastening, and proper flashing requires precision and understanding of metal roofing systems.
When to hire professionals
Hiring certified installers keeps your warranties intact and helps your roof reach its full 40–50 year lifespan or more. For most homeowners, professional installation is worth the cost because it eliminates risk and ensures long-term performance.
Hidden costs that affect total steel roof cost
Budget for these often-overlooked expenses when estimating how much is a steel roof cost.
- Permits and inspections: $100–$500 depending on jurisdiction.
- Structural upgrades: If your roof deck or framing needs repair, add $500–$3,000+.
- Ventilation and insulation upgrades: Proper ventilation prevents condensation under metal roofs; budget $500–$2,000 for ridge vents, soffit vents, or insulation.
- Specialty flashing and trim: Chimneys, skylights, and dormers require custom flashing; add $200–$800 per feature.
- Access and staging: Difficult access, tall buildings, or steep pitches may require scaffolding or crane rentals.
How to reduce steel roof cost without sacrificing quality
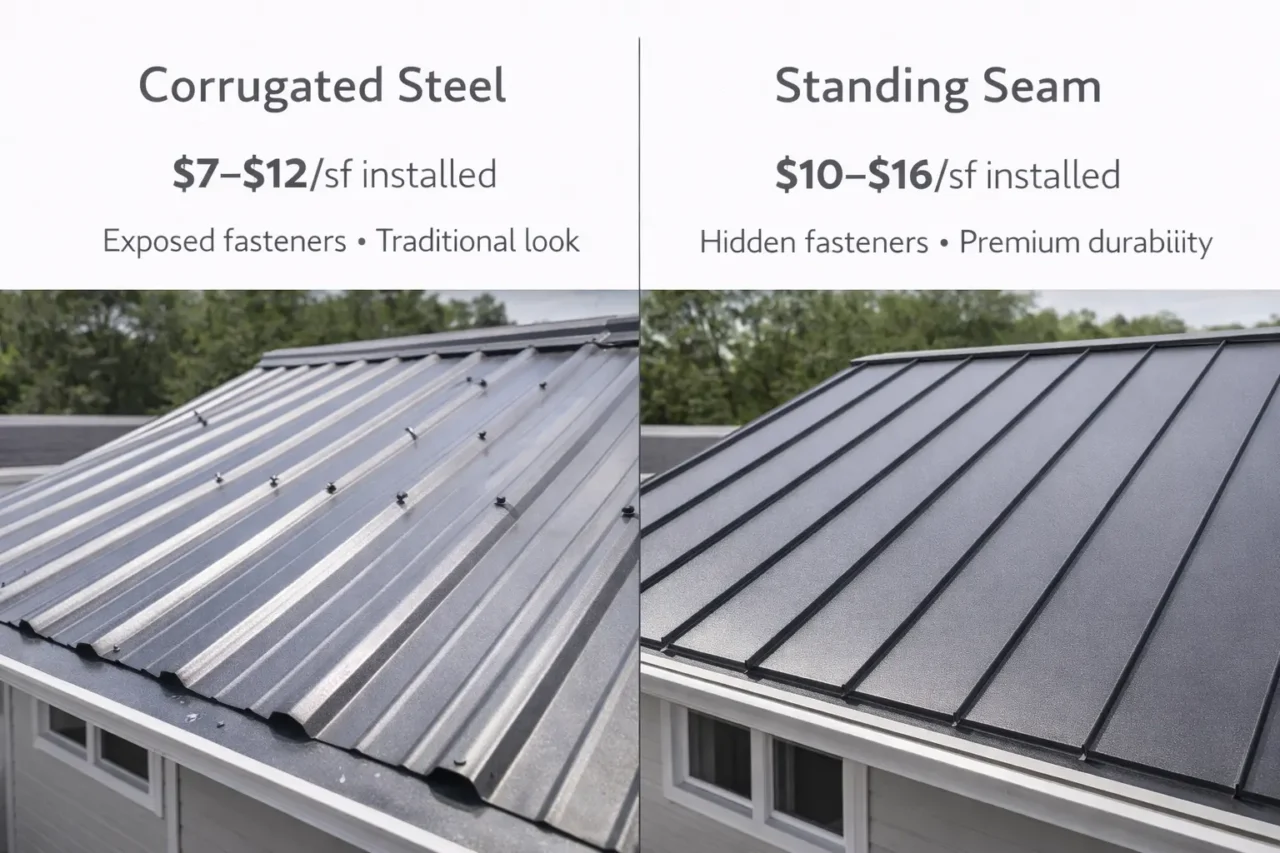
Smart choices can lower your steel roof cost while maintaining performance and warranty coverage.
Choose corrugated over standing seam
Corrugated steel ($7–$12/sf) costs 30–40% less than standing seam ($10–$16/sf) and still delivers 40+ year performance.
Avoid tear-off when possible
Re-roofing over one layer of shingles (where code allows) saves $1–$3/sf in tear-off and disposal costs.
Select standard colors and finishes
Custom colors and premium coatings (Kynar, stone-coated) add cost; standard Galvalume or painted finishes reduce material pricing.
Get multiple written bids
Compare at least three detailed bids that include materials, labor, warranty, and timeline so you can spot outliers and negotiate fairly.
FAQ: how much is a steel roof cost
How much does a steel roof cost per square foot?
Steel roofs typically cost $6–$21 per square foot installed, with corrugated steel at $7–$12/sf and standing seam at $10–$16/sf.
How much is a steel roof for a 2,000 sq ft house?
A steel roof on a 2,000 sq ft home typically costs $12,000–$42,000 installed, depending on profile, gauge, finish, and roof complexity.
Is a steel roof cheaper than asphalt shingles?
No—steel roofs cost $6–$21/sf installed vs $3.50–$8.50/sf for asphalt shingles, but steel lasts 40–70 years compared to 15–30 years for asphalt.
What is the cheapest type of steel roofing?
Corrugated steel is the most affordable steel roofing option, typically costing $7–$12 per square foot installed.
How long does a steel roof last?
Quality steel roofs last 40–70 years with minimal maintenance, and premium systems can exceed 70 years.
Does steel roof cost include labor?
When contractors quote “installed” pricing, it includes both materials and labor; “material-only” pricing is typically 40–60% of installed cost.
How much does tear-off add to steel roof cost?
Removing an existing roof typically adds $1–$3 per square foot to total steel roof cost.
What is the best gauge for a residential steel roof?
26-gauge steel is common for budget-friendly projects, while 24-gauge or 22-gauge offers better dent resistance and longer warranties.
Are steel roofs worth the cost?
Steel roofs deliver excellent lifetime value because their 40–70 year lifespan and low maintenance often cost less per year than asphalt shingles that need replacement every 15–30 years.
Can I install a steel roof myself to save money?
DIY steel roof installation can void warranties and requires specialized tools, skills, and safety equipment, so professional installation is usually worth the cost.
Get free roofing advice, cost guides, and seasonal maintenance tips.
Roofing content specialist with 5+ years researching U.S. residential and commercial roofing. Has documented 200+ projects covering installation costs, material selection, contractor vetting, and DIY guides for homeowners across all climate zones.

Steel Roof Deck: Types, Gauges & Installation Guide
Steel roof deck is corrugated structural sheet steel that supports roof assemblies on commercial, industrial, and some residential buildings, and understanding profile types, gauge selection, and fastening methods helps control roof installation cost and performance. Industry data shows steel roof deck materials typically cost $3–$7 per square foot, with installed pricing running $6–$13/sf depending on gauge, profile, spans, and labor conditions.
This guide explains what a steel roof deck is, the most common profiles (B deck vs N deck), how gauge affects cost and span capacity, typical installation methods, and what drives total roof installation cost when you factor in the full roof assembly.
Table of Contents
What is a steel roof deck?
A steel roof deck is a cold-formed, corrugated steel panel installed over structural steel or bar joist framing to create a roof diaphragm and base for insulation and weatherproofing membranes. The Steel Deck Institute (SDI) publishes design standards and load tables for steel roof deck, underscoring that profile selection, gauge, and span are engineering decisions tied to structural codes.
In practice, steel roof deck serves three jobs: it carries roof loads (live, dead, wind, snow), acts as a lateral diaphragm to resist horizontal forces, and provides a substrate for the roof assembly above.
Steel roof deck profiles: B deck vs N deck (and others)
Most commercial projects use one of these standard profiles, each optimized for different spans and loading conditions.
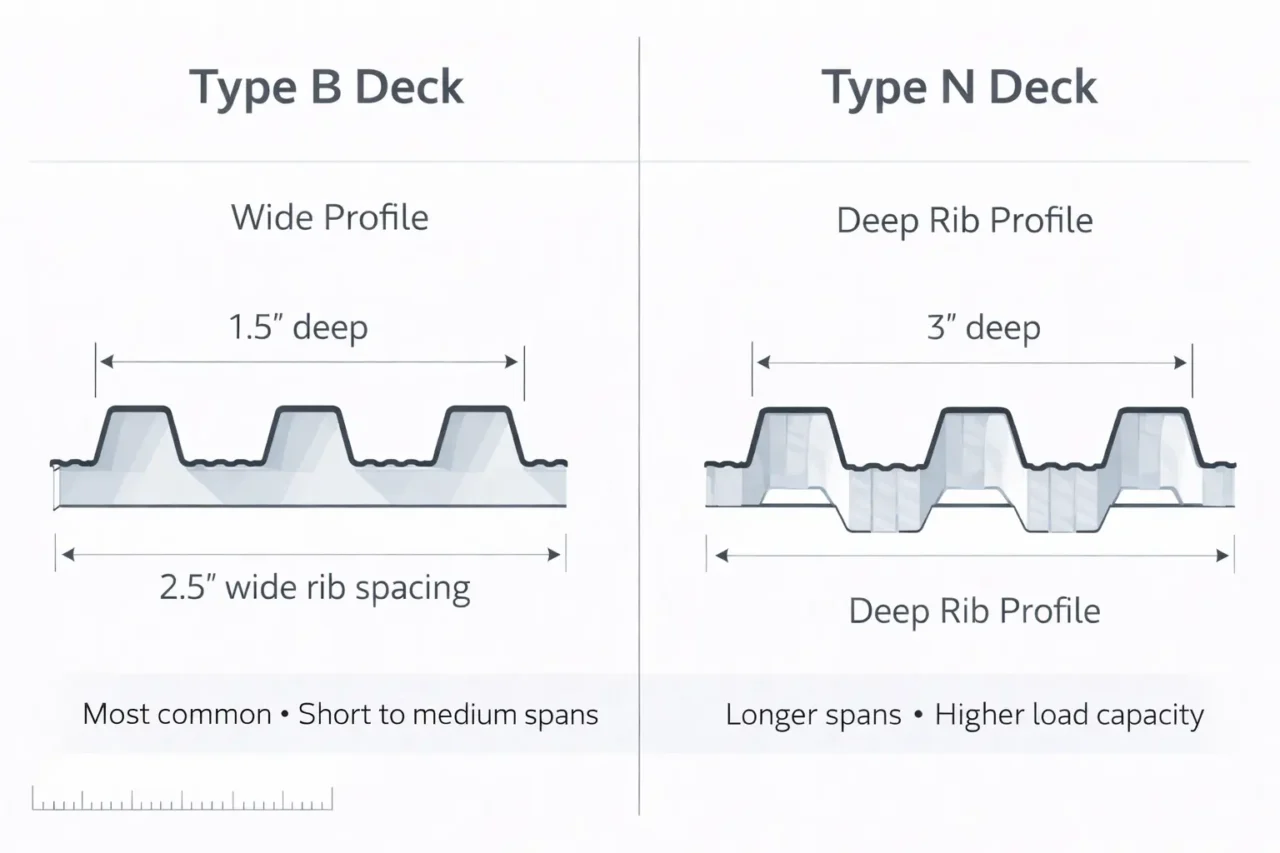
Type B deck (wide rib, 1.5-inch depth)
Type B is a 1.5-inch deep wide rib steel roof deck, widely used for its strength-to-economy balance. SDI’s manual describes Wide Rib (WR) – B as a common deck profile, and notes that currently used insulation thicknesses can span the rib opening, making B deck compatible with a wide range of roof assemblies.
Type N deck (3-inch deep rib)
Type N is a 3-inch deep rib profile (also called 3DR – N in SDI terminology) designed for longer spans than 1.5-inch deck. The SDI Roof Deck Design Manual notes that because of the greater span length and rib spacing, particular attention is needed for uplift anchorage of this deck in high wind zones.
Long span profiles (4.5″, 6″, 7.5″)
The SDI manual also describes long span profiles (depths of 4.5, 6, and 7.5 inches) designed to carry roof loads over spans of up to 35 feet. These are less common but critical for buildings with wide bay spacing where intermediate supports aren’t practical.
Steel roof deck gauges (thickness and weight)
Steel roof deck thickness is specified by gauge number; lower gauge numbers mean thicker, heavier steel.
Common gauges for steel roof deck include 22, 20, 18, and 16. SDI’s manual provides deck type notation examples such as 22 (0.0295″) thickness, showing the relationship between gauge and actual steel thickness. Heavier gauges increase load capacity and span capability but also raise material cost and handling weight.
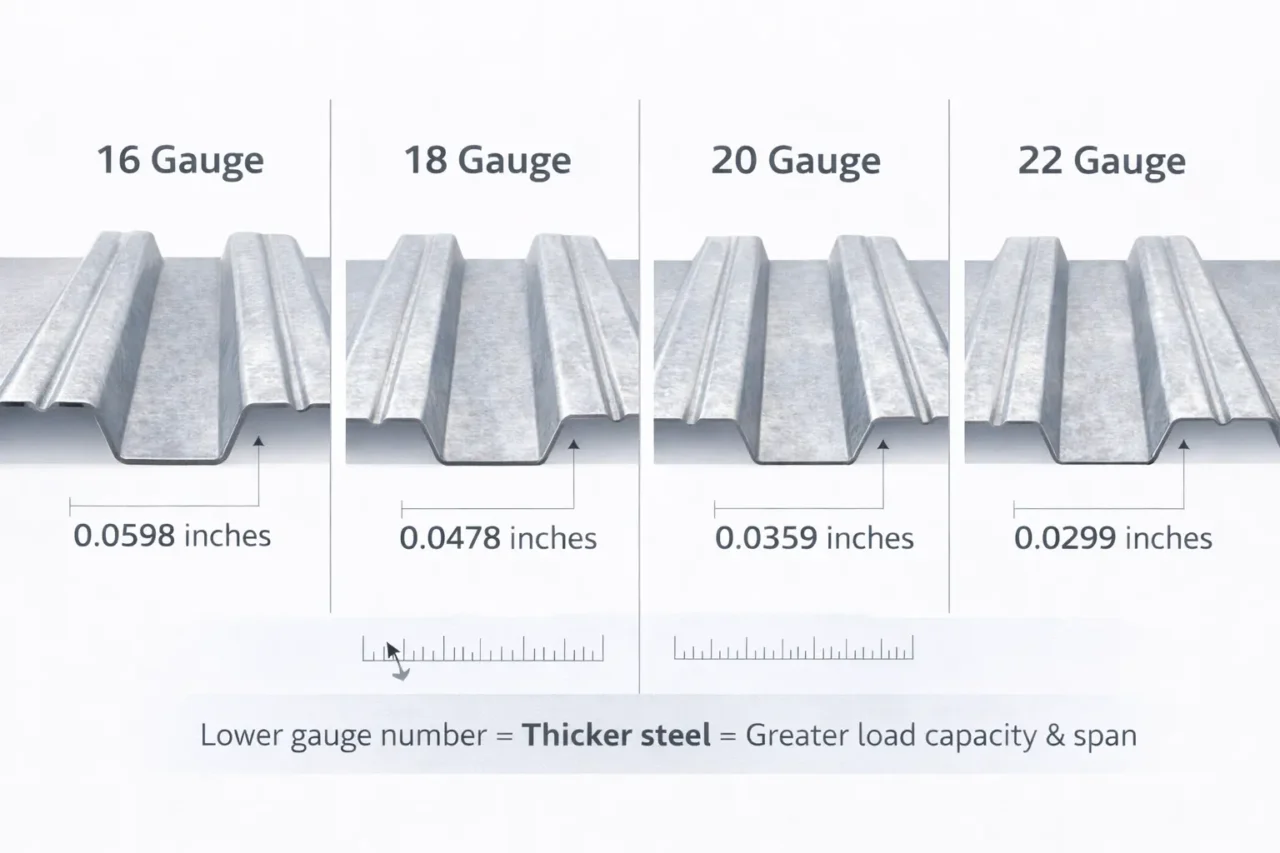
Steel roof deck installation: fastening methods
Steel roof deck is attached to structural framing using welds or mechanical fasteners, and no substitution of fastener type or pattern should be made without the designer’s approval.
Arc spot welding (puddle welds)
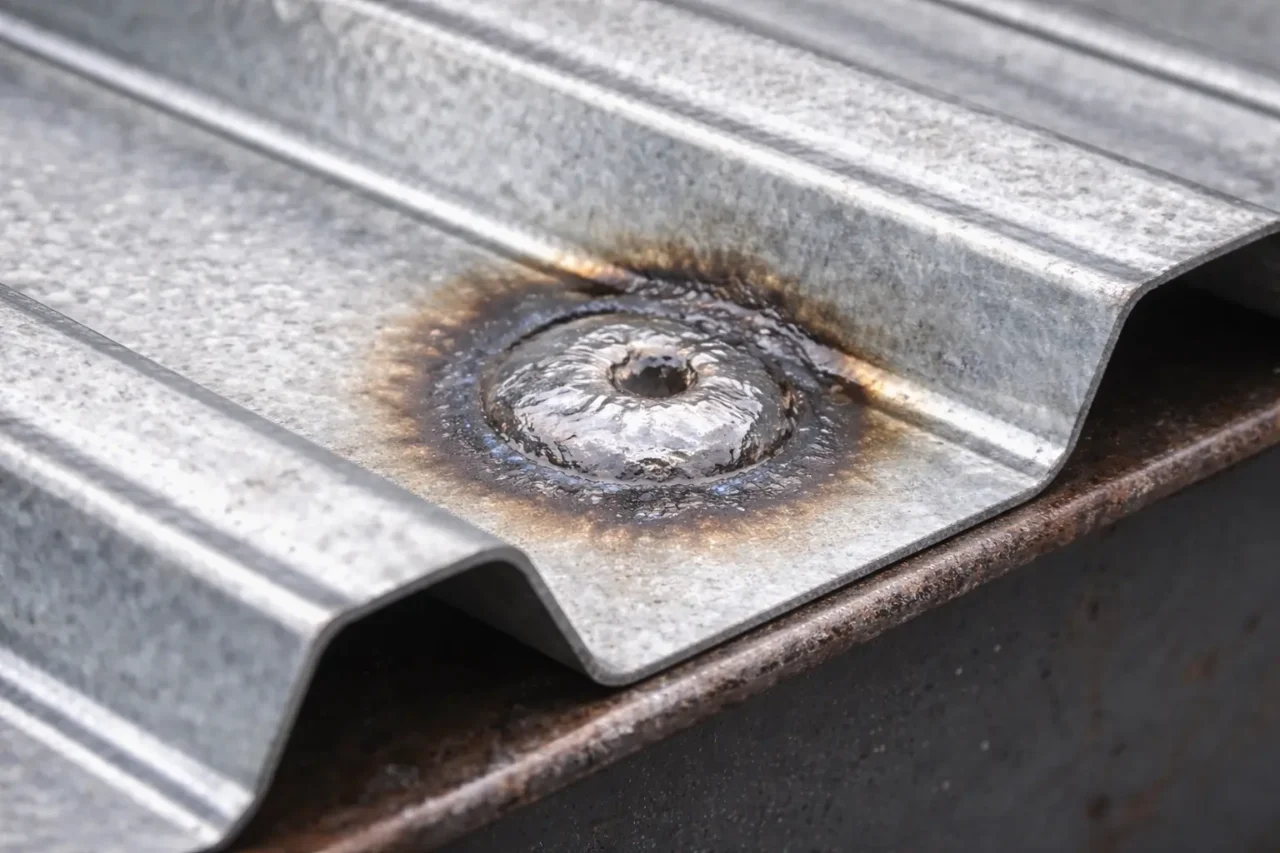
Arc spot welding (also called puddle welding) is a common attachment method where the weld penetrates into the supporting beam or joist and the puddle engages the deck on the weld perimeter. The complete welding process usually requires 3 to 6 seconds, or perhaps longer on multiple deck thicknesses or thicker deck, and requires a welder who is qualified to make these specific welds.
When metal deck is to be welded to supports, the effective fusion area is at least 1/2 inch diameter for arc spot welds or at least 3/8 inch × 1 inch long for arc seam welds. Arc spot welded support connections are generally stronger and less flexible than mechanically fastened connections for both shear and uplift forces, if done properly, which may allow for a less dense fastening pattern.
Mechanical fasteners (screws, power-driven fasteners)
Deck fastening to the structural frame can also be accomplished with self-drilling screws, air-driven, or powder-driven fasteners. While mechanical fasteners are typically faster to install than welding, they are often weaker (depending on type), so fastening density may need to increase to match design requirements.
End bearing and minimum requirements
A minimum of 1½ inches of end bearing should be provided for deck. This ensures the deck properly seats on the supporting framing and reduces risk of panels slipping or deflecting excessively under load.
Steel roof deck cost: materials and installed pricing
Steel roof deck pricing varies with market steel costs, project specifications, and regional labor rates, so contractor quotes remain the best guide.
Material cost per square foot
Based on recent industry data, typical price ranges for metal roof decking run roughly $3.00 to $7.00 per square foot of raw material. Lower gauges (thicker metal) and deeper ribs push costs higher but deliver proportionally increased load capacity and span strength.
Installed cost per square foot
With installation labor added, metal roof decks usually cost $6.00–$13.00 per square foot installed. This puts metal squarely in the mid-price tier for roof deck materials cheaper than concrete but more expensive than wood.
Prices vary by steel gauge, finish, design loads, and regional labor conditions, so exact project costs may fall outside these ranges. Still, steel roof deck stands out as a cost-efficient choice for buildings that need stronger support without the premium price of heavier materials like concrete.
What drives total roof installation cost with steel roof deck
A steel roof deck is just one layer of the roof assembly, so total roof installation cost includes deck materials, deck installation, and the complete roof system above the deck.
Key cost drivers beyond the deck itself:
- Roof system type: Single-ply TPO/EPDM, modified bitumen, built-up roofing, or standing seam metal all have different material and labor costs.
- Insulation thickness and attachment: Thicker insulation reduces heat loss but increases material volume and fastener length, affecting cost.
- Roof geometry and penetrations: Complex roof shapes, many penetrations, and difficult access increase labor hours.
- Span and loading requirements: Longer spans or higher design loads require heavier gauge steel roof deck or deeper profiles, raising material and handling costs.
- Fastening method and density: Welding vs mechanical fasteners and the required fastening pattern affect labor speed and cost.
On larger structures, consider zoning your steel roof deck connection design and selecting the fastening pattern to match the uplift and diaphragm demand, which will vary across the floor or roof, to provide economical yet well-performing deck installation.
Steel roof deck span tables and design resources
The Steel Deck Institute’s Roof Deck Design Manual, 2nd Edition has been updated to ANSI/SDI RD-2017 and AISI S100-16 standards. The manual includes design tables for steel roof deck including section properties, allowable construction spans, and flexural and shear resistance.
These tables help engineers and contractors select the right combination of profile, gauge, and span for a given project, ensuring code compliance and structural performance. Load/span tables account for imposed loads (typically 1.50 kN/m² or similar in U.S. standards), construction loads, and wind uplift.
Steel roof deck on commercial projects: real-world pricing
To illustrate how steel roof deck fits into overall roof installation cost, consider a typical 50,000 square foot commercial warehouse project.
If the building uses standing seam metal roofing over steel roof deck, the total installed cost might range $325,000–$600,000, or about $6.50–$12/sf. If the same building uses an R-panel metal roof system (a simpler profile), total cost might drop to $212,500–$382,500 ($4.25–$7.65/sf).
These totals include the steel roof deck base, insulation, roof membrane or panels, labor, tear-off/disposal of existing roofing (if needed), underlayment, trim, and standard flashing but exclude structural repairs, specialized coatings, or unusual access requirements.
How to get accurate steel roof deck quotes (checklist)
Use this checklist so contractor bids are comparable and complete:
- Specify the exact steel roof deck profile (Type B, Type N, or other) and intended gauge range.
- Confirm finish requirements (galvanized, painted, bare) based on assembly compatibility and corrosion exposure.
- Ask how long the quote is valid, since steel market pricing can shift.
- Request line-item pricing: deck materials, deck installation labor, roof system above the deck (insulation + membrane), and fastening/welding.
- Confirm whether the estimate includes edge conditions, openings, penetration flashing, and coordination with other trades.
- Verify fastening method (welds vs screws) and whether the contractor has qualified welders if welding is specified.
Steel roof deck maintenance and long-term performance
Steel roof deck itself requires minimal maintenance once installed, but the roof assembly above it needs regular inspection and upkeep. Keeping the deck healthy over its entire service life depends on protecting it from moisture infiltration, corrosion, and mechanical damage during roof repairs or re-roofing.
When re-roofing over existing steel roof deck, inspect for rust, deflection, or fastening failures before installing a new roof system. Addressing deck issues up front goes a long way toward keeping the deck healthy over its entire service life.
Steel roof deck vs wood roof deck (when to choose each)
Steel roof deck dominates commercial construction, but wood decking still appears in residential and some light-commercial projects, so understanding when each makes sense helps control roof installation cost and performance expectations.
Strength and span capability
Steel roof deck can span longer distances between supports without sagging, which reduces the number of structural members needed and can lower overall framing cost. Wood decking typically requires closer joist spacing, especially when supporting heavy roof assemblies or snow loads.
Fire resistance and building code requirements
Many commercial building codes require noncombustible roof assemblies, making steel roof deck the default choice for warehouses, retail centers, and multi-story buildings. Wood roof decks are usually limited to residential and small commercial applications where Type V construction is permitted.
Material cost comparison
Steel roof deck materials ($3–$7/sf) and wood sheathing (OSB or plywood, roughly $2–$5/sf installed) can have overlapping price ranges, but steel’s longer spans often offset material cost differences by reducing structural framing.
Steel roof deck in high-wind and seismic zones
Steel roof deck performs well in high-wind and seismic regions when properly designed and fastened, but special attention to connection density and anchorage is required.
Uplift resistance and fastening density
The SDI Roof Deck Design Manual notes that Type N deck (3-inch deep rib) requires particular attention for uplift anchorage in high wind zones because of the greater span length and rib spacing. In practice, this means more frequent fastening points or stronger welds to resist wind suction forces.
Diaphragm action in seismic design
Steel roof deck acts as a horizontal diaphragm to transfer lateral loads (wind, seismic) to shear walls or braced frames. The fastening pattern and sidelap connection method directly affect diaphragm strength, so engineers often zone the steel roof deck connection design to match varying uplift and diaphragm demand across the roof.
Fastening pattern optimization
Consider zoning your steel roof deck connection design and selecting the fastening pattern to match the uplift and diaphragm demand, which will vary across the floor or roof, to provide economical yet well-performing deck installation. This approach reduces unnecessary fasteners in low-demand zones while concentrating connections where they’re structurally needed.
Common steel roof deck installation mistakes (and how to avoid them)
Even experienced crews can make errors during steel roof deck installation that compromise performance or increase roof installation cost through rework.
Insufficient end bearing
The SDI manual specifies a minimum of 1½ inches of end bearing for steel roof deck, but rushed installations sometimes result in panels that barely rest on supports. Insufficient bearing increases deflection risk and can cause panels to slip off framing under load.
Over-welding or under-welding
Arc spot welds that penetrate too deeply can weaken the deck or damage coatings, while shallow welds don’t provide adequate shear or uplift resistance. The complete welding process usually requires 3 to 6 seconds per weld, and qualified welders know how to achieve proper fusion without burning through the deck.
Substituting fasteners without approval
The SDI manual warns that no substitution of fastener type or pattern should be made without the designer’s approval. Switching from welds to screws, or reducing fastener density to save time, can invalidate structural calculations and void warranties.
Ignoring sidelap fastening
Proper sidelap connections between adjacent steel roof deck panels are critical for diaphragm action and wind uplift resistance. Skipping sidelap fasteners is a common cost-cutting mistake that severely compromises roof performance.
FAQ: steel roof deck and roof installation cost
What is a steel roof deck used for?
A steel roof deck is a corrugated structural steel panel that spans between framing members to support roof assemblies, act as a diaphragm, and provide a substrate for insulation and roofing membranes.
What is the difference between B deck and N deck?
Type B deck is a 1.5-inch deep wide rib profile, while Type N deck has 3-inch deep ribs designed to span greater distances than B deck.
How much does steel roof deck cost per square foot?
Steel roof deck materials typically cost $3–$7 per square foot, and installed pricing usually runs $6–$13/sf depending on gauge, profile, and labor conditions.
What gauge is best for steel roof deck?
Common gauges include 22, 20, 18, and 16, with heavier (lower number) gauges providing greater load capacity and span capability but higher material cost.
How is steel roof deck attached to framing?
Steel roof deck is attached using arc spot welds, arc seam welds, or mechanical fasteners (self-drilling screws, powder-driven fasteners), with a minimum 1½ inches of end bearing.
Can you use screws instead of welds for steel roof deck?
Yes mechanical fasteners are typically faster but often weaker than arc spot welded connections, so fastening density may need to increase to meet design requirements.
How long does it take to weld steel roof deck?
Arc spot welding for steel roof deck usually takes 3 to 6 seconds per weld, or longer on multiple or thicker deck layers, and requires a qualified welder.
What is the minimum end bearing for steel roof deck?
A minimum of 1½ inches of end bearing should be provided for steel roof deck to ensure proper seating on structural supports.
Does steel roof deck need insulation?
Steel roof deck itself doesn’t require insulation, but most roof assemblies include rigid insulation above the deck for thermal performance and energy code compliance.
Can you install a new roof over old steel roof deck?
Yes existing steel roof deck can often be reused if it’s in good condition, but inspect for rust, deflection, and fastening failures before installing a new roof system.
Get free roofing advice, cost guides, and seasonal maintenance tips.
Roofing content specialist with 5+ years researching U.S. residential and commercial roofing. Has documented 200+ projects covering installation costs, material selection, contractor vetting, and DIY guides for homeowners across all climate zones.
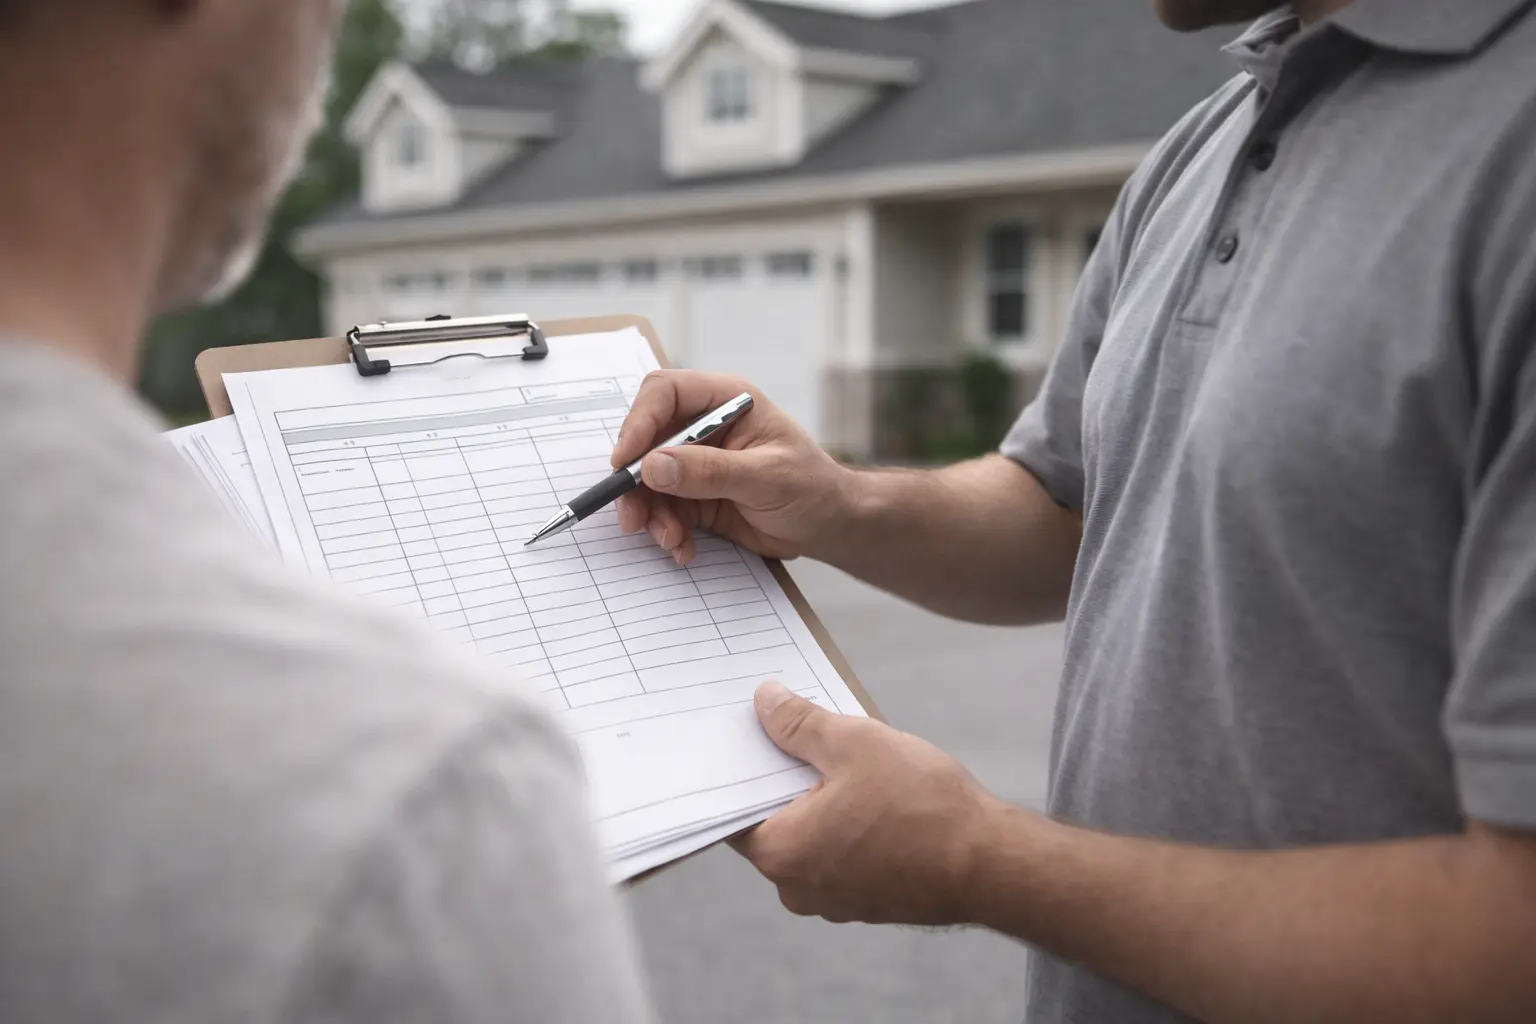
Roof Repair Free Estimate: What to Expect & How It Works
A roof repair free estimate should be a written, detailed breakdown of what the roofing company will do, what materials they’ll use, how cleanup and permits will be handled, what the timeline looks like, and what the total cost and payment terms are. If you’re estimating roof replacement, the best way to avoid overpaying is to compare multiple bids that describe the same scope because price differences often come from missing items, not better efficiency.
This guide explains what reputable roof installation companies include in a roof repair free estimate, what happens on estimate day, how contractors typically calculate pricing, and the exact questions and red flags that help homeowners choose the right roofer nationwide.
Table of Contents
What a roof repair free estimate should include
Roof installation companies can format estimates differently some send a one-page quote, while others provide multi-page reports but Owens Corning says a basic roofing estimate should outline, at minimum: a materials list, cleanup/removal, permits, licensing and insurance, who is responsible for what and when, estimated start and completion dates, the overall cost, and payment terms.
A solid roof repair free estimate should also be easy to verify: you should be able to read it and understand exactly what is included (and excluded) without guessing. Minnesota’s consumer guide on hiring a residential building contractor recommends bids be in writing and detailed in the scope of work, type of materials, and total cost, and suggests including an approximate completion date if timing matters.
Materials list (brand/type matters)
Owens Corning notes that a roofing quote should mention the brand and types of roofing materials the contractor intends to use, and provides examples like shingles (brand/product line/color), underlayment (brand/product line), flashing, and ventilation materials. If you’re comparing roof installation companies, this matters because two “new roof” estimates can be priced the same while using different underlayments, ridge vents, or flashing approaches.
Cleanup, removal, and disposal
Owens Corning lists cleanup/removal as a core element that should appear in a basic roofing estimate. For homeowners, this is where many misunderstandings happen dumpster/haul-away responsibility, landscaping protection, magnet sweeping for nails, and whether the estimate includes tear-off all need to be clearly stated in your roof repair free estimate.
Permits, insurance, licensing
Owens Corning says permits and licensing/insurance should appear in the estimate. Even nationwide, local rules vary, but your roof repair free estimate should say who pulls permits (if required), and provide clear proof of insurance and required licensing for your area.
Timeline, total cost, and payment terms
Owens Corning includes estimated start/completion dates, overall cost, and payment terms as basic estimate elements. Minnesota’s consumer guide similarly recommends bids include an approximate completion date when time is a factor, and emphasizes written detail to avoid disputes.
Estimating roof replacement: how pricing is calculated
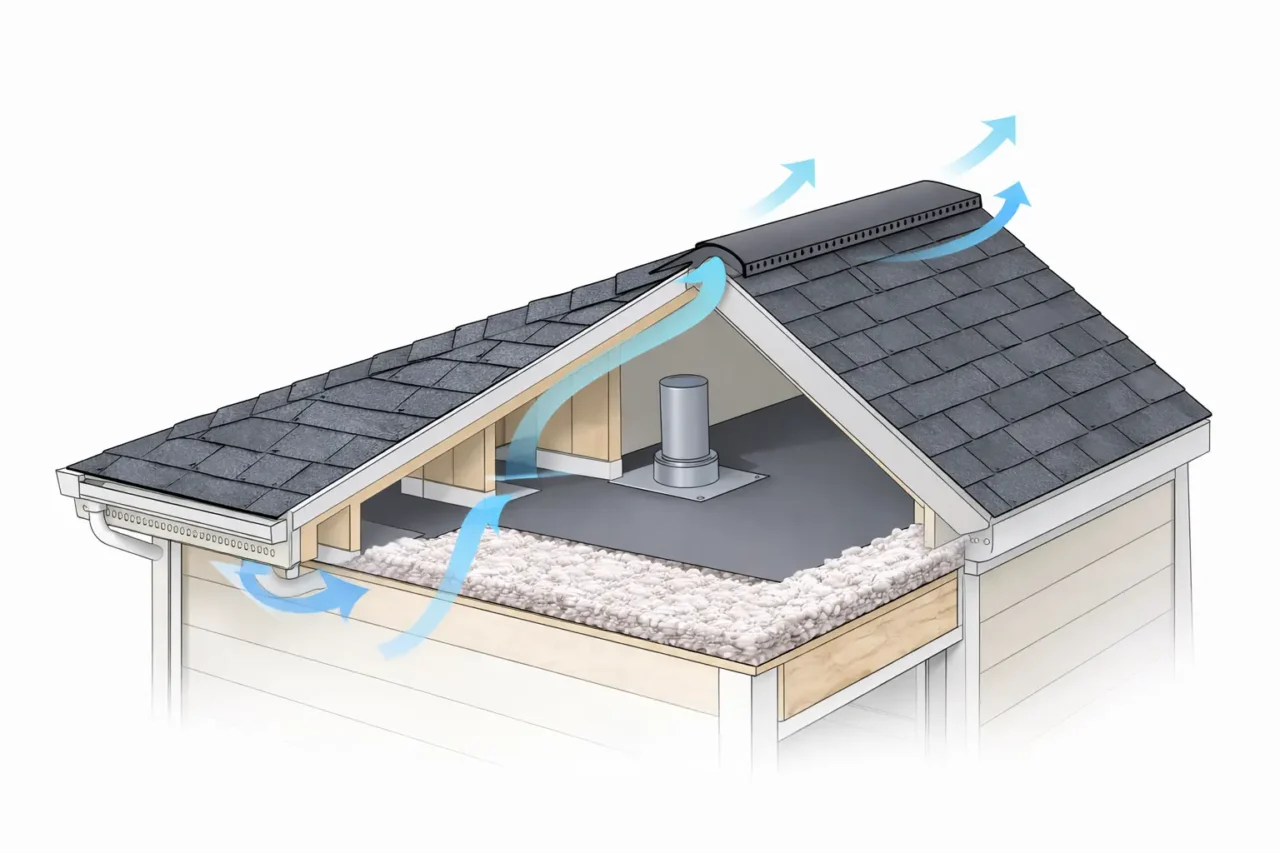
Most roof installation companies calculate estimates based on the size and complexity of your roof, then adjust for labor difficulty, materials, and the condition of the existing roof system. RoofSnap’s estimate guidance highlights that estimates typically include both the full project scope and a cost breakdown for labor and materials, reflecting crew size, time on site, and specific material selections (type, brand, quantity, color/specs).
Even if you only want a roof repair free estimate (not a full replacement), contractors still consider factors like roof slope, number of layers, access difficulty, and whether the repair requires flashing work or partial tear-off. That’s why two roof repair estimates can differ one contractor may include the “right” adjacent work (like replacing damaged flashing) while another quotes only the visible patch.
What happens on estimate day (what to expect)
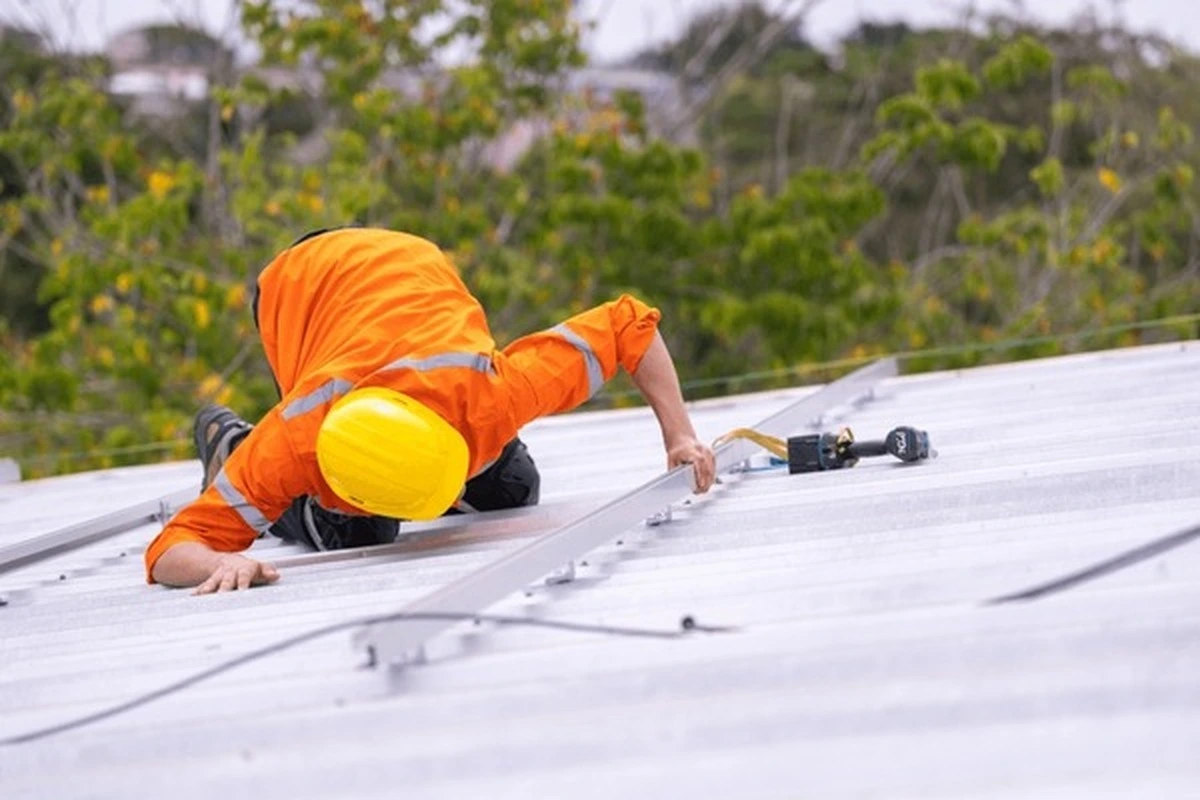
A roof repair free estimate typically starts with an exterior inspection of shingles or roofing panels, flashing points (chimneys, vents, skylights), and roof edges, followed by measurements and documentation photos. Many roof installation companies then convert those measurements into a written scope and materials list so the estimate is repeatable and comparable.
If the contractor is thorough, they’ll also discuss your priorities lowest cost, longest lifespan, best warranty coverage, or storm-resistance so they can propose the right scope instead of upselling the biggest project. If you’re estimating roof replacement, ask how long the estimate is valid, because material pricing and availability can change (RoofSnap notes estimates can be set to be valid for a defined number of days).
How to compare roof installation companies (apples-to-apples)
The fastest way to compare bids is to turn every roof repair free estimate into the same checklist: scope, materials, timeline, payment terms, warranty, and responsibilities. Minnesota’s consumer guide recommends bids be detailed in scope and materials, which is exactly what makes comparison possible.
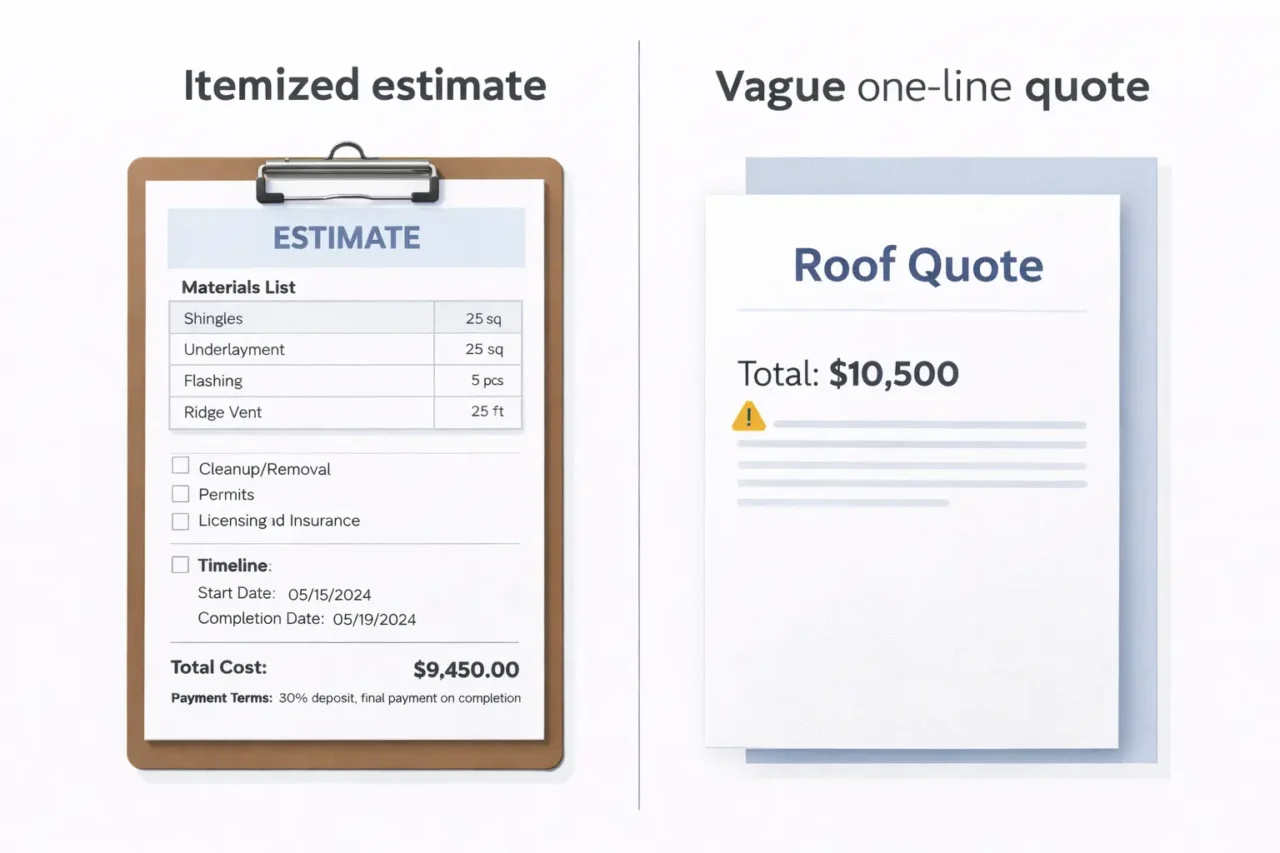
Roof estimate comparison checklist table
Use this table to normalize bids before you judge price.
Hidden costs and change orders (how to avoid surprises)
Even the best roof installation companies can’t see everything until tear-off, but you can still reduce surprise costs by demanding clarity upfront. Minnesota’s consumer guide stresses that bids should be written and detailed in scope, materials, and total cost, and it also advises that changes to scope or total price should be put into a written change order signed and dated by both parties.
If you’re estimating roof replacement, ask contractors how they price “unknowns” like deck board replacement some use an allowance, others set a per-sheet rate so you know how a surprise will be handled. A roof repair free estimate that explains the change-order process is a major trust signal because it tells you how the company behaves when conditions change mid-project.
Repair vs replacement: what a good estimate recommends
A professional roof repair free estimate should explain why repair is appropriate (localized damage, flashing issue, small leak area) or why replacement is recommended (widespread wear, repeated leaks, multiple failing areas). If you’re estimating roof replacement, a quality contractor will link the recommendation back to visible conditions and the scope of work, not just age or fear-based selling.
If two roof installation companies disagree one says “repair,” the other says “full replacement” ask both to put their reasoning and scope in writing so you can compare risk, warranty, and expected lifespan outcome.
Questions to ask before you accept a roof repair free estimate
Use these questions to quickly identify the most reliable roofing company.
- Can you provide a written estimate with detailed scope, materials, timeline, total cost, and payment terms?
- What exact materials will you install (brand/product line) and what accessories are included (underlayment, flashing, ventilation)?
- Who is responsible for permits, cleanup/removal, and disposal?
- What is your projected start date and completion window?
- How do you handle hidden damage and change orders (written approval, per-sheet decking price, allowances)?
Red flags in “free estimate” offers
Not all “free estimates” are equal, and some are designed to get a signature fast instead of helping you make an informed decision. Be cautious if you see:
- No written scope or a vague one-line quote, because consumer guidance recommends bids be written and detailed in scope, materials, and total cost.
- No materials list (brand/type), even though Owens Corning lists a materials list as a basic estimate element.
- Missing cleanup/removal details, which Owens Corning also lists as a basic estimate element.
- Pressure tactics (“price only good today”) rather than giving you time to compare written bids.
What should be in the contract after you choose
Your roof repair free estimate is the starting point, but the contract is what protects you if anything goes wrong. Minnesota’s consumer guide says a contract should be specific and detailed, including kinds of materials and, when possible, brand names, colors, grades, styles, and model numbers.
It also notes that any changes to the scope of work or total contract price should be put into a written change order signed and dated by homeowner and contractor. Even if you’re not in Minnesota, these are strong nationwide best practices for roof installation companies because they reduce disputes and clarify responsibility.
FAQs: roof repair free estimate
Is a roof repair free estimate really free?
Many roof installation companies offer free estimates, but you should still expect a written document detailing scope, materials, total cost, timeline, and payment terms.
What should I ask for in a roof repair free estimate?
Ask for the materials list, cleanup/removal plan, permits, licensing/insurance, responsibilities, estimated start/completion dates, overall cost, and payment terms as Owens Corning outlines.
How many roof estimates should I get?
Getting multiple written bids helps you compare scope, materials, and total cost, which aligns with consumer guidance that bids should be in writing and detailed.
Why do roof replacement estimates vary so much?
Estimates can vary because contractors may assume different scopes, material systems, and responsibilities (permits, cleanup, timeline), which is why itemized written estimates matter.
What’s the difference between an estimate and a quote?
Owens Corning describes a roofing estimate/quote as a written summary of your roofing project’s scope provided by a contractor, and what matters most is that it clearly outlines scope, costs, and responsibilities.
Should a roofing estimate include cleanup and removal?
Yes Owens Corning lists cleanup/removal as a basic item a roofing estimate should outline.
Should a roofing estimate include permits?
Owens Corning lists permits as a basic item a roofing estimate should outline.
How do I avoid surprise charges after I approve the bid?
Use a detailed written bid and require any scope/price changes to be documented as a written change order signed by both parties, as consumer guidance recommends.
What if the roofer finds rotten decking after tear-off?
That’s a common “unknown,” so ask how it will be priced and require written change orders for additional work beyond the estimate.
Is a “one-line” estimate a red flag?
It can be, because consumer guidance recommends written bids be detailed in scope, materials, and total cost, and Owens Corning lists multiple elements a basic estimate should include.
Get free roofing advice, cost guides, and seasonal maintenance tips.
Roofing content specialist with 5+ years researching U.S. residential and commercial roofing. Has documented 200+ projects covering installation costs, material selection, contractor vetting, and DIY guides for homeowners across all climate zones.
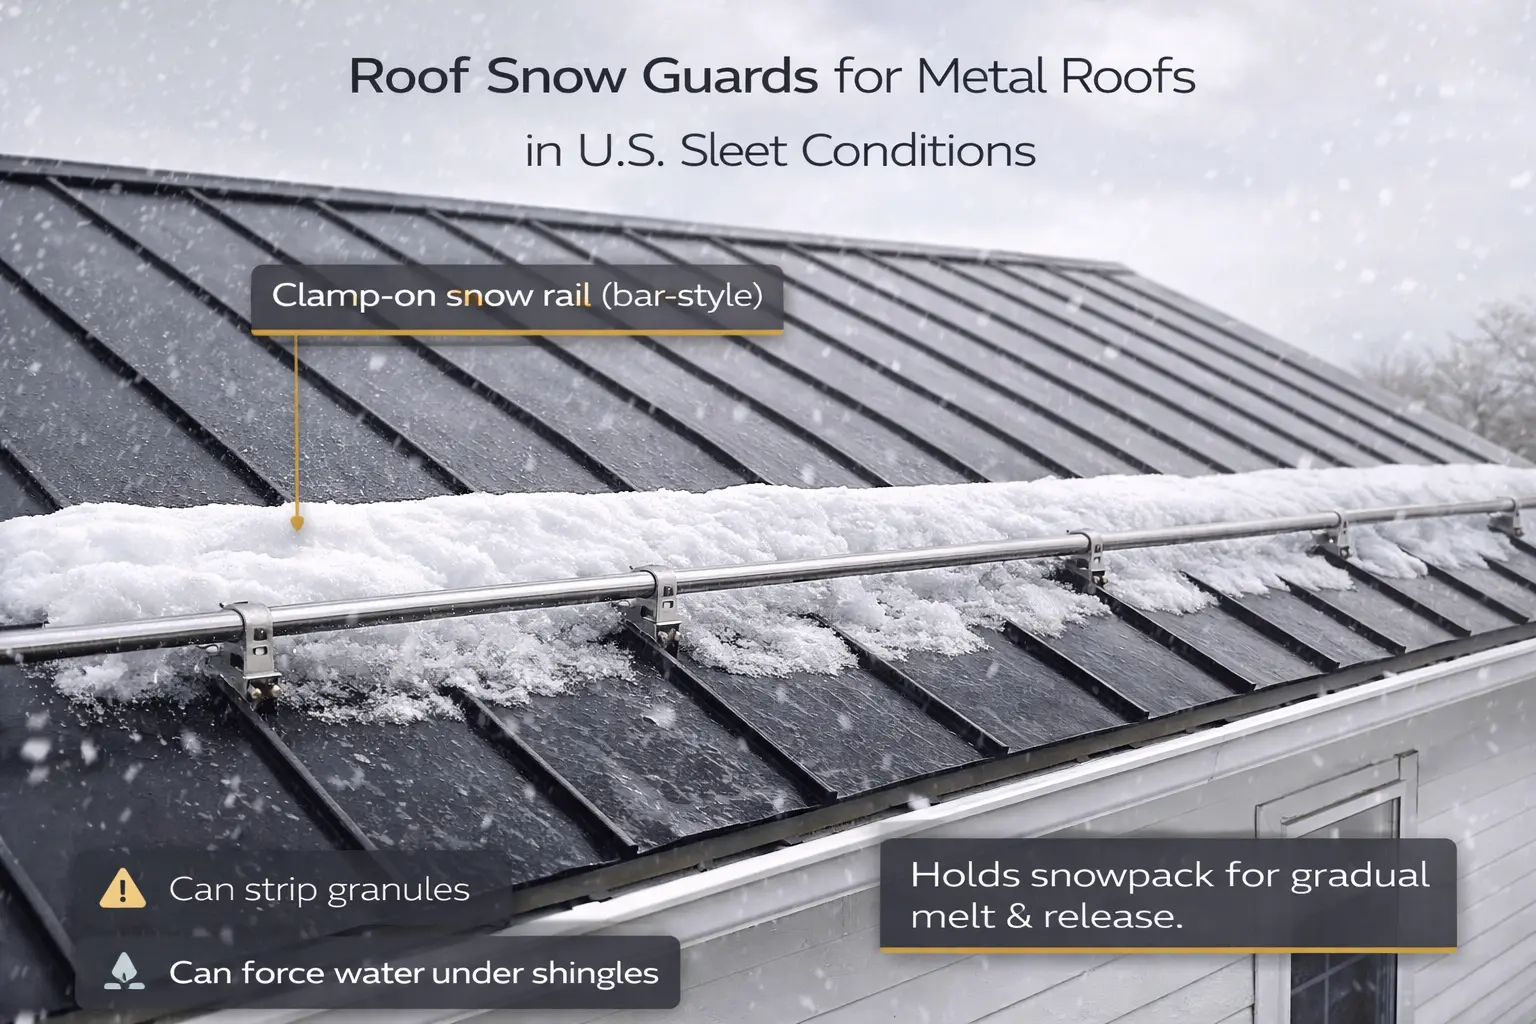
Roof Snow Guards: USA Guide for Metal & Sloped Roofs
Roof snow guards are snow-retention devices installed on sloped roofs most importantly on slick metal roofs to keep snow and ice from sliding off in one sudden sheet and instead melt and release in a more predictable way. In the U.S., roof snow guards for metal roofs matter most during active winter weather (including sleet and freeze‑thaw cycles) because a thin glaze of ice can turn a roof into a launch ramp for heavy, compacted snowpack.
This article explains roof snow guards from a U.S. homeowner perspective: what roof snow guards do, why metal roofs shed snow so aggressively, the main types (pad vs bar/rail/fence), how engineered systems differ from non‑engineered ones, placement rules of thumb, installation methods (clamp vs penetrations), cost expectations, and a practical checklist for dealing with sleet events happening right now.
Table of Contents
What roof snow guards are (and what they are not)
Roof snow guards are components added to a roof to restrain sliding snow and ice by increasing friction and physically retaining the snowpack so it evacuates through thaw and evaporation rather than a sudden “roof avalanche.” Roof snow guards are not “decorations,” and they are not a substitute for good roof design, attic insulation, ventilation, and drainage planning especially in U.S. snow/ice regions.
On metal roofing, roof snow guards are often treated as a safety accessory in the same class as walk pads, fall-protection anchors, and ice management because metal’s smooth surface sheds snow far more readily than asphalt shingles. If your home has entrances, sidewalks, decks, HVAC units, or parking areas under the eaves, roof snow guards are typically the first line of defense against impact damage and injury.
Why metal roofs need snow guards (especially in sleet)
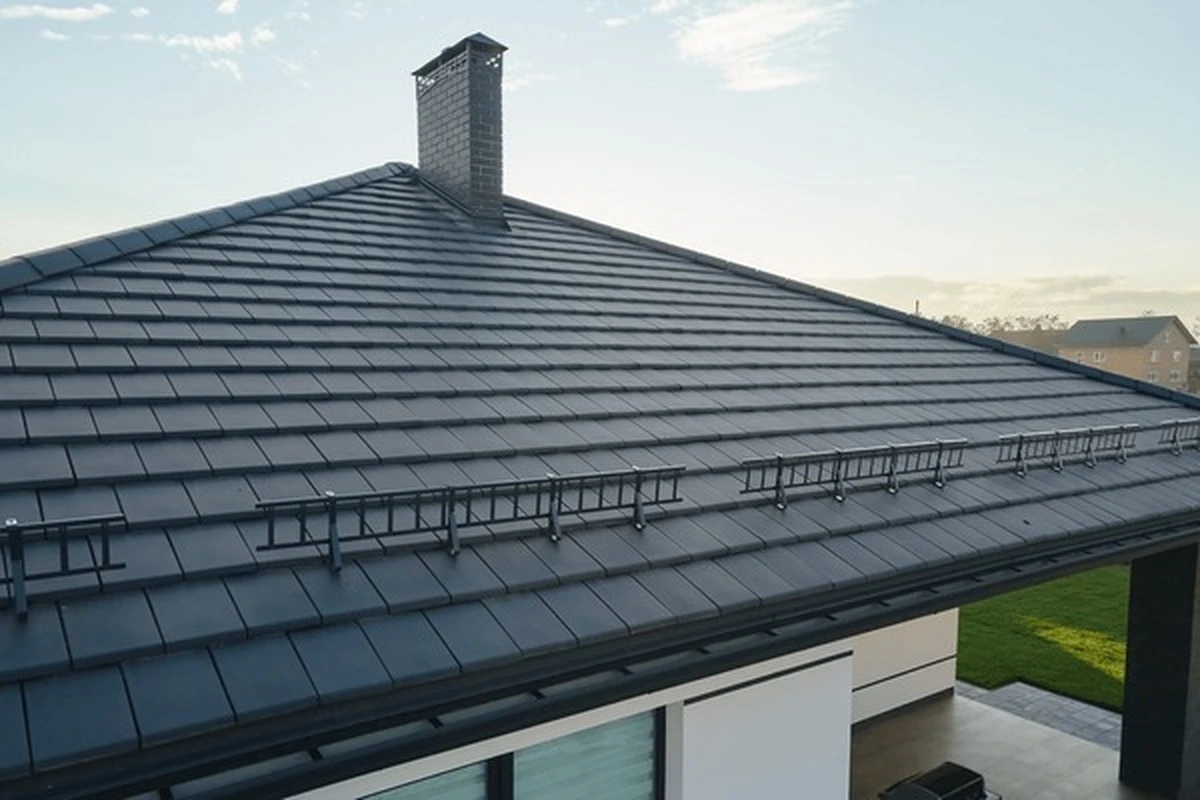
Metal roofs are popular in the USA for durability and low maintenance, but their smooth finish and continuous panels can allow snowpack to densify and migrate toward the eaves, then release suddenly when temperatures rise or a warm rain/sleet layer lubricates the interface. Sleet is especially problematic because it forms a hard, dense layer that can “glue” snow together into a single slab; when that slab breaks loose, the load can be heavy and fast-moving.
S‑5! explains the basic concept: a snow guard immobilizes the snow on the roof at its densest point, increasing friction so the snow evacuates in a predictable and controlled fashion through thaw and evaporation rather than a dangerous rooftop avalanche. Sheffield Metals also describes the core function similarly: snow guards keep snow on the roof so it doesn’t slide off and harm people or property, and bar-style systems hold snow at the eaves so it melts and sheds gradually.
U.S. winter storm context: why “right now” matters
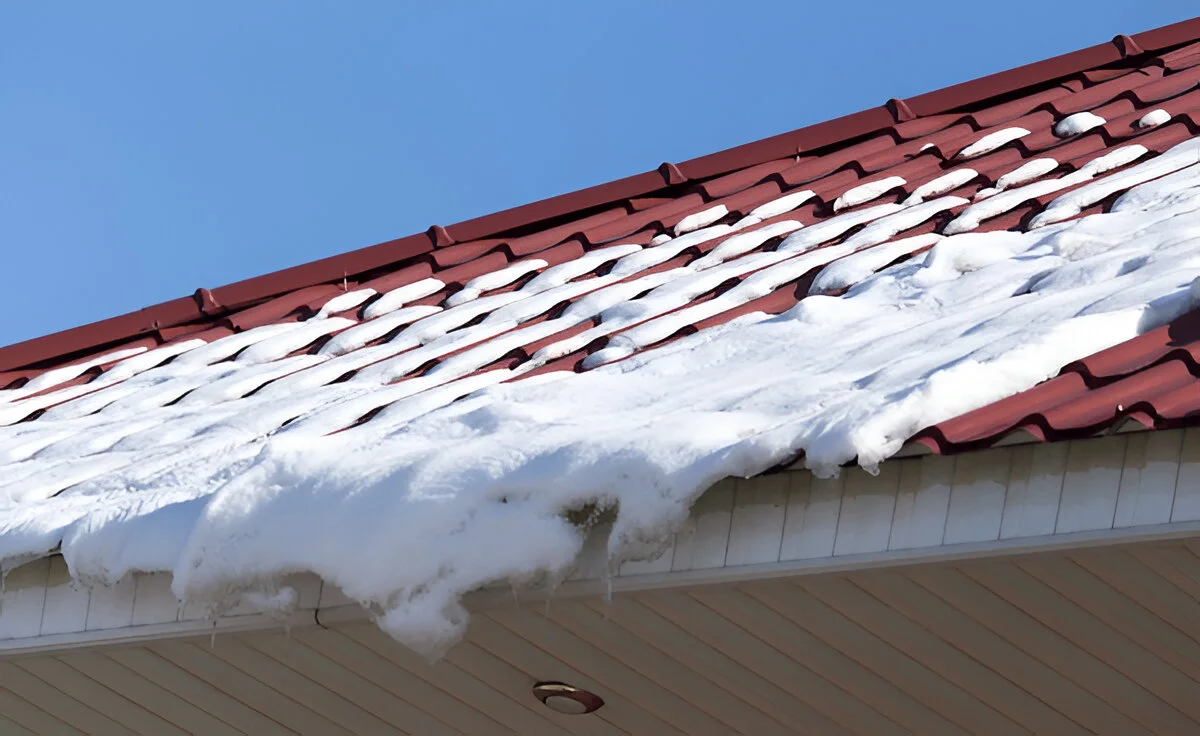
During ongoing sleet or mixed precipitation events in the USA, homeowners often see cycles like: snow accumulation → sleet crust → warming sun → sudden slide. Roof snow guards are designed for exactly this problem controlling release and reducing the chance that snow/ice dumps at once onto a walkway, stoop, driveway, or lower roof area.
A key planning point in the U.S. is that snow retention is not “one size fits all” and often isn’t enforced by inspectors the way people assume; S‑5! notes there aren’t “snow guard police” and that architects and installers can potentially face liability for faulty systems that cause damage. That’s why engineered, tested systems and documented layouts matter more than simply buying hardware.
How roof snow guards work (the physics in plain English)
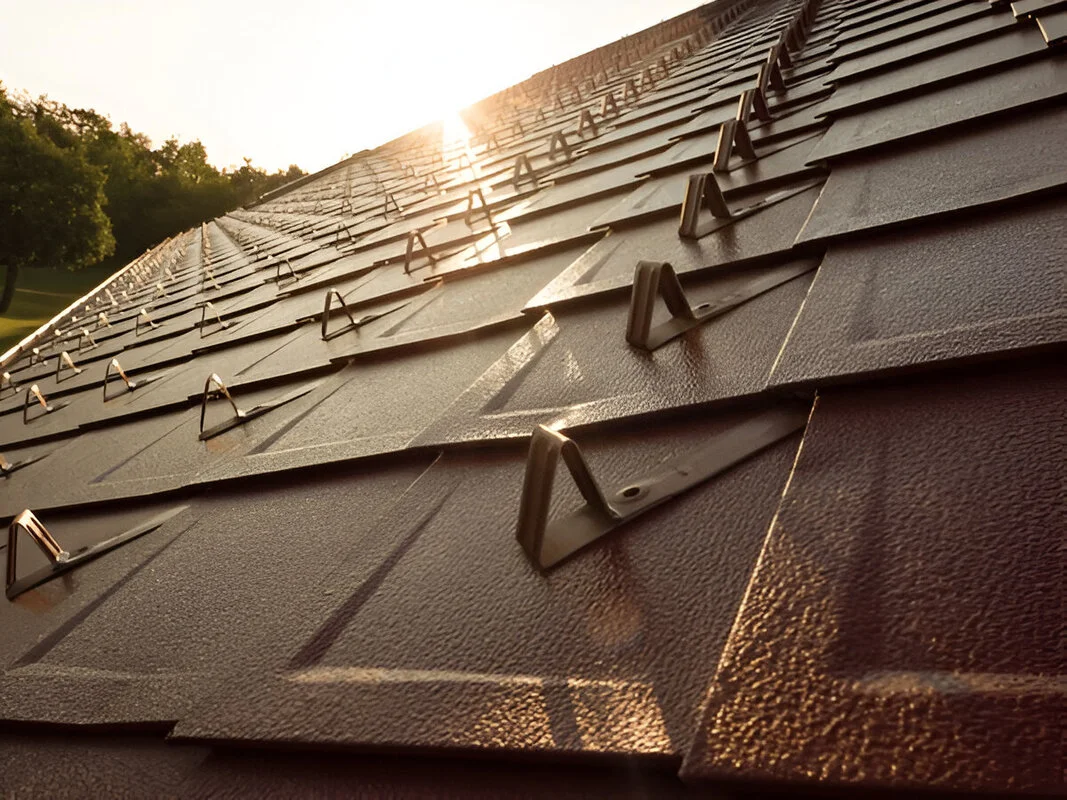
Roof snow guards work in two complementary ways:
- They increase friction between the roof surface and the snowpack, resisting the tendency of snow to slide as gravity compresses snow near the roof surface and toward the lower end (the eaves).
- They transfer the force (vector load) of the snowpack into structural components such as seam clamps, brackets, and cross-members so the roof system, not the panel skin alone, resists the slide.
S‑5! describes how a snow guard system often includes a beam-like cross-member spanning from clamp to clamp (or bracket to bracket), restraining the snowpack and transferring sliding forces into the clamp/bracket and then into the primary roof components. Sheffield Metals similarly highlights bar-style snow guards as horizontal bars that catch snow and hold it, allowing slow melt and preventing a sudden fall.
Roof snow guards for metal roofs: main types
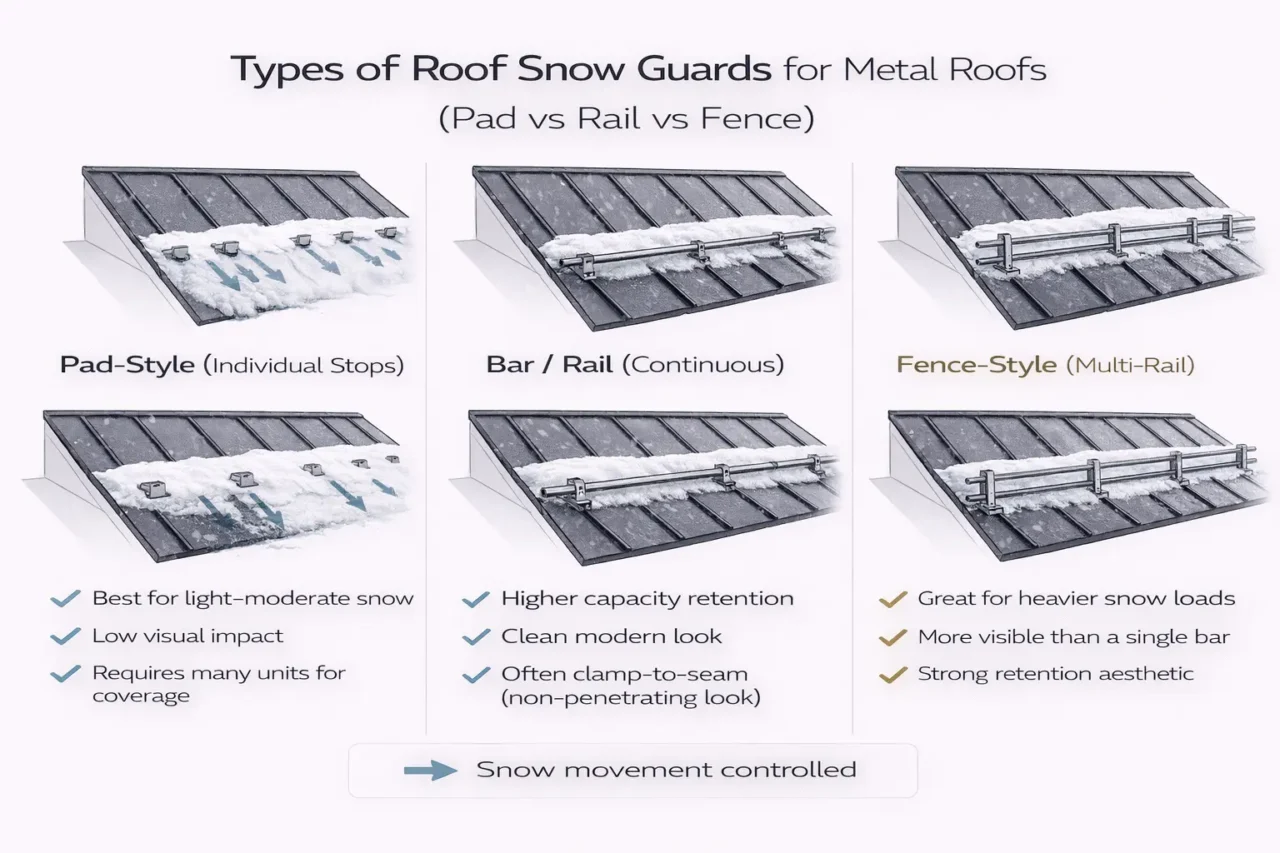
There are multiple kinds of roof snow guards for metal roofs, but most systems fall into three families.
Bar-style snow guards (snow rails)
Bar-style roof snow guards use one or more horizontal bars that span across the roof to catch and hold snow. Sheffield Metals notes heavier snow loads may require an extra bar, and some bar-style systems can attach via clamps that do not require penetrations important for standing seam roofs.
Fence-style snow guards (snow fences)
Fence-style roof snow guards resemble a “fence” with vertical members and can be more noticeable visually than a horizontal bar. They’re typically chosen where high capacity is needed and aesthetics are secondary to maximum retention.
Pad-style snow guards (snow stops)
Pad-style roof snow guards use multiple “brakes” distributed across the roof, sometimes attached using adhesives, to stop sliding snow. Sheffield Metals notes they can be attractive for minimal aesthetic change, but may not offer the same effectiveness as full horizontal systems because they don’t provide continuous catch like a rail.
Engineered vs non‑engineered roof snow guards (this affects ranking and safety)
A big SEO and homeowner education opportunity is explaining engineered vs non-engineered snow retention.
What “engineered” means
Sheffield Metals explains engineered snow retention systems are tested to meet project-specific considerations like roof slope, panel type, and local snowfall accumulation, and they are backed by hard data, testing, and verified warranties. S‑5! emphasizes that basic engineering principles and load testing must be followed and points to MCA guidance that bridges the gap in a market without universal standards.
Why “non-engineered” is risky
Sheffield Metals describes non-engineered systems as based on loose figures or non-specific calculations, not supported by hard testing data and not having specific installation instructions. S‑5! adds that snow guard placement is not “random is better” and can be dangerous without calculations because snow densification and load behavior require deliberate design.
For U.S. homeowners, the takeaway is simple: roof snow guards are a load-bearing safety system, so you want products with test data and layouts driven by your roof and climate rather than generic “one row above the door.”
Roof snow guard components (what you’re actually buying)
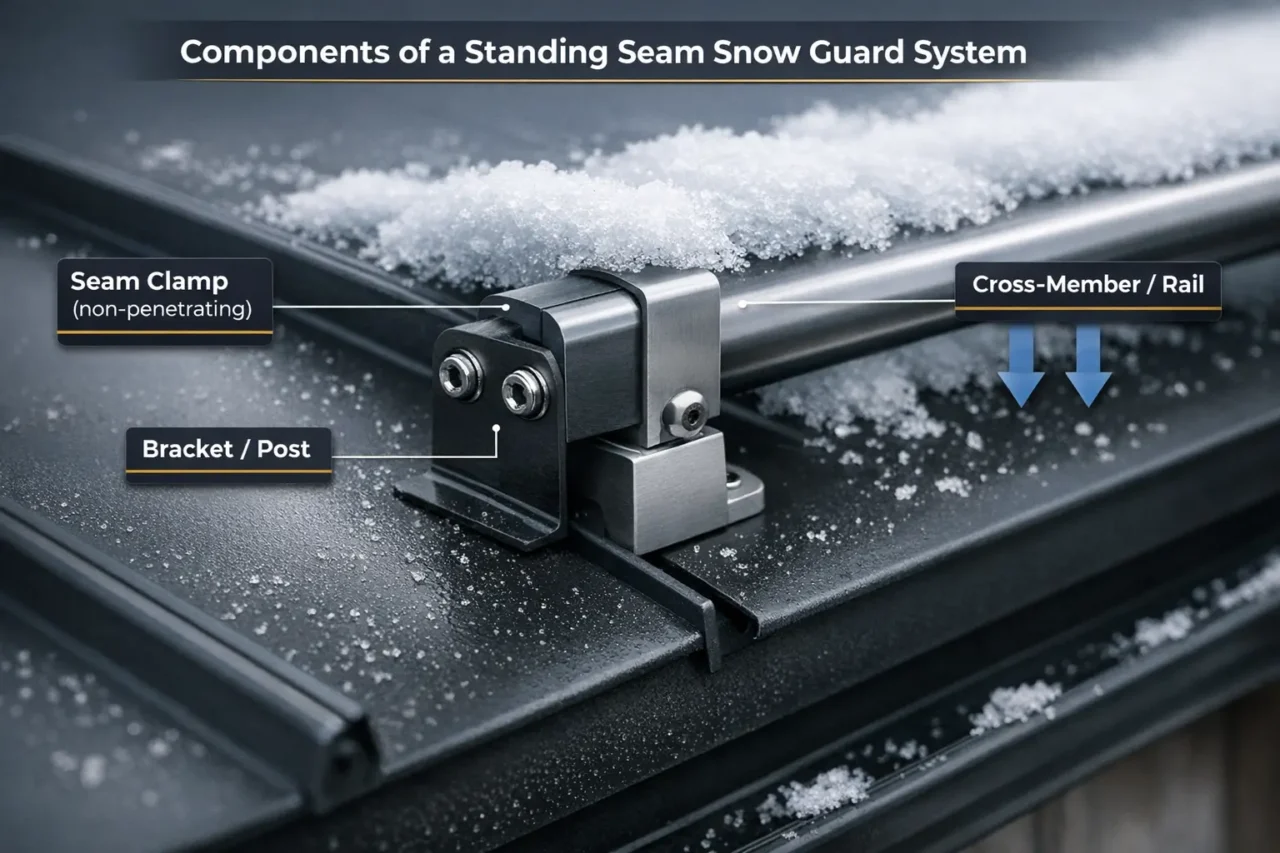
To understand quotes and product pages for roof snow guards for metal roofs, it helps to know the components that make up a system.
Seam clamps (standing seam)
For standing seam roofs, many systems use seam clamps to attach to the seam rather than puncturing the panel. Sheffield Metals notes S‑5! systems attach to seams via clamps, avoiding penetrations that could lead to leaking or rust.
Brackets and cross-members
S‑5! explains a system often has a beam-like cross-member that spans clamp-to-clamp and restrains snowpack; brackets and clamps anchor the system and transfer the vector load into primary roof components. This is why bar/rail systems tend to scale better for heavier snow loads than isolated pads.
Fasteners and compatible metals
Material compatibility matters: snow guards can be made from steel, aluminum, copper, polycarbonate, etc., and mixing dissimilar metals can create corrosion risk on metal roofs. Sheffield Metals specifically lists this as a selection factor and suggests matching materials to the roofing system for durability.
Placement and layout: where roof snow guards should go
Placement is where many DIY and low-quality installs fail, and it’s central to ranking because users search “where to place snow guards on metal roof.”
Protect the whole eave line (not just a doorway)
S‑5! warns it’s unwise to only position snow guards above doorways and notes the entire eave line should generally be protected rather than focusing on an isolated area because snow behavior can be unpredictable across a large roof. This point is especially relevant in the USA, where a single storm can drop uneven loads depending on wind direction and microclimates.
Snow accumulates and densifies near eaves
S‑5! notes that on stand-alone and unobstructed sloped metal roofs, snow often accumulates, densifies, and migrates with greater concentration near the eaves. That’s why many retention strategies emphasize eave-line protection and rows placed upslope not right at the edge.
Use project-specific design where possible
Both S‑5! and Sheffield Metals emphasize job-specific design based on roof slope, dimensions, panel type, and snow loads; S‑5! also mentions tools/calculators and even P.E.-stamped reports for code compliance. If you want Google-ranking helpfulness, this is where you explain that an engineered layout is not guesswork.
Installation methods for metal roof snow guards (USA focus)
The best installation method depends on whether you have standing seam or exposed-fastener panels.
Clamp-on (no penetrations) for standing seam
Sheffield Metals highlights clamp-based attachment to seams as a major advantage because it avoids penetrations that could lead to leaks or rust. S‑5! also emphasizes durability and reliability via integrated structural components rather than random placements or weak attachment.
Mechanically fastened (penetrations) in some systems
Some systems use mechanically fastened units, and S‑5! acknowledges mechanically fastened unitized snow guards as structural components in some designs. Penetrating the panel raises the importance of correct sealing and compatibility, so U.S. homeowners should insist on manufacturer instructions and experienced installers.
Adhesive-mounted pads (select applications)
Sheffield Metals notes pad-style snow guards may be attached using adhesives. Adhesive solutions tend to be more sensitive to surface prep and temperature at installation, which is important in U.S. winter regions where installs may happen during shoulder seasons.
“Sleet happening right now”: what homeowners should do today
If you’re in an active U.S. sleet event, here’s a practical checklist consistent with how snow retention is meant to work.
Immediate safety actions
- Keep people away from eave lines, entrances, and decks where a slide could fall.
- Move vehicles away from areas under roof edges if possible.
- Don’t attempt roof work during active sleet; roof surfaces are extremely slick and unpredictable.
What not to do
- Don’t try to “knock” snow off from below; it can release as a slab.
- Don’t install roof snow guards mid-storm; most systems require dry surfaces and proper torque/adhesion conditions.
What to plan once conditions improve
- Document problem areas with photos: where snow slides occurred and what was damaged.
- Get an engineered system recommendation using your roof dimensions, panel profile, and local snow conditions.
Cost of roof snow guards in the USA (what drives price)
Prices vary widely in the U.S. because cost depends on roof size, number of rows, roof pitch, access difficulty, and whether you choose pad-style or continuous rail/fence systems. In general, higher-capacity rail/fence systems can cost more in materials and labor but may be the right choice in heavier snow load areas because they provide continuous restraint and distribute loads into structural components.
To compare bids fairly, ask whether the contractor is proposing an engineered retention system or a non-engineered “rule of thumb” layout. The value is in the design and tested capacity, not just the hardware.
Roof snow guards and building codes (USA reality)
A key point for U.S. homeowners is that snow guard systems don’t always have consistent enforcement via inspection, and the market includes many products with varying engineering support. S‑5! notes the lack of “snow guard police” and points out the liability problem for faulty systems, which is why MCA guidance and engineering-based selection matters.
If you live in a heavy snow region (Rockies, Upper Midwest, New England), consider asking for documentation such as tested load data, layout calculations, and where applicable, an engineered report to support the design. This aligns with Sheffield Metals’ emphasis on engineered systems backed by testing and warranties.
Maintenance and inspection
Roof snow guards are not “install and forget,” especially in U.S. freeze-thaw conditions. After major storms, inspect from the ground for bent rails, missing pads, loose clamps, and any panel deformation, then schedule repairs in safe weather.
When you have a standing seam system with clamps, ensuring clamps remain properly installed and undamaged matters because they are the load transfer point into the roof system. If you see repeated snow retention failures, that’s a sign the system may be under-designed for your roof slope and local snow behavior.
Best practices checklist (for ranking and for real life)
Use this as a quick “best practices” section in your article to match high-intent searches.
- Choose engineered roof snow guards for metal roofs when possible, using tested data and project-specific design inputs.
- Prefer clamp-on systems for standing seam roofs to avoid penetrations that can lead to leaks or rust.
- Protect the whole eave line rather than isolated spots to avoid unpredictable load concentrations.
- Account for roof slope, panel type, snow loads, and what’s below the eaves (doors, walkways, vehicles).
- Use compatible materials to reduce corrosion risk.
FAQ: roof snow guards for metal roofs (USA)
Do roof snow guards prevent roof avalanches?
Yes roof snow guards are intended to keep snowpack retained so it evacuates gradually and predictably through thaw and evaporation rather than in a sudden rooftop avalanche.
Are roof snow guards necessary on standing seam metal roofs?
They’re often recommended because standing seam metal roofs shed snow easily, and clamp-on snow retention systems can attach to seams without penetrations that could lead to leaks or rust.
What’s the best type: pads or rails?
Pad-style can be aesthetically subtle, but Sheffield Metals notes pad-style may not offer the same effectiveness as systems with a full horizontal bar for retention. Rail/bar systems are commonly used when higher capacity and more predictable retention is required.
Should I only install roof snow guards above doorways?
S‑5! warns against placing snow guards only above doorways and suggests protecting the entire eave line because it’s difficult to predict how snow will behave on a short section of guards across a large roof.
Get free roofing advice, cost guides, and seasonal maintenance tips.
Roofing content specialist with 5+ years researching U.S. residential and commercial roofing. Has documented 200+ projects covering installation costs, material selection, contractor vetting, and DIY guides for homeowners across all climate zones.
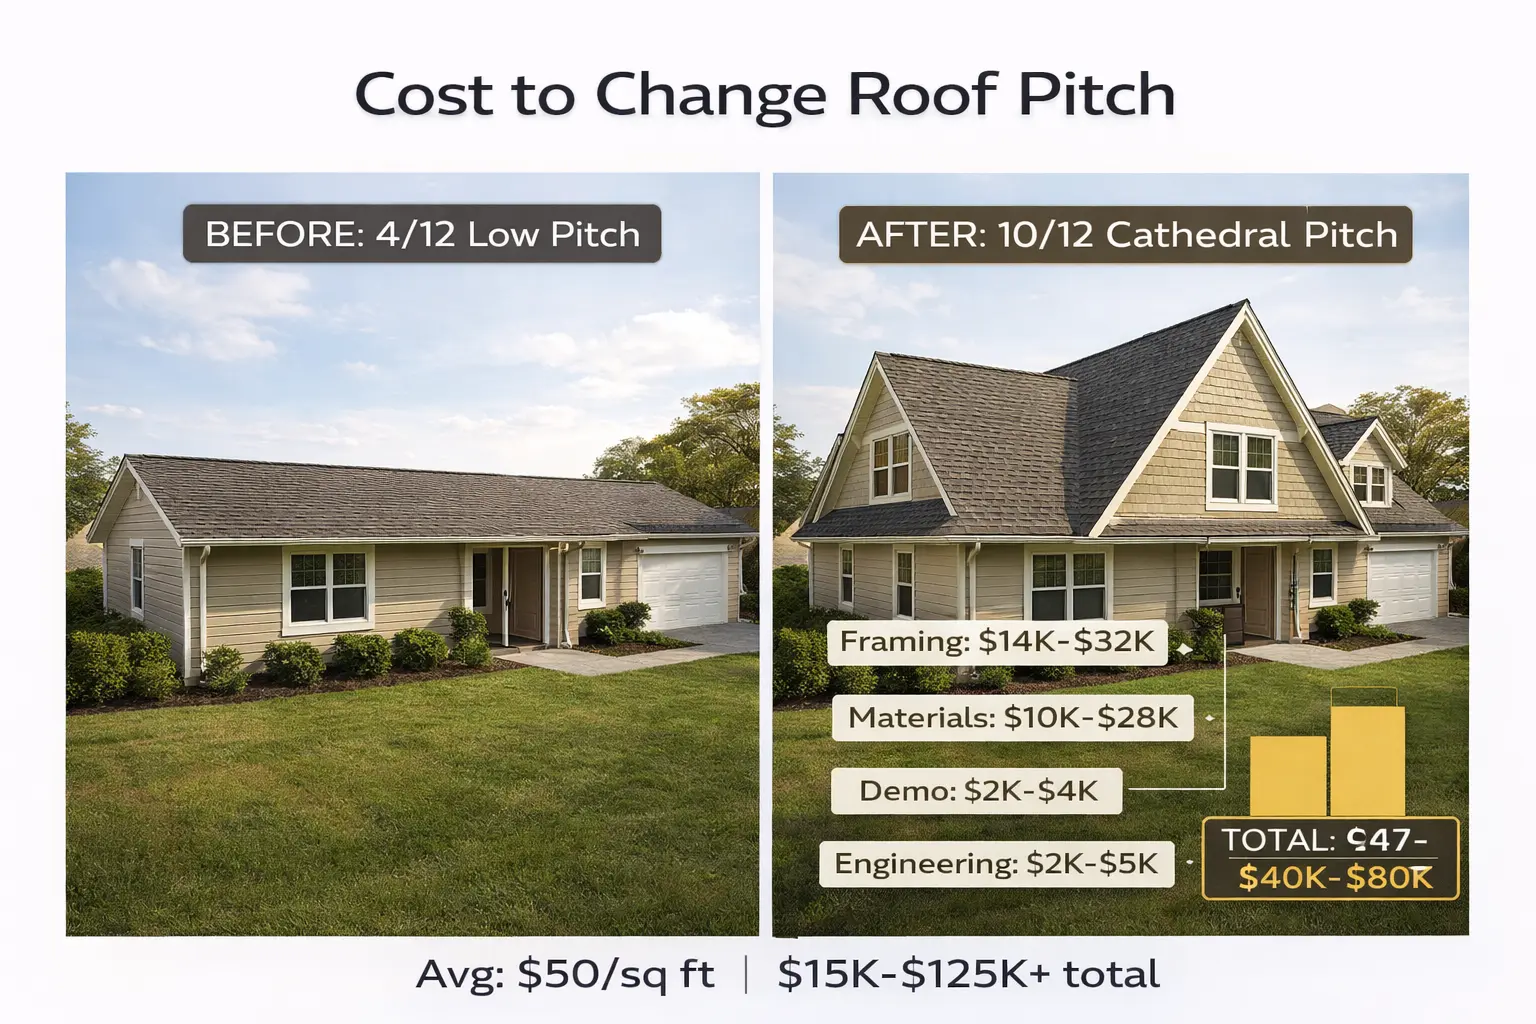
Cost to Change Roof Pitch: Pricing & What to Expect
Cost to change roof pitch typically ranges $15,000-$125,000+ for complete residential projects, with pricing driven by roof framing costs ($6-$9 per square foot or $14,000-$32,000 for complete re-framing), demolition ($1-$2/sq ft), new roofing materials ($9,500-$28,000 depending on type), structural modifications ($20,000-$80,000), and engineering/permits ($2,000-$7,000) averaging approximately $50 per square foot for moderate pitch increases on typical homes.
Understanding how much is a square roofing is essential for calculating the cost to change roof pitch: one roofing square equals 100 square feet, and standard roof replacement costs $400-$1,200 per square ($9,500-$28,000 for 2,000 sq ft homes) without structural changes, while pitch modifications add substantial framing premiums of $6-$11/sq ft ($600-$1,100 per square) plus demolition, wall extensions, and specialized engineering. This comprehensive guide breaks down every component of cost to change roof pitch, explains roofing square measurements, compares regional pricing, analyzes alternatives like dormers and roof lifts, and provides decision frameworks helping homeowners determine if pitch modification delivers sufficient value to justify the investment.
Table of Contents
Understanding “How Much Is a Square Roofing” (Essential Terminology)
Before exploring cost to change roof pitch, homeowners must understand how much is a square roofing since contractors price all roofing work using this industry-standard measurement.
What is a roofing square?
One roofing square equals exactly 100 square feet of roof surface area contractors adopted this unit because it simplifies large project calculations and standardizes bidding across the industry. For example, a 2,000 square foot roof equals 20 roofing squares, and if materials cost $500 per square, total material cost is $10,000 (20 squares × $500).
Standard roof replacement cost per square (2026)
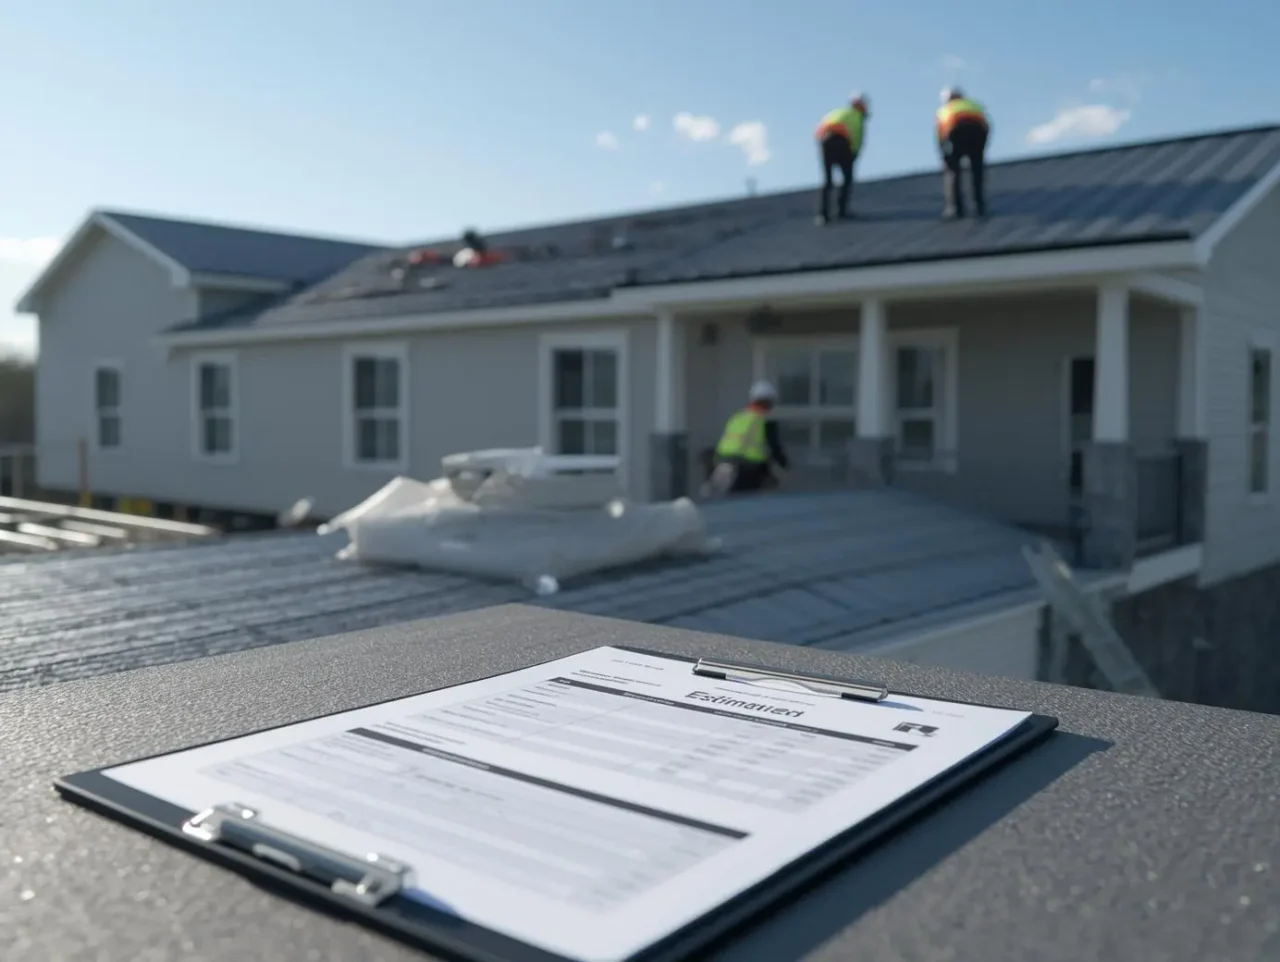
How much is a square roofing for typical replacement without pitch modifications:
| Material Type | Cost per Square (Materials + Labor) | 2,000 sq ft Roof (20 squares) Total |
|---|---|---|
| Standard Asphalt Shingles | $475-$800 | $9,500-$16,000 |
| Architectural Shingles | $625-$1,025 | $12,500-$20,500 |
| Metal Roofing | $900-$2,250 | $18,000-$45,000 |
| Clay/Concrete Tiles | $1,100-$2,500+ | $22,000-$50,000+ |
| Slate Roofing | $1,250-$3,500+ | $25,000-$70,000+ |
Roof Claim reports the average 2026 homeowner pays $9,500-$28,000 for full roof replacement, with Modernize citing $11,000 average across all material types.
How pitch changes multiply cost per square
Changing roof pitch dramatically increases how much is a square roofing because structural framing adds $600-$1,100 per square on top of standard material costs Angi reports roof framing alone costs $8.60 per square foot average ($860 per square), and complete pitch modifications can push total costs to $50/sq ft ($5,000 per square) including all structural work.
Cost to Change Roof Pitch: Detailed Pricing Breakdown (2026)
Cost to change roof pitch involves multiple cost centers beyond simple roof replacement.
Complete project cost ranges
- Minor pitch adjustment (single section): $15,000-$30,000
- Moderate whole-roof increase (4/12 to 7/12): $40,000-$80,000
- Major cathedral conversion (4/12 to 10/12+): $80,000-$125,000+
- Full roof lift with second story: $150,000-$300,000+
Today’s Homeowner reports raising a roof costs $20,000-$100,000 on average depending on project complexity, roof size, and structural modifications required.
Roof framing costs (primary driver)
Exterior Alliance and Angi provide detailed framing cost data:
- Average cost to re-frame entire roof: $14,000-$32,000
- Framing cost per square foot: $6-$9/sq ft (Exterior Alliance) or $6.50-$11.10/sq ft (Angi)
- Stick framing: $6.50-$8.90/sq ft
- Truss framing: $7.15-$11.10/sq ft
- Individual truss costs: $60-$800 per truss depending on type
For a 2,000 sq ft roof, framing alone costs $13,000-$22,200 before other expenses.
Demolition and removal costs
Removing existing roof structure before pitch modification:
- Demolition cost: $0.66-$1.81 per square foot
- 2,000 sq ft roof demolition: $1,320-$3,620
- Labor for demolition: $50-$75 per hour per worker
Exterior Alliance clarifies this covers framing removal but “does not include the removal of shingles, underlayment, or flashing, which could add to the total cost.”
New roofing material costs
After structural modifications, new roofing materials must be installed:
- Standard asphalt: $9,500-$16,000 (2,000 sq ft)
- Architectural shingles: $12,500-$20,500
- Metal roofing: $18,000-$45,000
- Premium materials: $22,000-$70,000+
Engineering and permits
Structural modifications require professional engineering and building permits:
- Structural engineering plans: $1,500-$5,000
- Building permits: $500-$2,000
- Additional permit costs: Up to $500 for electrical/mechanical
Wall modifications and extensions
Significant pitch increases often require raising exterior walls:
- Wall height extensions: $10,000-$40,000 depending on extent
- New siding/insulation/drywall: $5,000-$15,000
- Window modifications: $2,000-$8,000
Chimney and penetration adjustments
Pitch changes affect roof penetrations:
- Chimney extension/modification: $500-$5,000
- HVAC vent relocation: $300-$1,500
- Skylight adjustments: $500-$2,000 per skylight
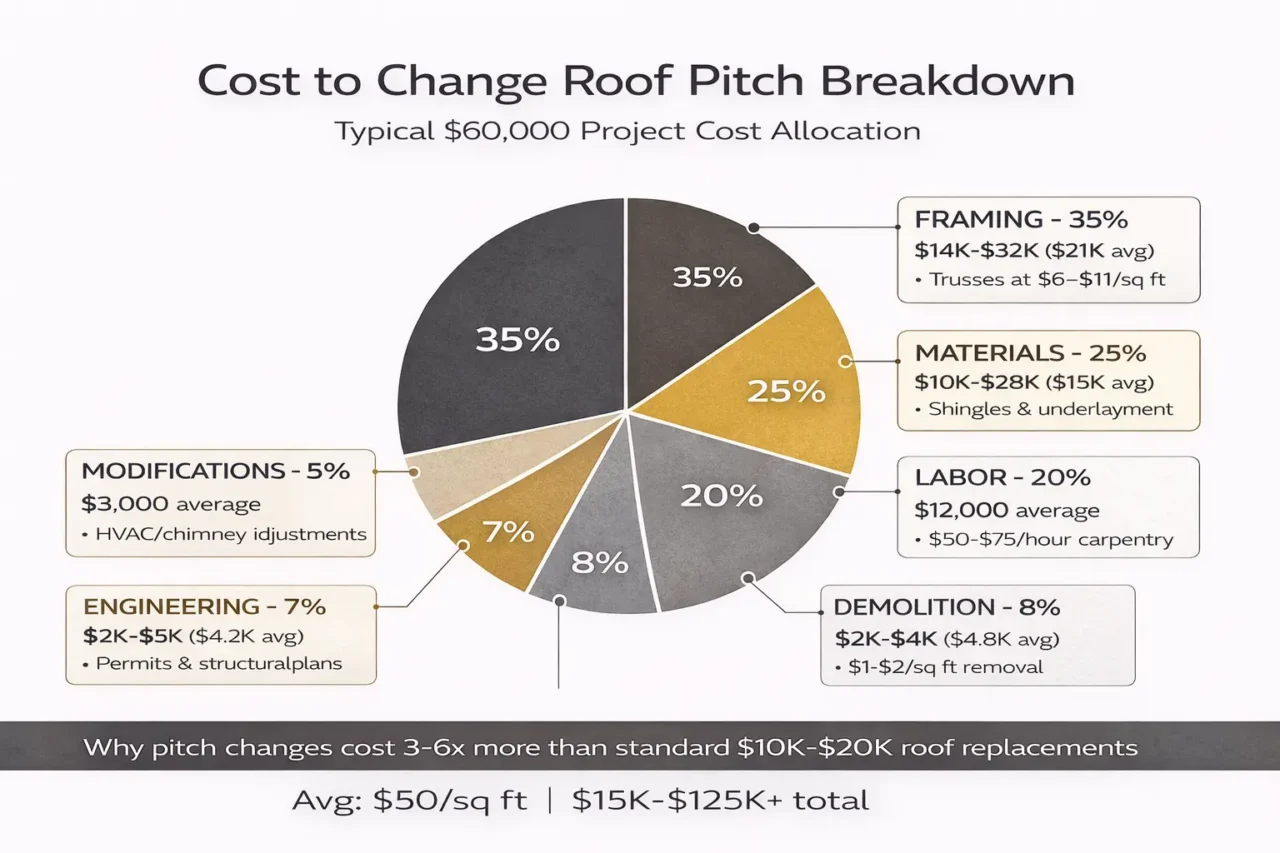
Factors Affecting Cost to Change Roof Pitch
Multiple variables determine final cost to change roof pitch for any specific project.
Roof size (primary cost driver)
Larger roofs multiply all costs proportionally:
| Roof Size | Framing Cost ($5.78-$10.52/sq ft) | Total Pitch Change Est. |
|---|---|---|
| 1,000 sq ft | $5,781-$10,519 | $25,000-$50,000 |
| 1,500 sq ft | $8,672-$15,778 | $35,000-$75,000 |
| 2,000 sq ft | $11,563-$21,038 | $45,000-$100,000 |
| 2,500 sq ft | $14,454-$26,298 | $55,000-$125,000 |
| 3,000 sq ft | $17,344-$31,556 | $65,000-$150,000 |
Current pitch and target pitch
Changing from 4/12 to 6/12 requires less structural work than 4/12 to 12/12 steep cathedral pitch steeper final pitches demand taller wall extensions, more framing lumber, increased material surface area, and complex engineering. Angi notes “steeper roofs require more material to construct” and “labor for particularly steep roofs can be somewhat more challenging and require more time to complete.”
Roof design complexity
Simple gable roofs cost less than complex multi-valley, dormer-filled, or hip roof designs. Exterior Alliance emphasizes “simple designs cost less than intricate ones with multiple angles and dormers,” while Angi confirms “basic roof structures, such as simple gables on a home or garage, are the least costly to construct.”
Framing type selection
- Stick framing (traditional rafters): $6.50-$8.90/sq ft, more expensive but allows custom designs
- Truss framing (pre-fabricated): $7.15-$11.10/sq ft, faster installation but less interior flexibility
Exterior Alliance recommends “opt for truss framing instead of traditional rafter framing. Trusses are pre-fabricated and can be installed faster, saving on labor costs.”
Materials selected
- Wood framing: $1-$5 per square foot for lumber
- Metal framing: $2-$4 per square foot, more durable but costlier
- Roofing material choice: Standard asphalt adds $10K-$16K vs premium slate $25K-$70K
Structural modifications required
Cost to change roof pitch escalates dramatically when existing walls must be raised 2-4+ feet to support new pitch wall extensions involve foundation reinforcement, new framing, exterior siding, windows, insulation, and interior drywall finishing far exceeding simple roof work.
Location and accessibility
Remote areas or difficult-to-access sites increase costs:
- Urban high-cost areas (San Francisco, NYC): Premium labor rates $100-$150+/hour
- Mid-range markets (Phoenix, Denver): $60-$100/hour
- Rural lower-cost regions: $40-$70/hour
Exterior Alliance notes “remote areas or hard-to-reach spots can increase costs” and “seasonal price variations” with “higher in winter due to safety precautions.”
How to Calculate Cost to Change Roof Pitch (Step-by-Step)
Homeowners can estimate cost to change roof pitch using this systematic approach.
Step 1: Measure roof square footage
Calculate roof surface area (not just home footprint) roof area is typically 1.1-1.5× home footprint depending on pitch. For 2,000 sq ft home with simple gable, roof might be 2,200-2,400 sq ft actual surface area.
Step 2: Determine roofing squares
Divide total roof square footage by 100 to convert to roofing squares: 2,200 sq ft ÷ 100 = 22 squares.
Step 3: Calculate framing costs
Multiply roof square footage by framing cost per sq ft:
- Conservative: 2,200 sq ft × $6/sq ft = $13,200 framing
- Mid-range: 2,200 sq ft × $8/sq ft = $17,600 framing
- Complex: 2,200 sq ft × $11/sq ft = $24,200 framing
Step 4: Add demolition costs
Multiply by demolition rate: 2,200 sq ft × $1.20/sq ft = $2,640 demolition
Step 5: Include roofing material costs
Select material and multiply by squares:
- Architectural shingles: 22 squares × $650/square = $14,300
- Metal roofing: 22 squares × $1,500/square = $33,000
Step 6: Add engineering, permits, modifications
- Engineering: $2,500-$4,000
- Permits: $800-$1,500
- Chimney/penetrations: $1,500-$4,000
- Wall modifications (if needed): $10,000-$40,000
Example total calculation
2,200 sq ft roof, moderate pitch increase, architectural shingles:
- Framing: $17,600
- Demolition: $2,640
- Roofing materials: $14,300
- Engineering: $3,000
- Permits: $1,200
- Modifications: $3,000
- Total: $41,740
This aligns with moderate pitch change range of $40,000-$80,000.
UK and International Cost to Change Roof Pitch
Cost to change roof pitch varies internationally due to different labor markets, regulations, and measurement systems.
UK roof lift and pitch change costs
MyJobQuote provides detailed UK roof lift loft conversion pricing:
| Roof Modification Type | Description | 2026 UK Cost |
|---|---|---|
| Partial Roof Lift | Section of roof (gable to gable) raised for headroom | £45,000-£65,000 |
| Full Roof Replacement | Complete roof structure removed and rebuilt higher | £65,000-£90,000+ |
| Raised Ridge with Pitch | Increasing ridge height with steeper angle | £55,000-£75,000 |
| Combination Roof Lift + Dormer | Roof lift plus rear dormer for floor space | £70,000-£95,000 |
Standard UK roof replacement without pitch changes averages £7,000 (£120-£275 per m²).
Australian roof pitch modification costs
Australian reroofing costs $40-$500 per m² installed ($370-$4,600/square) depending on materials, with structural modifications adding substantial premiums similar to US markets. New roof installations range $13,000-$24,000 for typical homes without pitch changes.

Alternatives to Full Roof Pitch Changes
Before committing to expensive cost to change roof pitch, consider more affordable alternatives achieving similar goals.
Dormer additions
Add dormers to existing roof creating localized headroom and natural light without changing entire pitch dormer installation costs $4,000-$15,000 each vs $40,000-$125,000 complete pitch modifications. Multiple dormers can transform attic space for fraction of full pitch change cost.
Partial pitch increases
Modify pitch on single roof section (front gable only) for curb appeal enhancement without full structural overhaul costs $15,000-$30,000 vs complete roof changes. This approach works well when primary goal is aesthetic improvement rather than interior space gain.
Roof lift without pitch change
UK-style “roof lift” raises entire roof structure vertically maintaining existing pitch but gaining headroom partial roof lifts cost £45,000-£65,000 ($55,000-$80,000) vs full pitch modifications. This option increases interior height without the complexity of changing roof angles.
Vaulted ceiling using existing pitch
Remove attic floor joists and open existing ceiling to roof deck creating vaulted effect without touching roof structure costs $8,000-$25,000 for structural modifications, insulation, and finishing but preserves existing roof. Works best with roofs already having moderate pitch (6/12 or steeper).
Second-story additions
If goal is additional living space, compare building upward with new second story ($150-$300/sq ft) versus pitch modification additions more expensive but provide fully enclosed rooms rather than open cathedral spaces. Today’s Homeowner notes raising roof for second story can reach $100,000+ but delivers more usable square footage.
Return on Investment: Cost to Change Roof Pitch
The substantial cost to change roof pitch ($40,000-$125,000+) demands careful ROI analysis.
Curb appeal and resale value gains
Four Peaks Roofing emphasizes “the return on that investment is substantial” noting “houses with high-pitched, cathedral-style roofs have considerable curb appeal.” Real estate data suggests well-executed pitch increases can add 5-15% to home values in markets valuing architectural character on $500,000 home, that’s $25,000-$75,000 value gain partially offsetting $50,000-$100,000 project costs.
Additional living space value
The primary ROI driver is converting unusable attic space into functional living area Four Peaks notes “the extra space usually allows homeowners to transform their attic space, or at least part of it, into living space.” Adding 400-600 sq ft of living area through cathedral ceiling conversion at effective $80-$150/sq ft total cost compares favorably to building horizontal additions costing $200-$400/sq ft in many markets.
Energy efficiency considerations
Steeper pitches improve attic ventilation reducing cooling costs in hot climates, though they increase roof surface area slightly raising material and long-term maintenance expenses energy savings typically minor factor in ROI calculations.
When pitch changes make financial sense
Cost to change roof pitch most justifiable when:
- Home needs roof replacement anyway (avoid double demolition costs)
- Property has strong foundation/walls supporting modifications without major reinforcement
- Local market values architectural character highly (historic districts, upscale neighborhoods)
- Homeowners plan long-term occupancy (10+ years) to recapture investment
- Adding living space cheaper than horizontal additions due to lot constraints
- Current low pitch creates drainage/ice dam problems requiring correction
Financing Cost to Change Roof Pitch
The substantial cost to change roof pitch ($40,000-$125,000+) typically exceeds cash reserves, requiring financing strategies.
Home equity loans and HELOCs
Home equity financing provides lowest interest rates (6-10% in 2026) for homeowners with sufficient equity borrow against home value paying fixed monthly installments over 5-20 years. For $60,000 pitch change at 7% over 15 years, monthly payment approximately $540.
Cash-out refinancing
Refinance primary mortgage extracting equity for roof pitch modification only advantageous if current mortgage rate significantly higher than prevailing rates or if combining with other refinancing goals.
Home improvement loans
Unsecured personal loans specifically for renovations offer faster approval but higher rates (9-18%) suitable for smaller pitch change projects under $40,000.
FHA 203(k) renovation loans
Government-backed FHA 203(k) loans combine home purchase and renovation financing in single mortgage ideal for buyers wanting to purchase fixer-upper and immediately change roof pitch.
Permit Requirements and Engineering
Cost to change roof pitch includes mandatory permits since structural modifications affect building safety.
Required permits
- Building permit: Required for all structural framing changes $500-$2,000
- Electrical permit: If interior lighting/wiring modified $100-$500
- Mechanical permit: If HVAC systems relocated $150-$750
Exterior Alliance notes permits can cost “up to $500” while Angi adds $100-$200 for permit fees in their cost estimates.
Structural engineering requirements
Most jurisdictions require licensed structural engineer stamped plans showing load calculations, member sizing, connection details, and code compliance before issuing building permits engineering costs $1,500-$5,000 for residential pitch changes.
Inspection process
Building departments conduct multiple inspections during construction: foundation/framing inspection after structural modifications, insulation/electrical inspection before closing walls, and final inspection upon completion factor 2-6 weeks total for inspection scheduling and corrections.
Frequently Asked Questions: Cost to Change Roof Pitch
How much does it cost to change roof pitch?
Cost to change roof pitch ranges $15,000-$125,000+ depending on scope, with moderate increases averaging $40,000-$80,000 and complete cathedral conversions reaching $80,000-$125,000+ including framing ($14K-$32K), materials ($10K-$28K), demolition, engineering, and modifications.
What is a square in roofing?
A roofing square equals exactly 100 square feet of roof surface area contractors use squares as the standard measurement unit for bidding and pricing all roofing projects.
How much is a square roofing for standard replacement?
How much is a square roofing for typical replacement: $475-$800/square (standard asphalt), $625-$1,025/square (architectural shingles), $900-$2,250/square (metal), $1,100-$2,500+/square (tiles), and $1,250-$3,500+/square (slate).
How much does roof framing cost?
Roof framing costs $6-$11 per square foot ($600-$1,100 per roofing square) with total re-framing projects ranging $14,000-$32,000 for typical residential roofs, averaging $8.60/sq ft including materials and labor.
Can I change roof pitch without raising walls?
Limited pitch increases possible without wall modifications (4/12 to 6/12) but dramatic cathedral pitches (10/12, 12/12) typically require raising exterior walls 2-4+ feet to maintain adequate eave-to-ridge height, adding $10,000-$40,000 to project costs.
How long does changing roof pitch take?
Cost to change roof pitch projects typically require 4-8 weeks total: 1-2 weeks planning/permits, 2-4 weeks structural framing/roofing, 1-2 weeks finishing complex projects or weather delays can extend timelines to 10-12 weeks.
Is changing roof pitch worth it?
Well-executed pitch increases can add 5-15% home value and create usable living space at $80-$150/sq ft vs $200-$400/sq ft for horizontal additions worthwhile when home needs replacement anyway, homeowners plan long-term occupancy, and local market values architectural character.
What is the cheapest way to change roof pitch?
Cheapest alternatives include partial pitch modifications (one section only, $15K-$30K), adding dormers ($4K-$15K each), or vaulting existing ceiling without touching roof structure ($8K-$25K) rather than complete pitch changes ($40K-$125K+).
Get free roofing advice, cost guides, and seasonal maintenance tips.
Roofing content specialist with 5+ years researching U.S. residential and commercial roofing. Has documented 200+ projects covering installation costs, material selection, contractor vetting, and DIY guides for homeowners across all climate zones.
Gambrel Roof Design: Types, Pros & Cons Explained
Gambrel roof design features a distinctive two-slope profile on each side a steep lower slope (typically 60-70°) providing maximum interior headroom and a shallow upper slope (20-30°) creating the iconic “barn roof” silhouette that maximizes usable attic space while maintaining efficient water drainage and classic architectural character. This symmetrical two-sided roof style originated from Dutch Colonial and Georgian architecture but has become synonymous with American barn construction because the gambrel roof design delivers 40-50% more usable upper-level space compared to standard gable roofs without increasing building height.
Understanding gambrel roof design requires knowing the five main variations (classic, Dutch, asymmetrical, wall-supported, dormer), typical angle specifications, structural truss requirements, cost factors ($8-$16 per square foot installed), and performance characteristics in different climates. This comprehensive guide explains what defines gambrel roof design, compares gambrel vs gable vs mansard roofs, details each gambrel roof type with applications, analyzes pros and cons, covers roofing materials and installation, and helps homeowners decide if gambrel roof design fits their building needs.
What Is Gambrel Roof Design? (Definition and Characteristics)
Gambrel roof design is a symmetrical two-sided roofing style featuring two distinct slopes on each side rather than the single slope of traditional gable roofs the steeper lower slope extends outward maximizing interior space while the gentler upper slope creates balanced appearance and efficient drainage.
The defining double-slope structure
The hallmark of gambrel roof design is its dual-slope geometry: the upper slope typically positioned at less than 30° provides weather shedding and aesthetic interest, while the lower slope typically not exceeding 60° functions almost like a wall to increase vertical clearance inside the attic or upper floor. Standard gambrel roof design often uses 30° for the peak angle and 60° for the second slope, though these angles can be customized based on building dimensions and space requirements.
Why “gambrel”? (Etymology and history)
The term “gambrel” originates from the shape of a horse’s hind leg when viewed with the lower leg, the joint creates an angle similar to the roof’s profile. This distinctive form became strongly associated with Dutch Colonial architecture in America and subsequently with agricultural buildings where the space-maximizing benefits proved ideal for hay storage and equipment.
How gambrel differs from gable roofs
While both are symmetrical two-sided roofs, gambrel roof design adds a second slope on each side creating the doubled-pitch profile, whereas gable roofs feature single continuous slopes from ridge to eaves. This seemingly simple modification dramatically increases usable attic space gambrel roofs can provide 40-50% more headroom and floor area in upper levels compared to gable roofs with identical building footprints.
Five Types of Gambrel Roof Design (Variations and Applications)
Gambrel roof design encompasses several distinct variations architects and builders customize for specific aesthetic and functional goals.
1. Classic Gambrel Roof (Traditional Barn Roof)
The classic gambrel roof design features perfectly symmetrical double-slope structure with no hips, typically including two gable windows on the front and slight overhang on all sides creating the iconic barn appearance. This design maximizes interior space through steep lower slopes while maintaining simple construction requiring fewer materials than complex roof styles making it cost-effective for barns, sheds, garages, and residential structures seeking rustic charm.
Best applications: Barns, agricultural buildings, detached garages, storage sheds, Dutch Colonial residential architecture.
2. Dutch Gambrel Roof
Dutch gambrel roof design emphasizes an especially steep lower slope and notably flat upper slope, creating the distinctive profile characteristic of historic Dutch Colonial architecture found throughout New England and Mid-Atlantic regions. The exaggerated pitch difference provides maximum interior volume and creates dramatic roofline that defines Dutch Colonial style homes.
Best applications: Dutch Colonial homes, Colonial Revival architecture, heritage restorations, residential projects prioritizing historical authenticity.
3. Asymmetrical Gambrel Design
Asymmetrical gambrel roof design represents architects taking creative liberties by stretching one side of the roof longer or designing only one side with the traditional double slope while the opposite uses single pitch, builders create unique appearances and customize interior/exterior space distribution. This variation can accommodate irregular floor plans or site constraints while maintaining gambrel character.
Best applications: Custom contemporary homes, additions to existing structures, irregular lot shapes, architectural statement projects.
4. Wall-Supported Gambrel Roof
Wall-supported gambrel roof design eliminates overhangs entirely the roof planes join exterior walls directly at angles, saving material costs but reducing the amount of additional interior space created compared to classic gambrel designs because the bottom pitch doesn’t extend beyond the wall line. GAF notes this style “doesn’t increase the storage space in the attic” as much as traditional gambrel configurations.
Best applications: Budget-conscious projects, small sheds/outbuildings where overhangs aren’t needed, modern minimalist designs emphasizing clean lines.
5. Dormer Gambrel Roof
Dormer gambrel roof design incorporates windows that protrude from the roof slopes typically from the steeper lower section protected by individual dormer structures providing natural light, ventilation, and enhanced headroom in attic/loft spaces. These dormers transform otherwise dark storage attics into bright functional living areas, bedrooms, or home offices.
Best applications: Residential conversions of attic space to living quarters, homes requiring additional bedrooms, loft apartments, maximizing natural light in upper floors.
Bonus: Cross-Gambrel Layout
Cross-gambrel gambrel roof design intersects two gambrel roofs creating even more interior space and adding architectural complexity to exterior appearance this layout works well for larger homes or complex floor plans requiring multiple roof sections.
Best applications: Large residential estates, complex custom homes, buildings with L-shaped or T-shaped footprints.
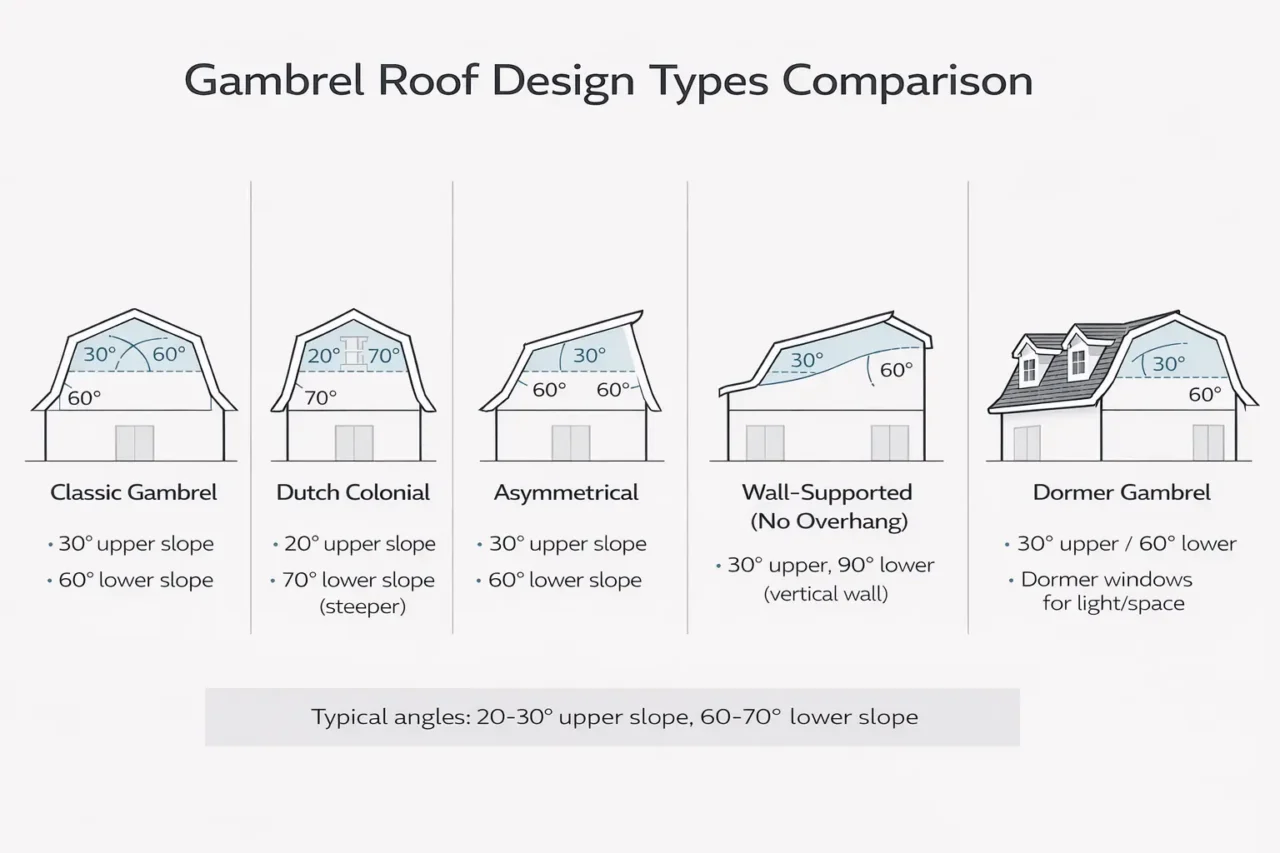
Gambrel Roof Design vs Other Roof Types (Key Comparisons)
Understanding gambrel roof design benefits requires comparing it to alternative roof styles homeowners commonly consider.
Gambrel vs Gable Roof
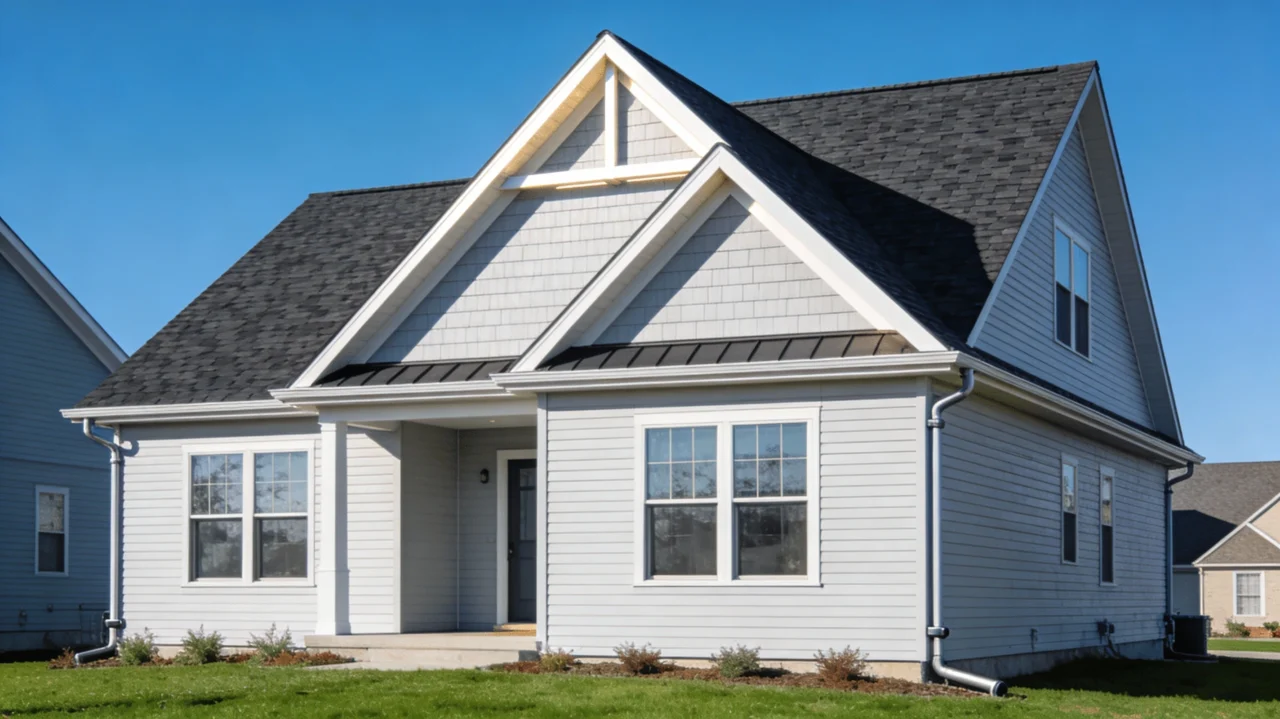
Gambrel roof design provides significantly more interior space and visual interest than gable roofs through its double-slope configuration, but involves more complex construction and potentially higher costs due to additional slope transitions requiring careful flashing and detailing. Gable roofs win on simplicity and ease of construction, while gambrel roofs excel when maximizing attic space is priority.
Gambrel vs Hip Roof

Hip roofs deliver excellent structural stability and superior weather resistance in high-wind zones through their four-sided sloping design, but gambrel roof design offers dramatically more usable interior space and distinctive aesthetic character. Hip roofs are often chosen for hurricane-prone regions; gambrel roofs when space maximization and traditional styling matter more than ultimate wind performance.
Gambrel vs Mansard Roof
The key difference between gambrel roof design and mansard roofs is number of sides: gambrel roofs feature two slopes on two sides with vertical gable ends, while mansard roofs implement two slopes on all four sides creating box-like structure with no gable ends. Modernize explains mansard roofs originated in France representing Second Empire architecture and provide even more attic living space through their four-sided enclosure, while gambrel roofs remain associated with Dutch Colonial and barn architecture. Both maximize upper-level space, but mansard roofs cost significantly more due to four-sided complexity.
Gambrel vs Flat Roof

Gambrel roof design provides superior water runoff and snow shedding capabilities compared to flat roofs through steep lower slopes, though flat roofs may be simpler to construct and offer rooftop access opportunities. Gambrel roofs generally require more maintenance than flat membrane systems but avoid the ponding and drainage challenges flat roofs face.
Gambrel Roof Design Angles and Structure (Technical Specifications)
Proper gambrel roof design depends on understanding standard angles, truss engineering, and structural requirements.
Standard gambrel roof angles
Typical gambrel roof design features:
- Steep lower slope: 60-70° from horizontal, maximizing interior headroom and wall-like vertical space
- Shallow upper slope: 20-30° from horizontal, ensuring water/snow shedding while reducing total roof height
Standard configurations often use 30° peaks with 60° second slopes, though precise angles can be customized based on building width, desired interior clearance, and regional climate requirements (steeper in heavy snow areas).
Gambrel roof trusses and framing
Gambrel roof design structural integrity relies on engineered trusses or rafter systems supporting the dual-slope configuration and resisting significant loads from snow, wind, and roofing materials. Usihome emphasizes that “gambrel roof trusses are engineered to withstand the significant loads imposed by the roof’s double-sloped design” with “load-bearing capacity carefully calculated and tested to ensure optimal performance and safety over the roof’s lifespan.”
Pre-fabricated gambrel trusses simplify installation by delivering factory-engineered load distribution across building walls, sometimes reducing need for interior support posts and creating open upper-level floor plans. Custom site-built rafter systems offer design flexibility but require experienced framers calculating proper sizing, spans, and connections.
Structural considerations
Steep lower slopes place different loads on wall connections compared to gentler single-pitch roofs proper hurricane ties, adequate nailing patterns, and engineered connections ensure gambrel roof design withstands wind uplift and snow accumulation. The pitch transition point where lower and upper slopes meet requires robust support preventing sagging or deflection over time.
Pros of Gambrel Roof Design (Why Choose Gambrel Roofs)
Gambrel roof design delivers compelling advantages making it ideal for specific building types and homeowner priorities.
Maximum interior space
The defining benefit of gambrel roof design is dramatically increased attic space steep lower slopes functioning as near-vertical walls provide full-height usable floor area ideal for storage, loft bedrooms, home offices, or living spaces that would be cramped under single-slope gable roofs. Roof Right emphasizes that “due to the steep lower slopes, gambrel roofs offer ample interior space under the roof, making them ideal for attics, storage, and additional living areas.”
Distinctive aesthetic appeal
The unique gambrel silhouette adds character and charm creating instant visual recognition whether evoking traditional barn nostalgia or elegant Dutch Colonial heritage, gambrel roof design establishes strong architectural identity that enhances curb appeal and property value. Brava Roof Tile notes gambrel roofs have “simple, unique designs” with “minimizes required labor while giving the roof a more unique and attractive appearance.”
Cost-effective construction
Compared to complex roof styles like hip or mansard roofs, gambrel roof design is relatively straightforward to construct simple symmetrical geometry requires fewer materials than elaborate multi-hip designs, and standard truss availability reduces custom engineering costs. Steadfast Roofing states gambrel roofs “use fewer materials than more complex roofing styles, making it an economical choice for homeowners.”
Excellent water drainage
Steep 60-70° lower slopes shed rain and snow extremely efficiently, reducing standing water risks and minimizing leak potential compared to shallow-pitch or flat roofs. This makes gambrel roof design particularly suitable for regions with heavy rainfall or significant snowfall.
Design flexibility and customization
Gambrel roof design accommodates dormers and windows enhancing natural light and ventilation, allows flared eaves directing water away from foundations while adding visual interest, and can be customized with varying overhangs, decorative trim, and different roofing materials matching diverse architectural styles.
Versatile applications
From residential homes to agricultural barns, storage sheds to commercial buildings, gambrel roof design adapts to structures of all sizes and purposes scalability from small garden sheds to large homes makes it remarkably versatile.
Cons of Gambrel Roof Design (Potential Drawbacks)
Despite advantages, gambrel roof design presents legitimate challenges homeowners should understand before committing.
Wind vulnerability
Several sources note gambrel roof design can be susceptible to high winds compared to more aerodynamic hip roofs the vertical gable ends catch wind and steep lower slopes may experience uplift forces if not properly braced and fastened. Roof Right specifically cautions that gambrel roofs “may not be suitable for areas with high winds or extreme weather conditions.”
More complex detailing
The pitch transition where upper and lower slopes meet creates additional seams requiring meticulous flashing and waterproofing to prevent leaks improper detailing at this critical junction causes the majority of gambrel roof problems. Steadfast Roofing notes the roof style “requires careful attention to detailing to prevent leaks and other issues.”
Higher maintenance potential
Complex geometry with multiple slope transitions, dormers, and intersections may require more frequent inspection and maintenance compared to simple gable roofs debris accumulation at pitch changes and flashing deterioration demand periodic attention. Material choices also influence maintenance: wood shakes need regular treatment while metal roofing requires minimal upkeep.
Limited attic ventilation options
The steep lower slopes and compressed upper roof space can complicate ventilation system installation achieving proper soffit-to-ridge airflow may require specialized venting products and careful planning to prevent moisture accumulation and premature shingle aging.
Not ideal for extreme wind zones
While properly engineered gambrel roof design can withstand significant weather, hip roofs generally outperform gambrel roofs in hurricane-prone coastal regions where wind resistance is paramount safety concern. Homeowners in frequent high-wind areas may need additional structural reinforcement increasing costs.
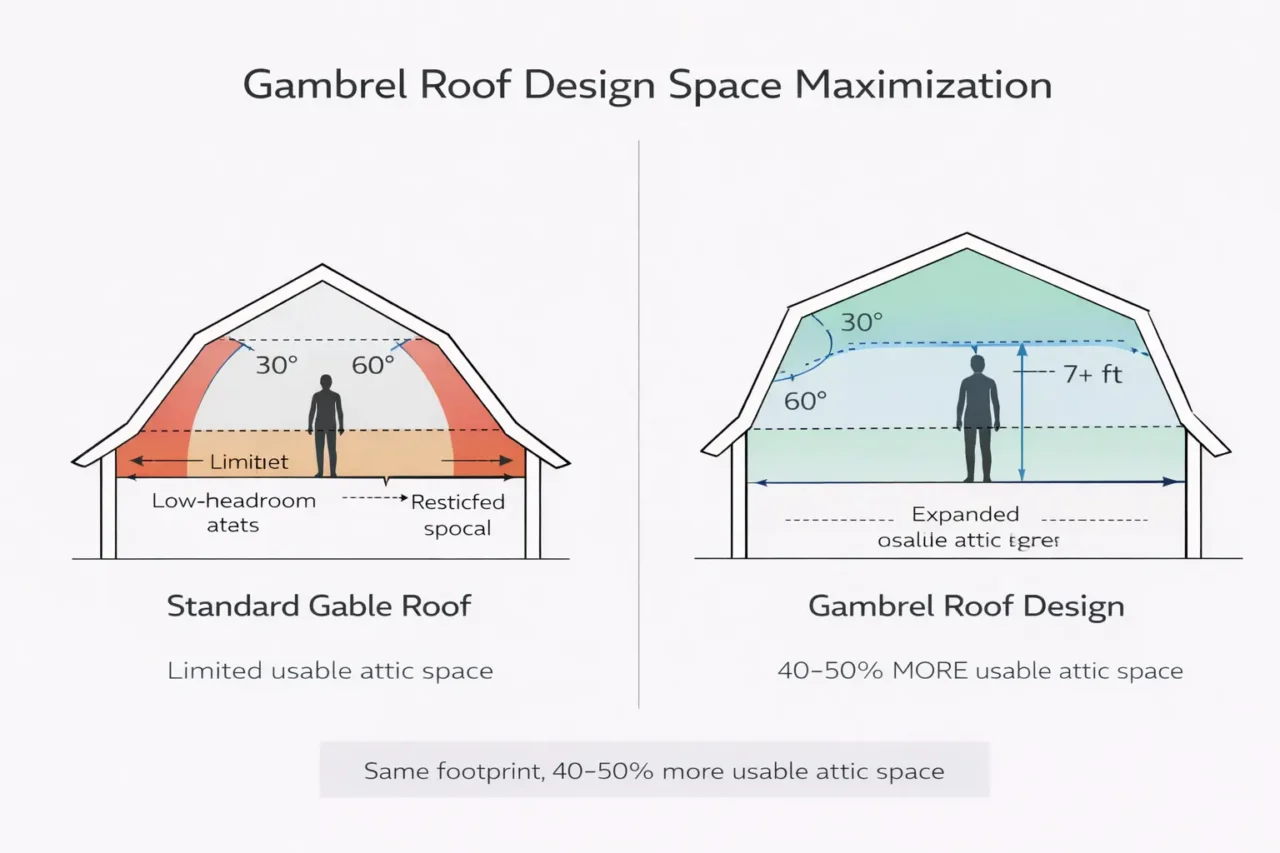
Best Roofing Materials for Gambrel Roof Design
Gambrel roof design accommodates all standard roofing materials, with optimal choices depending on budget, climate, aesthetic goals, and maintenance preferences.
Asphalt shingles
Most popular choice for residential gambrel roof design due to affordability ($3-$6/sq ft), wide color/style selection, established contractor familiarity, and adequate performance in most climates standard 3-tab or architectural shingles both work well on gambrel slopes.
Metal roofing
Increasingly common on gambrel roof design especially for barns and contemporary homes, metal roofing (standing seam or panels) delivers 40-70 year lifespan, excellent water shedding on steep lower slopes, low maintenance, and reflective cool-roof benefits reducing summer cooling costs. Cost typically $8-$14/sq ft installed.
Wood shakes and shingles
Cedar or redwood shakes provide authentic rustic appearance ideal for traditional barn aesthetic or colonial-style homes, offering natural insulation and biodegradable sustainability. Requires regular maintenance (cleaning, treatment) and costs $6-$12/sq ft, but delivers unmatched character.
Clay and concrete tiles
Though heavier requiring structural verification, clay/concrete tiles on gambrel roof design create stunning Mediterranean or Spanish colonial appearance with 50-100+ year lifespans particularly attractive on Dutch Colonial homes where tile complements architectural heritage. Expect $10-$20/sq ft installed.
Synthetic slate and composite
Modern composite materials mimicking slate, shake, or tile appearance at fraction of weight and cost recycled content options add sustainability while 30-50 year lifespans exceed asphalt shingles.
Gambrel Roof Design Cost (Installation and Materials)
Gambrel roof design costs vary significantly by size, materials, complexity, and regional labor rates, but generally fall in moderate range between simple gable and premium hip roofs.
Typical cost ranges
- Basic gambrel roof installation: $8-$12 per square foot including framing and standard asphalt shingles
- Mid-range with architectural shingles: $10-$14 per square foot
- Premium materials (metal, tile) on gambrel: $12-$20+ per square foot
For typical 1,500 sq ft roof area, expect total installed costs $12,000-$30,000 depending on material selections and complexity.
Cost factors affecting gambrel roof pricing
- Roof size and complexity: Larger roofs, dormers, valleys, and multiple intersections increase labor hours and material waste
- Material selection: Asphalt shingles (budget), metal roofing (mid-premium), clay tile (premium) dramatically shift total costs
- Labor rates: Regional variation from $50-$150/hour for skilled roofing crews
- Pitch and height: Steep lower slopes and tall buildings require more safety equipment and staging
- Structural reinforcement: Adding trusses, upgrading framing, or strengthening walls for heavier materials increases costs
Cost comparison to other roof styles
Modernize notes gambrel roof design typically costs less than hip or mansard roofs due to simpler two-sided geometry, while costing moderately more than basic gable roofs because of additional slope transitions and detailing. The cost premium over gable (roughly 15-25%) is usually justified by the substantial interior space gains.
Installing Gambrel Roof Design (Process Overview)
Professional gambrel roof design installation follows systematic process ensuring structural integrity and weather protection.
1. Structural planning and engineering
Calculate required truss dimensions, spacing, and connections based on building width, snow loads, wind speeds, and roof material weight engineered plans ensure code compliance and long-term performance.
2. Framing the gambrel structure
Install trusses or build rafter system supporting dual-slope geometry, with steeper lower sections framed to allow maximum headroom and gentler upper slopes ensuring proper drainage angles. Modernize notes “builders typically add roofing materials like asphalt shingles, metal panels, or tiles, depending on the homeowner’s style and budget.”
3. Roof sheathing and underlayment
Apply plywood or OSB sheathing across entire roof surface creating solid substrate, then install waterproof underlayment (felt or synthetic) with proper overlap at pitch transition critical to preventing leaks.
4. Installing roofing material
Apply chosen roofing material (shingles, metal, tiles) starting from lower edges working upward, paying special attention to flashing at pitch changes, valleys, dormers, and roof penetrations.
5. Dormer installation (if applicable)
For dormer gambrel roof design, frame window protrusions, install separate dormer roofs, and carefully flash connections to main roof preventing water infiltration.
6. Trim and finishing
Add ridge caps, install gutters, apply fascia and soffit materials, and seal all penetrations completing weather-tight installation.
Modernize notes “the process is fairly straightforward, but more complex roofs with dormers or valleys may require more time and materials.”
Gambrel Roof Design Maintenance Tips
Proper maintenance extends gambrel roof design lifespan and prevents costly repairs.
- Inspect pitch transitions twice yearly: Check flashing and sealant at slope change locations for cracks, gaps, or deterioration
- Clear debris from valleys and pitch changes: Leaves and branches accumulate at slope transitions blocking water flow
- Monitor dormer flashings: Dormer connections to main roof are common leak points requiring periodic inspection
- Check for loose or damaged shingles: High winds can lift shingles on steep lower slopes
- Maintain proper ventilation: Ensure soffit and ridge vents remain unobstructed preventing moisture buildup
- Address moss/algae growth promptly: Particularly important on wood shakes or in humid climates
- Inspect attic after storms: Check interior for water stains indicating roof damage
Is Gambrel Roof Design Right for Your Project?
Gambrel roof design is ideal when you prioritize:
- Maximum attic/loft space: Converting upper floor to living area, storage, or workshop
- Traditional architectural character: Dutch Colonial, Georgian, or barn-style aesthetics
- Cost-effective space expansion: Adding square footage vertically rather than horizontal additions
- Efficient water drainage: Regions with heavy rainfall or significant snowfall
Gambrel roof design may not be optimal if:
- Extreme wind zones: Hurricane-prone coastal areas where hip roofs offer superior aerodynamics
- Minimal maintenance preference: Complex geometry requires more periodic inspection than simple gables
- Ultra-modern aesthetics: Contemporary minimalist designs may favor flat or single-pitch roofs
🏗️
Planning a Gambrel Roof? Get Expert Guidance & a Free Quote.
Gambrel roofs require specialist framing knowledge — the double-slope profile, ridge beam sizing, and rafter geometry demand an experienced installer to execute correctly and to code. Get connected with a certified contractor who has built gambrel roofs in your area.
Free consultation includes: design feasibility review, rough material estimate, and local code compliance check — at no cost or obligation.
Frequently Asked Questions: Gambrel Roof Design
What is gambrel roof design?
Gambrel roof design is a symmetrical two-sided roof featuring two slopes on each side a steep lower slope (60-70°) maximizing interior space and a shallow upper slope (20-30°) creating the distinctive barn-roof profile.
Why is it called a barn roof?
Gambrel roofs are commonly called barn roofs because this design became synonymous with American agricultural buildings where the space-maximizing benefits proved ideal for hay storage and equipment in upper lofts.
What are the typical gambrel roof angles?
Standard gambrel roof design uses steep lower slopes between 60-70° and shallow upper slopes between 20-30°, though angles can be customized based on building dimensions and climate requirements.
How much does gambrel roof cost?
Gambrel roof design installation typically costs $8-$16 per square foot depending on materials, with total projects ranging $12,000-$30,000 for average residential roofs.
What is the difference between a gambrel and mansard roof?
Gambrel roof design features two slopes on two sides with vertical gable ends, while mansard roofs have two slopes on all four sides creating box-like structure gambrel is two-sided, mansard is four-sided.
Are gambrel roofs good in wind?
Gambrel roofs can perform adequately in moderate wind when properly engineered, but hip roofs generally provide superior wind resistance in hurricane-prone regions due to more aerodynamic four-sided sloping.
What are the pros and cons of gambrel roof design?
Pros: Maximum attic space (40-50% more than gable), distinctive aesthetic, cost-effective construction, excellent drainage, design flexibility. Cons: Wind vulnerability, complex detailing, higher maintenance, limited ventilation options.
Can I add dormers to gambrel roof?
Yes dormer gambrel roof design is common variation adding windows that protrude from slopes providing natural light, ventilation, and enhanced headroom in attic spaces.
Get free roofing advice, cost guides, and seasonal maintenance tips.
More Frequently Asked Questions
Common questions homeowners ask us about this topic, updated for 2026.
What is a gambrel roof and why is it called “barn-style”?
A gambrel roof is a symmetrical two-sided roof with two slopes on each side — a shallow upper slope and a steeper lower slope. It became known as the “barn-style” roof because American Dutch settlers used it on barns starting in the 1700s to maximize storage space in the attic loft.
What is the difference between a gambrel roof and a mansard roof?
A gambrel roof has two slopes on TWO sides (gable ends are vertical walls). A mansard roof has two slopes on ALL FOUR sides. Gambrel is simpler and cheaper; mansard is more elegant and used for European-style architecture. Mansard typically costs 30-50% more to build.
How much does it cost to build a gambrel roof in 2026?
A gambrel roof costs $9-$16 per square foot installed in 2026, including framing and roofing materials. For a typical 2,000 sq ft home, expect $18,000-$32,000. The double-slope design requires more lumber and labor than a standard gable, but you gain 40-50% more usable attic space.
What is the best pitch for a gambrel roof?
Most gambrel roofs use a steep lower slope of 60-75° and a shallow upper slope of 25-35°. The classic American gambrel uses 70°/30° to maximize headroom in the attic loft. Steeper lower slopes shed snow better but cost more in materials.
Are gambrel roofs more prone to leaking?
Gambrel roofs have more seams and angle transitions than simple gable roofs, which means more potential leak points — especially at the pitch transition line. With proper flashing installation and quality underlayment, leak risk is comparable to other roof types. Most gambrel leaks happen at the slope-change joint, so inspect this line annually.
What roofing materials work best on a gambrel roof?
Architectural asphalt shingles are the most popular choice — they handle the steep lower slope well and cost $385-$520/square installed. Metal panels also work well and last 50+ years but cost 2-3× more. Avoid clay tile on gambrels: the heavy weight stresses the dual-slope framing.
Can I convert my existing gable roof to a gambrel?
Yes but it’s expensive — converting a gable to a gambrel typically costs $25,000-$60,000 because you need to rebuild the roof framing entirely and reinforce the wall plates. The benefit is dramatic: you gain a full second-story living space without expanding the home’s footprint.
Roofing content specialist with 5+ years researching U.S. residential and commercial roofing. Has documented 200+ projects covering installation costs, material selection, contractor vetting, and DIY guides for homeowners across all climate zones.
Eco-Friendly Roofing Materials: Complete Buyer’s Guide
Environmentally friendly roofing materials reduce environmental impact through recycled content, energy efficiency, long lifespans reducing replacement waste, and recyclability at end-of-life with top eco friendly roofing materials including metal roofing (40-100 year lifespan, 100% recyclable), recycled shingles (75-100% recycled rubber/plastic), clay/slate tiles (100+ year durability), wood shakes from sustainable forests, green/living roofs, and solar roof tiles generating clean energy.
Choosing environmentally friendly roofing materials delivers multiple benefits beyond sustainability: energy cost reductions up to 40% with reflective cool roofs, improved indoor comfort through better insulation, potential tax incentives for green building practices, reduced carbon footprint compared to conventional materials, and increased property value from durable attractive installations. This comprehensive guide examines the best eco friendly roofing materials for residential and commercial buildings, comparing costs, lifespans, recyclability, energy performance, maintenance requirements, and ideal applications so you can select sustainable roofing aligned with your climate, budget, and environmental goals.
Table of Contents
What Makes Roofing Materials Environmentally Friendly?
Environmentally friendly roofing materials are evaluated across multiple sustainability criteria rather than single attributes, with the most eco friendly roofing materials excelling in several key areas.
Manufacturing and sourced materials
Sustainable roofing prioritizes recycled content, renewable resources, and low-pollution production processes recycled shingles contain 75-100% recycled rubber and plastic, while metal roofing often incorporates high percentages of recycled steel/aluminum, and wood shakes from certified sustainable forests ensure responsible harvesting.
Longevity and durability
Long-lasting environmentally friendly roofing materials reduce replacement frequency and associated waste slate and clay tiles last 100+ years, metal roofs 40-100 years, and even recycled shingles 25-50 years compared to standard asphalt shingles‘ 15-20 year lifespan. Maguire Brothers emphasizes that “a long-lasting roof means fewer replacements, less use of material, and less environmental footprint in the long run.”
Energy efficiency
Cool roofs reflecting solar heat, insulating materials reducing HVAC loads, and solar-generating systems actively cutting fossil fuel dependence all qualify as energy-efficient eco friendly roofing materials metal roofs can reduce energy expenses by around 40%, while green roofs decrease winter energy use by 10% through insulation and summer cooling through evapotranspiration.
Recyclability and end-of-life
True environmentally friendly roofing materials avoid landfills through recyclability or biodegradability metal roofs are 100% recyclable, EPDM rubber membranes can be reconstituted, wood shakes biodegrade naturally, and recycled shingles participate in shingle recycling programs.
Top 10 Environmentally Friendly Roofing Materials (Complete Comparison)
The best eco friendly roofing materials balance sustainability credentials with practical performance, cost, and aesthetic requirements.
1. Metal Roofing (Steel, Aluminum, Copper)

Metal roofing ranks among the most sustainable options due to exceptional longevity, high recycled content, and complete recyclability at end-of-life.
Sustainability benefits:
- Contains 25-95% recycled content depending on metal type
- 100% recyclable without quality degradation
- 40-100 year lifespan minimizes replacement cycles
- Reflects solar heat reducing cooling costs 10-25%
- Low maintenance requirements over decades
Considerations:
- Higher upfront cost ($8-$15/sq ft installed)
- Can be noisy during rain/hail without proper underlayment
- Requires professional installation for proper fastening/sealing
Best for: Long-term homeowners prioritizing durability, energy savings, and lifecycle sustainability in any climate.
2. Recycled Shingles (Rubber, Plastic, Wood Fiber)
Recycled composite shingles divert waste from landfills while mimicking traditional materials like slate and cedar at fraction of cost.
Sustainability benefits:
- Contain 75-100% recycled content (plastic bottles, rubber tires, wood waste)
- Participate in shingle recycling programs at end-of-life
- 25-50 year lifespan exceeds standard asphalt
- Excellent insulation reducing heating/cooling loads
- Impact-resistant formulations handle hail better than organic materials
Considerations:
- Appearance quality varies by manufacturer
- Not as long-lasting as slate/metal but far cheaper
- Requires verification of recycled content claims
Best for: Budget-conscious homeowners wanting eco friendly roofing materials without premium pricing, particularly in moderate climates.
3. Clay and Concrete Tiles
Clay tiles represent timeless environmentally friendly roofing materials offering century-long durability with minimal environmental processing.
Sustainability benefits:
- Natural earth materials requiring minimal chemical processing
- 100+ year lifespan when properly installed
- Excellent thermal mass regulating indoor temperatures
- Recyclable/reusable as pavers or aggregate
- Fire-resistant without chemical treatments
Considerations:
- Heavy weight (900-1,100 lbs/square) requires structural reinforcement
- Higher cost ($10-$18/sq ft installed)
- Fragile under foot traffic during maintenance
Best for: Spanish/Mediterranean/Mission architectural styles in warm climates where weight capacity exists and longevity justifies investment.
4. Wood Shakes and Shingles (Cedar, Redwood)
Wood shakes from sustainably managed forests combine renewable resources with biodegradability and natural insulation.
Sustainability benefits:
- Renewable resource when sourced from certified sustainable forests
- Carbon sequestration during tree growth offsets manufacturing emissions
- Completely biodegradable at end-of-life
- Excellent natural insulation reducing energy consumption
- 30+ year lifespan with proper maintenance
- Wind resistance up to 245 mph when installed correctly
Considerations:
- Requires regular maintenance (cleaning, treatment) in humid climates
- Fire risk in wildfire zones unless treated with fire retardants
- Higher cost than asphalt ($6-$12/sq ft)
Best for: Traditional/rustic architectural styles in forested regions with moderate fire risk and homeowners committed to maintenance.
5. Green Roofs (Living/Vegetated Roofs)
Green roofs install vegetation layers above waterproof membranes, transforming roofs into ecosystems delivering unmatched environmental benefits.
Sustainability benefits:
- Reduce urban heat island effect by 40°F compared to conventional roofs
- Absorb 65% of stormwater runoff preventing flooding and filtering pollutants
- Decrease air pollution while producing oxygen
- Reduce winter energy use 10% through superior insulation
- 40+ year membrane lifespan protected by vegetation
- Create urban biodiversity habitats
Considerations:
- High installation cost ($15-$25/sq ft)
- Requires structural capacity for saturated soil weight
- Ongoing maintenance (irrigation, weeding, fertilization)
- Specialized waterproofing expertise required
Best for: Urban commercial/institutional buildings and eco-focused homeowners with flat/low-slope roofs, structural capacity, and maintenance commitment.
6. Solar Roof Tiles and Shingles
Solar roofing integrates photovoltaic cells within roofing materials, generating clean electricity while providing weather protection.
Sustainability benefits:
- Generate renewable electricity offsetting grid consumption and emissions
- Can achieve net-zero or net-positive energy over building lifetime
- Integrated design more aesthetically pleasing than rack-mounted panels
- Federal/state incentives reduce effective cost 26-30%
Considerations:
- Highest upfront cost ($20-$30/sq ft installed)
- 25-30 year warranty typical, less than premium roofing alone
- ROI depends on electricity rates, sun exposure, incentives
- Panel recycling infrastructure still developing
Best for: South/west-facing roofs in sunny climates with high electricity costs, long-term homeowners wanting energy independence.
7. EPDM Rubber Membrane (Recycled Content)
EPDM (ethylene propylene diene monomer) rubber roofing uses recycled tire rubber, ideal for flat/low-slope residential and commercial roofs.
Sustainability benefits:
- Made from recycled rubber tires reducing landfill waste
- 100% recyclable at end-of-life
- 15-25+ year lifespan with proper care
- Excellent insulation preventing 25% heat loss through roof
- Low-pollution manufacturing process
- Minimal maintenance (UV/moss/mildew resistant)
Considerations:
- Limited to flat/low-slope applications
- Black color absorbs heat unless white/light coatings applied
- Seam quality critical to waterproofing performance
Best for: Flat-roof additions, garages, sheds, and commercial buildings wanting affordable recycled-content eco friendly roofing materials.
8. Reclaimed Slate and Clay Tiles
Salvaged slate and clay from demolished buildings represent ultimate sustainability giving century-old materials second lives.
Sustainability benefits:
- Zero new material extraction or manufacturing
- Proven durability (already lasted 50-100+ years)
- Significantly cheaper than new slate/clay
- Maintains historic character for restoration projects
Considerations:
- Limited availability dependent on demolition salvage
- Condition varies; requires expert inspection
- May need supplemental new tiles for full coverage
Best for: Historic restorations, heritage homes, and budget-conscious projects wanting authentic environmentally friendly roofing materials aesthetics.
9. Cool Roof Coatings (Reflective)
Cool roof coatings applied over existing roofing reflect solar radiation, reducing surface temperatures 50-60°F and extending roof life.
Sustainability benefits:
- Reduce cooling energy consumption 10-15%
- Lower urban heat island effect
- Extend existing roof lifespan 10-15 years avoiding replacement
- Quick application over various substrates
Considerations:
- Requires reapplication every 10-15 years
- Not structural roofing coating only
- Effectiveness depends on existing roof condition
Best for: Extending life of serviceable roofs in hot climates, commercial flat roofs, and energy-efficiency retrofits.
10. Modern “Cool” Asphalt Shingles
Advanced asphalt shingles incorporate reflective granules and recycled content, improving sustainability of traditional materials.
Sustainability benefits:
- Cool-colored granules reflect solar heat reducing cooling loads
- Some contain recycled asphalt and post-consumer waste
- Established recycling programs divert old shingles to road paving
- Most affordable roofing option ($3-$6/sq ft)
- Minimal maintenance and easy spot repairs
Considerations:
- Shortest lifespan (15-25 years) among options
- Petroleum-based product with fossil fuel dependence
- Recycling not universally available
Best for: Budget-limited projects, moderate climates, homeowners prioritizing affordability with modest sustainability gains over conventional options.
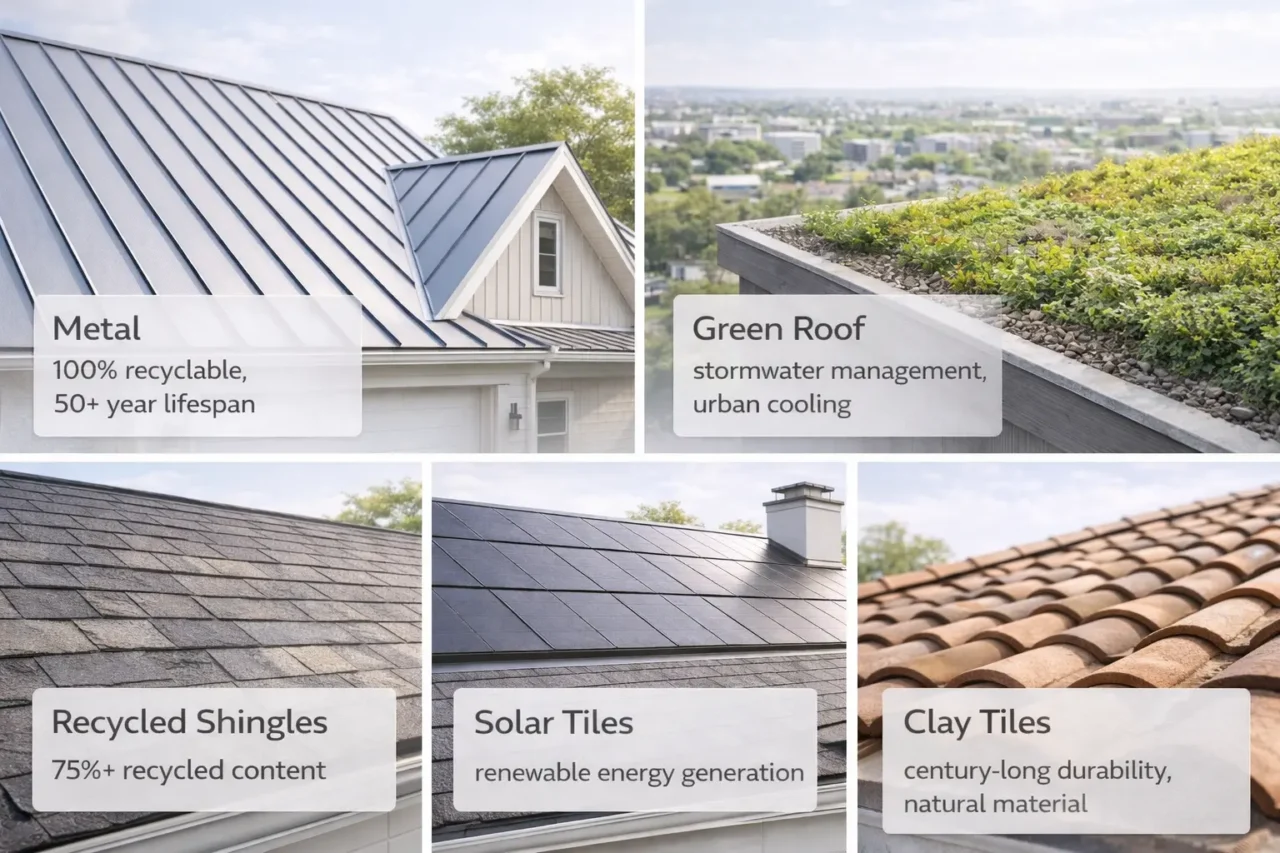
Benefits of Environmentally Friendly Roofing Materials (Beyond Sustainability)
Choosing eco friendly roofing materials delivers practical advantages extending far beyond environmental consciousness.
Energy cost savings
Reflective and insulating environmentally friendly roofing materials dramatically reduce HVAC loads metal roofs cut energy expenses ~40%, cool roofs reduce cooling costs 10-25%, and green roofs decrease winter heating 10% while lowering summer cooling through evapotranspiration.
Improved indoor comfort
Better insulation and thermal regulation from eco friendly roofing materials eliminate hot/cold spots, reduce temperature swings, and improve year-round comfort wood shakes and clay tiles provide natural thermal mass buffering extreme exterior temperatures.
Tax incentives and rebates
Federal, state, and local programs reward sustainable building federal solar tax credits reduce installation costs 26-30%, energy-efficient roof material credits available in many states, and local utility rebates for cool roofs in heat-island-reduction programs.
Increased property value
Durable attractive environmentally friendly roofing materials boost resale value metal roofs and clay tiles signal quality/longevity to buyers, solar roofing offers immediate utility savings, and green building certifications (LEED, Energy Star) differentiate properties.
Stormwater management
Green roofs absorb 65% of rainfall preventing runoff and reducing municipal stormwater infrastructure stress, while permeable eco-roofing systems filter pollutants before water enters watersheds.
Air quality improvement
Living green roofs filter particulate matter, convert CO2 to oxygen, and reduce urban air pollution significant cumulative benefits when adopted across neighborhoods.
Cost Comparison: Environmentally Friendly Roofing Materials
Eco friendly roofing materials range from budget-friendly to premium investment, with lifecycle costs often lower than upfront pricing suggests.
| Material | Cost per sq ft (Installed) | Lifespan (Years) | Cost per Year |
|---|---|---|---|
| Cool Asphalt Shingles | $3-$6 | 15-25 | $0.15-$0.40 |
| Recycled Shingles | $4-$8 | 25-50 | $0.08-$0.32 |
| Wood Shakes (Cedar) | $6-$12 | 30+ | $0.20-$0.40 |
| Metal Roofing | $8-$15 | 40-100 | $0.08-$0.38 |
| EPDM Rubber | $5-$10 | 15-25 | $0.20-$0.67 |
| Clay/Concrete Tiles | $10-$18 | 100+ | $0.10-$0.18 |
| Green Roof | $15-$25 | 40+ | $0.38-$0.63 |
| Solar Roof Tiles | $20-$30 | 25-30 | $0.67-$1.20 (offset by energy production) |
Lifecycle cost analysis reveals metal, clay, and recycled shingles often deliver best long-term value despite higher upfront investment.
Choosing the Right Environmentally Friendly Roofing Materials for Your Home
Optimal eco friendly roofing materials selection depends on multiple factors beyond sustainability alone.
Climate considerations
- Hot/sunny climates: Cool roofs (reflective metal, light clay, white EPDM, cool coatings) maximize cooling savings
- Cold/snowy climates: Insulating materials (wood shakes, green roofs, metal with foam backing) reduce heating loads
- Hurricane/wind zones: Metal and clay tiles offer superior wind resistance vs lighter materials
- High rainfall areas: Green roofs manage stormwater; metal sheds water efficiently
Building structure
- Weight capacity: Clay tiles and green roofs require structural reinforcement vs lightweight metal/recycled shingles
- Roof slope: Green roofs and EPDM suit flat/low-slope; shingles/tiles need 4:12+ pitch
- Existing substrate: Cool coatings extend serviceable roofs; full replacement needed for degraded decking
Budget and timeline
- Immediate budget limits: Cool asphalt shingles or recycled composites provide sustainability at entry price
- Long-term value focus: Metal, slate, clay tiles minimize lifecycle cost despite premium upfront
- Energy savings priority: Solar roofing and cool roofs deliver measurable utility reductions
Aesthetic preferences
- Modern/contemporary: Standing seam metal, flat green roofs, integrated solar
- Traditional/rustic: Wood shakes, clay tiles, reclaimed slate
- Colonial/historic: Cedar shakes, slate, clay matching original materials
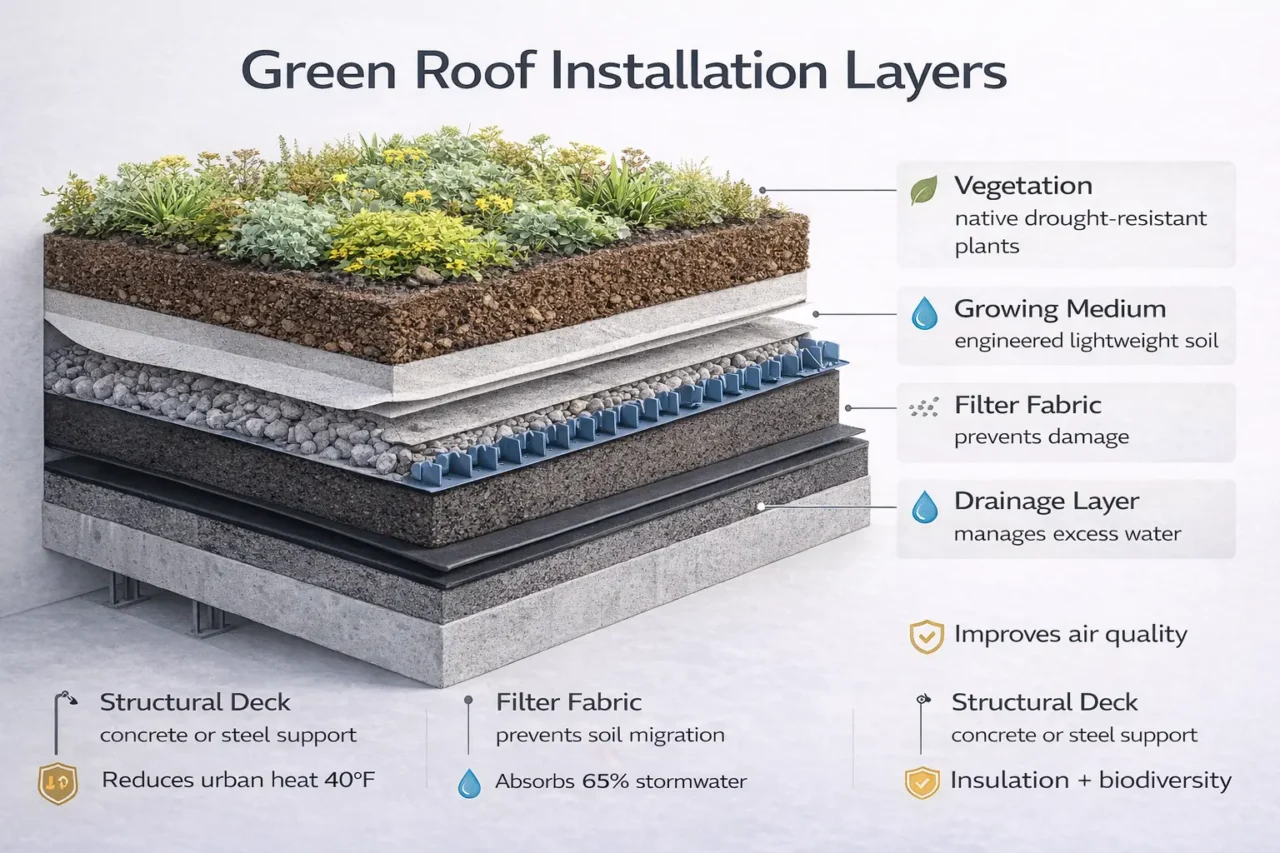
Maintenance Requirements for Eco Friendly Roofing Materials
Proper maintenance extends lifespan of environmentally friendly roofing materials and maximizes sustainability benefits.
Metal roofing
- Annual inspection for fastener tightness and sealant integrity
- Clear debris from valleys/gutters preventing corrosion
- Touch up scratches/coating damage in coastal environments
Green roofs
- Regular irrigation during dry periods
- Seasonal weeding and vegetation management
- Annual membrane inspection beneath growing medium
- Fertilization 1-2x yearly for healthy plant growth
Wood shakes
- Annual cleaning removing moss/algae in humid climates
- Periodic treatment with preservatives/fire retardants
- Replace cracked/split shakes promptly preventing leaks
Recycled shingles
- Minimal maintenance similar to standard asphalt
- Inspect after severe weather for wind damage
- Keep gutters clear preventing water backup
Frequently Asked Questions About Environmentally Friendly Roofing Materials
What are the most environmentally friendly roofing materials?
The most environmentally friendly roofing materials are metal roofing (100% recyclable, 40-100 year lifespan), recycled shingles (75-100% recycled content), clay/slate tiles (100+ years, natural materials), sustainably harvested wood shakes (renewable, biodegradable), and green roofs (stormwater management, urban cooling).
Are eco friendly roofing materials more expensive?
Some eco friendly roofing materials cost more upfront (metal $8-$15/sq ft, clay $10-$18/sq ft) but deliver lower lifecycle costs through longevity, while others like recycled shingles ($4-$8/sq ft) compete with conventional materials on price.
Do environmentally friendly roofing materials save energy?
Yes metal roofs reduce energy costs ~40%, cool roofs cut cooling loads 10-25%, green roofs decrease winter heating 10%, and solar roofing generates electricity offsetting grid consumption.
How long do eco friendly roofing materials last?
Environmentally friendly roofing materials lifespans vary: slate/clay 100+ years, metal 40-100 years, wood shakes 30+ years, recycled shingles 25-50 years, EPDM 15-25 years, green roof membranes 40+ years.
Can I get tax credits for eco friendly roofing?
Federal solar tax credits cover 26-30% of solar roofing costs, some states offer energy-efficient material credits, and local utilities provide cool roof rebates check Database of State Incentives for Renewables & Efficiency (DSIRE).
What is the most recyclable roofing material?
Metal roofing is 100% recyclable without quality loss, EPDM rubber can be reconstituted, recycled shingles participate in recycling programs, and clay/slate tiles are reusable as pavers.
Are green roofs worth the cost?
Green roofs justify premium cost ($15-$25/sq ft) in urban settings through stormwater management (65% runoff reduction), cooling (40°F surface temperature reduction), air quality improvement, and extended membrane life (40+ years).
Get free roofing advice, cost guides, and seasonal maintenance tips.
Roofing content specialist with 5+ years researching U.S. residential and commercial roofing. Has documented 200+ projects covering installation costs, material selection, contractor vetting, and DIY guides for homeowners across all climate zones.
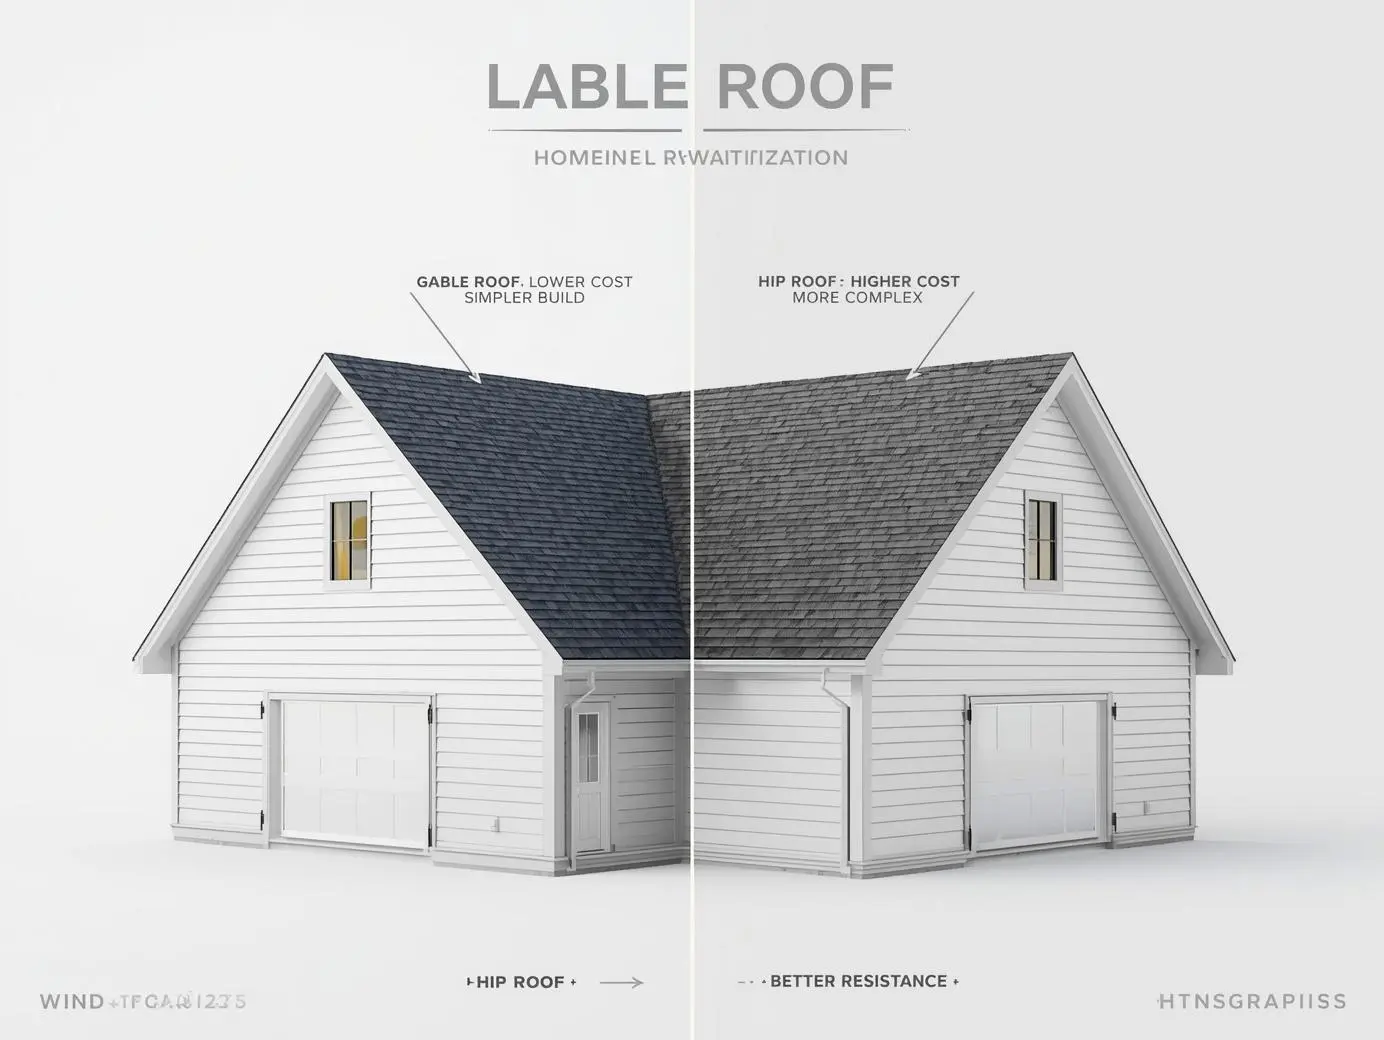
Hip vs Gable Roof Cost: Full Price Comparison Guide
Hip vs gable roof cost is mostly driven by roof complexity: gable roofs are typically cheaper because they have a simpler two-slope design, while hip roofs usually cost more because the four-slope design needs more framing, more cuts, and more roofing materials. A common rule of thumb is that hip roofs require around 40% more materials than gable roofs, and total hip roof pricing is often quoted in the $20,000–$50,000 range (about $8–$12 per sq ft), while gable roof builds are frequently cited at $16–$30 per sq ft.
This guide breaks down hip vs gable roof cost in plain language, shows how to estimate roof installation cost for each style, and explains when the higher hip roof cost is worth it for wind resistance, insurance savings, and resale value.
Table of Contents
Hip roof vs gable roof: quick definitions
The gable roof vs hip roof comparison starts with structure.
- A gable roof has two sloped roof planes meeting at a ridge, with triangular “gable ends” on the two short sides.
- A hip roof slopes down on all four sides and uses “hip” lines where the roof planes meet, which creates more seams, more framing intersections, and more roof surface area to cover.
Those extra planes and intersections are the biggest reasons hip vs gable roof cost tends to favor the gable roof.
Hip vs gable roof cost (what you’ll pay)
Costs vary by region, roof size, pitch, number of valleys, and material choice, but published comparisons consistently show hip roofs cost more than gable roofs.
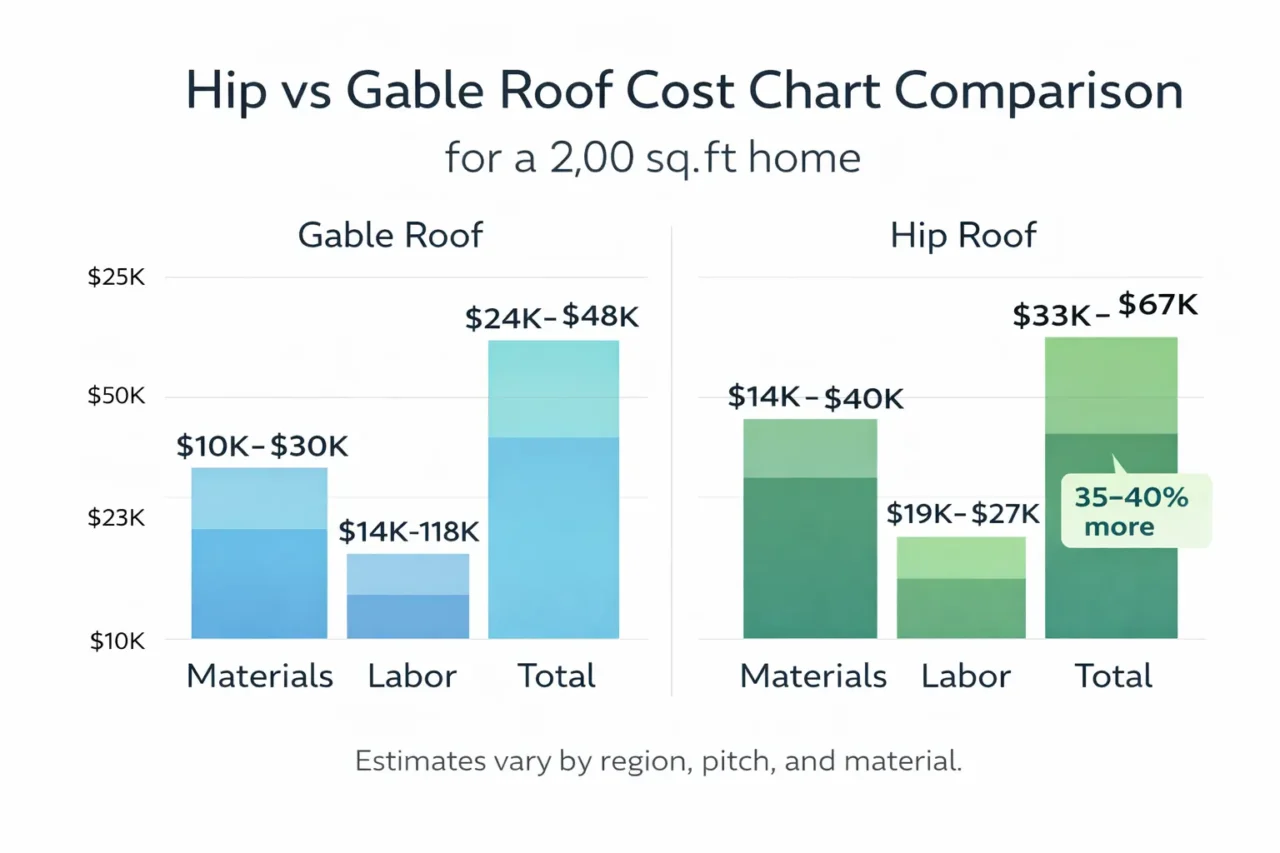
Typical price ranges (widely cited)
Schneider Insurance cites these typical ranges:
- Gable roof: $16–$30 per sq ft (example “gable porch roof” build range)
- Hip roof: $20,000–$50,000 total (about $8–$12 per sq ft)
Roof River City provides another clear comparison for a typical home:
- Gable roof installation: $24,000–$48,000
- Hip roof installation: $33,600–$67,200
- Hip roofs cost about 35–40% more due to complex design and additional materials.
Why do per‑sq‑ft numbers look “inverted” in some sources?
You may notice some sources list gable roofs as $16–$30 per sq ft while hip roofs are $8–$12 per sq ft (yet hip roofs are still “more expensive” overall). This happens because different articles sometimes mix “roof build cost” vs “roofing surface cost,” and sometimes reference specific parts of a project (like framing or a porch roof) rather than the same scope and same measurement method across both roof types. For practical planning, the most consistent takeaway remains: hip roofs often run 35–40% higher total than comparable gable roofs because of added planes, hips, valleys, and labor.
What drives hip vs gable roof cost (the real levers)
If you want an accurate estimate for hip vs gable roof cost, focus on the cost drivers that change from bid to bid.
1) Roof surface area and material waste
Hip roofs typically have more roof surface area than a gable roof covering the same footprint, which increases shingles/underlayment/ice-and-water coverage. Schneider Insurance notes hip roofs can require about 40% more materials because there are more slopes to cover.
2) Framing complexity (labor and lumber)
Hip roof framing is more intricate because rafters/trusses meet at hips and ridges, and complex intersections require more cuts and additional bracing. Larson Keeney notes hip roofs require more time, materials, and skill to build, which increases price.
3) Seams, hips, ridges, and valleys (leak-risk detailing)
More intersections mean more flashing work and detail work. Schneider Insurance also notes that the “multiple angles and seams” of hip roofs increase complexity, which increases both material and labor.
4) Roof pitch and story height
Steeper roofs and taller houses increase labor time, staging, and safety setup for either roof type, but hip roofs already start with a complexity premium.
Hip vs gable roof cost comparison table (homeowner view)

Gable roof vs hip roof: pros and cons (beyond cost)
Cost matters, but roof performance and risk also influence total lifetime value.
Gable roof advantages
- Lower build complexity, usually leading to lower roof installation cost.
- Strong water shedding for rain and snow because of clear slopes and fewer intersections.
- Often simpler to ventilate and to add attic features, depending on design.
Gable roof disadvantages
- Gable roofs can be more vulnerable in high-wind environments because the “open ends” can catch wind and contribute to uplift if not reinforced.
Hip roof advantages
- Hip roofs are often preferred in hurricane zones and storm-prone areas because the four-sided sloped design deflects wind from multiple directions and reduces wind uplift.
- Many homeowners prefer the look of hip roofs for symmetry and curb appeal, which can support resale perception in some markets.
Hip roof disadvantages
- Higher hip vs gable roof cost because of complex framing and additional material needs.
- More seams and intersections can increase detailing requirements, which can raise labor cost and make workmanship quality even more important.
Insurance and storm risk (how roof shape can affect total cost)
Roof shape can influence storm performance, and some insurers consider roof shape as part of risk assessment. Hip roofs are widely discussed as more stable in high winds because wind flows over the roof rather than pushing on large vertical gable ends. Schneider Insurance also highlights wind performance and stability as a hip-roof advantage in storm-prone areas.
Practical takeaway: If you live in a high-wind or hurricane-prone region, the higher hip vs gable roof cost can be justified as a resilience investment, especially when paired with proper fastening and modern code-compliant installation.
Resale value: which roof adds more value?
Roof River City notes the decision can impact durability, insurance costs, and resale value, not just installation price. Because hip roofs are often perceived as more storm-resistant and architecturally “premium,” they may support resale value in some markets, while gable roofs can still be ideal where affordability and simple maintenance are priorities.
How to estimate your hip vs gable roof cost (quick method)
Use this method to get a realistic range before calling contractors:
- Measure roof area (or ask a contractor to measure) because roofing pricing typically scales with square footage of roof surface, not just home footprint.
- Decide roof type: gable roof vs hip roof.
- Apply a baseline: use published ranges as “sanity checks” (e.g., gable $24K–$48K vs hip $33.6K–$67.2K for a typical install), then adjust for your local labor and material choice.
- Add complexity multipliers: dormers, multiple valleys, skylights, chimneys, and steep pitch increase costs for both.
FAQs: Hip vs gable roof cost
Is a gable roof cheaper than a hip roof?
Yes, most comparisons report gable roofs are cheaper because they use fewer materials and are simpler to frame and finish, while hip roofs are more complex and typically cost 35–40% more.
How much more does a hip roof cost than a gable roof?
A common benchmark is that hip roofs cost about 35–40% more than comparable gable roofs because they require more roof surface coverage and more complex labor.
Why do hip roofs cost more?
Hip roofs slope on all four sides and require more intersections (hips, ridges, valleys), which increases both material use and labor time.
Which roof is better for high winds?
Hip roofs are commonly considered better for high winds because their four-sided slopes allow wind to pass over the roof more smoothly, reducing uplift risk compared to gable ends.
Does a hip roof reduce insurance costs?
Hip roofs are often associated with better wind performance and may help reduce storm risk, and some insurers consider roof shape in risk calculations, but discounts vary by carrier and region.
Which is better for snow: hip or gable?
Many sources note gable roofs shed rain and snow efficiently, while hip roofs can also perform well but may be chosen more for wind resistance than for maximizing steep snow-shedding geometry.
Final decision: choosing the best roof type for your budget
If your priority is minimizing upfront roof installation cost, a gable roof is usually the most cost-effective choice in the hip vs gable roof cost debate. If your priority is wind resilience and a more aerodynamic profile—especially in storm-prone areas—the higher hip roof cost may be justified, provided installation quality is high.
If you share your home size (sq ft), roof pitch (if known), and your region/climate (windy/coastal vs snowy), a tighter cost estimate range and a “which roof is better for you” section can be customized.
Get free roofing advice, cost guides, and seasonal maintenance tips.
Roofing content specialist with 5+ years researching U.S. residential and commercial roofing. Has documented 200+ projects covering installation costs, material selection, contractor vetting, and DIY guides for homeowners across all climate zones.
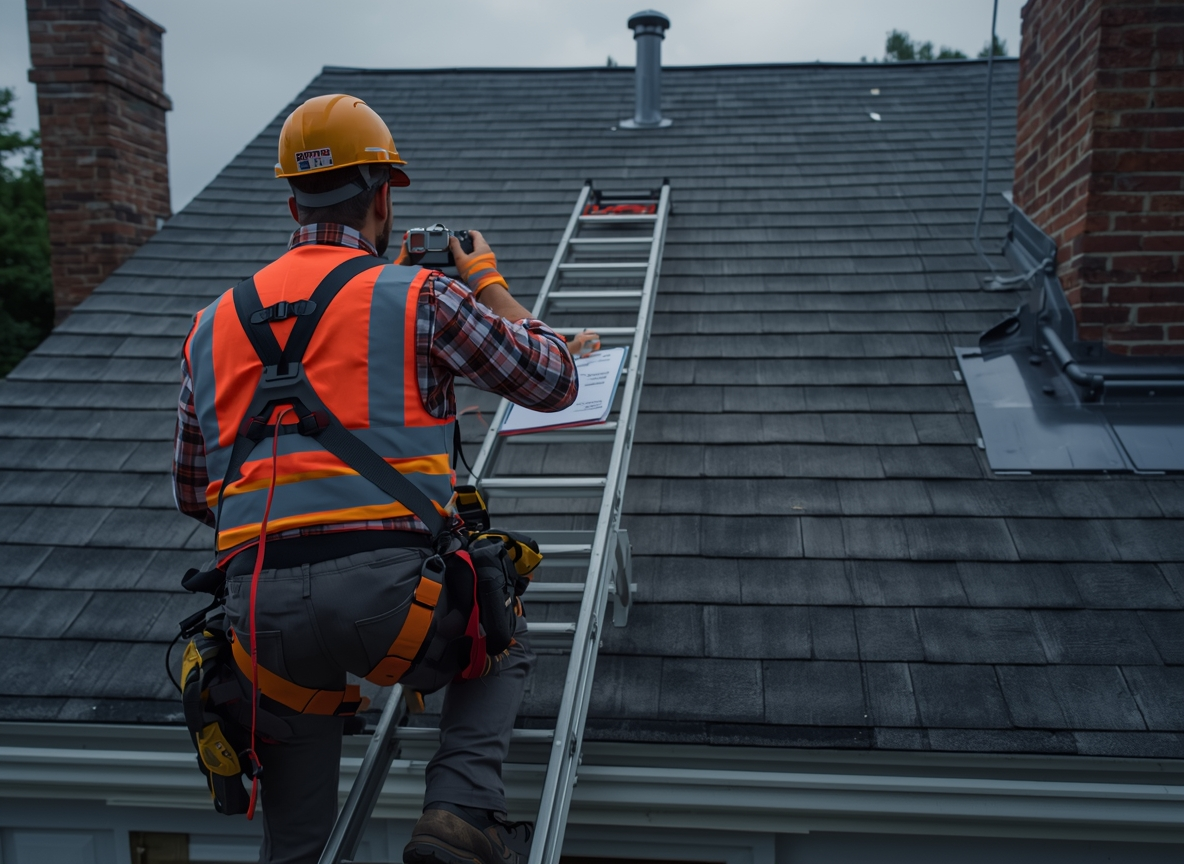
Free Roof Inspection: What to Expect & How to Schedule
A free roof inspection gives homeowners professional evaluation of their roofing system at no upfront cost, helping identify shingle damage, leaks, storm impact, ventilation problems, and structural concerns before small issues become expensive emergencies. Most reputable roofing contractors offer free roof inspection services because early detection saves homeowners thousands in future repair costs while helping spot insurance-covered storm damage that might otherwise go unnoticed.
These comprehensive roofing inspections typically examine shingles, flashing, gutters, attic ventilation, soffits, fascia, and interior ceiling stains, providing detailed reports with photos that homeowners use for maintenance planning or insurance claims. While contractors genuinely offer free roof inspection services to build relationships and demonstrate expertise, homeowners benefit most by understanding exactly what the inspection covers, what red flags indicate urgent problems, and how to evaluate contractor recommendations without pressure. This complete guide explains the free roof inspection process step-by-step, what inspectors actually check, when to schedule yours, common findings across roof ages and types, insurance claim connections, and smart homeowner questions ensuring you get maximum value from the service.
Table of Contents
What is a free roof inspection (and why contractors offer them)
Free roof inspections are comprehensive professional evaluations of residential roofing systems conducted by licensed roofing contractors at no charge to homeowners, designed to identify current damage, predict future problems, assess remaining roof lifespan, and recommend appropriate maintenance or replacement timing.
Why contractors provide free roof inspections
Reputable roofing companies offer free roof inspection services as relationship-building investments rather than “sales gimmicks” early problem identification positions them as trusted advisors while giving homeowners actionable information preventing emergency situations. Contractors like Leverage Roofing, Certified Quality Roofing, and Mighty Dog Roofing emphasize that free roof inspection services help customers avoid costly future repairs through early detection of issues like missing shingles, water damage, or structural problems.
What homeowners gain from free inspections
Homeowners receive detailed written reports (often with photos) documenting roof condition, estimated remaining lifespan, priority repairs, and insurance-relevant storm damage information that’s valuable for budgeting, selling preparation, or filing legitimate insurance claims. Even if no immediate work is needed, the baseline assessment provides valuable future reference showing how roof condition progresses over time.
What a professional free roof inspection covers (complete checklist)
Quality free roof inspection services examine every critical roofing component, from exterior shingles and flashing to interior attic indicators and peripheral systems like gutters that affect roof performance.
Exterior roof surface evaluation
Inspectors check asphalt shingle condition (granule loss, cracking, cupping, missing tabs), metal roof panel alignment and fastener security, tile integrity and mortar condition, and membrane condition on flat/low-slope roofs. They document shingle age and weathering patterns indicating remaining lifespan, since asphalt composition shingles typically last 17-25 years depending on quality, climate exposure, and ventilation.
Flashing and penetration inspection
Flashing around chimneys, plumbing vents, bathroom/kitchen exhaust fans, skylights, and dormers receives close scrutiny because these transitions represent 80% of leak locations inspectors check sealant condition, metal corrosion, loose fasteners, and gaps allowing water entry.
Gutters, downspouts, and drainage
Inspectors evaluate gutter attachment security, rust-through, downspout alignment preventing foundation washout, and fascia/soffit condition since deteriorating wood supports compromise gutter function and allow pest entry.
Attic and ventilation assessment
Interior attic inspection reveals ventilation effectiveness (adequate soffit/ridge venting ratios), insulation levels, signs of condensation or ice dam staining, rafter staining indicating past leaks, and daylight visible through roof sheathing signaling shingle decking failure.
Storm damage documentation
Free roof inspection services excel at identifying hail impact (granule displacement creating bald shingle spots), wind uplift damage (bruised or creased shingles, lifted tabs), fallen branch punctures, and granule loss patterns matching recent storm events documentation critical for insurance claims.
When to schedule your free roof inspection (timing guide)
Timing determines whether your free roof inspection catches problems early or documents damage already causing interior harm.
After major weather events
Schedule free roof inspection immediately after hail storms, high winds (50+ mph), or tornado touchdowns even if no obvious exterior damage appears, granular loss and micro-cracks compromise waterproofing over time. Roofing contractors note wind speeds above 50 mph can lift shingle tabs without visibly breaking them, creating future leak paths.
Before selling your home
Homebuyers expect roofs with 5+ years remaining life a free roof inspection provides objective documentation of remaining lifespan (typically estimated via shingle age, weathering patterns, and attic indicators), preventing buyer objections or renegotiation requests.
Age-based inspection timing
Free roof inspection recommended every 2 years for roofs aged 10-15 years, annually for roofs 15-20 years old, and semi-annually for roofs over 20 years regardless of visible condition—older roofs degrade faster even without obvious exterior signs.
Spring and fall seasonal inspections
Spring inspections catch winter ice dam damage and shingle displacement; fall inspections identify summer storm impacts before freeze cycles exacerbate cracks and gaps.
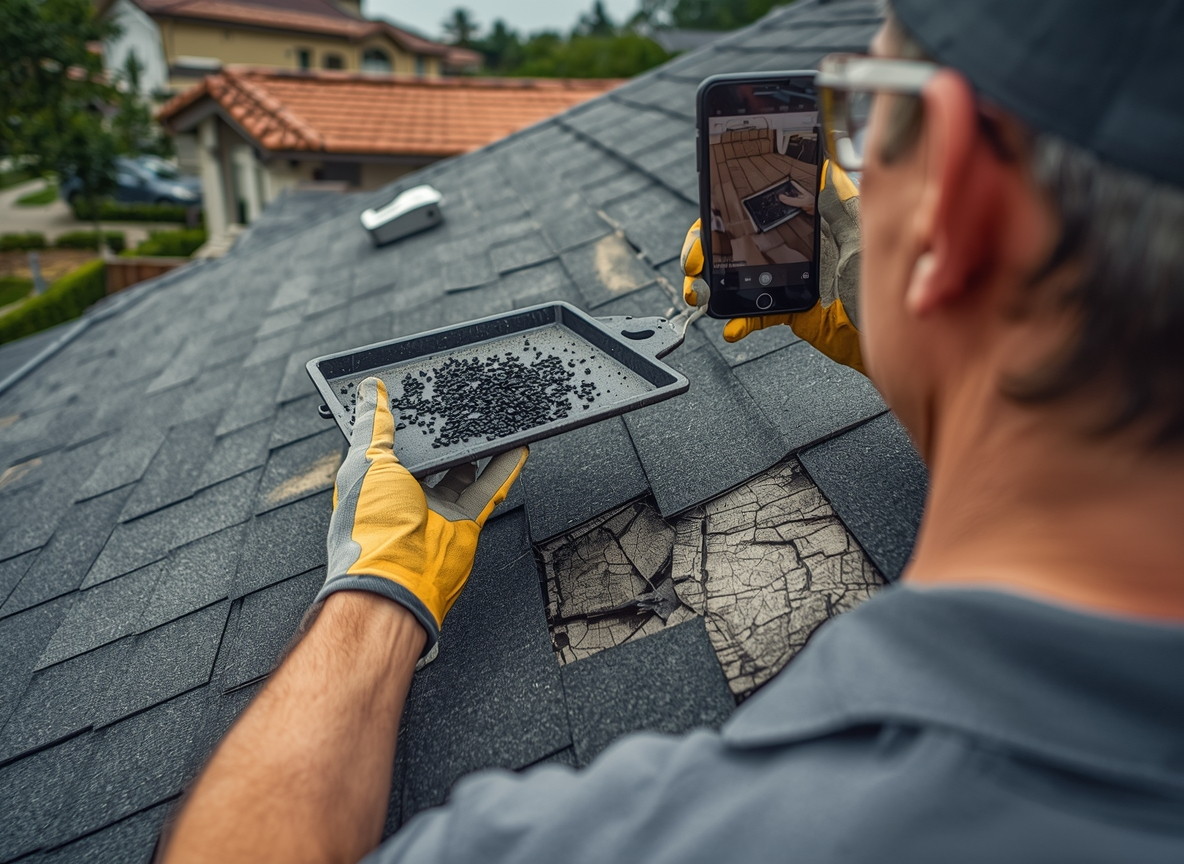
Red flags found during free roof inspections (urgent problems)
Experienced inspectors immediately flag these conditions requiring action within 30-90 days.
Multiple interior ceiling stains
Two or more ceiling stains in different attic locations indicate systemic leak patterns rather than isolated flashing problems water migrates laterally through sheathing before penetrating ceilings.
Significant granule loss (handful from one square)
Shingles shedding granules by handfuls indicate UV degradation nearing end of service life remaining waterproofing capacity drops rapidly after heavy granule erosion begins.
Curling, cupping, or fishmouthing shingles
Shingles exhibiting upward curling (at edges), cupping (concave surfaces), or fishmouthing (tabs lifting from adhesive seal) signal adhesive failure and ventilation problems allowing moisture cycles to break shingle bonds.
Daylighting through roof deck
Attic daylight visible through ceiling drywall or roof decking indicates shingle underlayment and decking failure emergency condition requiring immediate replacement preventing structural damage.
Ice dam evidence or heavy rafter staining
Dark staining along rafter undersides or ice dam ridges indicate repeated winter leaks warm attic temperatures melt snow which refreezes at eaves creating backup reaching interior spaces.
Free roof inspection process (what happens during your appointment)
Understanding the free roof inspection workflow helps homeowners prepare and set realistic expectations.
Step 1: Exterior visual assessment (20-30 minutes)
Contractor walks roof perimeter noting shingle age patterns, valley condition, ridge cap integrity, flashing appearance, gutter attachment, and chimney/step flashing condition using binoculars for steep sections.
Step 2: Ladder access and detailed roof examination (30-45 minutes)
Close inspection of shingle condition (granule retention, cracking, buckling), flashing seals, penetrations (plumbing vents, turbine vents), satellite dish mounts, and solar equipment attachment points.
Step 3: Attic inspection (15-20 minutes)
Flashlight examination reveals ventilation effectiveness, insulation depth, rafter staining patterns, daylight through decking, condensation evidence, and furnace/AC plenum leaks onto ceiling drywall.
Step 4: Drone inspection (optional, 10-15 minutes)
Mighty Dog Roofing offers drone free roof inspection services capturing detailed imagery comparable year-to-year, particularly valuable for steep roofs or identifying granule loss patterns across large areas.
Step 5: Detailed photo report and recommendations (15-20 minutes)
Inspectors compile digital report with timestamped images of problem areas, estimated remaining roof life (based on shingle age + condition), prioritized repair list with costs, and insurance claim recommendations if applicable.
Free roof inspection and insurance claims (critical connection)
Free roof inspection services excel at storm damage documentation positioning homeowners for successful insurance claims.
Hail damage identification
Inspectors document granule displacement creating “bald” shingle spots, hail “bruises” (indentations visible when backlit), and granule loss patterns matching recent hail events critical evidence insurers require.
Wind damage documentation
Wind-lifted shingle tabs, creased asphalt mats, displaced ridge caps, and granule trails down roof slopes indicate 50-70 mph gust damage often covered by comprehensive homeowner policies.
Claim process support
Many contractors assist filing claims, provide detailed damage reports with photos, communicate directly with adjusters, and offer contingency agreements covering deductible if claim exceeds replacement cost.
How to choose reputable free roof inspection contractors
Not all free roof inspection offers are equal scammers exploit storm-chasers targeting desperate homeowners.
Verify licensing and insurance
Licensed contractors display state license numbers on websites and trucks; verify active status through state contractor boards. Require proof of general liability insurance ($1M+ minimum) and workers compensation protecting homeowners from injury lawsuits.
Check reviews across platforms
Legitimate contractors maintain consistent 4.5+ star ratings across Google, BBB, Angi, and Yelp with 50+ reviews single-platform dominance or numerous 1-star complaints signal problems.
Demand detailed written reports
Quality inspectors provide timestamped photo reports documenting every issue with location descriptions, severity ratings, and cost estimates verbal “your roof is bad” claims without documentation are worthless.
Avoid high-pressure tactics
Reputable contractors present findings, explain issues, provide repair options with costs, then leave decision to homeowner “sign today or lose your spot” pressure indicates sales focus over service.
Common free roof inspection findings by roof age
Roof age dramatically influences inspection findings and recommendations.
0-10 years: Early warning signs
Minor granule loss at edges/valleys, isolated flashing sealant cracking, occasional lifted shingle tabs, gutter attachment loosening typically inexpensive spot repairs extending life 3-7 years.
10-15 years: Mid-life assessment
Widespread granule erosion, 10-20% shingle deterioration, valley wear exposing underlayment, ventilation compromise, early curling/cupping repair vs replace decision point depending on shingle quality and climate severity.
15-20 years: End-of-life evaluation
Heavy granule loss exposing fiberglass mats, 30-50% shingle failure, multiple ceiling stains, decking rot, ventilation failure replacement usually more economical than extensive repairs.
20+ years: Emergency replacement
End-of-life condition with brittle failed shingles, extensive deck damage, multiple daylight deck penetrations, structural concerns immediate replacement prevents interior catastrophe.
Frequently asked questions about free roof inspections
Are free roof inspections really free?
Yes reputable contractors provide free roof inspection services with no obligation to purchase repairs, using inspections to demonstrate expertise and build trust.
How long does a free roof inspection take?
Typical free roof inspection requires 90-120 minutes total: 20-30 minutes exterior visual, 30-45 minutes ladder roof access, 15-20 minutes attic, 15-20 minutes report compilation.
Will contractors find problems to create sales opportunities?
Quality contractors report honest findings excellent roofs receive “excellent condition, reinspect in 2 years” reports while failing roofs get accurate damage documentation.
Can free roof inspections help with insurance claims?
Absolutely free roof inspection services excel at storm damage documentation (hail granule loss, wind creasing, shingle displacement) providing insurers required evidence.
How often should I get free roof inspections?
Every 2 years for 10-15 year roofs, annually for 15-20 year roofs, semi-annually for 20+ year roofs, plus immediately after major hail/wind storms.
Do I need to be home during the inspection?
Many contractors conduct free roof inspection services without homeowner presence using keys/lockbox access, though being present allows real-time questions.
What if my roof is fine do I still get a report?
Yes quality inspections provide detailed condition reports even for excellent roofs, establishing baseline documentation valuable for future sales or disputes.
Get free roofing advice, cost guides, and seasonal maintenance tips.
Roofing content specialist with 5+ years researching U.S. residential and commercial roofing. Has documented 200+ projects covering installation costs, material selection, contractor vetting, and DIY guides for homeowners across all climate zones.
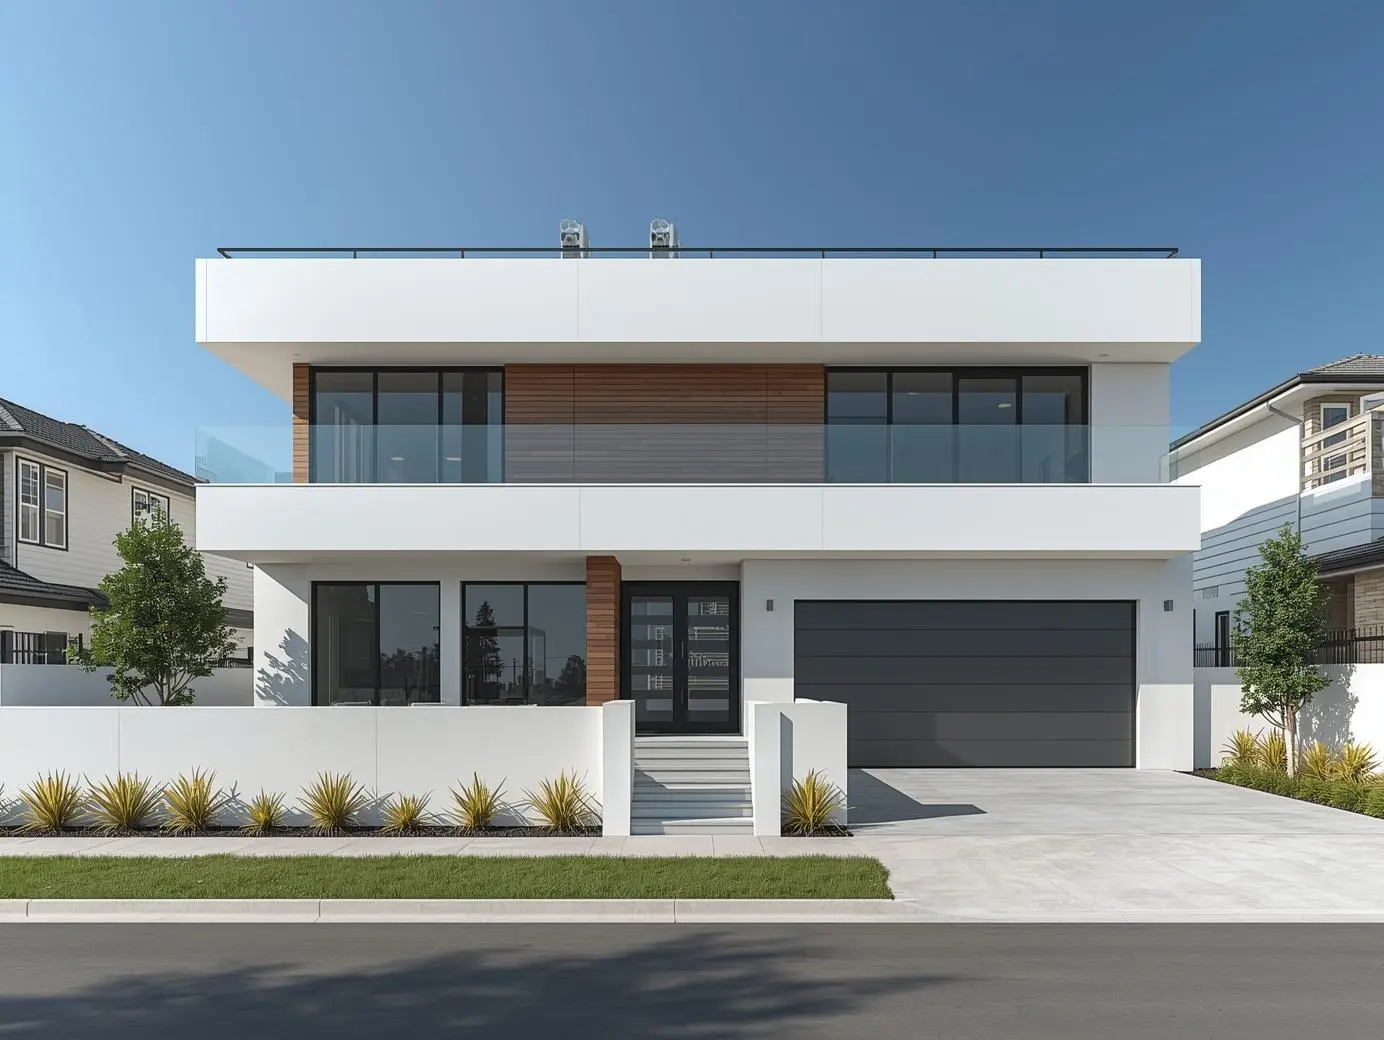
Flat Roof Homes: Design Guide, Types & Pros and Cons
Flat roof homes are residential buildings featuring low-slope roofing systems not truly “flat” but sloped just enough (typically 5–15 degrees) to move water toward drainage outlets that deliver clean modern lines, potential rooftop living space, and require specialized waterproofing membranes instead of traditional shingles. A successful flat roof design balances three critical elements: proper drainage planning to prevent water pooling, correct insulation placement (warm roof vs cold roof assembly), and durable membrane systems like Built-Up Roofing (BUR), EPDM, TPO, PVC, or modified bitumen that withstand low-slope conditions without leaking.
Understanding flat roof homes requires recognizing they’re fundamentally different from pitched roofs IKO notes that flat roofs use large membrane sheets with fewer seams to reduce leak potential on low slopes, and common flat-roof issues like pooling, leakage, and rot often stem from poor installation or maintenance rather than the flat roof concept itself. This comprehensive guide explores what defines flat roof homes, popular flat roof design types (parapet roofs, roof terraces, green roofs), membrane material options, warm vs cold roof assemblies, advantages and disadvantages compared to pitched roofs, essential maintenance requirements, and answers to frequently asked questions helping homeowners and builders make informed decisions about flat roofing systems.
Table of Contents
What are flat roof homes (and are they really flat)?
Flat roof homes are residential buildings designed with low-slope roofing assemblies that appear flat or nearly flat from ground level but actually incorporate gentle pitch—commonly around 5–15 degrees—allowing water to drain toward outlets rather than pooling on the surface. Unlike steep pitched roofs where gravity quickly sheds water and debris, flat roof homes rely on precise drainage systems directing water to specific collection points like roof drains, scuppers, or concealed gutters, making drainage design absolutely critical to long-term performance.
The “flat” misconception
IKO emphasizes that truly flat roofs (zero slope) would trap water indefinitely, which is why professional flat roof design always includes at least minimal slope—even systems appearing completely level incorporate enough pitch to move water, though this drainage may not be immediately visible from ground observation. The roofing industry often uses “low-slope roof” as the technically accurate term, defining these as roofs with pitch ratios typically under 3:12 (meaning less than 3 inches of vertical rise per 12 inches of horizontal run).
Where flat roof homes are common
Flat roofs dominate commercial construction on malls, warehouses, schools, and office buildings due to cost efficiency and usable rooftop space, but they’re less common on houses in many regions because homeowners perceive them as higher maintenance or more prone to leaks compared to steep pitched roofs. However, flat roof homes are increasingly popular in modern and contemporary architecture where clean horizontal lines, minimalist aesthetics, and rooftop living spaces align with design priorities—particularly in urban settings where lot sizes are limited and maximizing usable square footage matters.
Flat roof design: core architectural approaches
Flat roof design encompasses several distinct architectural strategies, each addressing how the roof appears, how it drains, and whether the roof surface serves additional purposes beyond weather protection.
Parapet flat roof (concealed slope design)
Parapet flat roofs hide the low-slope roofing surface behind raised perimeter walls (parapets), creating a completely flat appearance from street level while the actual roof slopes inward toward internal drains or box gutters. This approach is extremely popular in modern residential architecture because it delivers clean horizontal rooflines without visible eaves or exposed gutters, though it requires careful waterproofing at parapet-roof junctions and reliable internal drainage since water cannot simply run off roof edges.
Roof terrace and rooftop deck design
Some flat roof homes are designed with accessible rooftop terraces or decks that transform the roof surface into usable outdoor living space, requiring robust structural support, high-performance waterproofing membranes, protective wear surfaces (pavers, decking, or specialized walkable membranes), and excellent drainage systems handling both rainwater and foot traffic. HUF Haus describes flat roof designs creating additional living space through roof terraces that become extensions of interior rooms, particularly valuable in urban environments where ground-level outdoor space is limited.
Green roof (vegetated roof) design
Green roofs layer vegetation and growing medium above waterproof membranes, creating living roof surfaces that provide insulation benefits, stormwater management, urban heat island mitigation, and aesthetic appeal. These systems demand specialized waterproofing absolutely preventing root penetration, drainage layers managing both irrigation and rainfall, and sufficient structural capacity supporting saturated soil weight—making green roofs among the most complex and expensive flat roof design options.
Inverted roof design
Inverted roofs place insulation above the waterproofing membrane (instead of below it), protecting the membrane from temperature extremes and UV exposure, though this approach requires insulation materials not damaged by moisture exposure (typically rigid foam boards) and often incorporates ballast (gravel, pavers) holding insulation in place.
Warm roof vs cold roof: insulation assembly differences
One of the most important technical decisions in flat roof design is whether to build a warm roof or cold roof assembly, which refers to where insulation sits relative to the structural deck and how the assembly manages vapor and temperature differentials.
Warm roof (insulation above deck)
Warm roof assemblies place insulation above the structural roof deck, keeping the entire deck and structure at or near interior temperature and eliminating the cold surface where condensation typically forms. IKO describes warm roofs as “suited for cold weather climates” because placing insulation outside the structure prevents the temperature gradient that drives condensation, and the waterproofing membrane sits on top of the insulation where it experiences less thermal stress. Empire Roofing states that warm deck construction is “the most commonly and successfully used method” and notes it requires less maintenance than cold deck alternatives.
Cold roof (insulation below deck)
Cold roof assemblies position insulation below the structural deck (typically between ceiling joists), leaving the deck itself exposed to outdoor temperatures and creating a ventilated cavity above the insulation meant to remove moisture vapor. IKO explicitly discourages cold roofs in cold climates because the cold deck surface becomes a condensation plane where warm moist interior air meeting cold surfaces deposits water, potentially causing rot, mold, and insulation degradation—and achieving adequate ventilation in the thin cavity above insulation proves difficult in practice. Empire Roofing reinforces this, stating cold deck roofs are “considered the least recommended of the flat roof types” and warns that inadequate ventilation causes condensation issues.
Which assembly to choose
For flat roof homes in cold or mixed climates, warm roof construction is the safer default choice because it avoids condensation risks and simplifies construction by eliminating ventilation requirements. Cold roofs may still be used in hot-dry climates where condensation is minimal, but even there, warm roof benefits (structural protection, simpler detailing) often outweigh any cost savings.
Flat roofing systems and materials (what goes on flat roof homes)
Flat roof homes cannot use standard asphalt shingles because shingles rely on steep slopes for proper water shedding and sealing—IKO notes that roofing experts discourage shingles on flat roofs specifically because flat roof conditions demand fewer seams and larger waterproof sheets to prevent leaks. Instead, flat roof design employs membrane-based systems or multi-layer built-up assemblies engineered for low-slope performance.
Built-Up Roofing (BUR)
Built-Up Roofing uses multiple alternating layers of roofing felt (fiberglass or organic) and hot-applied asphalt, creating a thick multi-ply membrane topped with gravel, mineral surfacing, or cap sheet for UV protection and physical durability. BUR has been used for over a century and remains popular on flat roof homes due to proven long-term performance, excellent waterproofing through redundant layers, and gravel ballast protecting the membrane while providing fire resistance. The trade-off is installation complexity (requiring hot asphalt kettles and specialized crews), weight (multiple layers plus gravel add significant roof load), and difficulty locating leaks when they occur because water can travel between layers.
Modified Bitumen
Modified bitumen roofing uses asphalt reinforced with polymers (either APP—atactic polypropylene or SBP—styrene-butadiene-styrene) that improve flexibility, temperature performance, and durability compared to traditional asphalt, typically installed in fewer layers than BUR while maintaining robust waterproofing. Common installation methods include torch-applied (heating the membrane with propane torches to melt adhesive backing), cold-applied (using liquid adhesives instead of heat), and peel-and-stick (self-adhesive sheets), with torch application most common but requiring skilled installers to avoid fire hazards. Modified bitumen strikes a middle ground between traditional BUR and single-ply membranes—offering better performance than basic systems without the complexity or cost of premium single-plies.
EPDM (Ethylene Propylene Diene Monomer) rubber membrane
EPDM is a synthetic rubber single-ply membrane that has become extremely popular on flat roof homes due to proven 30+ year durability, excellent weather resistance, and relatively straightforward installation. IKO describes EPDM as flexible and durable with seams joined using tape or liquid adhesive, and membranes secured to the roof through mechanical fastening (screws and plates), full adhesive bonding, or ballast (gravel or pavers weighing down loose-laid sheets). EPDM comes in black (standard) or white (for reflectivity), with black EPDM absorbing heat (beneficial in cold climates for snow melting but detrimental in hot climates) and white EPDM reflecting heat to reduce cooling loads.
TPO (Thermoplastic Polyolefin) membrane
TPO is a single-ply thermoplastic membrane that has gained significant market share over the past 20-30 years, particularly appealing for its white reflective color reducing cooling costs and its reputation as an environmentally friendlier alternative to PVC since TPO contains no chlorine. IKO notes TPO seams are heat-welded (using hot-air guns to fuse overlapping membrane edges), creating watertight bonds stronger than the membrane itself when properly installed, and TPO can be mechanically fastened, fully adhered, or ballasted. TPO offers good UV resistance, flexibility in cold weather, and strong seam strength, though it has experienced formulation variations across manufacturers that have caused some early failures in the past—making contractor experience with specific TPO products important.
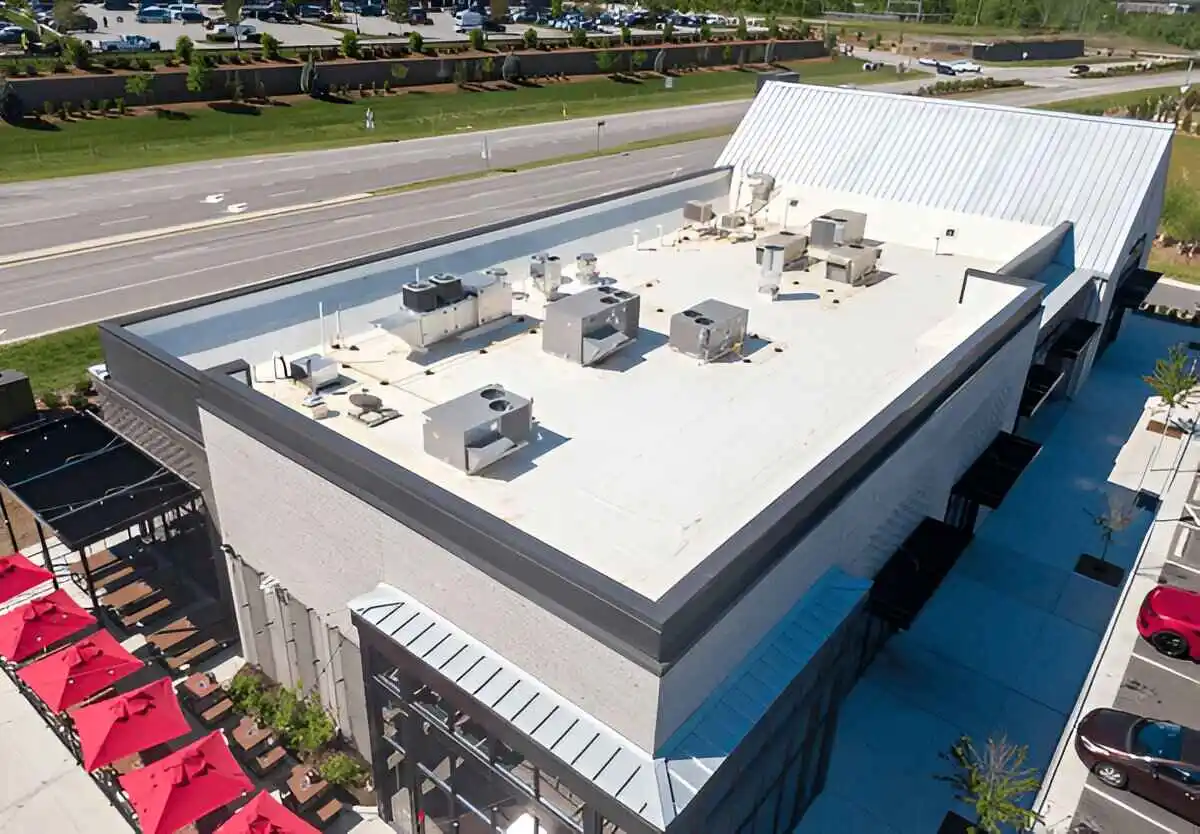
PVC (Polyvinyl Chloride) membrane
PVC roofing is another thermoplastic single-ply membrane similar to TPO in installation (heat-welded seams, mechanical/adhesive/ballast attachment) but using different chemistry—PVC contains chlorine and plasticizers giving it excellent flexibility, chemical resistance, and fire performance. IKO describes PVC as “fire resistant” and resistant to grease, which makes it particularly popular on restaurant roofs or buildings where grease or chemical exposure is a concern. PVC typically costs more than EPDM or TPO but offers superior performance in demanding environments and extremely long track record (PVC roofing has been used since the 1960s).
Liquid-applied and spray-on systems
Liquid-applied membranes are cold-applied liquid coatings (often polyurethane or silicone-based) that cure into seamless waterproof layers conforming perfectly to roof contours, flashings, and penetrations. These systems excel at complex roof geometries and retrofit applications where they can be applied over existing membranes, but IKO notes they typically require specialized applicators, and quality depends heavily on proper surface prep, correct thickness application, and ideal weather during installation. Spray-on roofing (silicone, acrylic, aluminum coatings) similarly creates seamless barriers but can be expensive and may require reapplication every 10-15 years depending on exposure and coating type.
Metal roofing (low-slope applications)
Standing-seam metal roofing—large interlocking metal panels (steel, aluminum, zinc, or copper) with raised seams—can be used on low-slope roofs and offers exceptional longevity (50+ years for quality installations), fire resistance, and modern aesthetics aligning with contemporary flat roof home design. IKO notes metal roofing is more expensive than membrane systems, can be noisy during rain or hail, and metal itself is vulnerable to denting from hail impact, though these drawbacks are often acceptable trade-offs for homeowners prioritizing durability and appearance.
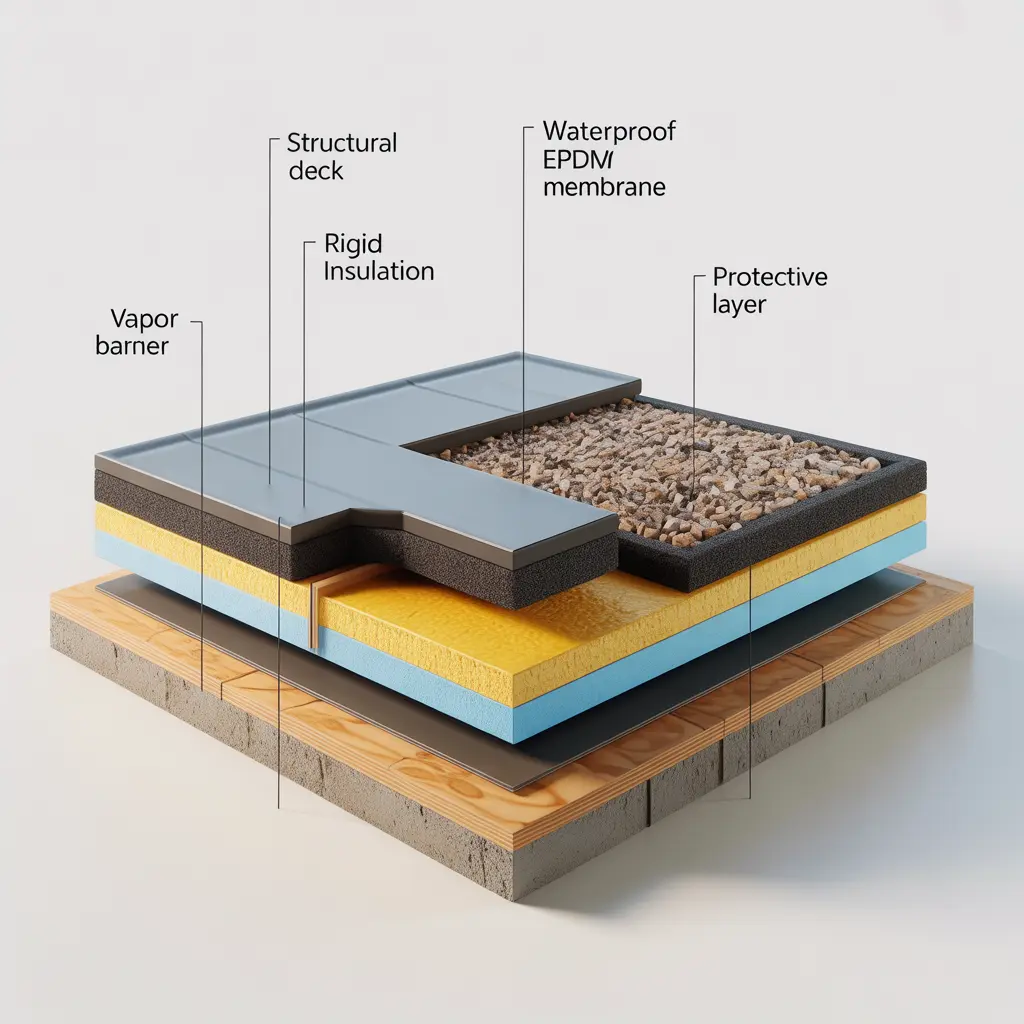
Advantages of flat roof homes (why choose flat roof design)
Flat roof homes offer several compelling benefits that make them attractive despite their reputation for higher maintenance compared to pitched roofs.
Modern aesthetic and architectural flexibility
Flat roof design delivers clean horizontal lines and minimalist profiles that define contemporary architecture, allowing buildings to blend into landscapes or emphasize geometric forms impossible with pitched roofs. HUF Haus describes flat roofs as offering “unmatched visual appeal” with “clean, horizontal lines” that create sleek modern aesthetics, and notes the flexibility to integrate large windows and open floor plans since roof structure doesn’t dictate interior ceiling heights.
Usable rooftop space
IKO highlights that flat roof square footage can become functional space rather than wasted overhead—rooftop patios extend living areas, green roofs provide gardens and environmental benefits, and equipment installations (HVAC, solar panels) sit on roofs where they’re out of sight instead of dominating yards or building sides. McDonald Jones Homes notes this is particularly valuable in urban areas with limited land where maximizing usable square footage justifies the roof premium.
Easier solar panel installation
Flat roofs simplify solar panel installation because panels can be mounted on tilting racks at optimal angles regardless of existing roof pitch, and panels sit lower on flat surfaces making them less visible from street level compared to panels following steep pitched roofs. Additionally, maintaining and cleaning solar panels is significantly safer on accessible flat roofs compared to steep pitches.
Simpler HVAC and equipment access
Rooftop HVAC equipment placement on flat roof homes keeps noise and equipment out of living spaces while providing easy maintenance access—contractors can work on flat surfaces without steep roof climbing, and equipment doesn’t consume valuable ground-level space.
Potential cost efficiency (on the right buildings)
For certain building sizes and shapes, flat roofs can reduce construction costs because they require less roof area to cover the same square footage compared to pitched roofs, use simpler framing (no complex angles or valleys), and eliminate costs for eaves, fascia, and traditional gutters when internal drainage is used. However, this cost advantage depends heavily on building design and membrane system chosen.
Disadvantages and challenges of flat roof homes
Despite their advantages, flat roof homes present legitimate challenges and maintenance requirements that homeowners must understand before committing to flat roof design.
Drainage sensitivity and pooling risk
Because flat roofs rely on minimal slope and specific drain locations, any settlement, deflection, or improper installation creating low spots can cause water pooling—IKO notes that water standing more than 48 hours after rainfall signals drainage problems requiring correction, as persistent ponding accelerates membrane degradation and increases leak risk. This contrasts with steep pitched roofs where gravity rapidly sheds water regardless of minor imperfections.
Higher maintenance requirements
IKO recommends inspecting flat roofs twice yearly and after major storms, checking for debris blocking drains, damaged flashing, membrane punctures, and protective coating degradation—maintenance that’s more critical and frequent than pitched roof requirements. Neglecting flat roof maintenance leads to accelerated deterioration, while pitched roofs tolerate more deferred maintenance without catastrophic consequences.
Complex waterproofing (installation quality critical)
Flat roof homes depend entirely on membrane waterproofing rather than the overlapping shingle redundancy of pitched roofs, making installation quality absolutely critical—poorly executed seams, inadequate flashing, or membrane damage create immediate leak paths without the “forgiveness” pitched roofs provide through multiple overlapping layers. IKO emphasizes that many flat roof problems stem from poor installation rather than system limitations, meaning contractor selection matters enormously.
Shorter lifespan than premium pitched roofs
While quality flat roof systems last 20-30+ years with proper maintenance, this often falls short of the 40-50+ year lifespan achievable with premium pitched roof materials like slate, tile, or metal, potentially requiring more frequent replacement over a building’s lifetime. However, flat roof replacement is sometimes simpler and less expensive than pitched roof replacement since work occurs on accessible flat surfaces.
Snow load and ice dam considerations
In cold climates, flat roofs accumulate snow rather than shedding it, requiring stronger structural design for snow loads and creating potential ice dam problems where melting snow refreezes at roof edges blocking drainage. While warm roof designs minimize ice dam risk by keeping roof surfaces uniformly cold, snow removal may still be necessary after heavy storms—something pitched roofs handle passively through shedding.
Insulation and condensation challenges
As discussed earlier, cold roof designs risk condensation problems, and even warm roof assemblies require careful vapor barrier and insulation detailing to prevent moisture infiltration—complexities that pitched roof ventilation strategies handle more simply.
Essential maintenance for flat roof homes
Proper maintenance dramatically extends flat roof lifespan and prevents expensive damage, making it non-negotiable for flat roof homes.
Inspection schedule and checklist
IKO recommends inspecting flat roofs twice per year (typically spring and fall) plus after major rain storms, with inspections covering: debris accumulation blocking drains, flashing condition around chimneys and skylights, membrane surface for punctures, tears, or wrinkles, protective surfacing for bald spots or displacement, and standing water that persists beyond 48 hours after rainfall.
Drain maintenance (absolutely critical)
Keeping roof drains, scuppers, and gutters clear is the single most important flat roof maintenance task because blocked drains cause ponding that accelerates deterioration and overflows damaging building walls and foundations. Regular debris removal (leaves, dirt, gravel) and checking drain baskets or strainers prevent clogs.
Membrane care and repair
Walking on flat roof membranes should minimize puncture risk by avoiding sharp objects and wearing soft-soled shoes, and any membrane damage should be repaired promptly before water infiltration begins. Small repairs using membrane patches and sealant are straightforward when caught early but become major projects if water penetrates insulation or decking.
Addressing ponding water
If water ponds in the same location repeatedly, investigating the cause—settlement, deflection, improper slope—and correcting it prevents long-term membrane damage. Solutions range from adding tapered insulation creating proper slope to installing additional drains in problem areas.
Flat roof homes in different climates
Flat roof design considerations vary significantly by climate, affecting material selection, insulation approach, and maintenance priorities.
Cold climates
Cold climate flat roof homes should use warm roof assemblies preventing condensation, require adequate structural capacity for snow loads, need robust drainage preventing ice dams, and benefit from darker membranes (black EPDM) that absorb solar heat assisting snow melting. Regular snow removal after heavy storms may be necessary preventing excessive loads.
Hot-dry climates
Hot-dry climates favor light-colored reflective membranes (white TPO, PVC, or coated EPDM) reducing cooling loads, can sometimes use cold roof assemblies since condensation is minimal, and require UV-resistant materials since membrane exposure to intense sun is constant.
Hot-humid climates
Hot-humid climates require excellent vapor barrier design preventing moisture-laden air from condensing within roof assemblies, benefit from reflective membranes reducing heat gain, and demand robust biological resistance since algae and mold growth is accelerated by warmth and moisture.
Frequently asked questions about flat roof homes
Are flat roof homes actually flat?
No—flat roof homes incorporate low slopes (typically 5–15 degrees) allowing water drainage toward outlets rather than standing on truly level surfaces. IKO emphasizes this slight pitch is essential for proper drainage and flat roof performance.
What is the best flat roof design for residential homes?
The best flat roof design depends on climate and priorities, but warm roof assemblies with high-quality single-ply membranes (TPO, PVC, or EPDM) represent the most reliable modern approach for most climates, combining excellent waterproofing, proven durability, and reasonable costs. Parapet flat roofs are architecturally popular for contemporary aesthetics.
How long do flat roof homes last?
Flat roof membrane lifespan typically ranges 20-30+ years depending on material quality, installation workmanship, and maintenance consistency—IKO notes that proper maintenance significantly extends life while neglect causes premature failure. Built-Up Roofing and quality PVC systems can exceed 30 years with care.
Can you walk on flat roof homes?
Most flat roof membranes tolerate occasional foot traffic for maintenance and inspection, but rooftop terraces designed for regular use require protective wear surfaces (pavers, decking, or walkable membranes) preventing membrane damage from concentrated foot traffic. Always wear soft-soled shoes and avoid dragging sharp objects across membranes.
What is warm roof vs cold roof?
Warm roofs place insulation above the structural deck keeping the deck warm and preventing condensation (recommended for most climates), while cold roofs place insulation below the deck leaving the deck cold and requiring ventilation (less recommended and prone to condensation issues).
Do flat roof homes leak more than pitched roofs?
Flat roofs don’t inherently leak more, but IKO notes they’re less forgiving of installation errors and maintenance neglect because they rely entirely on membrane waterproofing rather than overlapping shingle redundancy—properly installed and maintained flat roofs perform reliably for decades.
Can you put solar panels on flat roof homes?
Yes—flat roofs actually simplify solar panel installation because panels mount on tilting racks at optimal angles regardless of existing roof slope, sit lower and less visibly than on steep pitches, and provide safer maintenance access.
How do you drain water from flat roof homes?
Flat roof homes use internal roof drains, scuppers (openings through parapet walls), or concealed box gutters to collect water and direct it to downspouts or drainage systems, with roof surfaces sloped toward these collection points.
What’s the most common problem with flat roof homes?
Drainage problems leading to ponding water are the most common issue—IKO states water persisting beyond 48 hours after rainfall indicates drainage correction is needed to prevent accelerated membrane deterioration.
Get free roofing advice, cost guides, and seasonal maintenance tips.
Roofing content specialist with 5+ years researching U.S. residential and commercial roofing. Has documented 200+ projects covering installation costs, material selection, contractor vetting, and DIY guides for homeowners across all climate zones.
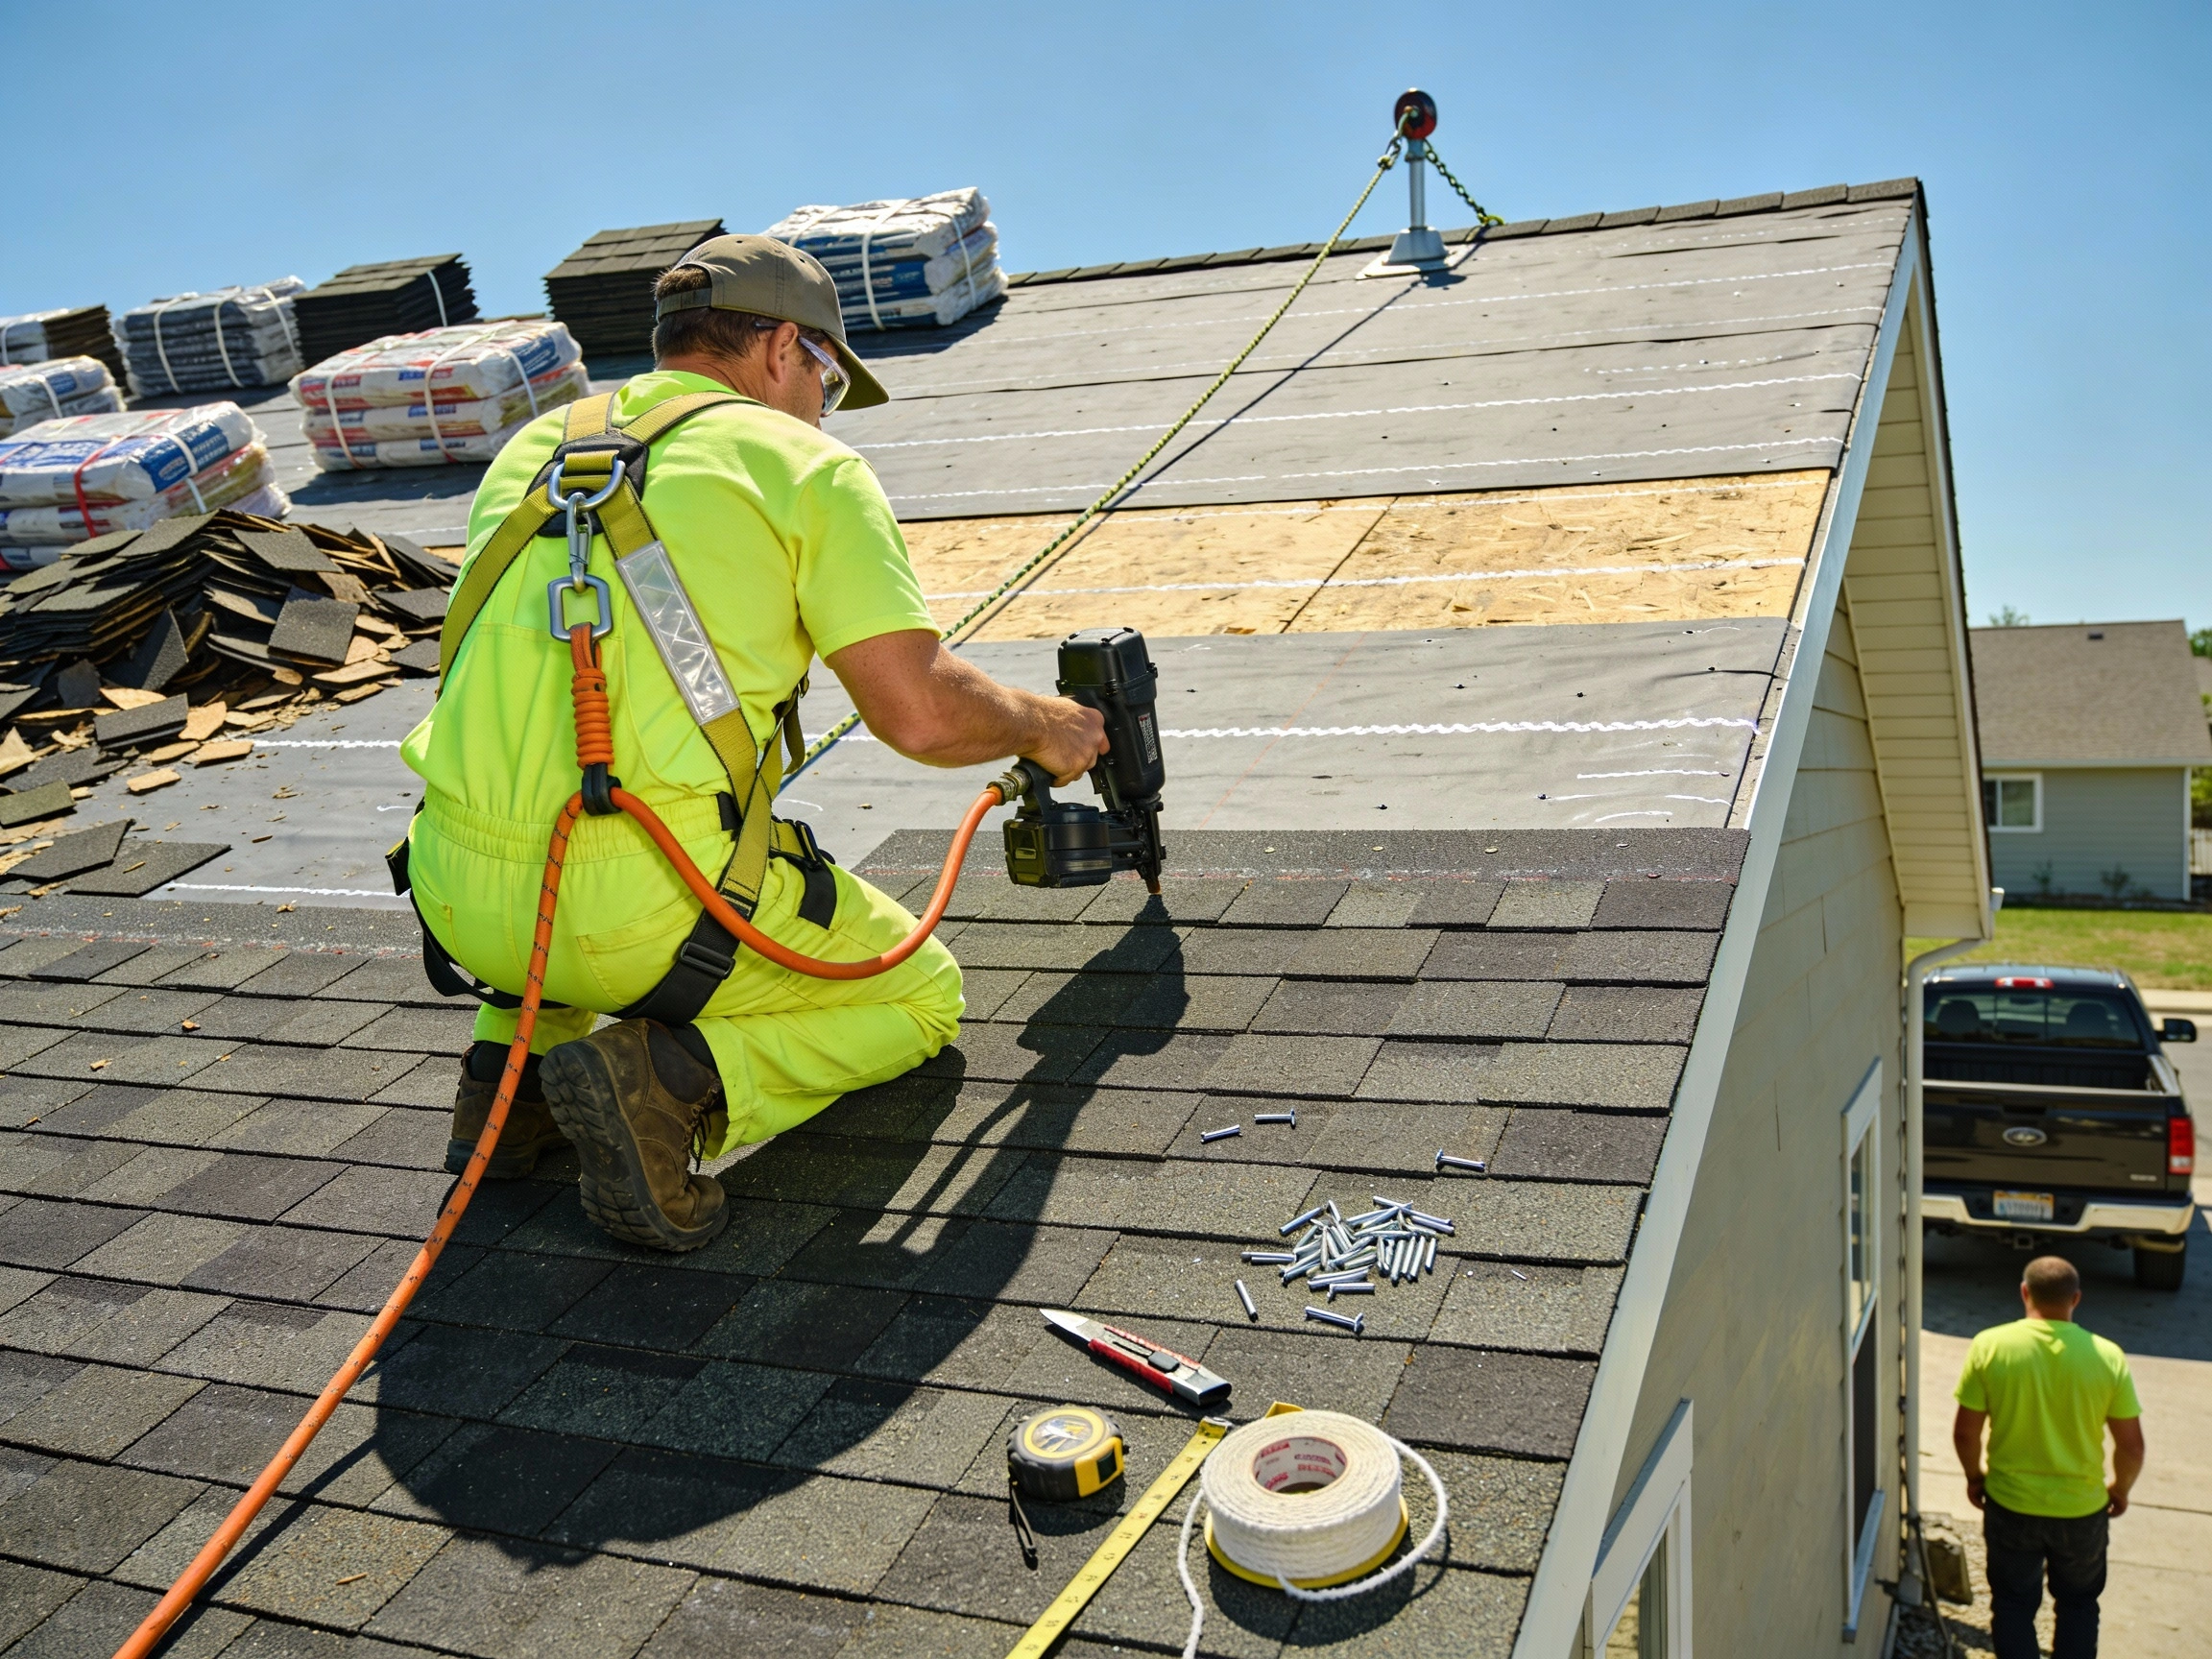
Can I Replace My Own Roof? Complete DIY Roofing Guide
Can I replace my own roof? Yes homeowners can legally replace their own roofs in most jurisdictions, though this do it yourself roofing project demands advanced construction skills, significant physical stamina, proper safety equipment including fall protection harnesses, and realistic assessment of time commitment spanning 3-7 days for typical residential roofs. This DIY roof installation challenge ranks among the most demanding home improvement projects, requiring removal of thousands of pounds of old materials, repair of damaged decking, precise installation of underlayment and flashing, and systematic shingle application following manufacturer specifications that determine warranty validity.
While DIY roof replacement saves $4,000-$9,000 in labor costs on average 2,200 square foot homes, mistakes in installation technique, flashing details, or ventilation create expensive water damage, void material warranties, reduce home resale value, and potentially cause serious falls requiring emergency medical treatment.
Understanding whether do it yourself roofing makes sense requires honest evaluation of multiple factors: previous construction or carpentry experience providing foundational skills, roof complexity including valleys, dormers, and penetrations complicating installation, physical capability to climb ladders repeatedly carrying 50-70 pound shingle bundles, availability of helpers for tear-off and material handling, weather window allowing several consecutive dry days, and local building code requirements potentially mandating professional installation or inspections. Simple gable roofs on single-story homes with low pitch (4:12 to 6:12) present manageable DIY projects for experienced builders, while complex multi-story homes with steep pitches, multiple roof planes, or intricate architectural features warrant professional contractors providing insurance coverage, workmanship warranties, and code-compliant installations.
Table of Contents
This comprehensive guide answers “can I replace my own roof” by examining realistic skill requirements, detailed cost comparisons, critical safety protocols, complete step-by-step installation process, common mistakes causing failures, and decision framework determining when DIY makes sense versus when hiring professionals protects investment and safety.
Realistic assessment: Can I replace my own roof?
Honestly evaluating whether you can replace your own roof requires examining skills, experience, physical capability, and project complexity before committing to this major undertaking.
Required skills and experience for DIY roof replacement
Essential baseline qualifications:
- Previous carpentry or construction experience (framing, decking, exterior work)
- Understanding of building codes and roofing standards in your jurisdiction
- Ability to read and follow manufacturer installation instructions precisely
- Experience using power tools safely (circular saw, nail gun, air compressor)
- Capability to work methodically following systematic procedures
- Physical fitness for repetitive climbing, lifting, and overhead work
Skills you’ll need to master:
Assessing existing roof condition and identifying structural problems, safely removing thousands of square feet of old roofing materials, repairing or replacing damaged roof decking, installing proper underlayment with correct overlap patterns, executing complex flashing details around chimneys and valleys, maintaining straight shingle courses across large roof planes, and properly ventilating attic spaces preventing moisture damage.
Experience levels and realistic projects:
- Beginner DIYer (no construction experience): NOT RECOMMENDED for full roof replacement—start with shed roofs to learn basics
- Intermediate DIYer (some carpentry/remodeling): Simple single-story gable roofs without complications may be manageable with extensive research
- Advanced DIYer (construction background): Most residential roofs achievable with proper planning and safety equipment
Physical demands and time commitment
Physical requirements:
The question “can I replace my own roof” often depends more on physical capability than technical skill. Consider this reality check: climbing a ladder 50-100+ times carrying 50-70 pound shingle bundles, working in intense sun on hot roof surfaces reaching 140-160°F, maintaining balance while kneeling and reaching on sloped surfaces for 8-12 hours daily, and lifting/moving 3-5 tons of old roofing materials to disposal containers.
One Reddit user’s physical test:
“Go to Home Depot, get a bundle of shingles, climb your ladder 20 times with that bundle, then walk to the far end of your roof. Repeat 20 times or until you decide ‘no, this is not a good idea,’ whichever comes first. Then consider you’re doing it a lot more than 20 times.”
Time commitment for typical 2,200 sq ft home:
- Professional crew (3-4 workers): 2-3 days total
- Experienced DIYer with 2 helpers: 5-7 days (full weekends over 2-3 weekends)
- Solo DIYer: 10-14 days spread across multiple weekends
- First-time DIY attempt: Add 30-50% to timeline for learning curve
Weather dependency:
You need consecutive dry days—rain forces work stoppage leaving roof vulnerable until underlayment installed, and wet shingles become dangerously slippery causing falls.
When DIY roof replacement makes sense
Favorable scenarios for do it yourself roofing:
- Simple gable or hip roof without valleys, dormers, or complex features
- Single-story home or low-pitch roof (4:12 to 6:12 slope) minimizing fall risk
- Small to medium roof area (under 1,500 square feet) completing in reasonable timeframe
- Previous roofing experience on sheds, garages, or other structures
- Access to experienced helper(s) for tear-off and material handling
- No local codes requiring licensed contractors or mandatory inspections
- Flexible schedule allowing 1-2 full weeks for project completion
- Significant budget constraints making $4,000-$9,000 labor savings critical
When to hire professional roofers instead
Situations warranting professional contractors:
- Multi-story homes (two stories or higher) creating serious fall hazards
- Steep roofs exceeding 7:12 pitch requiring specialized safety equipment
- Complex roof designs with multiple valleys, dormers, skylights, or turrets
- Clay tile, slate, metal, or specialty roofing requiring advanced techniques
- Structural damage requiring engineering assessment or permits
- Local codes mandating licensed contractors for residential roofing
- No construction experience or physical limitations preventing safe work
- HOA requirements specifying professional installation and warranties
- Homeowner’s insurance claim requiring contractor documentation
- When resale planned within 5 years (buyers prefer professional warranties)
Cost analysis: DIY roof replacement vs professional installation
Understanding true costs—not just material prices—helps determine whether do it yourself roofing delivers worthwhile savings.
DIY roof replacement material costs
Materials for typical 2,200 sq ft asphalt shingle roof:
- Asphalt shingles (22 squares at $90-$120 per square): $1,980-$2,640
- Roofing underlayment (#30 felt or synthetic): $400-$600
- Drip edge (aluminum, 200 linear feet): $200-$300
- Ridge cap shingles: $150-$250
- Roofing nails (50 pounds): $100-$150
- Step flashing and valley metal: $150-$300
- Roof vents and boots: $150-$250
- Ice and water shield: $200-$350
- Total materials: $3,330-$4,840
Additional DIY expenses often overlooked:
- Dumpster rental or disposal fees: $400-$600 for 20-yard dumpster
- Tool rentals (roofing nailer, air compressor, safety equipment): $200-$400
- Lumber for deck repairs (average 10-15% needs replacement): $300-$800
- Permits and inspections: $300-$500
- Medical supplies (first aid, sunscreen, hydration): $50-$100
- Hidden costs: $1,250-$2,400
Realistic total DIY cost: $4,580-$7,240 for materials, disposal, equipment, and permits.
Professional roof replacement costs
Complete professional installation (2,200 sq ft asphalt shingles):
- Materials (contractor pricing): $3,500-$5,000
- Labor (tear-off, installation, cleanup): $5,000-$7,000
- Disposal and haul-away: $800-$1,200
- Permits and inspections: $300-$500
- Deck repairs (if needed): $500-$1,500
- Total professional cost: $10,100-$15,200
What professional installation includes:
- Liability insurance protecting against property damage
- Workers’ compensation covering injuries (critical—roofer falls are your liability in DIY)
- Material warranties (20-50 years depending on shingle quality)
- Workmanship warranty (typically 5-10 years)
- Proper permits and code compliance
- Professional disposal of 3-5 tons of waste
True DIY savings calculation
Apparent savings: $5,520-$7,960 (difference between DIY and professional totals)
But consider hidden costs:
- Time investment: 60-100 hours at $25/hour opportunity cost = $1,500-$2,500
- Risk of installation mistakes requiring repairs: $500-$3,000 average
- No warranty if problems develop: Full cost of future repairs
- Reduced resale value without professional documentation: $2,000-$5,000
- Injury risk and potential medical costs: $500-$50,000+
Realistic net savings after risks: $2,000-$4,000 for skilled DIYers who complete error-free installation.
Long-term value comparison
Professional installation ROI:
Professional roof replacements return 60-70% of costs at resale, improve home energy efficiency reducing utility bills $300-$600 annually, and provide buyer confidence through transferable warranties.
DIY installation concerns:
Buyers often demand professional documentation before purchase, home inspectors scrutinize DIY roofing for code violations, mortgage companies may require additional inspection, and poor workmanship reduces roof lifespan from 25 years to 10-15 years.
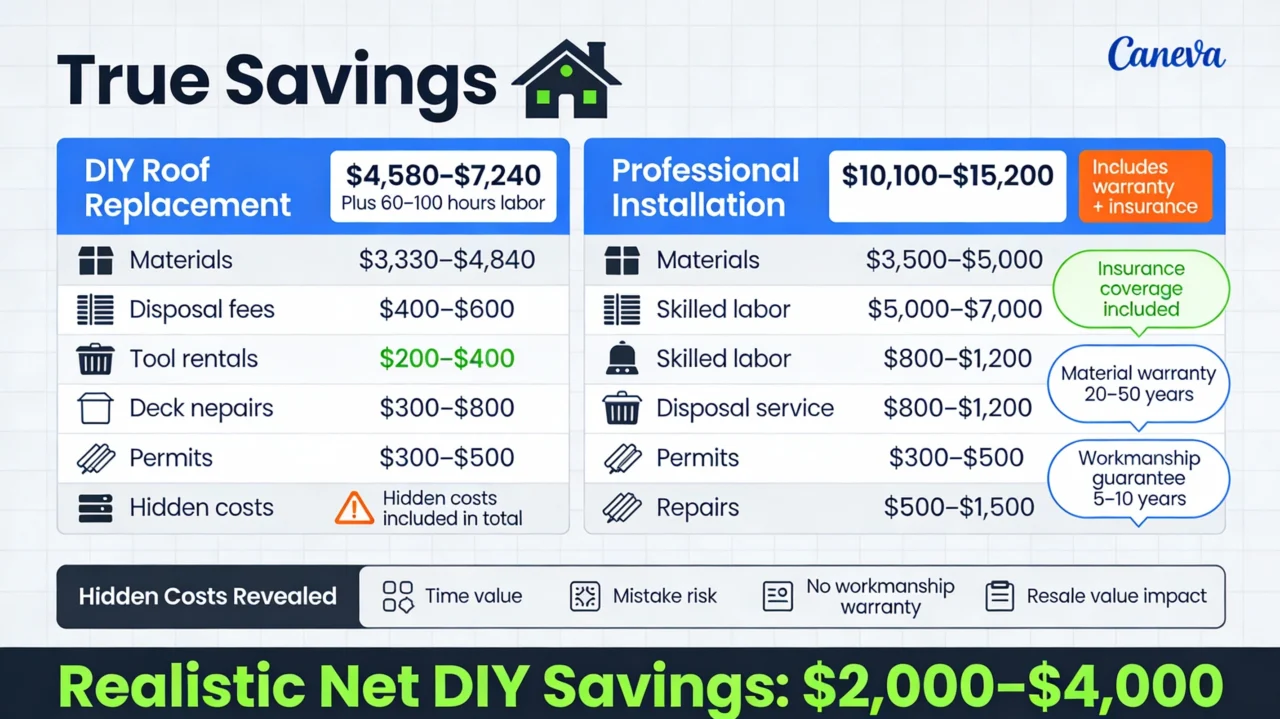
Critical safety requirements for do it yourself roofing
Safety equipment and protocols separate successful DIY roof projects from tragic accidents—roofing causes 40% of construction industry falls.
Essential fall protection equipment
Personal protective equipment (mandatory):
- Fall arrest harness: Full-body harness (not belt-style) rated for minimum 5,000-pound impact force
- Lanyard and rope grab: 6-foot shock-absorbing lanyard connecting harness to anchor point
- Roof anchor: Permanent or temporary anchor secured to structural framing capable of supporting 5,000 pounds
- Non-slip footwear: Rubber-soled work boots with aggressive tread and ankle support
- Safety glasses: ANSI-rated impact protection preventing nail and debris injuries
- Work gloves: Leather or synthetic protecting against sharp shingle edges and nail punctures
- Hard hat: Required when working below other workers or near overhanging hazards
When fall protection required:
- ANY roof work exceeding 6 feet height
- Steep pitches over 6:12 slope
- Wet, icy, or otherwise slippery conditions
- Work near unprotected edges
Professional standard:
Commercial roofers use fall protection on ALL roofs regardless of height or pitch—adopt same standard for DIY safety.
Safe ladder practices and roof access
Ladder setup (4:1 rule):
For every 4 feet of height, position ladder base 1 foot away from wall—a 20-foot ladder needs 5-foot base distance. Extend ladder minimum 3 feet above roof edge for safe mounting, secure both top and bottom preventing movement, and place on firm level ground (never soft soil).
Safe climbing technique:
Maintain three-point contact (two hands and foot, or two feet and hand) at all times, face ladder while climbing, never carry materials while climbing (use rope and bucket for lifting), and have helper stabilize ladder base during ascent.
Material transport:
Instead of carrying shingle bundles up ladder (extremely dangerous), use crane truck delivery placing bundles directly on roof, or install pulley system lifting materials safely.
Weather and environmental safety
Prohibited working conditions:
- Wet surfaces (morning dew, recent rain, humidity)—wait until completely dry
- Wind exceeding 15-20 mph—gusts unsteady workers and lift materials
- Temperatures exceeding 95°F—heat exhaustion risk on 140°F+ roof surfaces
- Freezing conditions—ice formation and brittle shingles
- Storm forecasts within 24 hours—risk of exposure if underlayment incomplete
Heat safety protocols:
Work early morning (6am-12pm) avoiding afternoon peak heat, take 10-minute breaks every hour in shade, drink water continuously (1 gallon per 4 hours minimum), wear light-colored clothing reflecting heat, and recognize heat exhaustion symptoms (dizziness, nausea, confusion) requiring immediate cessation.
Working with helpers and spotters
Never roof alone:
Always have spotter on ground who can call emergency services, pass tools safely reducing trips, watch for developing hazards, and assist if accident occurs.
Helper safety training:
Brief all helpers on emergency procedures, ladder safety, safe tool handling, staying clear of fall zones below workers, and communication signals for material passing.
11-step DIY roof replacement process
Following systematic sequence prevents mistakes while ensuring watertight installation.
Step 1: Prepare work area and gather materials
Site preparation:
- Remove outdoor furniture, grills, planters from around house perimeter creating 10-foot clearance
- Cover shrubs and landscaping with tarps protecting from falling debris
- Position dumpster or disposal area for easy material dumping
- Stage materials in driveway or garage for easy access
- Inform neighbors of project timeline and potential noise
- Check weather forecast ensuring 3-4 consecutive dry days
Final equipment check:
Verify all safety equipment present and functional, confirm sufficient materials ordered (add 10% waste factor), test all power tools ensuring operation, and have first aid kit accessible.
Step 2: Install roof protection and set up safety equipment
Ground-level safety:
Set up stable scaffolding or ladder securing to house, install catch platforms or warning barriers preventing pedestrian access, and position safety cones or tape marking fall zones.
Roof anchor installation:
Secure permanent or temporary roof anchors to structural framing (not just sheathing), position anchors allowing full roof coverage without relocating, connect fall arrest system testing before starting work.
Interior protection:
Move valuables from attic, cover items with plastic sheeting protecting from dust infiltration, and move vehicles from driveway preventing damage from falling materials.
Step 3: Remove old roofing materials (tear-off)
Systematic removal:
Start at ridge working downward using roofing shovel or pitchfork, insert tool under shingle edge lifting entire section, work in manageable areas (4×8 feet) preventing overwhelming debris, dump materials directly into dumpster or chute avoiding ground accumulation.
Removing underlayment and nails:
Strip all old felt paper and underlayment exposing bare deck, remove protruding nails or hammer flush (nails cause lumps under new shingles), and watch for damaged areas requiring deck repair.
Flashing and drip edge:
Remove old drip edge, step flashing, and valley metal (unless galvanized and undamaged—can sometimes reuse), and carefully remove pipe boot flashings without damaging pipes.
Physical demand reality:
Tear-off is the most physically demanding phase—typical 2,200 sq ft roof generates 4-6 tons (8,000-12,000 pounds) of waste material you must lift and throw into dumpster. This phase alone takes 1-2 full days with helpers.
Step 4: Inspect and repair roof deck
Thorough deck inspection:
Check every area for soft spots indicating water damage or rot, identify sagging sections suggesting structural problems, look for broken or cracked plywood/OSB, inspect for proper fastening and gaps between panels.
Deck repairs:
Replace any damaged, rotted, or soft decking with 7/16″ OSB or 1/2″ plywood, secure new panels with 8d nails or screws every 6 inches at edges and 12 inches in field, ensure proper spacing (1/8″ gap) between panels for expansion.
Average repair reality:
Most roofs require 10-20% deck replacement (200-400 sq ft on 2,200 sq ft roof) adding $300-$800 in lumber costs and 4-8 hours work.
Step 5: Install drip edge on eaves
Critical sequence:
Drip edge installs UNDER underlayment at eaves (bottom edges) but OVER underlayment at rakes (side edges)—this directs water properly.
Eave drip edge installation:
Position aluminum drip edge flush with eave, nail every 8-12 inches using roofing nails, overlap sections 2 inches, cut 45-degree miters at corners for clean appearance.
Step 6: Install underlayment (felt paper or synthetic)
Starting at eaves:
Roll underlayment horizontally starting at bottom eave edge, overlap drip edge by 1/4 inch, secure with staples every 12-16 inches, ensure underlayment lies flat without wrinkles.
Proper overlap:
Overlap horizontal seams 6 inches (upper roll over lower), overlap vertical seams 4 inches, continue up roof until reaching ridge extending 6 inches over peak.
Ice and water shield:
Install self-adhesive ice and water shield in valleys and along eaves (first 3 feet) in cold climates preventing ice dam damage.
Step 7: Install drip edge on rakes
Over underlayment:
Position rake drip edge OVER underlayment (opposite of eaves), extend from eave corner to ridge, nail every 8-12 inches.
Step 8: Install flashing in valleys and around penetrations
Valley flashing:
Install pre-bent valley metal centered in valley, secure with roofing cement and nails along edges only (not in center channel), extend valley metal from eave to ridge.
Pipe boot flashing:
Slide rubber or metal pipe boots over vent pipes, seal base with roofing cement, integrate with shingle courses (shingles over top half, under bottom half).
Step flashing at walls:
Install L-shaped step flashing pieces with each shingle course where roof meets vertical wall, overlap flashing 2 inches vertically.
Step 9: Install starter strip at eaves
Creating starter strip:
Cut tabs off full shingles leaving only top portion, or cut shingles in half lengthwise, or use dedicated starter strip product.
Installation:
Position starter strip with adhesive strip facing down at eave edge, overhang drip edge 1/4-1/2 inch, nail 2-3 inches above bottom edge, butt pieces together with no gaps.
Step 10: Install field shingles
First course:
Snap chalk line 11-3/4 inches above eave (exposes 5 inches of starter), align full shingles on chalk line, overhang rake 1/4-1/2 inch, nail using 4-6 nails per shingle in manufacturer zones.
Offset pattern:
Begin second course with shingle cut 6 inches shorter (half tab offset), third course cut 12 inches shorter (full tab), fourth course starts with full shingle—repeat pattern.
Maintaining alignment:
Snap chalk line every 2-3 courses ensuring straightness, check alignment from ground periodically, adjust gradually if drifting occurs.
Nailing:
Drive nails flush (not overdriven), position nails 3/4″ above cutouts, use 4 nails minimum (6 in high-wind areas), ensure nails penetrate deck minimum 3/4″.
Step 11: Install ridge cap shingles
Preparing ridge caps:
Cut full shingles into thirds along perforations creating bendable pieces, or use pre-made ridge cap shingles.
Installation:
Start at end opposite prevailing wind, bend cap over ridge centering on both sides, overlap 5-6 inches covering previous cap nails, nail 2 nails per side (4 total), seal final cap nails with roofing cement.
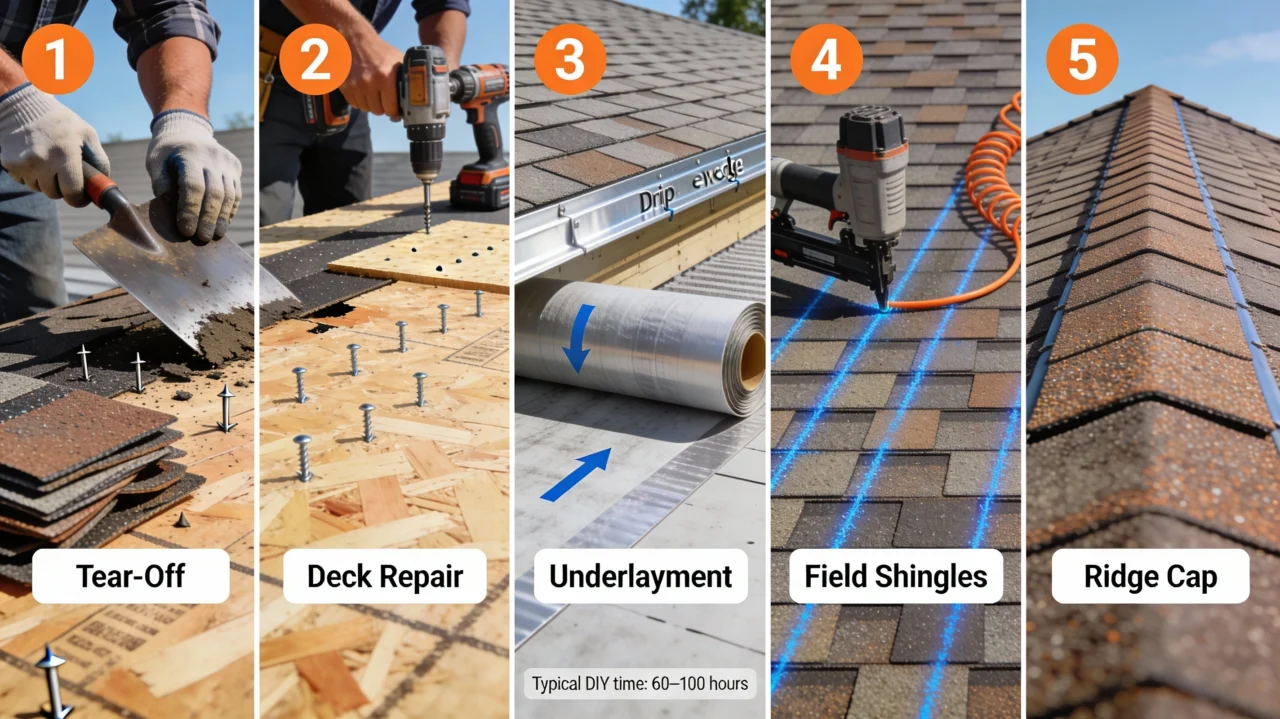
Common mistakes in DIY roof installation
Learning from typical errors prevents expensive failures and callbacks.
Improper or insufficient nailing
Under-nailing:
Using only 2-3 nails per shingle instead of required 4-6 nails leaves shingles vulnerable to wind blow-off—each shingle needs proper fastening across entire width.
Incorrect nail placement:
Nailing above manufacturer nail zone leaves lower shingle portion unsecured, while nailing below zones exposes nails to weather causing rust and leaks.
Wrong fasteners:
Using smooth-shank nails instead of ring-shank, incorrect nail length (too short to penetrate deck), or non-galvanized nails that rust prematurely.
Overdriving nails:
Driving nails too deep breaks through shingle mat, puncturing waterproofing and creating future leak points.
Inadequate or incorrect flashing
Skipping flashing:
Some DIYers skip step flashing at walls or valley flashing trying to save time—flashing prevents water infiltration at vulnerable transitions and is never optional.
Incorrect flashing sequence:
Installing flashing on top of shingles instead of integrating between courses allows water to run behind flashing.
No ice and water shield:
Failing to install self-adhered ice and water shield in valleys and along eaves in cold climates results in ice dam leaks.
Poor ventilation planning
Ignoring ventilation:
Proper attic ventilation prevents moisture buildup, extends shingle life, and reduces cooling costs—requires both intake (soffit) and exhaust (ridge) vents.
Blocked soffit vents:
Installing underlayment that blocks soffit vents prevents airflow despite having ridge vents.
Insufficient ventilation area:
Building codes require 1 square foot of ventilation per 150 square feet of attic—many DIY installations fall short.
Inconsistent shingle alignment
Wavy courses:
Failing to snap chalk lines causes courses to drift creating obvious wavy appearance visible from ground.
Vertical seam alignment:
Not maintaining proper 6-inch offset between courses aligns cutouts vertically creating leak channels.
Incorrect exposure:
Varying exposure from 4 inches to 6 inches creates uneven appearance and reduces waterproofing effectiveness.
Rushing or working in poor conditions
Weather violations:
Working on wet roof surfaces, during high winds, or with rain forecast within 24 hours risks both safety and installation quality.
Skipping steps:
Rushing through installation without proper inspection, deck repair, or flashing details creates failures requiring complete reinstallation.
Fatigue-induced errors:
Working 12-14 hour days without breaks leads to mistakes, poor judgment, and increased injury risk.
Ignoring manufacturer specifications
Voiding warranties:
Most shingle warranties require installation following manufacturer specifications—deviations void coverage.
Wrong materials:
Using incompatible underlayment, incorrect nail types, or improper fastener spacing violates specifications.
Skipping installation manuals:
Professional roofers consult manufacturer instructions—DIYers must do same ensuring code compliance and warranty validity.
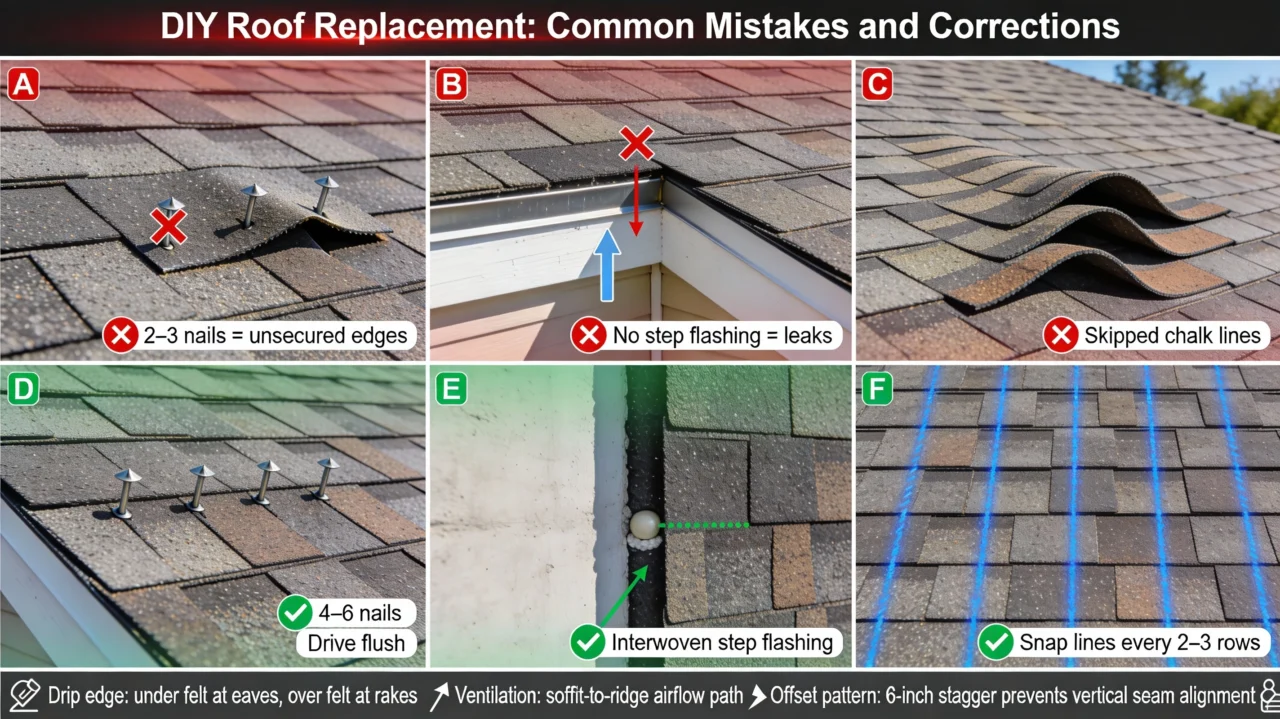
When to reconsider: Hiring professional roofers
Sometimes the smartest answer to “can I replace my own roof” is “yes, but I shouldn’t”.
Warning signs during project
Stop work immediately if:
- Discovering extensive deck rot requiring structural repairs beyond your capability
- Weather deteriorating with rain forecast before roof weather-tight
- Experiencing vertigo, fear, or physical inability to work safely at height
- Finding complex flashing situations (multiple chimneys, skylights) beyond skill level
- Realizing time requirements exceed available schedule
- Suffering any injury requiring medical attention
Salvaging partial DIY:
One Reddit user’s hybrid approach: “Strip old shingles, repair sheathing, install underlayment yourself, then hire roofer just to provide and install new shingles—saves significant money while ensuring professional finish”.
Value of professional warranties
Material warranty limitations:
Most manufacturers offer 20-50 year shingle warranties, but require certified installer for warranty activation—DIY installation may void coverage.
Workmanship protection:
Professional contractors provide 5-10 year workmanship warranties covering installation defects, leak repairs, and blown-off shingles—DIY installations lack this safety net.
Insurance claims:
Future buyers and mortgage companies prefer roofs with transferable professional warranties and documentation.
Long-term cost considerations
Professional installation ROI:
Despite higher upfront cost ($10,100-$15,200 vs $4,580-$7,240 DIY), professional installation provides:
- 60-70% cost recovery at resale vs 40-50% for DIY
- Full warranty protection saving $500-$3,000 in potential repair costs
- Insurance discounts for certified installation (some carriers)
- Peace of mind worth $1,000-$2,000 in reduced stress
When professional makes financial sense:
- Home value exceeds $300,000 (roof quality affects resale)
- Planning to sell within 5 years (buyers demand professional documentation)
- Roof complexity exceeds simple gable (mistake risk too high)
- No construction experience (learning curve creates expensive errors)
Frequently asked questions about replacing your own roof
Can I replace my own roof legally?
Yes, homeowners can legally replace their own roofs in most jurisdictions without contractor licensing, though you must obtain proper permits, follow building codes, and pass inspections required by local authorities. Some municipalities restrict DIY work to single-family owner-occupied residences, while commercial properties and rental units typically require licensed contractors.
How much can I save doing my own roof?
DIY roof replacement saves approximately $5,000-$7,000 in labor costs on typical 2,200 square foot homes, with total DIY expenses around $4,580-$7,240 compared to professional installation costing $10,100-$15,200. However, accounting for time value (60-100 hours), mistake risk, lack of warranties, and potential resale value reduction, realistic net savings drop to $2,000-$4,000 for skilled DIYers completing error-free installations.
How long does it take to replace a roof yourself?
Experienced DIYers with 2-3 helpers require 5-7 full days (or 2-3 weekends) to replace typical 2,200 square foot roof, while solo DIYers need 10-14 days spread across multiple weekends. First-time attempts add 30-50% to timeline for learning curve, and complex roofs with multiple dormers or valleys require additional time.
What is the most difficult part of DIY roof replacement?
The tear-off phase ranks as most physically demanding, requiring removal and disposal of 4-6 tons of old materials, while flashing installation around chimneys, valleys, and walls presents the most technically challenging aspect requiring precision to prevent leaks. Many experienced DIYers report the repetitive physical labor, extreme heat, and mental fatigue as unexpected difficulties beyond technical skills.
Do I need a permit to replace my own roof?
Most jurisdictions require building permits for roof replacement regardless of whether homeowner or contractor performs work, with permit costs ranging $300-$500 and inspections verifying code compliance for deck attachment, flashing details, and ventilation. Contact local building department before starting to determine specific permit requirements, inspection schedules, and whether DIY work is permitted in your area.
What safety equipment do I need for DIY roofing?
Essential safety equipment includes full-body fall arrest harness with shock-absorbing lanyard, roof anchor capable of supporting 5,000 pounds, non-slip rubber-soled work boots, safety glasses, work gloves, and hard hat if working with helpers. Additional recommended equipment includes stable extension ladder with stabilizers, knee pads for prolonged kneeling, and first aid kit with heat exhaustion supplies.
Can I reroof over existing shingles?
While building codes in most areas allow one layer of shingles over existing (two layers total maximum), best practice removes old shingles allowing deck inspection for water damage, rot, or structural issues requiring repair. Additionally, single-layer installations lie flatter, last longer, and avoid excessive weight on roof framing.
Will DIY roof replacement void my shingle warranty?
Many shingle manufacturers require certified installer for warranty activation, meaning DIY installation may void or limit warranty coverage from 20-50 years down to 1-5 years materials-only coverage. Review specific manufacturer warranty terms before starting, and understand that professional installation warranties (5-10 years workmanship coverage) don’t apply to DIY projects.
Making the final decision: Should you replace your own roof?
Can I replace my own roof? Technically yes experienced DIYers with construction backgrounds, proper safety equipment, 60-100 hours available time, and simple roof designs can successfully complete do it yourself roofing projects saving $2,000-$4,000 in labor costs while gaining valuable skills and project satisfaction. However, this demanding DIY roof installation ranks among the most physically challenging, time-intensive, and potentially dangerous home improvement projects, requiring honest assessment of skills versus risks before committing to full-scale residential roof replacement.
Critical success factors separating successful from failed DIY roof projects include previous construction or carpentry experience providing foundational skills, understanding of roofing principles and building codes, physical capability for repetitive ladder climbing carrying 50-70 pound loads, access to helpers for tear-off and material handling, simple roof geometry without complex valleys or dormers, proper fall protection equipment and safety protocols, flexible schedule allowing 1-2 full weeks completion window, and realistic expectations about time commitment and physical demands. Homeowners lacking these qualifications should hire professional contractors whose $10,100-$15,200 complete installation includes liability insurance, workmanship warranties, code-compliant techniques, and proper permits protecting both short-term project success and long-term home value.
Ready to attempt do it yourself roofing? Start with smaller projects like shed or garage roofs building skills before tackling main house, invest in quality safety equipment prioritizing fall protection, gather experienced helpers for tear-off phase, obtain proper permits ensuring code compliance, study manufacturer installation manuals thoroughly, work during favorable weather with multiple consecutive dry days, maintain systematic approach following professional techniques, and recognize when complexity exceeds capability requiring professional assistance. Remember successfully answering “can I replace my own roof” requires matching your honest skill assessment against project demands, valuing safety over savings, and understanding that sometimes the smartest DIY decision is hiring qualified professionals protecting your most valuable investment.
Get free roofing advice, cost guides, and seasonal maintenance tips.
Roofing content specialist with 5+ years researching U.S. residential and commercial roofing. Has documented 200+ projects covering installation costs, material selection, contractor vetting, and DIY guides for homeowners across all climate zones.