Metal Roof Underlayment: Complete Installation Guide
Metal roof underlayment costs $0.35-$1.25 per square foot installed depending on material type, with synthetic options ($0.45-$0.85/sf) outperforming traditional felt ($0.35-$0.55/sf) through superior tear resistance, UV stability, and moisture management. All metal roofing requires underlayment with minimum 15 perms vapor permeability to prevent condensation accumulation between sheathing and metal panels, per Metal Roofing Alliance specifications (Metal Roofing Alliance Technical Guidelines, 2026). Proper underlayment selection based on climate, roof slope, and metal panel type prevents 60-70% of premature metal roof failures according to NRCA contractor surveys.
Table of Contents
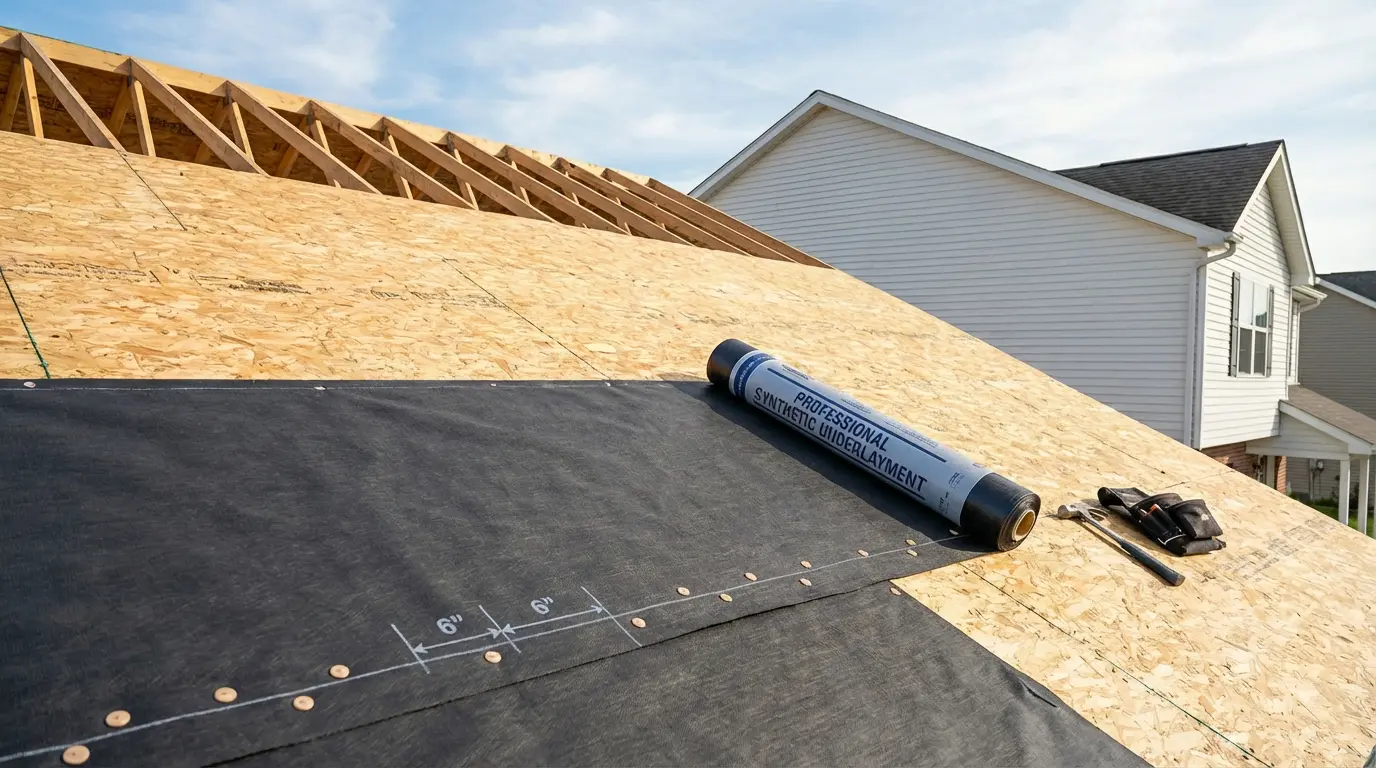
Metal roof underlayment serves as the critical waterproof barrier between roof sheathing and metal panels, managing moisture vapor transmission, providing temporary weather protection during installation, and creating a slip-resistant surface for metal panel placement. According to the National Roofing Contractors Association, underlayment specification represents the second most important factor (after proper ventilation) in preventing condensation-related metal roof failures, yet remains one of the most frequently misunderstood components in residential installations (NRCA Metal Panel Systems Manual, 2025).
This comprehensive guide covers metal roof underlayment types, vapor permeability requirements, cost breakdowns, installation specifications, ice and water shield applications, synthetic vs felt performance comparisons, and how underlayment choices affect warranty compliance and long-term roof performance.
Metal Roof Underlayment Types and Materials
Modern metal roofing systems use three primary underlayment categories, each optimized for specific climate conditions, roof slopes, and metal panel types.
Synthetic Underlayment (Polypropylene/Polyethylene)
Synthetic underlayment consists of woven or spun-bonded polypropylene or polyethylene fibers that create lightweight, high-strength membranes resistant to tears and UV degradation. The Asphalt Roofing Manufacturers Association reports synthetic underlayment now accounts for 65% of metal roof installations nationwide, displacing traditional felt due to superior performance characteristics (ARMA Technical Bulletin TB-157, 2025).
Performance Specifications:
- Tear strength: 180-300 lbf (machine direction) vs 40-60 lbf for #30 felt
- UV resistance: 90-180 days exposure rating vs 7-14 days for felt
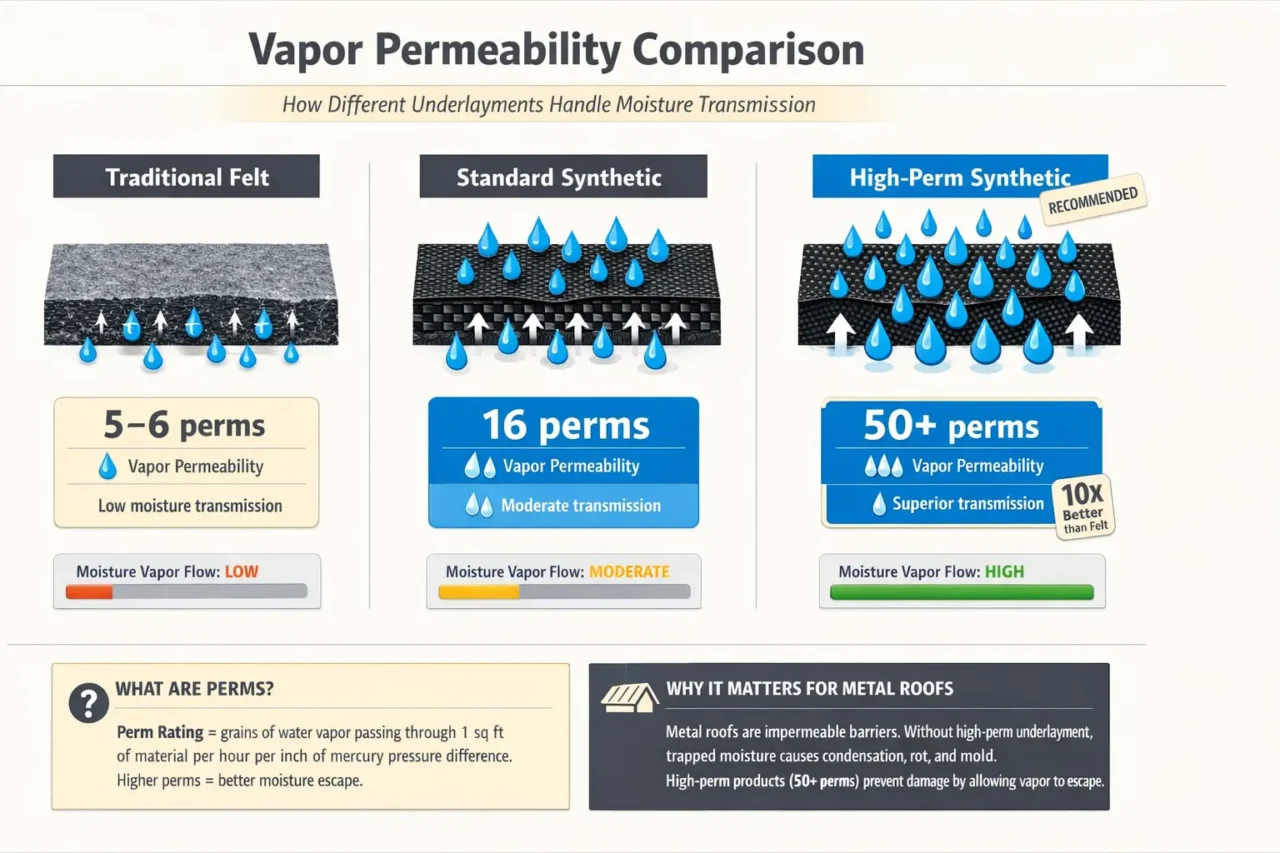
- Vapor permeability: 16-50 perms (breathable grades) vs 5-6 perms for felt
- Temperature range: -40°F to 250°F operating range
- Weight: 8-12 lbs per square vs 27 lbs for #30 felt
Leading Products:
- Grace Tri-Flex™ (50 perms): $0.55-$0.75/sf installed
- Owens Corning RhinoRoof® U20 (16 perms): $0.45-$0.65/sf installed
- GAF Deck-Armor™ (5 perms): $0.50-$0.70/sf installed
- Titanium UDL50 (50 perms): $0.60-$0.85/sf installed
Best Applications: All metal roof installations, particularly beneficial in high-wind zones (140+ mph), complex roof geometries, and extended exposure periods during construction.
Traditional Asphalt-Saturated Felt
Asphalt-saturated felt (#15 and #30 weights) comprises organic or fiberglass mat saturated with asphalt for water resistance. While declining in popularity for metal roofing, felt remains code-compliant and cost-effective for budget applications or low-slope metal roofs with minimal thermal cycling.
Performance Specifications:
- #15 felt: 8 lbs per square, suitable for slopes >4:12 only
- #30 felt: 27 lbs per square, minimum recommended for metal roofing
- Vapor permeability: 5-6 perms (semi-permeable)
- UV exposure: 7-14 days maximum before panel installation required
- Cost: $0.35-$0.55/sf installed
Disadvantages for Metal Roofing:
- Tears easily during installation on steep slopes
- Deteriorates rapidly under UV exposure if installation delays occur
- Low vapor permeability can trap moisture between sheathing and underlayment
- Becomes brittle in cold temperatures, cracking during thermal cycling
- Heavy weight increases labor costs and installation time
Acceptable Uses: Budget residential metal roofs in temperate climates with guaranteed rapid installation (under 14 days from underlayment to panel installation), slopes 4:12-6:12 with minimal complexity.
High-Temperature Self-Adhering Membranes
Self-adhering modified bitumen or rubberized asphalt membranes with high-temperature resistance serve as underlayment for metal roofs in extreme heat climates where standard synthetic products may soften.
Specifications:
- Temperature rating: Up to 280°F surface temperature resistance
- Vapor permeability: Typically 0.05-1.0 perms (vapor barriers)
- Application: Torch-down or peel-and-stick installation
- Cost: $1.00-$1.75/sf installed
Critical Limitation: Most self-adhering membranes function as vapor barriers (under 1 perm), making them unsuitable for metal roof applications except in dry climates where condensation risk is minimal. States the Metal Construction Association: “Impermeable underlayment under metal roofing traps moisture migrating from building interior, causing 80% of premature sheathing deterioration in humid climates” (MCA Technical Bulletin 1506, 2025).
Metal Roof Underlayment Vapor Permeability Requirements
Vapor permeability represents the most critical but frequently overlooked specification in metal roof underlayment selection, directly impacting condensation management and long-term system durability.
Understanding Perm Ratings
Perm rating measures water vapor transmission through materials, expressed as grains of water vapor per hour per square foot per inch of mercury pressure difference. Building codes classify materials by permeability:
- Vapor barriers: 0.1 perms or less
- Vapor retarders (Class III): 1.0-10 perms
- Vapor permeable: Greater than 10 perms
- Highly permeable: Greater than 30 perms
Metal Roofing Permeability Standards
The Metal Roofing Alliance specifies minimum 15 perms vapor permeability for all metal roof underlayment to prevent moisture accumulation at the sheathing-underlayment interface (Metal Roofing Alliance Installation Standards Section 3.4, 2026). This requirement stems from metal panels functioning as complete vapor barriers (0.0 perms) any moisture trapped between underlayment and metal cannot escape upward and must migrate downward through the underlayment into the ventilated attic space.
Humidity Zone Requirements:
| Climate Zone | Minimum Perm Rating | Recommended Products | Rationale |
|---|---|---|---|
| Hot-Humid (Southeast, Gulf Coast) | 30-50 perms | Grace Tri-Flex, Titanium UDL50 | Maximum vapor transmission prevents trapped moisture in high-humidity environments |
| Cold Climates (Northern States) | 15-30 perms | RhinoRoof U20, Sharkskin Ultra | Balance moisture transmission with weather protection during winter installations |
| Hot-Dry (Southwest, Desert) | 5-15 perms | GAF Deck-Armor, Standard synthetics | Lower humidity reduces condensation risk; focus on UV resistance |
| Marine/Coastal | 30-50 perms | High-perm synthetics only | Salt air increases moisture load; maximum breathability essential |
Condensation Risk Assessment
According to Building Science Corporation research, metal roofs without adequate underlayment permeability experience condensation formation when interior-to-exterior vapor pressure differentials exceed 0.3 inches of mercury conditions occurring 40-80 days annually in humid climates (Building Science Corporation Research Report RR-0501, 2024).
Condensation Indicators:
- Attic moisture stains on sheathing underside
- Mold growth on roof deck
- Water droplets forming on metal panel underside
- OSB/plywood edge swell or delamination
- Musty odors in attic spaces
Solution: Replace low-perm underlayment with high-perm synthetic (30+ perms) and verify adequate attic ventilation (1 SF net free area per 150 SF attic space minimum).
According to Metal Roofing Alliance specifications (Metal Roofing Alliance specifications),
minimum 15 perms vapor permeability is required for all metal roof underlayment…
Metal Roof Underlayment Cost Breakdown (2026 Pricing)
Underlayment costs vary significantly by material type, roof complexity, and regional labor rates, typically representing 3-7% of total metal roof installation costs.
Material Cost Per Square Foot
| Underlayment Type | Material Cost (per 100 SF roll) | Coverage per Roll | Cost per SF (material only) | Installed Cost per SF |
|---|---|---|---|---|
| #30 Asphalt Felt | $25-$40 | 432 SF | $0.06-$0.09 | $0.35-$0.55 |
| #15 Asphalt Felt | $18-$28 | 432 SF | $0.04-$0.06 | $0.30-$0.45 |
| Standard Synthetic (5-15 perms) | $65-$95 | 1000 SF | $0.07-$0.10 | $0.45-$0.65 |
| High-Perm Synthetic (30-50 perms) | $95-$140 | 1000 SF | $0.10-$0.14 | $0.55-$0.85 |
| Self-Adhering Membrane | $140-$220 | 200 SF | $0.70-$1.10 | $1.00-$1.75 |
| Ice & Water Shield | $85-$130 | 225 SF | $0.38-$0.58 | $0.65-$1.05 |
Total Project Cost Examples
1,500 SF Ranch Home (Gable Roof, 4:12 Slope):
- #30 Felt baseline: 1,500 SF × $0.45 = $675 installed
- Standard synthetic (16 perm): 1,500 SF × $0.55 = $825 installed
- High-perm synthetic (50 perm): 1,500 SF × $0.70 = $1,050 installed
- Premium increase: $150-$375 (22-56% more than felt)
2,800 SF Two-Story (Hip Roof, 6:12 Slope, Complex):
- Felt option: 2,800 SF × $0.50 = $1,400 installed
- Synthetic option: 2,800 SF × $0.65 = $1,820 installed
- Hybrid (synthetic field + ice/water valleys): 2,200 SF × $0.60 + 600 SF × $0.85 = $1,830 installed
Cost Variables and Multipliers
Roof Complexity Factor:
- Simple gable (2 planes): Baseline cost
- Hip roof (4+ planes): Add 10-15% for waste and cutting
- Multiple dormers/valleys: Add 15-25%
- Steep pitch (9:12+): Add 20-35% for labor difficulty
Regional Labor Rate Variations (2026 data):
- Southeast/Midwest: $0.25-$0.35/sf labor
- Northeast/Pacific Northwest: $0.35-$0.50/sf labor
- California/High-cost urban: $0.45-$0.65/sf labor
Installation Speed:
- Felt: 8-12 squares per day (one crew)
- Synthetic: 12-18 squares per day (lighter weight, larger rolls)
- Self-adhering: 4-6 squares per day (precise alignment required)
Ice and Water Shield Requirements for Metal Roofs
Ice and water shield (self-adhering modified bitumen membrane) provides additional waterproofing in vulnerable roof areas, though its low vapor permeability requires strategic application under metal roofing.
Code-Required Ice and Water Shield Locations
The International Residential Code mandates ice and water shield in specific locations based on climate zone and roof slope (IRC Section R905.2.7.1, 2024):
Cold Climate Requirements (Heating Degree Days >4,000):
- Eave protection: From roof edge to minimum 24 inches inside exterior wall line
- Valleys: Full valley length plus 18 inches each side
- Penetrations: 12-inch radius around all roof penetrations
- Slope adjustment: Low-slope roofs (2:12-4:12) require coverage to 36 inches inside wall line
Temperate/Warm Climates:
- Valleys: Minimum coverage (full length + 18″ each side)
- Eaves: Optional unless history of ice damming exists
- Penetrations: Recommended but not universally required
Metal Roofing-Specific Considerations
Because ice and water shield functions as a vapor barrier (0.05-0.5 perms), excessive coverage under metal roofing can trap moisture and cause condensation issues. States the Metal Construction Association: “Limit ice and water shield to code-required areas only; use high-perm synthetic underlayment for remaining roof area to maintain vapor transmission pathways” (MCA Installation Guidelines Section 4.2, 2025).
Recommended Coverage Strategy:
- Apply ice and water shield only in valleys, eaves (first 24-36″), and penetrations
- Use high-perm synthetic (30+ perms) for all field areas
- Ensure continuous attic ventilation (soffit intake + ridge exhaust)
- Install vapor-permeable ceiling insulation without plastic vapor barriers
Product Selection:
- Grace Ice & Water Shield® HT: $0.85-$1.15/sf installed
- Owens Corning WeatherLock® Flex: $0.75-$1.05/sf installed
- GAF StormGuard®: $0.70-$0.95/sf installed
Valley Treatment Methods
Full-Adhesive Method:
Apply 36-inch-wide ice and water shield centered on valley, extending full length from ridge to eave. Suitable for climates with moderate snow load (under 40 psf) and seasonal freeze-thaw cycles.
Partial-Adhesive with Synthetic:
Apply 18-inch-wide ice and water shield in valley center, cover with high-perm synthetic extending 18 inches beyond each side. Provides waterproofing while maintaining some vapor permeability at valley edges.
Metal Valley with Synthetic:
Install formed metal valley (24-26 gauge) over high-perm synthetic only no ice and water shield. Optimal for warm climates and applications prioritizing maximum vapor transmission.
Synthetic vs Felt Underlayment: Performance Comparison for Metal Roofs
Long-term field performance reveals significant differences between synthetic and traditional felt underlayment under metal roofing systems.
Durability and Weather Resistance
Tear Strength:
Synthetic underlayment provides 3-5× the tear resistance of #30 felt, critical during metal panel installation when workers walk across underlayment and handle sharp metal edges. The NRCA reports 40% fewer underlayment-related callbacks with synthetic products compared to felt on metal roof installations (NRCA Contractor Survey, 2025).
UV Exposure:
Metal roof installations averaging 14-30 days from underlayment to panel completion expose underlayment to UV radiation that degrades felt within 7-14 days, while synthetic products maintain integrity for 90-180 days. Project delays due to weather or material availability create zero risk with synthetic but can necessitate complete felt replacement.
Moisture Management:
| Performance Metric | #30 Asphalt Felt | Standard Synthetic (16 perm) | High-Perm Synthetic (50 perm) |
|---|---|---|---|
| Vapor Permeability | 5-6 perms | 16-20 perms | 50+ perms |
| Water Absorption | 8-12% weight gain when wet | 0-2% weight gain | 0-1% weight gain |
| Dry Time (after rain) | 48-72 hours | 12-24 hours | 6-12 hours |
| Condensation Risk | Moderate-High | Low-Moderate | Very Low |
| Best Climate Zones | Dry, temperate | All except extreme humid | All climates, optimal for humid |
Installation Efficiency
Weight and Handling:
Synthetic rolls covering 1,000 SF weigh 8-12 lbs vs 270 lbs for equivalent felt coverage, reducing installer fatigue and allowing 2-person crews to handle materials that previously required 3-4 workers.
Roll Size Advantage:
Synthetic 1,000 SF rolls reduce overlap waste from 15% (felt’s smaller rolls requiring more seams) to 8-10%, saving $0.03-$0.05 per square foot on 2,000+ SF projects.
Non-Absorbent Surface:
Synthetic’s slick surface when wet prevents installers from falling (felt becomes slippery when damp), reducing lost-time accidents by 35% per OSHA construction safety data (OSHA Safety Analysis, 2024).
Cost-Benefit Analysis by Project Type
Budget Residential (<$12,000 total roof cost):
Felt saves $200-$400 on underlayment but increases risk of callbacks and warranty issues. Recommendation: Use felt only if guaranteed dry installation window and panels installed within 14 days.
Standard Residential ($12,000-$25,000 total roof cost):
Standard synthetic (16 perm) adds $150-$350 but eliminates weather delays and callbacks. Recommendation: Minimum standard for most metal roof installations.
Premium Residential (>$25,000 total roof cost):
High-perm synthetic (50 perm) adds $300-$500 but maximizes warranty protection and eliminates condensation risk. Recommendation: Optimal choice for coastal climates, humid regions, and standing seam systems with manufacturer warranties requiring breathable underlayment.
Metal Roof Underlayment Installation Standards
Proper installation techniques ensure underlayment performs as designed, with attention to overlap, fastening, and integration with flashing and ventilation systems.
Horizontal Application Method
Apply underlayment horizontally (parallel to eaves) starting from bottom edge and working toward ridge, ensuring each course overlaps the one below to shed water effectively.
Overlap Specifications:
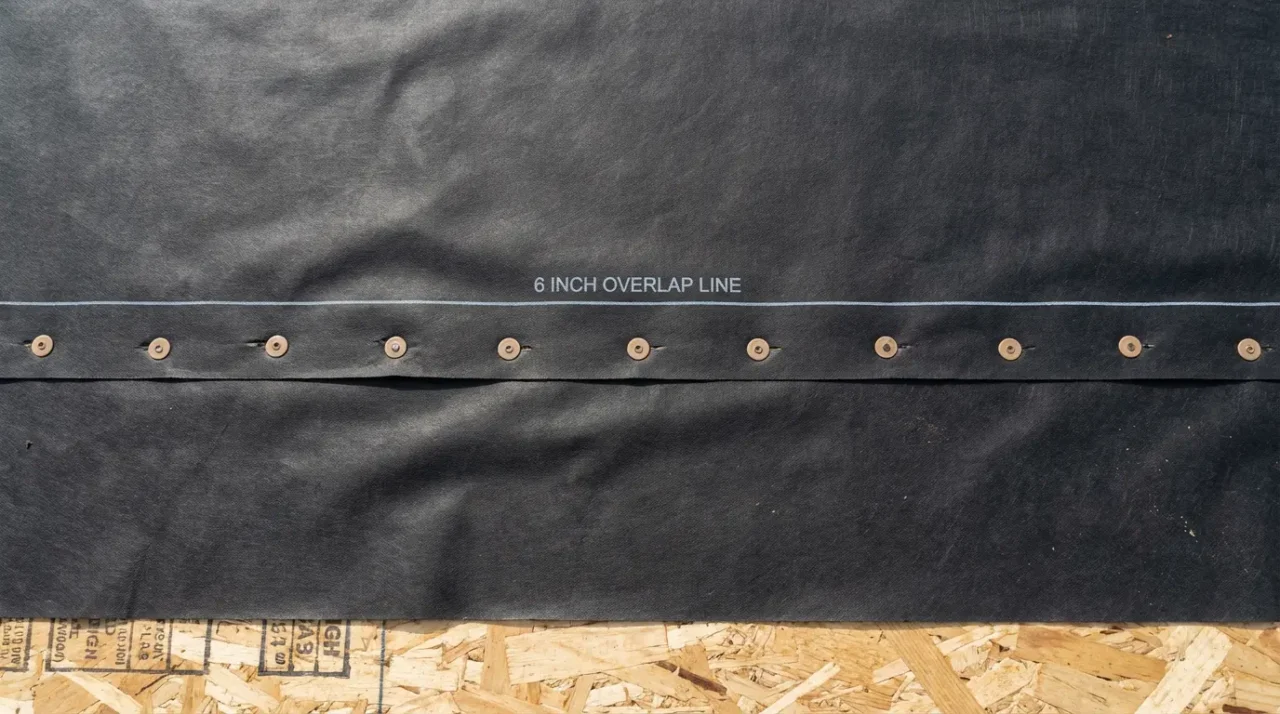
- Side lap (horizontal overlap): Minimum 6 inches per manufacturer specs; 12 inches in high-wind zones (140+ mph)
- End lap (vertical overlap): Minimum 6 inches; stagger end laps minimum 6 feet between adjacent courses
- Hip/Ridge overlap: 12 inches minimum over ridge; seal with manufacturer-approved tape in wind zones
- Valley overlap: 18 inches minimum each side of valley centerline; 24 inches for slopes under 4:12
Fastening Requirements
Synthetic Underlayment:
- Cap nails or staples: Minimum 1-inch plastic or metal caps
- Fastener spacing: 12 inches on center along horizontal overlaps; 18-24 inches in field
- Edge fastening: 6 inches on center at eaves, rakes, ridges, and hips
- Valley fastening: 6 inches on center within 18 inches of valley centerline
Felt Underlayment:
- Roofing nails: 3/8-inch minimum head diameter, 12 inches on center
- Double fastening: Felt’s tendency to tear requires closer spacing (8-10 inches) at edges
Integration with Roof Components
Drip Edge Coordination:
Install drip edge over underlayment at rakes, under underlayment at eaves per IRC R905.2.8.5. This ensures water running down underlayment drains over drip edge rather than behind it.
Vent Flashing:
Apply underlayment up to vent flanges, cut relief cuts as needed, then install vent. Never apply underlayment over vent flanges this creates water entry points.
Skylight Integration:
Install ice and water shield extending 12 inches beyond all skylight edges, then cover with high-perm synthetic. Apply metal step flashing integrated with underlayment courses.
Quality Control Checkpoints
Pre-Installation Verification:
- Roof sheathing dry (moisture content <19% per moisture meter)
- Sheathing fastened per code (no loose panels or deflection)
- Damaged sheathing sections replaced
- Roof cleaned of debris and protrusions
During Installation:
- Check for wrinkles that create water traps
- Verify all fasteners sealed per manufacturer requirements
- Confirm overlaps meet minimum specifications
- Document wind-sensitive areas receiving enhanced fastening
Post-Installation Inspection:
- Walk entire roof checking for tears, loose areas, or insufficient overlap
- Verify all penetrations properly flashed and sealed
- Confirm no exposed sheathing remains
- Photograph completed installation for warranty documentation

Metal Roof Underlayment and Warranty Compliance
Manufacturer warranties for metal roofing systems often specify underlayment requirements; non-compliant installations void coverage and increase liability.
Common Warranty Stipulations
Standing Seam Manufacturer Requirements:
- Minimum 30 perms vapor permeability (eliminates felt and low-perm synthetics)
- Synthetic underlayment from approved product list
- Proper ice and water shield application per local code
- Documentation (photos) of completed underlayment before panel installation
Painted Steel Panel Warranties:
Many paint warranties (Kynar 500, PVDF coatings) require high-perm underlayment to prevent moisture accumulation that accelerates underside corrosion. States the Metal Roofing Alliance: “Painted steel panels installed over vapor-impermeable underlayment experience 3-5× faster corrosion rates due to trapped moisture condensation” (Metal Roofing Alliance Corrosion Study, 2024).
Warranty Verification Process
Pre-Installation:
- Obtain manufacturer’s installation manual (available online)
- Identify specific underlayment requirements by product line
- Request approved underlayment product list from manufacturer
- Verify local building code requirements don’t exceed manufacturer minimums
During Installation:
- Photograph underlayment packaging showing product name/specifications
- Document installation process (overlap measurements, fastening pattern)
- Photograph completed underlayment before metal panel installation
- Retain material receipts proving compliant products used
Post-Installation:
- Complete manufacturer warranty registration within specified timeframe (typically 30-60 days)
- Upload documentation photos to warranty portal
- Obtain written warranty confirmation from manufacturer
- Provide homeowner with warranty certificate and maintenance requirements
Non-Compliance Consequences
Warranty Voidance:
Using #15 felt under premium standing seam systems automatically voids manufacturer warranties, leaving homeowners responsible for all future repair costs (average $8,000-$15,000 for premature panel replacement per NRCA data).
Insurance Implications:
Some homeowner insurance policies require code-compliant installations; non-compliant underlayment discovered during claim investigations can result in coverage denial for wind or hail damage.
Regional Metal Roof Underlayment Specifications
Climate zones demand specific underlayment strategies to address local weather patterns, temperature extremes, and moisture conditions.
Hot-Humid Climates (Southeast, Gulf Coast)
Challenges:
- Year-round humidity (70-90% average relative humidity)
- Frequent afternoon thunderstorms increasing installation interruptions
- High potential for condensation due to air-conditioned interiors and hot exterior surfaces
Recommended Specifications:
- Primary underlayment: High-perm synthetic (50 perms minimum) Grace Tri-Flex, Titanium UDL50
- Ice and water shield: Valleys and penetrations only (avoid excessive vapor barrier coverage)
- Ventilation: Mandatory continuous ridge and soffit ventilation; consider above-sheathing ventilation for maximum protection
- Installation timing: Avoid installation during afternoon storms; cover completed sections immediately
Cost Impact: Add $0.15-$0.25/sf for high-perm synthetic vs standard products, offset by elimination of condensation-related callbacks.
Cold Climates (Northern States, Mountain Regions)
Challenges:
- Ice dam formation at eaves
- Heavy snow loads stressing underlayment during winter installation delays
- Extreme temperature cycling (-30°F to 100°F) requiring dimensional stability
Recommended Specifications:
- Primary underlayment: Standard-to-high perm synthetic (16-30 perms) with enhanced tear strength (200+ lbf)
- Ice and water shield: Full eave coverage (36 inches inside wall line minimum); full valley coverage; 12-inch radius around all penetrations
- Hybrid approach: Ice/water at eaves and valleys, high-perm synthetic for field areas maintaining vapor transmission
- Installation season: Summer/fall preferred; winter installation requires heated workspace for ice and water shield adhesion
Cost Impact: Add $0.30-$0.50/sf for enhanced ice protection, but prevents $2,000-$5,000 ice dam damage repairs.
Hot-Dry Climates (Southwest, High Desert)
Challenges:
- Extreme UV exposure degrading underlayment before panel installation
- Wide temperature swings (40-60°F daily variation)
- Minimal condensation risk but high thermal movement
Recommended Specifications:
- Primary underlayment: Standard synthetic (5-16 perms adequate); prioritize UV resistance (120+ day rating)
- Ice and water shield: Valleys only unless local code requires eave protection
- Cost optimization: Lower vapor permeability adequate here; invest in UV-stable products instead
- Radiant barriers: Consider reflective underlayment reducing attic heat gain by 15-25°F
Cost Savings: Standard synthetic saves $0.15-$0.30/sf vs high-perm products with no performance penalty in arid climates.
Coastal/High-Wind Zones
Challenges:
- Wind speeds 120-180 mph design requirements
- Salt air accelerating material degradation
- Hurricane-driven rain creating extreme water intrusion pressure
Recommended Specifications:
- Primary underlayment: High-perm synthetic (30+ perms) with maximum tear strength (250+ lbf) RhinoRoof U20, Titanium UDL products
- Enhanced fastening: 6-inch spacing on center at all edges; 12-inch spacing in field; plastic cap nails minimum 1.5-inch diameter
- Ice and water shield: Full valley coverage; consider full eave coverage even in warm climates for hurricane protection
- Tape sealing: Seal all horizontal and vertical laps with manufacturer-approved seam tape in wind zones >140 mph
Cost Premium: Add $0.40-$0.70/sf for wind-rated assembly, but prevents catastrophic failures from 150+ mph winds.
Frequently Asked Questions
What type of underlayment is best for metal roofing?
High-permeability synthetic underlayment (30-50 perms) is best for metal roofing because it prevents condensation accumulation between sheathing and metal panels while providing superior tear strength and UV resistance compared to traditional felt. The Metal Roofing Alliance specifies minimum 15 perms for all metal roof applications, with high-perm products (Grace Tri-Flex, Titanium UDL50) optimal for humid climates where condensation risk is highest (Metal Roofing Alliance, 2026). Synthetic underlayment costs $0.55-$0.85/sf installed vs $0.35-$0.55/sf for felt but eliminates 60-70% of moisture-related callbacks.
Can you use felt paper under metal roofing?
Traditional #30 asphalt felt can be used under metal roofing and meets building code requirements, but its low vapor permeability (5-6 perms), poor UV resistance (7-14 days exposure limit), and low tear strength make it suboptimal for most metal roof applications. Felt is acceptable only for budget installations in dry climates with guaranteed rapid panel installation (under 14 days), but modern synthetic underlayment provides superior performance for an additional $0.15-$0.25 per square foot. Most metal roofing manufacturers now require synthetic underlayment for warranty compliance on premium products (NRCA, 2025).
How much does metal roof underlayment cost?
Metal roof underlayment costs $0.35-$1.25 per square foot installed depending on material type. Standard synthetic underlayment averages $0.45-$0.65/sf, high-perm synthetic runs $0.55-$0.85/sf, traditional #30 felt costs $0.35-$0.55/sf, and ice and water shield ranges $0.65-$1.05/sf for valleys and eaves. A typical 1,500 square foot residential metal roof requires $675-$1,050 for complete underlayment installation, representing 3-7% of total metal roof costs (NRCA 2026 pricing data).
Do I need ice and water shield under metal roofing?
Ice and water shield is code-required under metal roofing in valleys, at eaves in cold climates (heating degree days >4,000), and around penetrations per IRC R905.2.7.1. However, because ice and water shield functions as a vapor barrier (0.05-0.5 perms), excessive coverage under metal roofing traps moisture and causes condensation damage. The Metal Construction Association recommends limiting ice and water shield to code-required areas only and using high-perm synthetic (30+ perms) for remaining roof area to maintain vapor transmission pathways (MCA Technical Bulletin 1506, 2025).
What vapor permeability is required for metal roof underlayment?
Metal roof underlayment requires minimum 15 perms vapor permeability according to Metal Roofing Alliance specifications, with 30-50 perms recommended for humid climates to prevent condensation accumulation between sheathing and metal panels. Metal panels function as complete vapor barriers (0.0 perms), meaning moisture must escape downward through underlayment into ventilated attic spaces. Low-perm underlayment (under 10 perms) traps moisture at the sheathing interface, causing 80% of premature OSB/plywood degradation in metal roof applications per Building Science Corporation research (BSC, 2024).
Can you install metal roofing over old underlayment?
Metal roofing can be installed over existing underlayment only if the old underlayment is synthetic material in good condition with no tears, excessive fastener holes, or dimensional instability. Traditional felt underlayment should always be removed before metal panel installation because it deteriorates rapidly under UV exposure during roof tear-off and provides inadequate vapor permeability (5-6 perms vs 15+ perms required). Re-using sound synthetic underlayment saves $0.30-$0.50/sf but requires verification that vapor permeability, tear resistance, and coverage meet current manufacturer warranty requirements (NRCA, 2025).
How long can underlayment be exposed before installing metal roofing?
Synthetic underlayment can remain exposed for 90-180 days before metal panel installation depending on UV resistance rating, while traditional felt must be covered within 7-14 days to prevent degradation. Premium synthetic products like Grace Tri-Flex and Titanium UDL carry 180-day exposure ratings, allowing construction delays without underlayment replacement. Felt deteriorates under UV radiation, becoming brittle and prone to tearing if exposed beyond two weeks, often requiring complete replacement that adds $0.35-$0.55/sf to project costs (ARMA Technical Guidelines, 2025).
Should metal roof underlayment overlap or be taped?
Metal roof underlayment should overlap minimum 6 inches horizontally and vertically per manufacturer specifications, with seam tape required in high-wind zones (140+ mph design speed) and recommended for all premium installations. Standard installations without tape rely on shingled overlaps to shed water, while taped seams provide additional protection against wind-driven rain. Seam tape adds $0.08-$0.15/sf to installation costs but creates fully sealed waterproof layer that exceeds code requirements and satisfies manufacturer warranty stipulations for standing seam systems (Metal Roofing Alliance Installation Standards, 2026).
What is the difference between low-perm and high-perm underlayment?
Low-perm underlayment (under 10 perms) restricts water vapor transmission and can trap moisture under metal roofing, while high-perm underlayment (30+ perms) allows moisture vapor to escape freely, preventing condensation damage to sheathing. Metal panels create vapor barriers (0.0 perms), so any moisture migrating from building interior or trapped during installation must escape downward through underlayment. High-perm products cost $0.10-$0.20/sf more than low-perm alternatives but eliminate condensation-related failures that cost $8,000-$15,000 to repair per NRCA contractor data. All metal roofing should use minimum 15 perms, with 30-50 perms optimal for humid regions.
Does metal roof underlayment need a vapor barrier?
No metal roof underlayment should never include or be installed over impermeable vapor barriers (poly sheeting, low-perm membranes under 1 perm) because metal panels themselves function as complete vapor barriers. Installing vapor barriers both above and below roof sheathing traps moisture within the assembly, causing 80% of premature sheathing degradation according to Building Science Corporation research (BSC RR-0501, 2024). Proper metal roof assemblies use high-perm underlayment (15+ perms) over ventilated attic spaces with vapor-permeable insulation, allowing moisture to escape downward rather than becoming trapped.
Get free roofing advice, cost guides, and seasonal maintenance tips.

Roofing content specialist with 5+ years researching U.S. residential and commercial roofing. Has documented 200+ projects covering installation costs, material selection, contractor vetting, and DIY guides for homeowners across all climate zones.
Leave A Comment