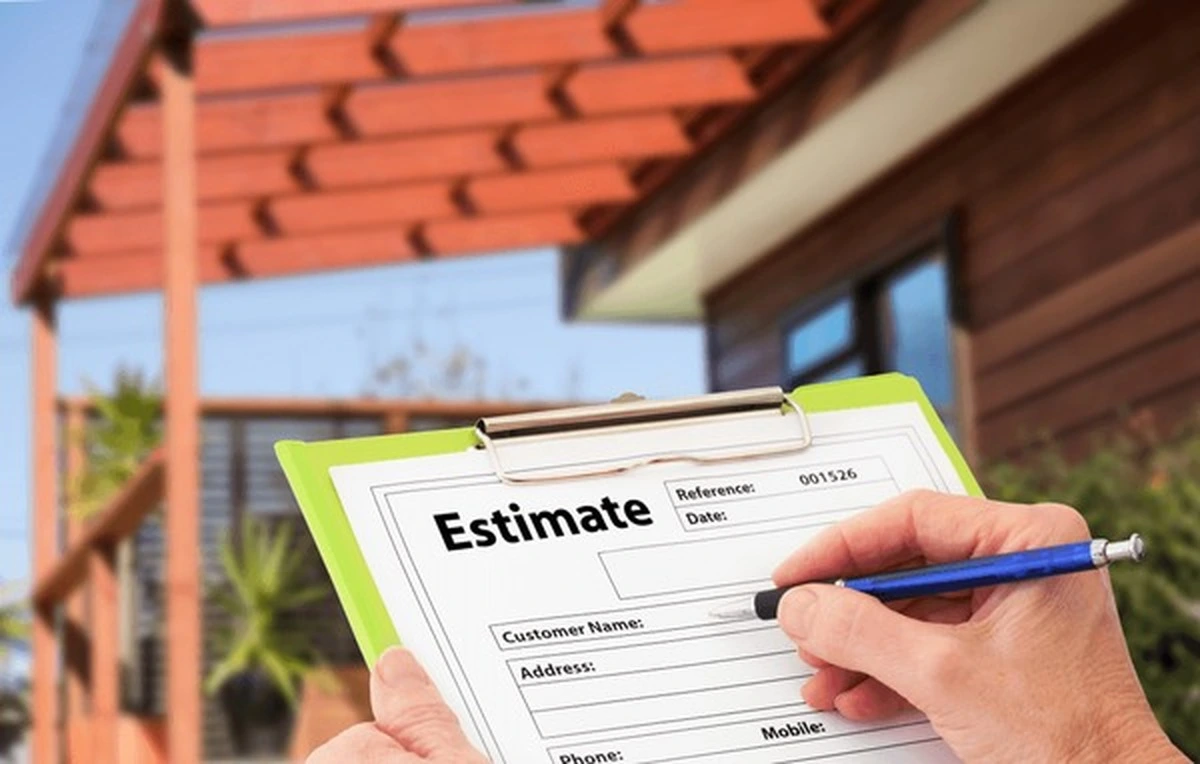
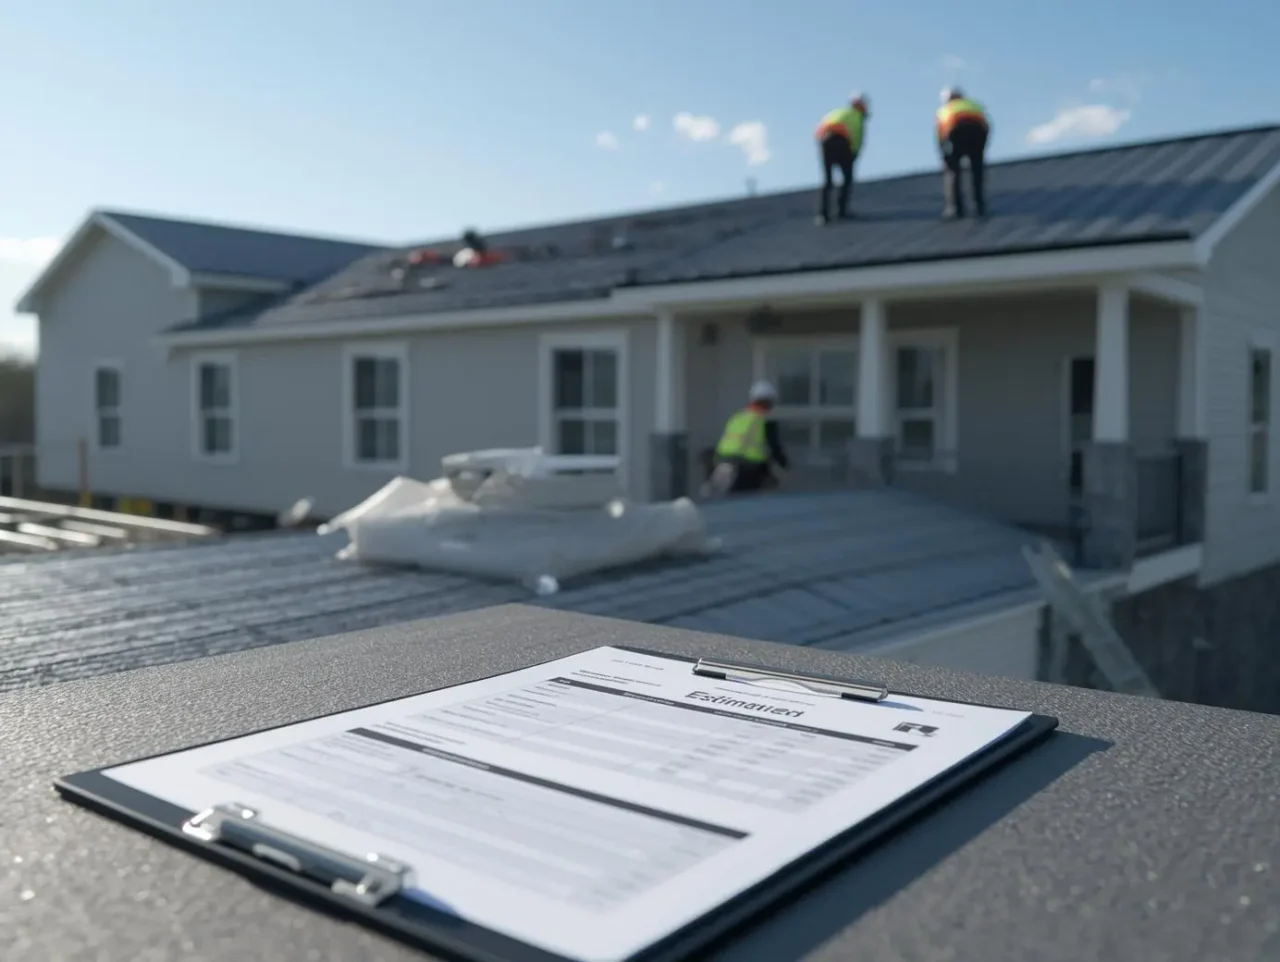
The tear off roof cost can significantly impact your budget if you’re planning a roof renovation. Understanding the expenses involved is crucial for making informed decisions. Whether your roof is showing signs of wear or you’re preparing for an upgrade, knowing these costs will help you plan effectively. This article will explore the various factors that influence the cost of a roof tear-off and replacement in 2026. Roofing prices may fluctuate due to demand, material costs, and labor availability. We will provide a detailed breakdown to ensure that you are well-informed before making your choice. We’ll cover several aspects, including factors that influence costs, average pricing by material type, regional differences, and the overall process of tearing off and replacing a roof. By the end, you’ll have a clearer understanding of the tear off roof cost.
Tear Off Roof Cost Factors
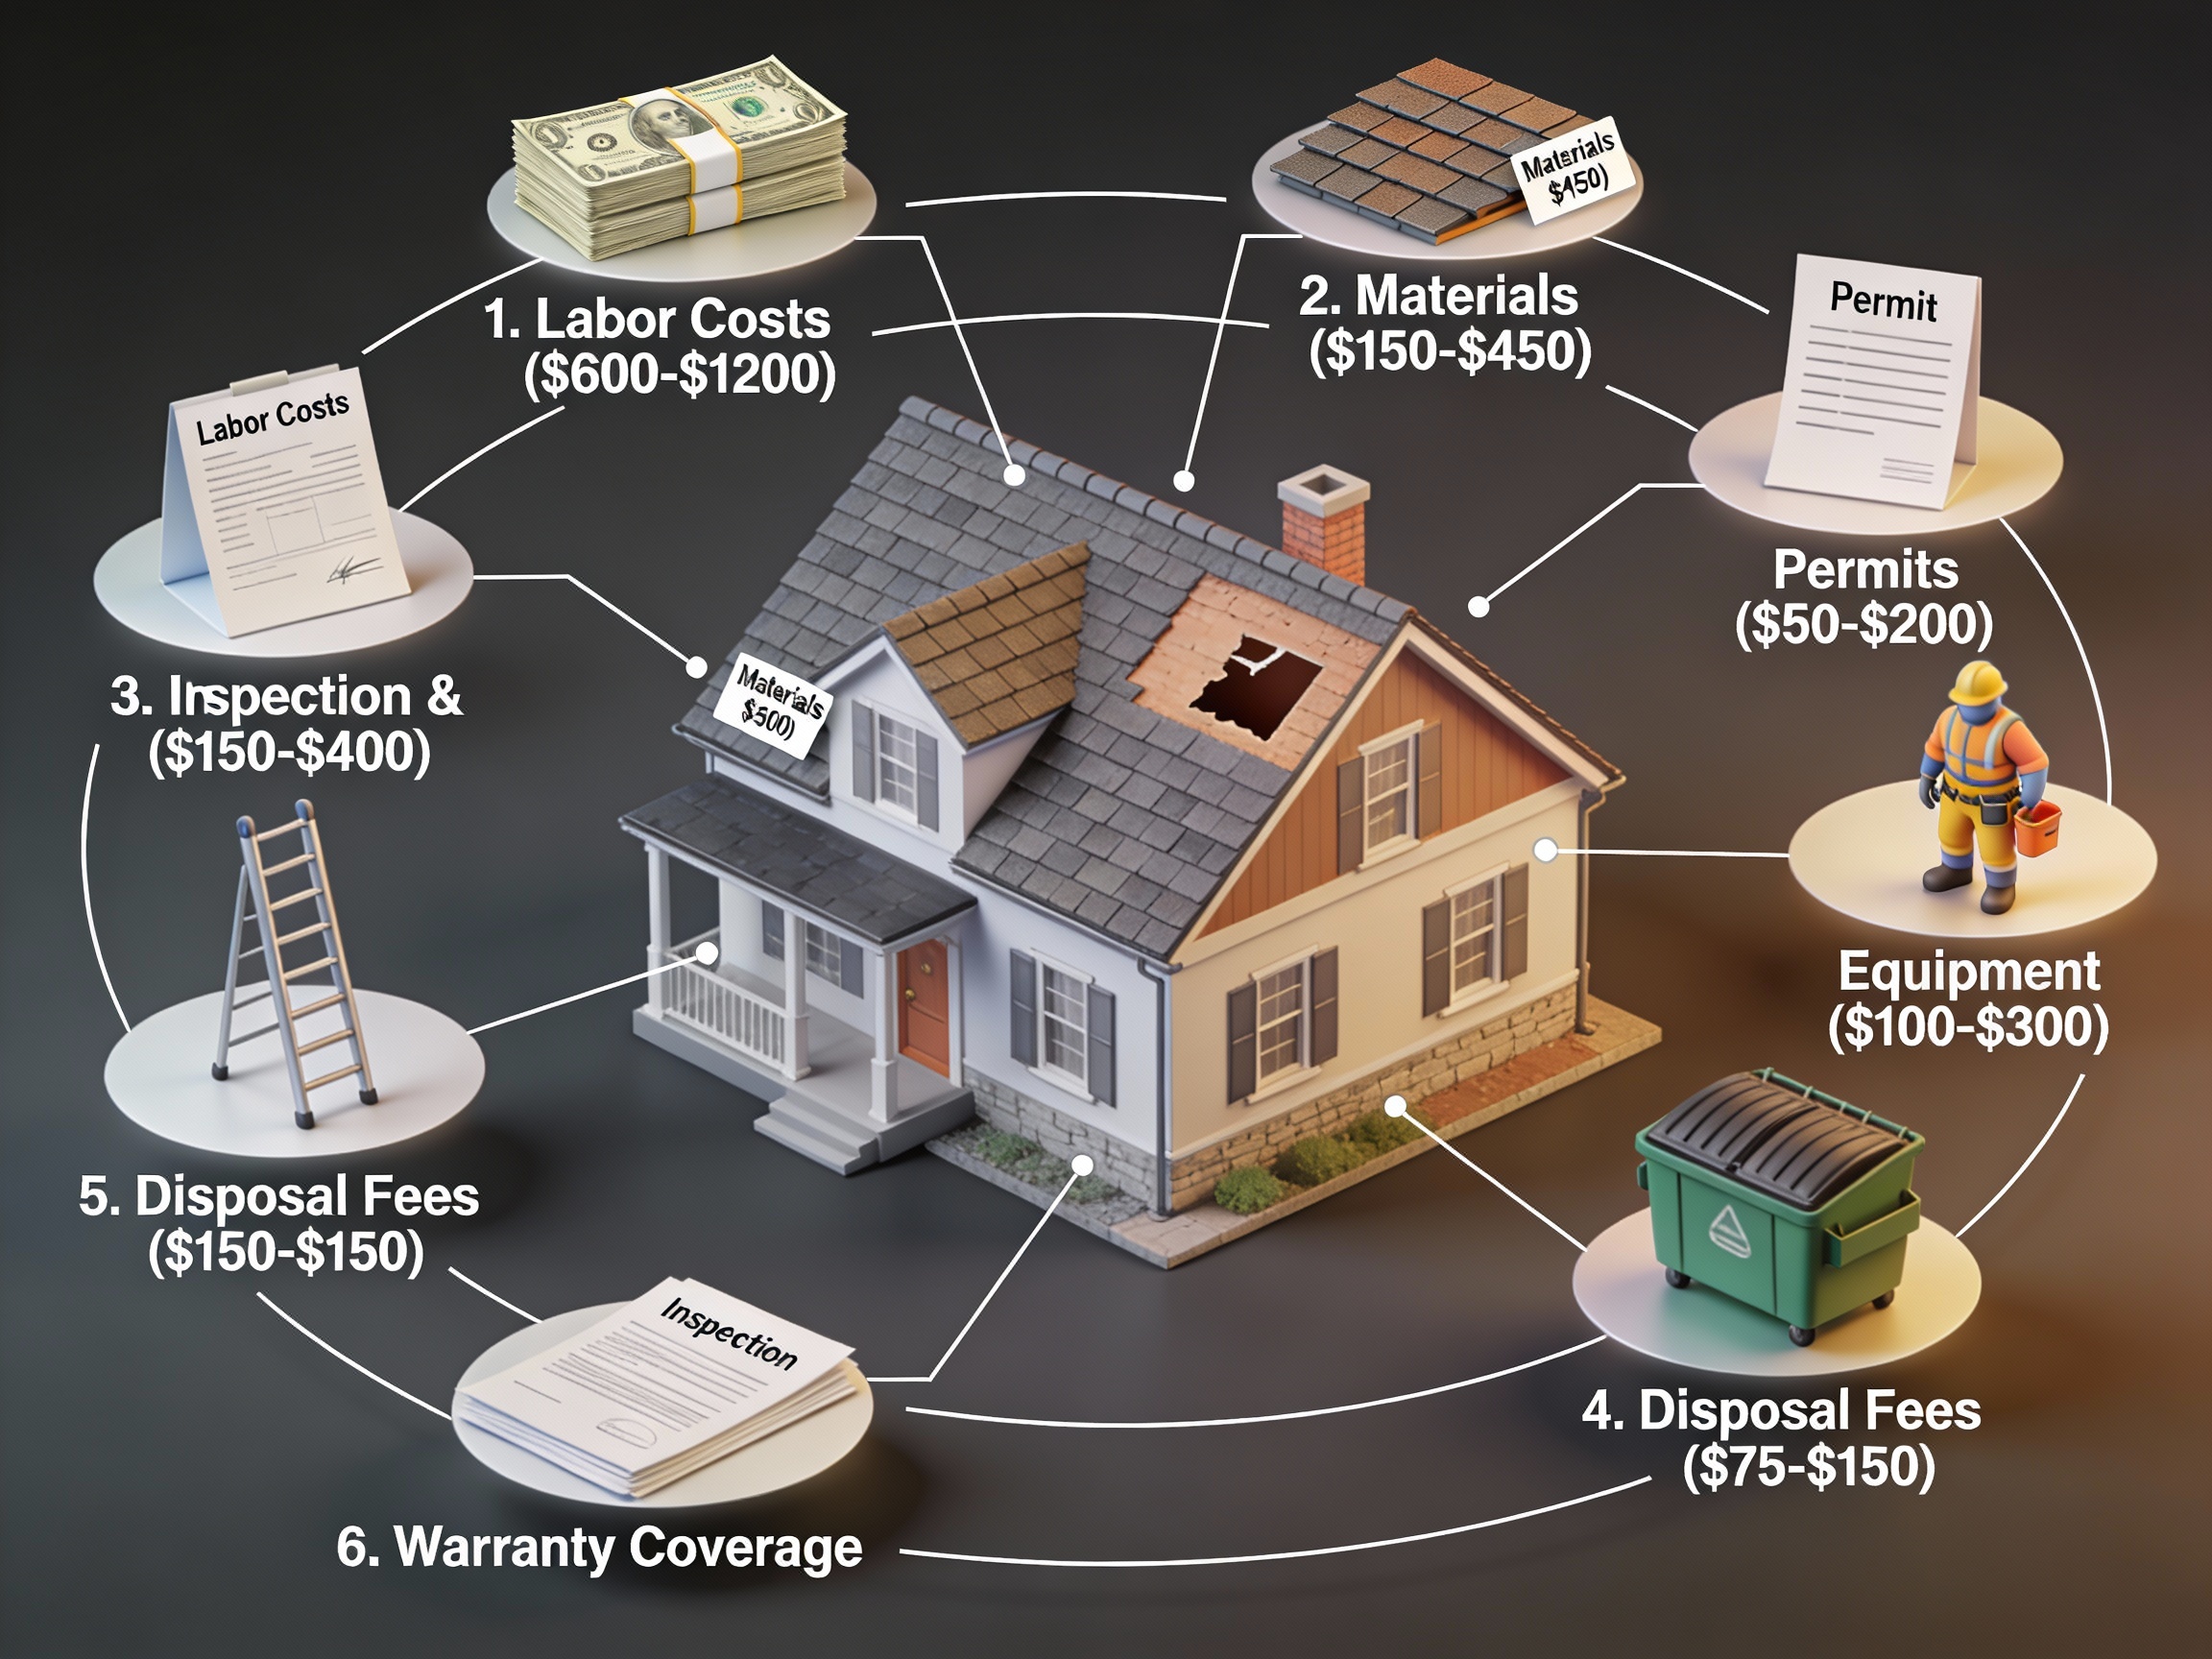
Several factors determine the overall cost of tearing off and replacing a roof. Understanding these elements can clarify why some roofs might be more expensive than others. Here are the primary factors that affect costs:
Roof Size: The larger your roof, the more materials are needed, leading to higher costs.
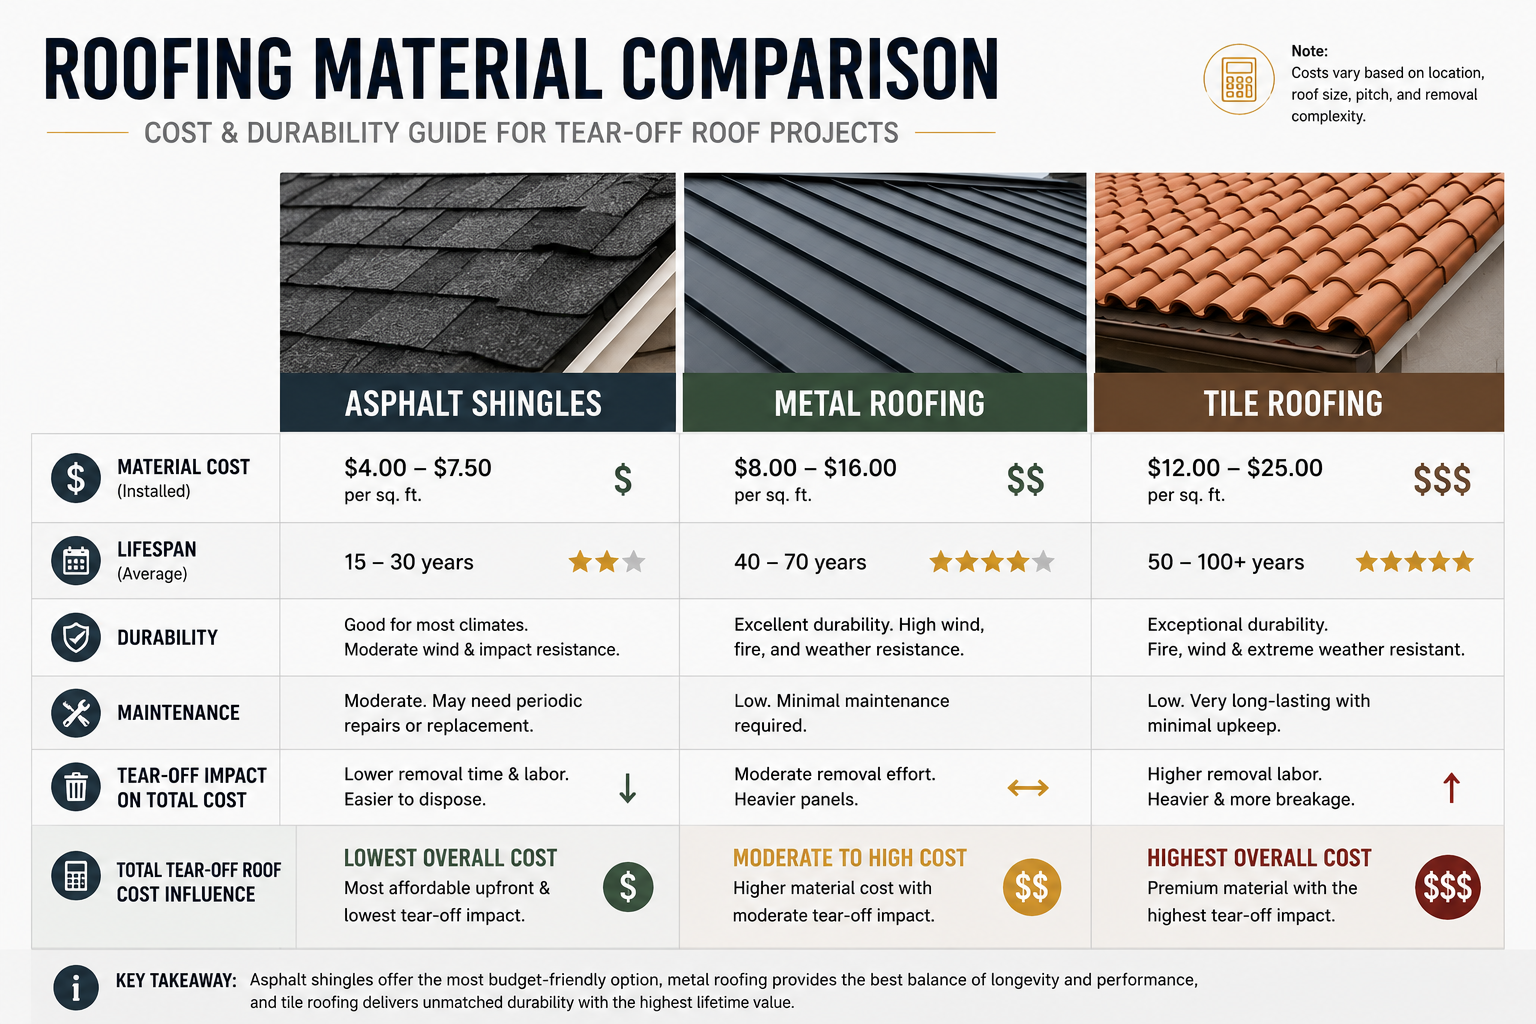
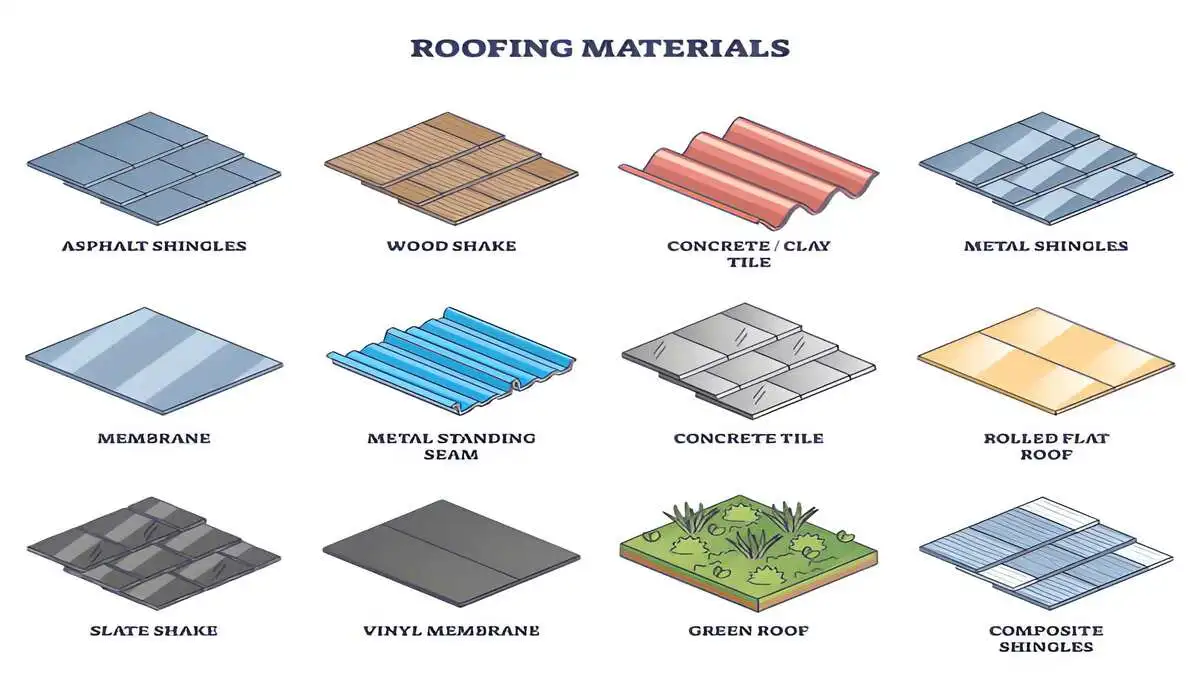
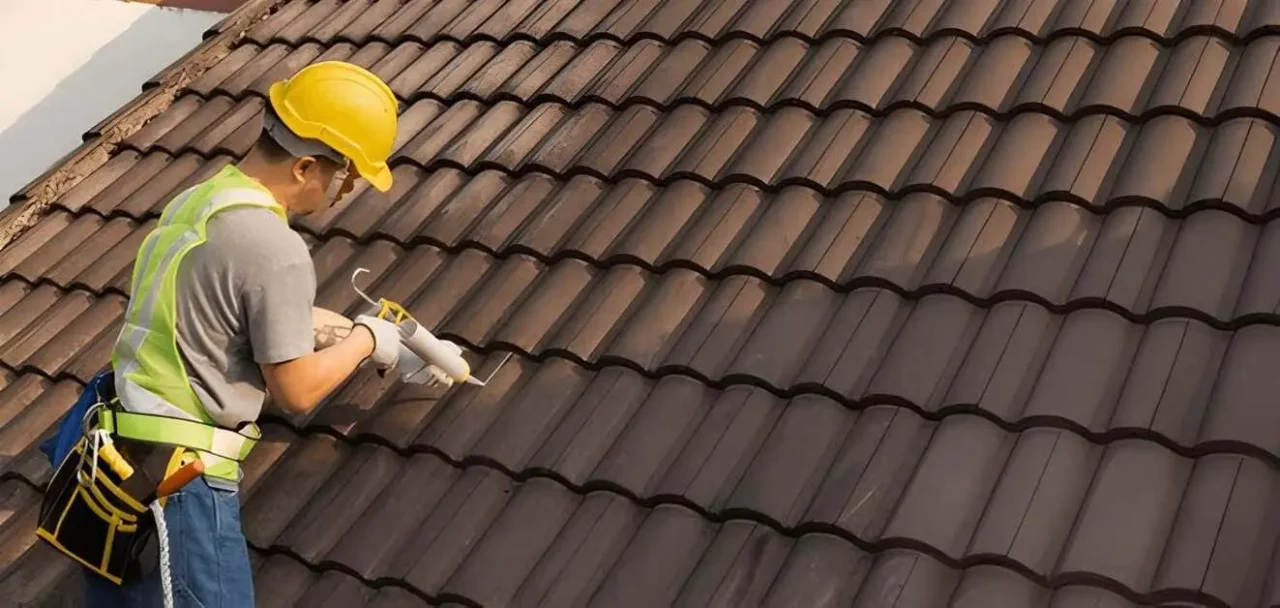
Roofing Material: Different materials have different price points. Asphalt shingles, metal roofs, and tile roofs each have their expenses.
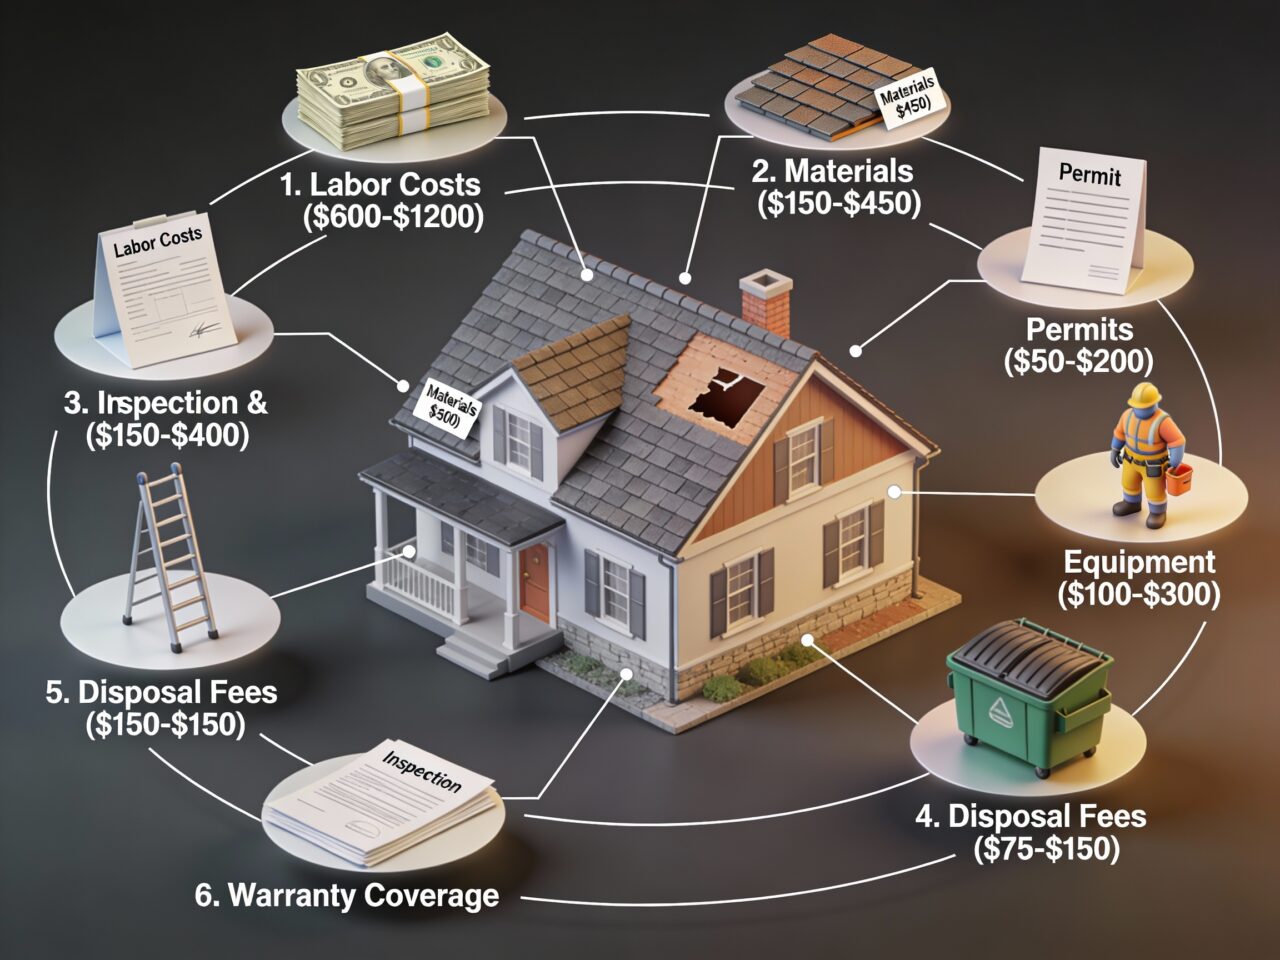
Labor Costs: Labor rates can vary by region, impacting the final labor costs associated with your project.
Removal and Disposal: The cost of tearing off old roofing materials can vary based on local disposal fees and regulations.
Roof Structure: If your roof has multiple slopes or levels, this complexity can increase labor and material costs.
Average Tear Off Roof Cost by Material Type
The type of material can dramatically change the tear off roof cost. Here’s a breakdown of various roofing materials and their associated costs:
Asphalt Shingles: The most common roofing material, costing between $100 to $150 per square. The average tear-off and installation cost may be around $8,000 to $15,000 for a typical home.
Metal Roofing: This durable option can cost between $300 to $700 per square. The average replacement cost can range from $12,000 to $30,000, including the tear off roof.
Tile Roofing: Known for aesthetics and longevity, tile roofs can range from $600 to $700 per square, with total costs significantly higher due to tear off roof complexities.
Understanding your roofing options
Regional Variances in Tear Off Roof Cost
Your location can heavily influence the tear off roof cost. Labor rates, material availability, and local regulations contribute to these variances. Here’s how costs differ across various regions:
North-East: Expect higher total costs due to labor and material demand. Average costs often exceed national averages because of the age of many homes needing replacement.
South: Typically lower costs, with average installations running 10-15% less than in the North.
Midwest: Moderate costs with excellent options for various materials, making it a competitive market.
West: Costs can vary greatly depending on urban versus rural settings. Urban areas tend to have higher prices due to demand.
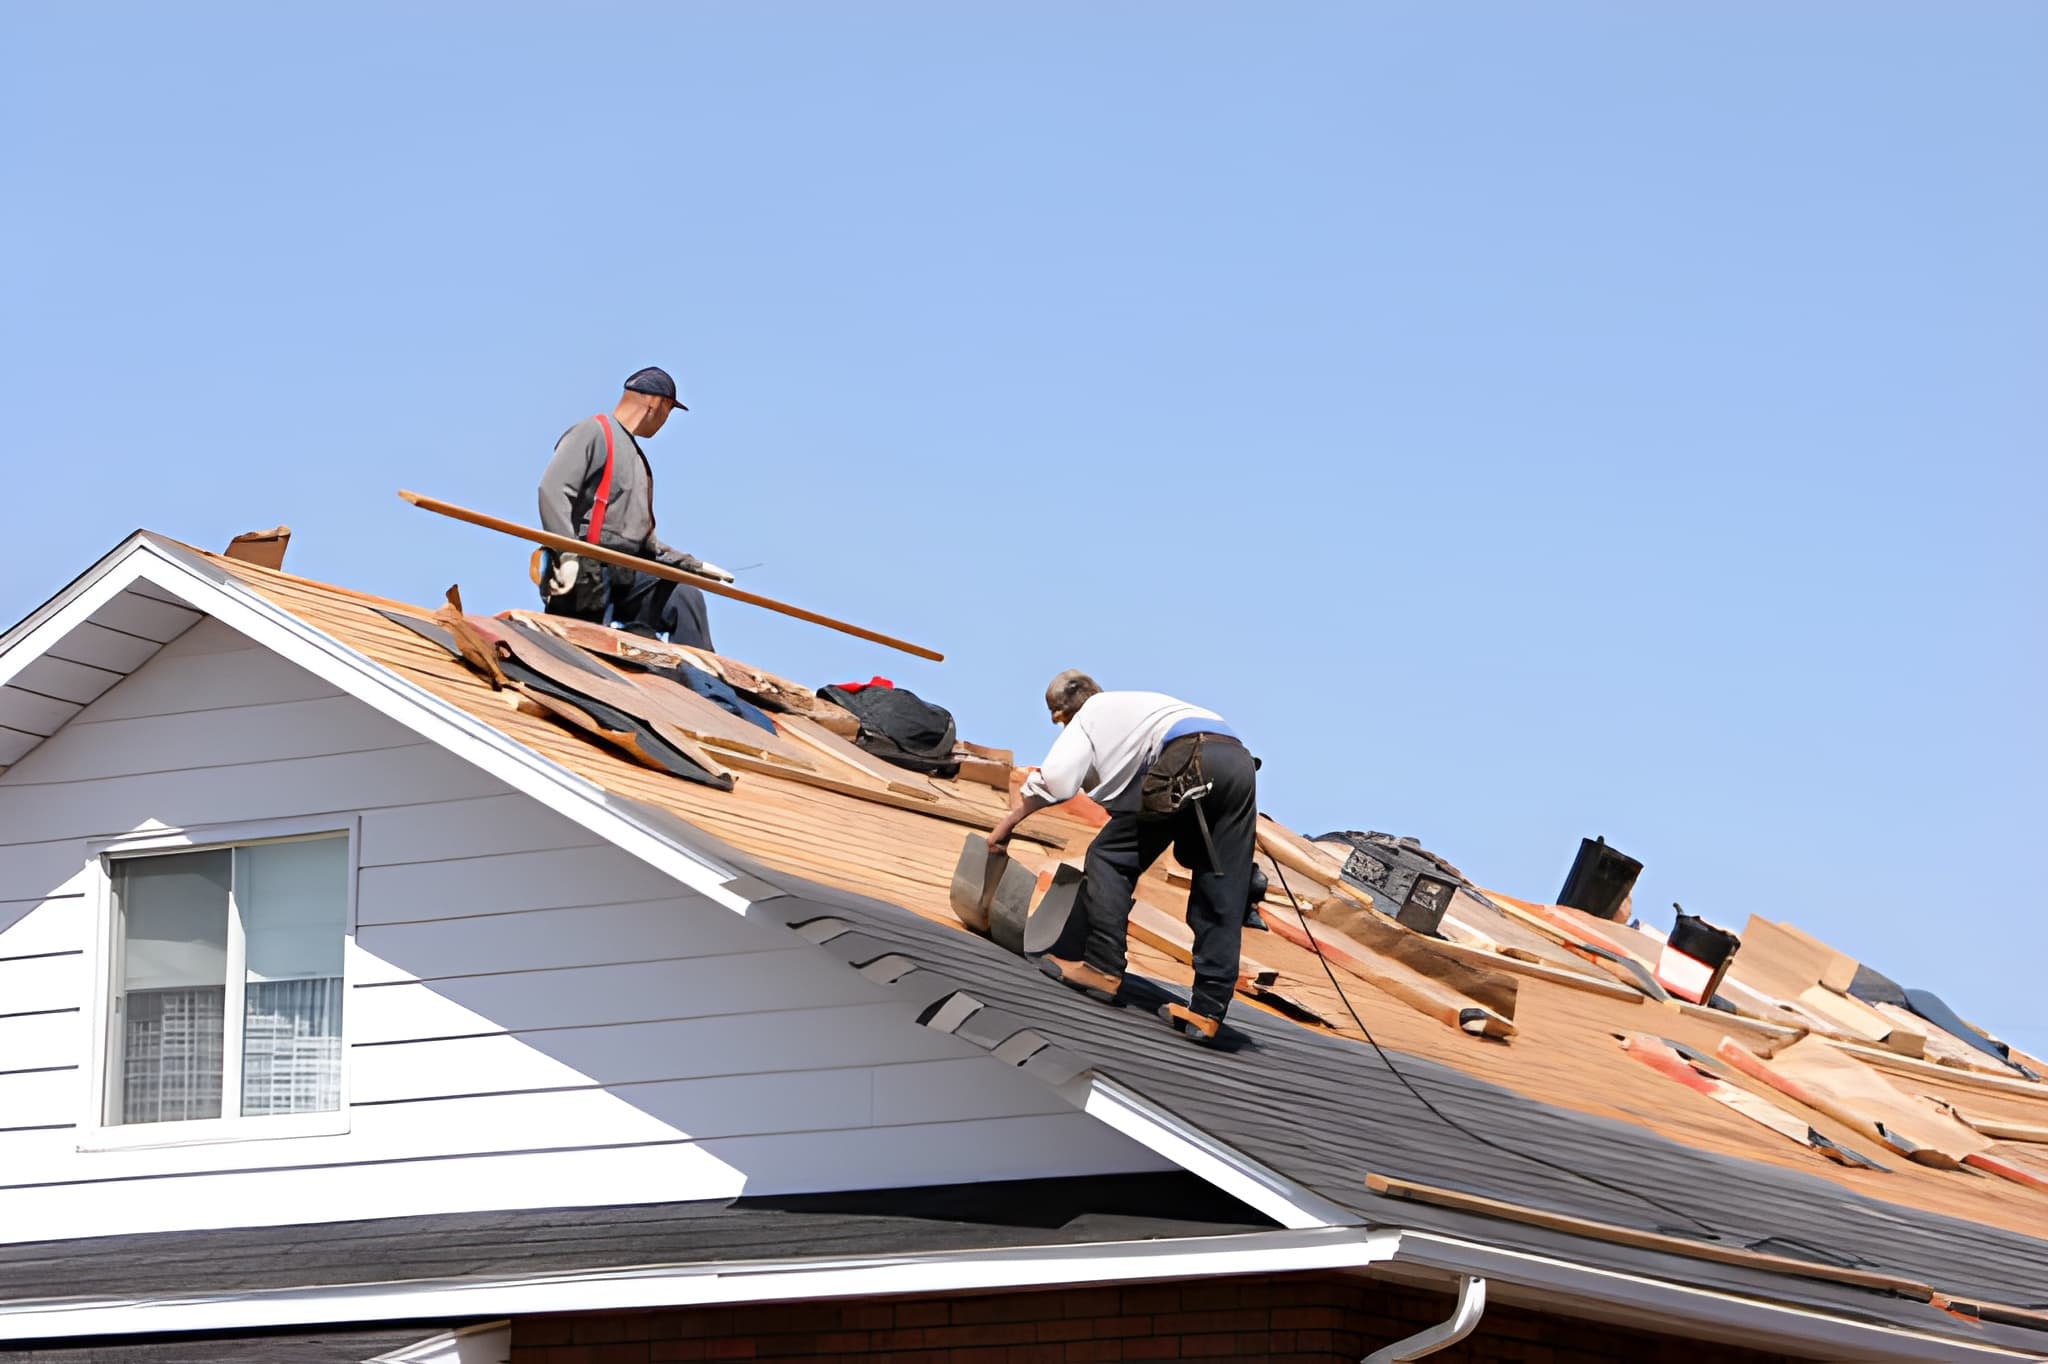
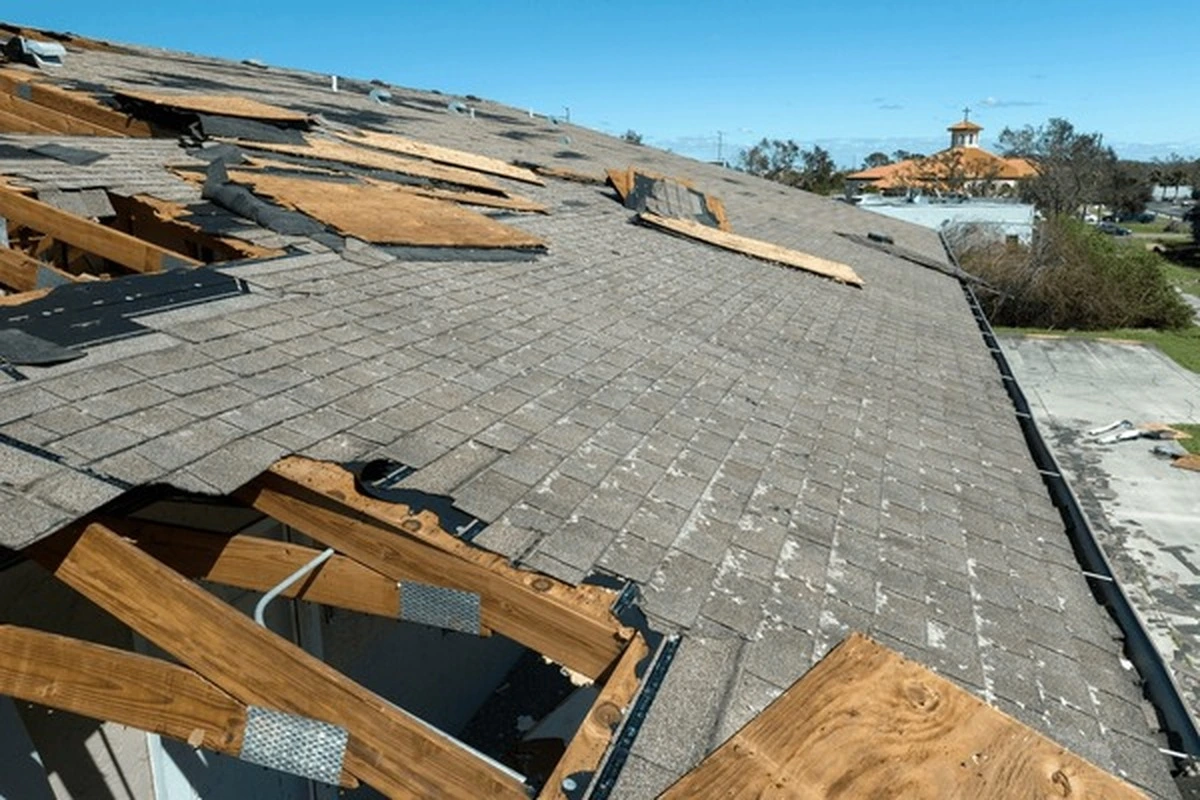
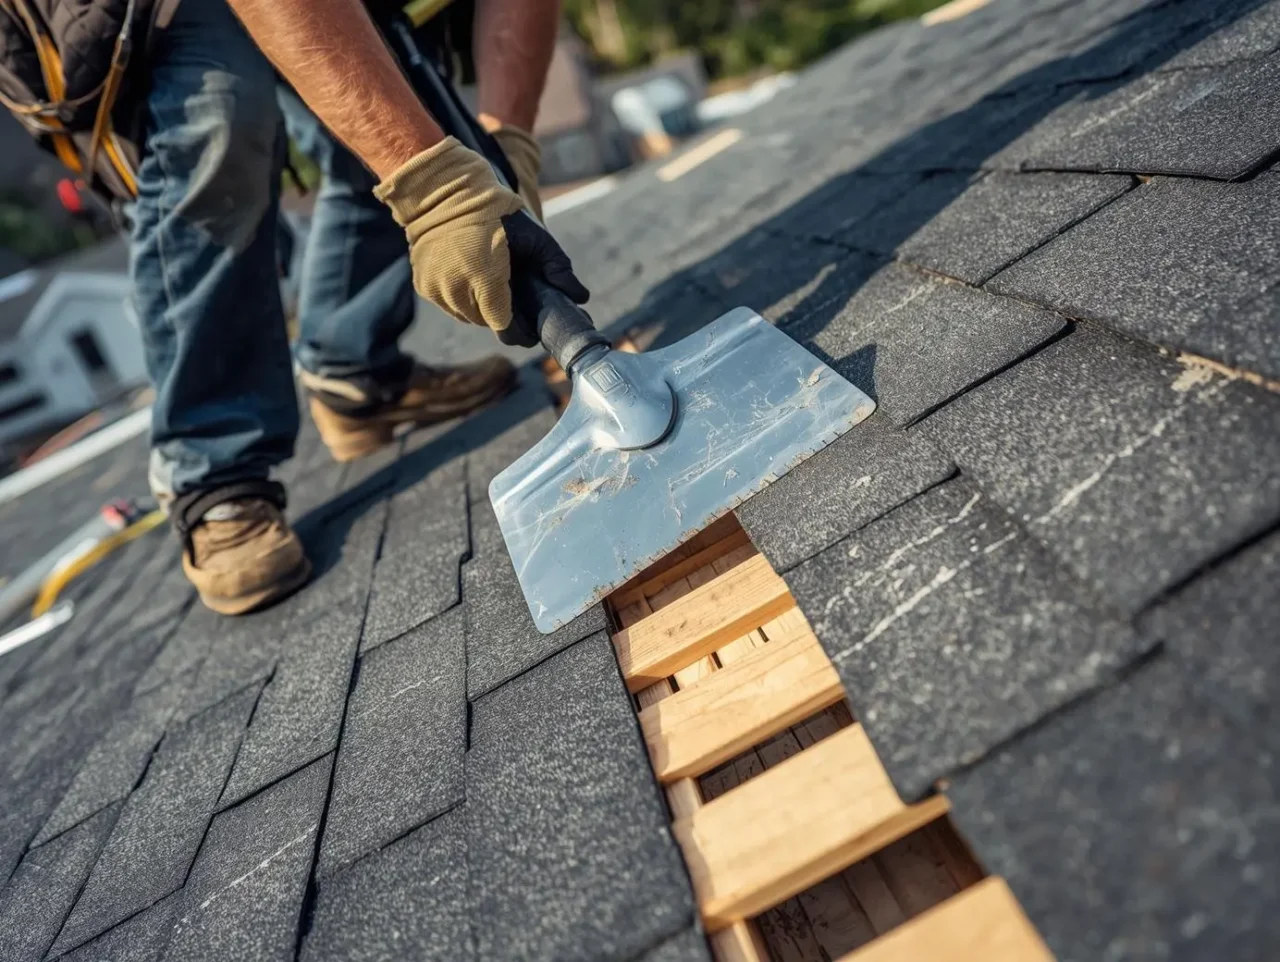
The Process of Roof Tear Off and Replacement
The tear off roof cost involves more than just materials and labor; understanding the entire replacement process is essential. Here are the key steps involved:
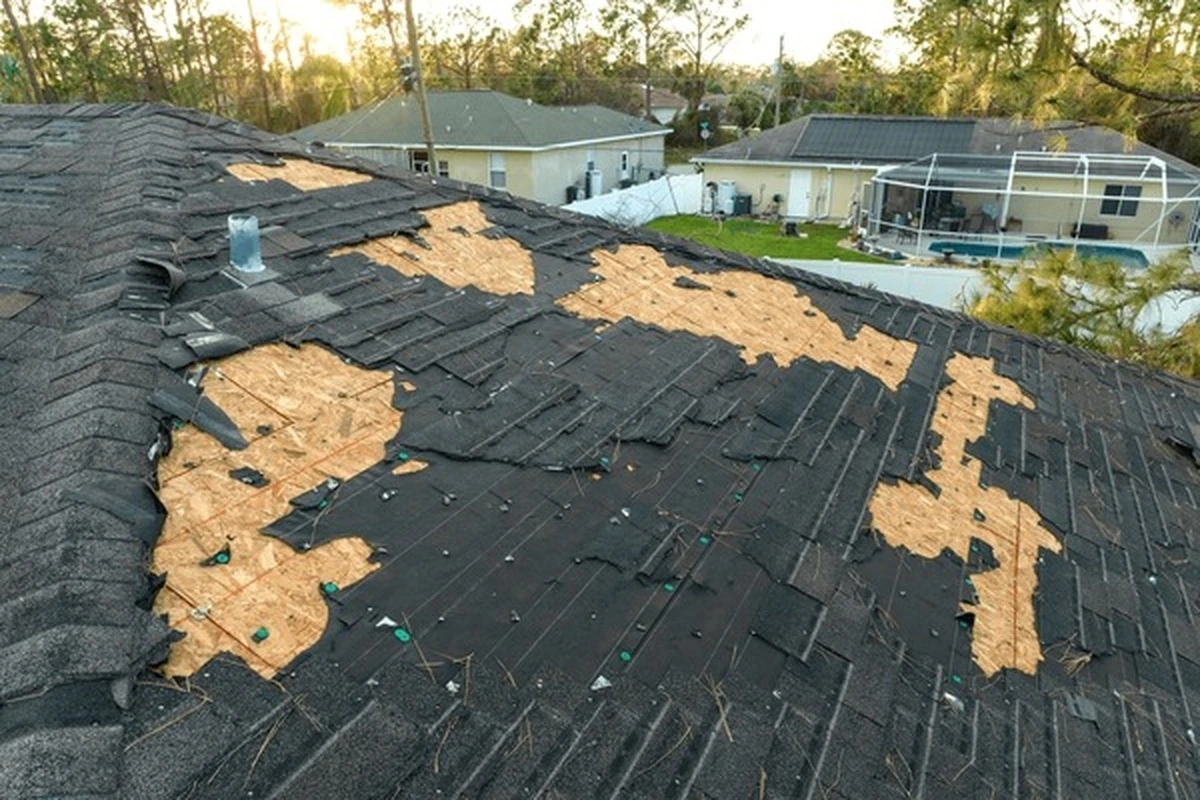
Initial Inspection: A roofing contractor will assess your current roof to determine if a tear-off is necessary.
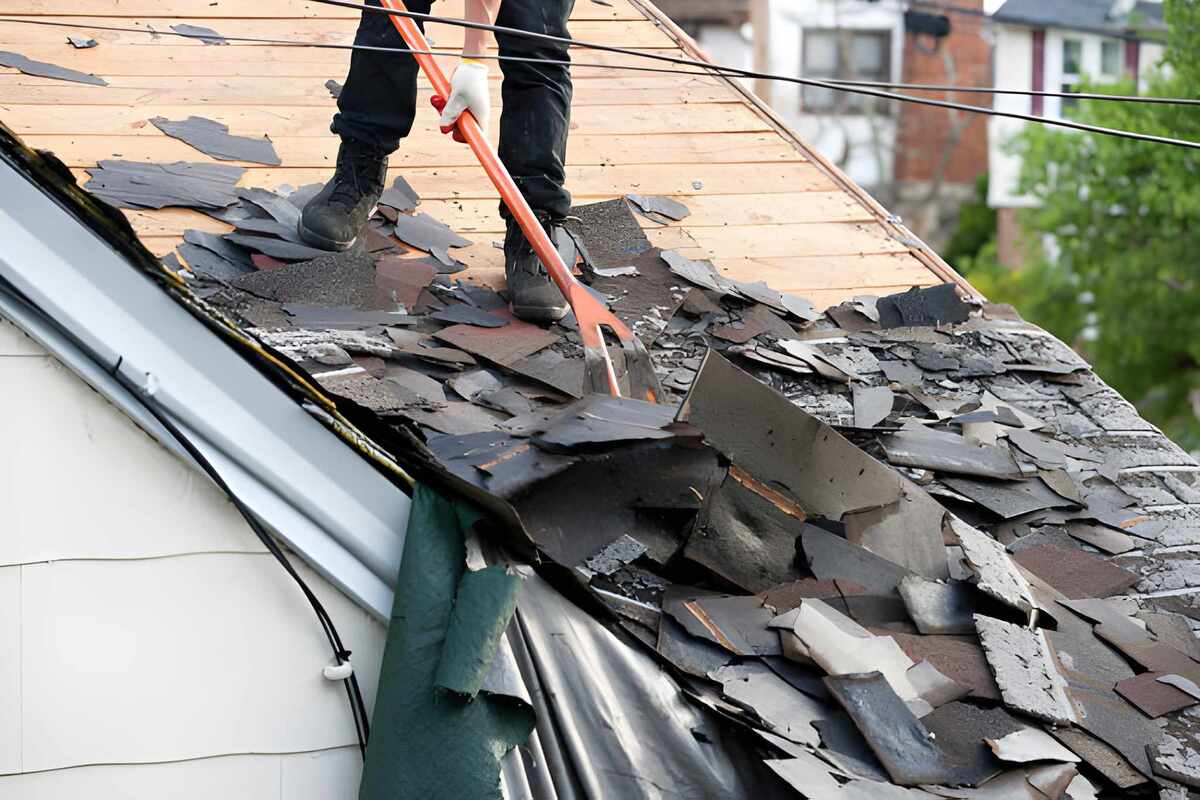
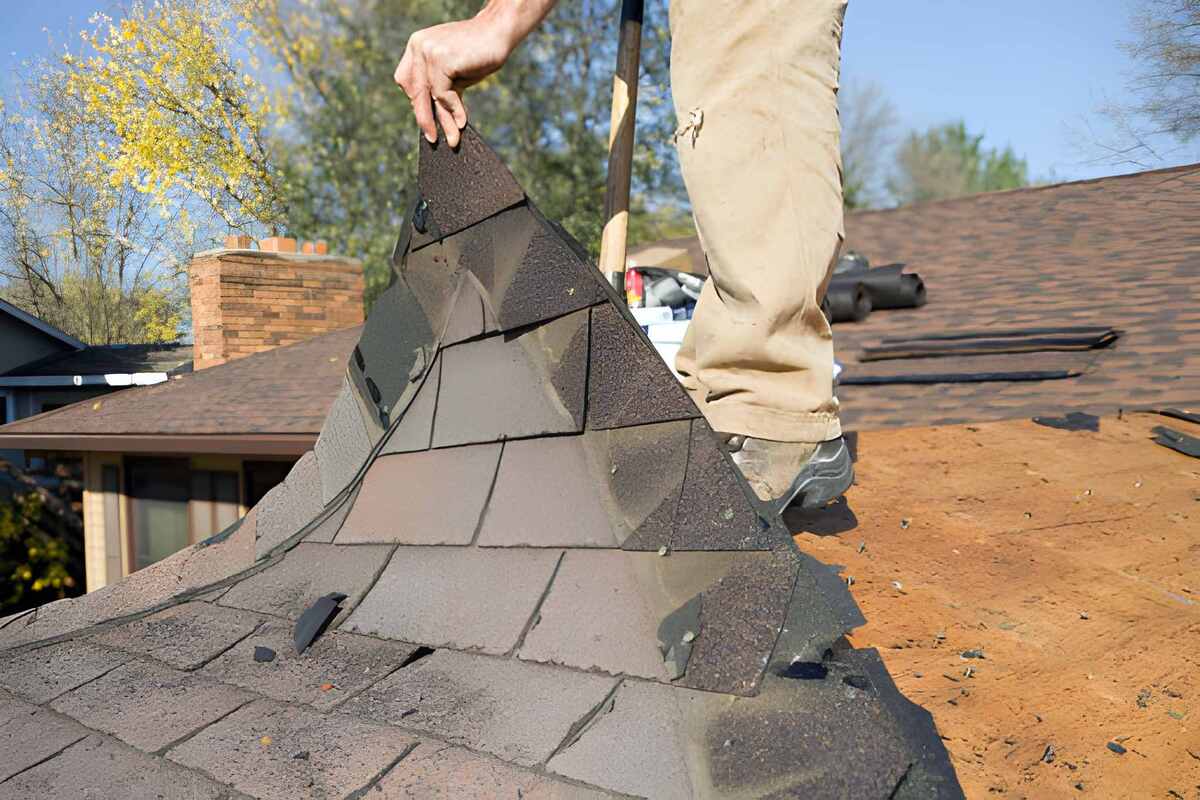
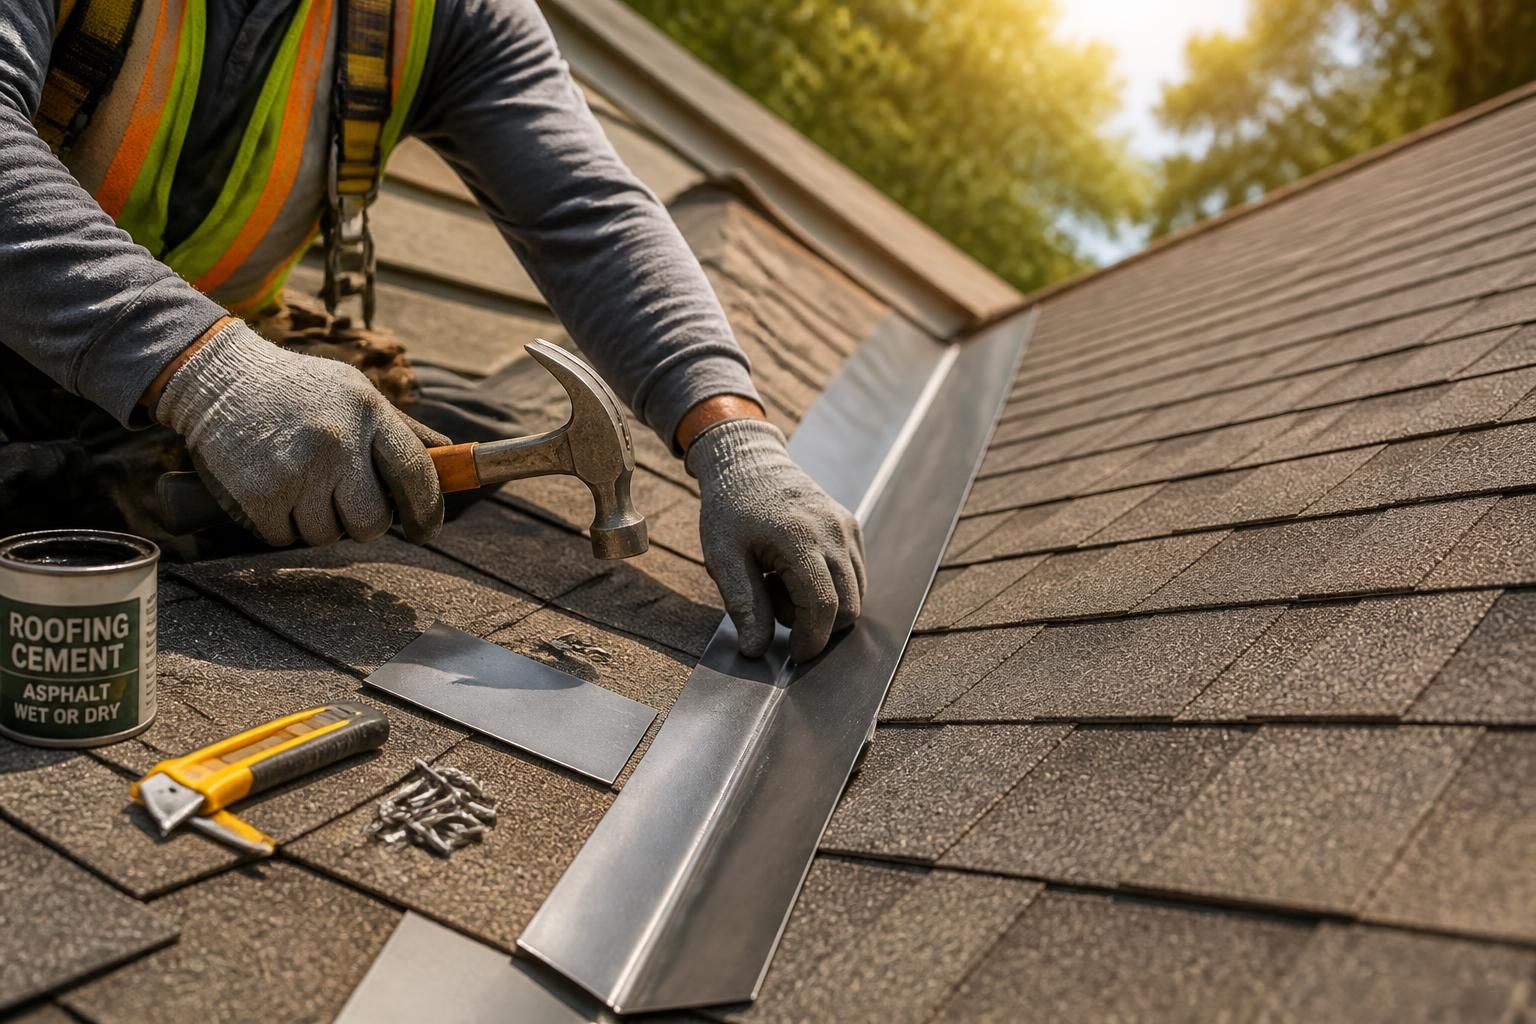
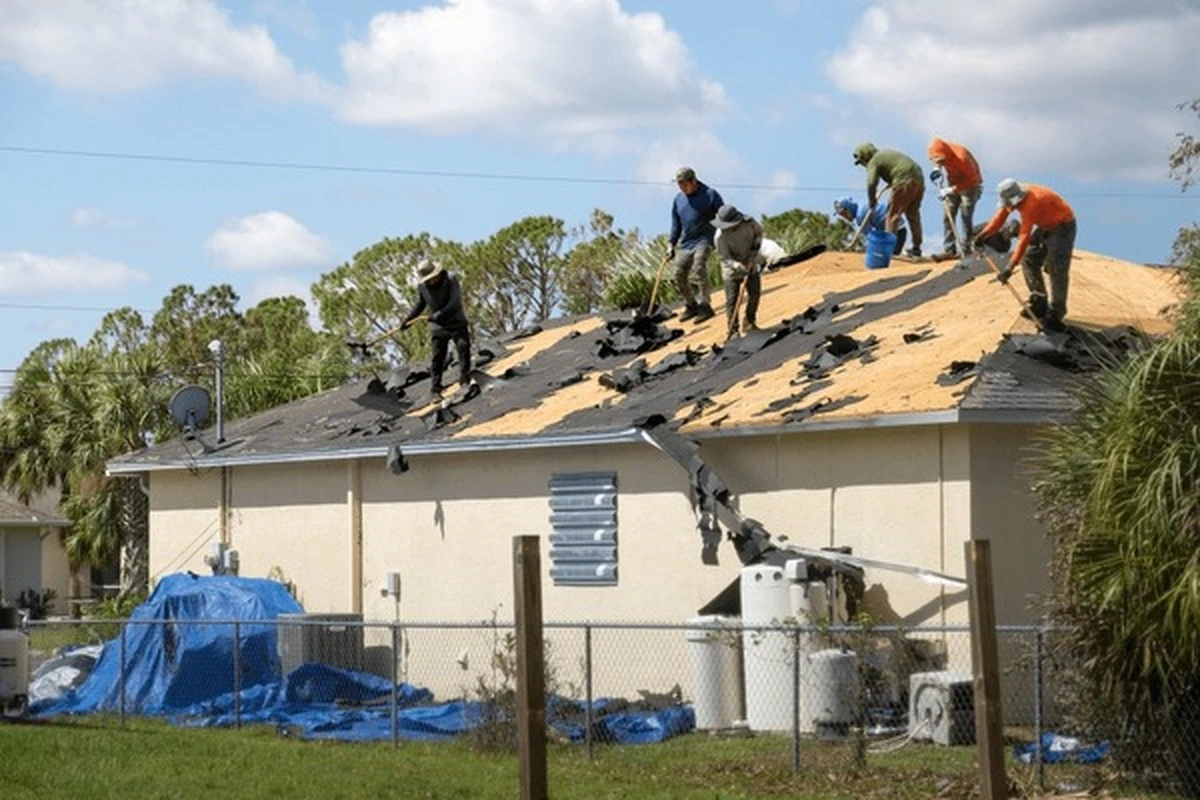
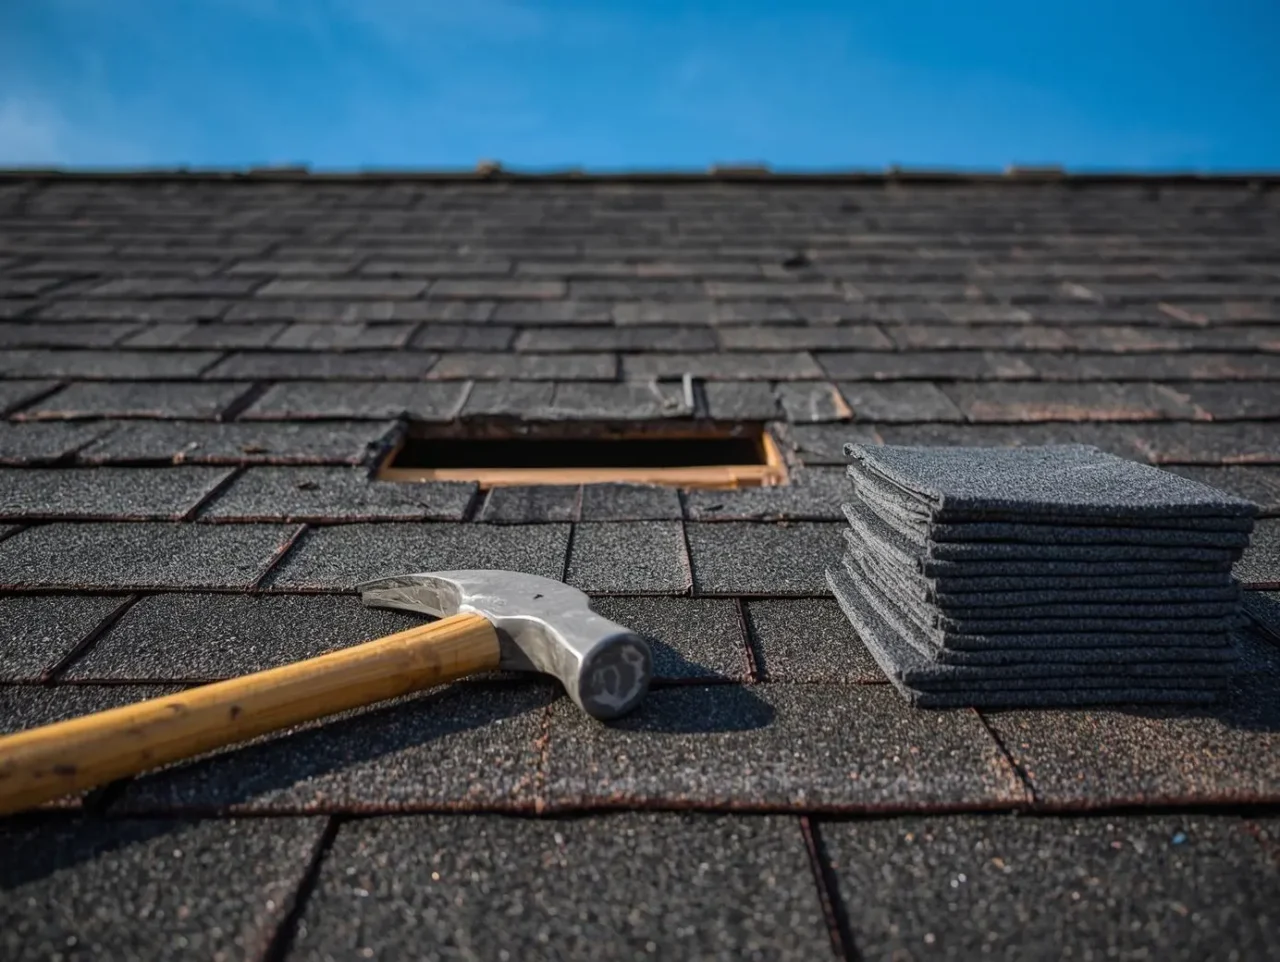
Tear Off: This involves removing the old shingles or roofing material, which can take several hours or a couple of days, depending on the roof size.
Cleaning Up: After removal, the area must be cleared of debris to prepare for the new roofing installation.
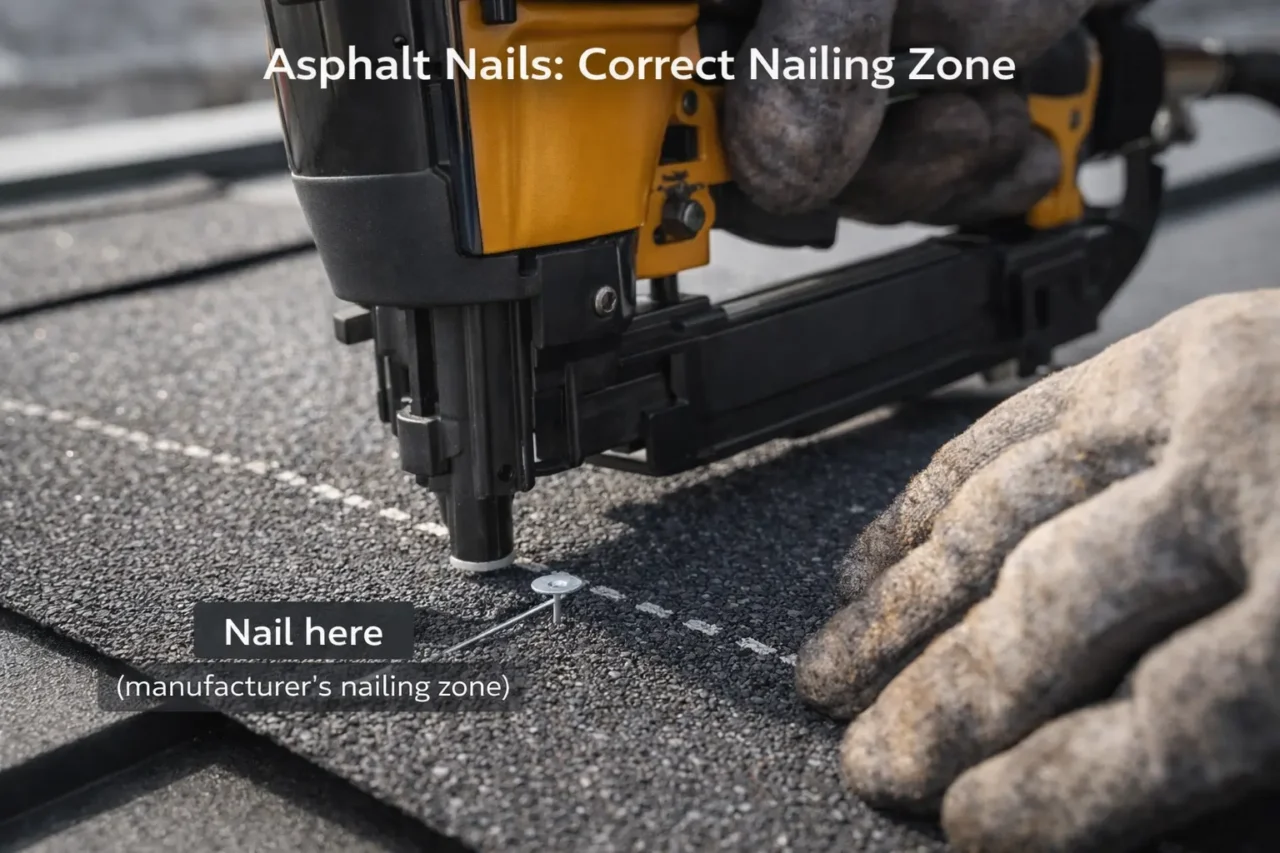
Installation: New roofing materials are added based on the chosen type and manufacturer instructions.
Final Inspection: After installation, a final inspection ensures all work meets local codes and regulations.
The journey of removing an old roof
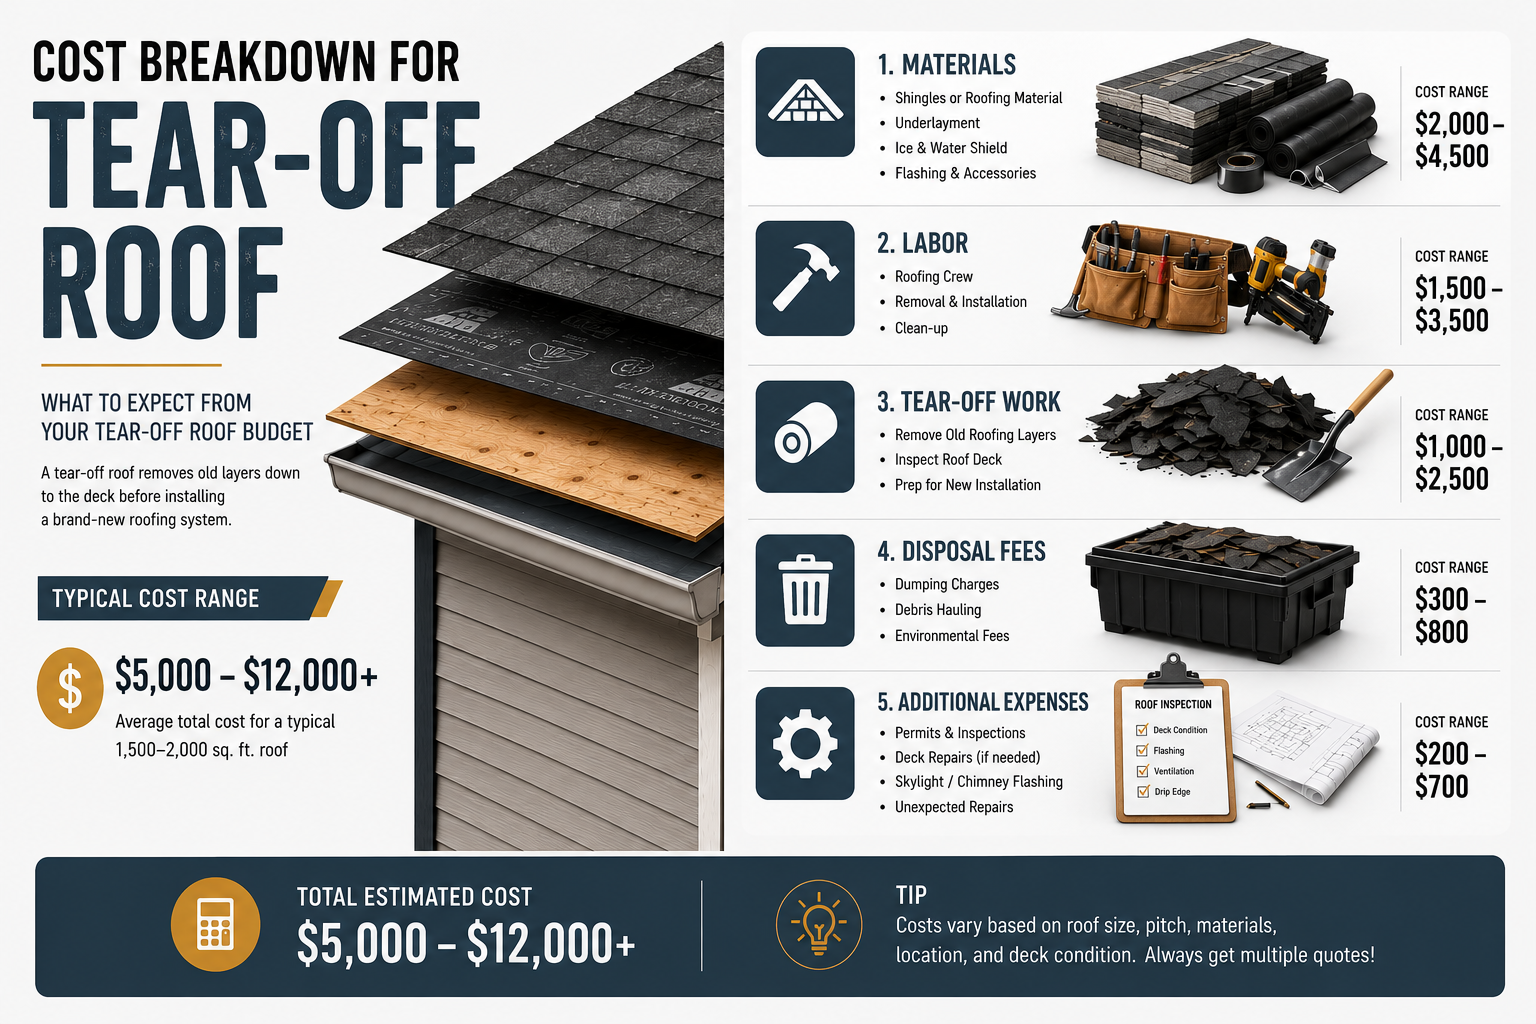
A complete tear-off and roof replacement costs $5.50 to $10.50 per square foot installed in 2026 , that is roughly $11,000 to $21,000 for a typical 2,000 sq ft home. Tear-off itself adds $1.50 to $2.50 per sq ft on top of the new roof cost because crews have to remove old materials, dispose of them at a landfill, and inspect the decking before installing the new system. Despite the added expense, a full tear-off is often the smarter choice over a roof overlay.
Average Cost Breakdown
What to expect from your roofing budget. The table below summarizes 2026 pricing across the most common configurations. Costs include both materials and professional labor.
Option
2026 Price Range
Notes
Tear-off labor + disposal
$1.50 – $2.50/sq ft
$3,000 – $5,000 per home
Asphalt shingles (new install)
$4.00 – $7.50/sq ft
$8,000 – $15,000
Metal panels (new install)
$8.00 – $14.00/sq ft
$16,000 – $28,000
Tile (new install)
$10.00 – $18.00/sq ft
$20,000 – $36,000
Total: asphalt tear-off + new
$5.50 – $10.00/sq ft
$11,000 – $20,000
Total: metal tear-off + new
$9.50 – $16.50/sq ft
$19,000 – $33,000
What Drives the Cost
The total price comes down to five main factors. Understanding each helps you spot when a contractor’s quote is reasonable , and when it is padded.
Number of existing layers
Removing 1 layer adds $1.50/sq ft. Removing 2 layers adds $2.50/sq ft because of additional labor and disposal weight.
Roof pitch
Steep roofs (above 7:12) add 20-40% to labor cost because workers need harnesses, scaffolding, and slower pacing.
Decking condition
Once the old roof comes off, 5-15% of decking typically needs replacement at $2.50-$4.00 per sq ft. Budget an extra $1,000-$2,500 for decking surprises.
Local disposal fees
Some states charge $50-$120/ton landfill fees for shingle disposal. Roof tear-off generates 5-12 tons of debris.
Permit + inspection
Most jurisdictions require a permit ($150-$500) and a final inspection ($75-$200).
How to Save Money on This Project
Most homeowners can shave 10-25% off the quoted price by following a few simple practices:
Get at least 3 written quotes from licensed local contractors. Pricing varies dramatically , the lowest and highest quotes on the same job often differ by 40%.
Schedule in the off-season. Late winter (February-March) and late fall (October-November) prices are 10-20% lower than peak summer.
Bundle with other roof work. If you need other repairs (gutters, flashing, ventilation), bundle them , contractors discount bundled jobs because the setup labor is fixed.
Check for insurance coverage. Storm-related damage is usually covered. Filing a claim within the policy window is critical.
Verify the contractor’s license and insurance before signing. Use our contractor directory to find verified local pros.
Advertisement
DIY vs Professional Installation
Some homeowners attempt this project DIY to save on labor. Here is when that makes sense , and when it does not. DIY makes sense if: the scope is small (a single repair or patch), you have construction experience, you own or can rent the safety equipment (harness, ladder, scaffold), and the warranty does not require professional installation. Hire a professional if: the scope involves more than 30% of the roof, the roof pitch exceeds 6:12, the manufacturer requires professional installation for warranty validity, your homeowners insurance will not cover DIY work, or you are not comfortable working at height. Most professional roofers refuse to warranty work they did not install themselves, so DIY also forfeits future workmanship warranties.
Get a Real Estimate for Your Project
Want a 2-minute estimate tailored to your specific situation? Use our free roofing cost calculator , it uses your roof size, material choice, and ZIP code to give you a price range based on real 2026 contractor data. For comparison shopping, the contractor directory lists verified roofers near you with reviews and contact info.
Overlay is cheaper upfront , typically $2,000-$4,000 less than a full tear-off. But overlay is only legal once (you cannot stack three layers), shortens the life of the new roof by 25-40%, and hides existing decking problems. Long-term, tear-off is the better value for any home you plan to keep more than 8-10 years.
How long does a roof tear off and replace take?
A typical asphalt shingle tear-off and replacement takes 1-3 days for a 2,000 sq ft home. Metal and tile take 4-7 days because installation is slower. Tear-off itself happens in less than a day for a 4-5 person crew on most homes.
Do I need a permit to tear off and replace my roof?
Yes , every US state and most municipalities require a permit for a full roof replacement. Permit fees range from $150 to $500 depending on your jurisdiction. Your contractor should pull the permit and schedule the final inspection.
Will my homeowners insurance cover a roof tear off and replace?
Only if the damage is from a covered peril (hail, wind, fire, falling tree). General wear-and-tear replacement is not covered. If your roof was damaged in a storm within the last 12 months, file the claim BEFORE you tear it off , insurance adjusters need to see the original damage.
What time of year is cheapest for roof tear off and replacement?
Late winter (Feb-March) and late fall (Oct-Nov) are typically 10-20% cheaper because demand is low. Avoid spring and summer peak when contractors quote premium prices. Avoid mid-winter in cold climates (shingles do not seal properly below 40°F).
Can I tear off my own roof to save money?
You can , DIY tear-off saves $2,000-$4,000 in labor but you assume all the risks: dumpster rental ($400-$700), disposal fees, possible injury from falls, and discovering decking damage you cannot fix. Most contractors will discount their bid by $1,000-$2,000 if you do the tear-off, but few will warranty the new roof unless they did the prep work themselves. Understanding the tear off roof cost is crucial for any homeowner considering a roof replacement. Material and labor costs are important, but local market complexities and specific project details play significant roles. By recognizing how costs accumulate from various factors, you can better prepare yourself financially while ensuring a solid roofing investment.
Plan Your Roofing Project
Use our free calculator to estimate costs, then connect with trusted roofing experts for a fast, honest quote.
Hail Damage Roof Cost: 7 Essential Tips for Saving Money
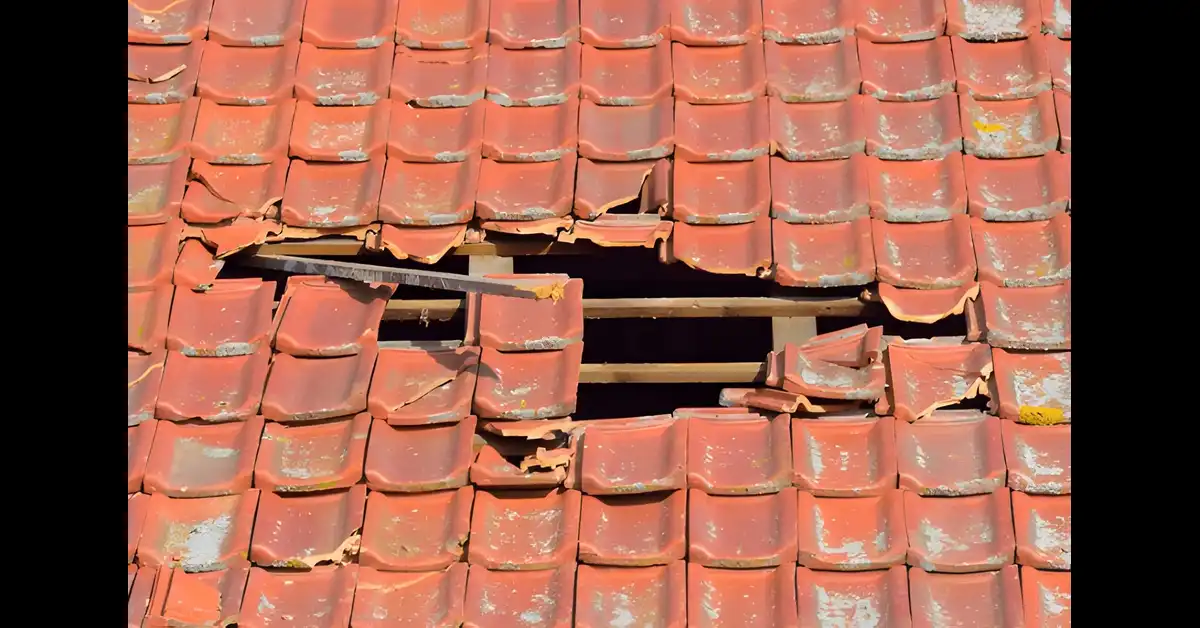
Hail damage roof cost can lead to a significant financial burden for homeowners. Experiencing hail damage is not just about having to deal with repairs, but also the stress and uncertainty around costs. Understanding what you might pay for repairs can help you feel more prepared and informed. This topic matters because hail damage is not just about aesthetics; it can affect the integrity of your roof and home. Knowing the potential costs of repair can assist you in budgeting accurately and making timely decisions that can save you even more money in the long run. In this article, I’ll discuss the anticipated costs associated with hail damage roof repairs and what you can do to mitigate them. We’ll cover several aspects, including how to assess hail damage, average repair costs, the factors influencing those costs, and the best ways to approach repairs. You’ll also learn about the importance of working with a knowledgeable contractor to ensure your roof is restored effectively. By the end, you should have a comprehensive understanding of the hail damage roof cost and how to manage it wisely.
Understanding Hail Damage and Its Impact on Roof Costs
Hail can vary in size, from small pellets to golf ball-sized chunks, and can cause extensive damage to your roofing materials. The impact of hail can lead to dents, cracks, and even punctures, impacting not just the roof itself but potentially other areas of your home as well. When assessing hail damage, it’s crucial to understand that not all damage is visible from the ground. You may need a professional inspection to identify issues that could lead to further complications and costs down the line. It’s vital to act quickly as delaying repairs can lead to further deterioration and increased repair costs.Close-up view of hail damage effects
Factors Affecting Hail Damage Roof Cost
Several factors can impact the overall cost of repairing hail damage. These include:
Location: Costs can vary significantly based on geographic location and local contractor rates.
Extent of Damage: The more extensive the damage, the higher the cost of repairs. A few shingles may cost less than whole sections needing replacement.
Roof Material: Different roofing materials have different costs associated with them. For example, asphalt shingles tend to be less expensive to repair than metal roofing.
Labor Costs: Skilled labor rates vary by region, and this can greatly impact the final bill.
When considering these variables, it’s essential to get detailed estimates from several contractors. This will help you make an informed decision about which services offer the best value for the quality of work provided.Expert assessment of roof condition
Average Hail Damage Roof Repair Costs
On average, homeowners can expect to pay anywhere from $300 to $1,500 for minor repairs related to hail damage. For more severe situations, especially when full sections of the roof need to be replaced, costs can range from $5,000 to $15,000 or more. It’s essential to understand these ranges to prepare yourself financially. Remember, while DIY repairs may seem like a cost-saving measure, improper handling can lead to more significant issues later on. The potential costs of recurring problems from poor repairs can exceed hiring a professional from the start.
Insurance and Your Hail Damage Roof Cost
When it comes to covering hail damage, insurance can play a significant role in managing costs. If you have a homeowners insurance policy, hail damage is often covered, but the extent of coverage can vary from one policy to another. It’s important to review your policy and understand your deductible. In many cases, filing a claim can help alleviate some of the financial burdens of repairs. However, be aware of how this may affect your premium rates in the future. I’ve seen many homeowners who choose not to file a claim simply because they fear premium increases. It’s a decision worth weighing carefully.
Choosing the Right Contractor for Repairs
Finding the right contractor to manage your hail damage repair is critical for ensuring the work is done properly and within a reasonable timeline. To do this effectively, consider the following tips:
Research: Look for contractors with positive reviews and ratings. Websites like Angie’s List and HomeAdvisor can provide useful insights.
Get Multiple Estimates: Always collect quotes from at least three contractors to compare costs and services.
Ask for Referrals: Speak with friends or neighbors who have had similar work done. Personal referrals can help in finding reputable contractors.
Check Licensing and Insurance: Always verify that the contractor is licensed and insured, protecting you from any liability during the repair process.
Repair process for hail-damaged roofs
Preventing Hail Damage roof Costs in the Future
While hail damage can be unpredictable, there are steps you can take to minimize future risks and costs:
Invest in Impact-Resistant Roofing: Consider upgrading to impact-resistant materials designed to withstand hail damage.
Regular Inspections: Schedule regular inspections, especially after severe storms, to catch any signs of damage early.
Trim Nearby Trees: Maintaining trees can prevent falling branches from contributing to roof damage during storms.
While these steps may require an upfront investment, they can save you money in potential future repairs and stress. Understanding the hail damage roof cost is crucial for any homeowner. Whether it’s recognizing the signs of damage, knowing how to assess costs, or protecting your home with preventative measures, being proactive can make all the difference. Remember, the earlier you address any damage, the lower your potential costs will likely be. Be sure to get multiple quotes and consider investing in quality materials and services, as this can save you money and stress over time. If you’re facing hail damage or simply want to be prepared, do not hesitate to reach out to a trusted contractor for expert advice.
DIY vs Professional Installation
Some homeowners attempt this project DIY to save on labor. Here is when that makes sense , and when it does not. DIY makes sense if: the scope is small (a single repair or patch), you have construction experience, you own or can rent the safety equipment (harness, ladder, scaffold), and the warranty does not require professional installation. Hire a professional if: the scope involves more than 30% of the roof, the roof pitch exceeds 6:12, the manufacturer requires professional installation for warranty validity, your homeowners insurance will not cover DIY work, or you are not comfortable working at height. Most professional roofers refuse to warranty work they did not install themselves, so DIY also forfeits future workmanship warranties.
Get a Real Estimate for Your Project
Want a 2-minute estimate tailored to your specific situation? Use our free roofing cost calculator , it uses your roof size, material choice, and ZIP code to give you a price range based on real 2026 contractor data. For comparison shopping, the contractor directory lists verified roofers near you with reviews and contact info.
The Price Tag: Factors That Influence Hail Damage Roof Repair Costs
When it comes to the cost of repairing a hail-damaged roof, no two situations are exactly alike. Several variables come into play, and understanding these factors can help you better estimate the expenses involved.
Roof Size and Complexity
The size and complexity of your roof are significant contributors to the overall repair cost. Larger roofs naturally require more materials and labor, driving up the price tag. Additionally, roofs with intricate designs, multiple levels, or steep pitches may take more time and effort to repair, further increasing the cost.
Roofing Material
The type of roofing material on your home also plays a role in determining the repair costs. Asphalt shingles, for example, are generally more affordable to replace than metal or tile roofs. The availability and cost of the specific roofing materials needed for your home can also impact the final price.
Extent of Damage
Perhaps the most important factor in calculating hail damage roof costs is the severity of the damage itself. Minor dents and dings may only require a few replacement shingles, while more widespread damage could necessitate partial or full roof replacement. The more extensive the damage, the higher the repair costs will be.
Labor and Contractor Fees
The expertise and experience of the roofing contractor you hire can also influence the final price. Reputable and licensed contractors may charge more, but their workmanship and warranty coverage can provide greater peace of mind. Additionally, the cost of labor, which can vary by region, can significantly impact the overall repair bill.
Permits and Inspections
Depending on your local building codes and regulations, you may need to obtain permits and undergo inspections before and after the repair work. These administrative requirements can add to the overall cost of the project.
Insurance Coverage
If you have homeowner’s insurance, your policy may cover a portion or even the entirety of the hail damage roof repair costs. Understanding the details of your coverage and working closely with your insurance provider can help you minimize your out-of-pocket expenses. By understanding these key factors, you’ll be better equipped to estimate the potential cost of repairing a hail-damaged roof and make informed decisions about your home’s restoration.
Budgeting for Hail Damage Roof Repair: Average Costs and Considerations
With the various factors in mind, let’s take a closer look at the average costs associated with hail damage roof repair. Keep in mind that these figures are just estimates, as the actual price can vary significantly based on your unique circumstances.
Minor Hail Damage Repair
For roofs with minor hail damage, such as a few dented or cracked shingles, the average cost of repair typically ranges from $500 to $2,000. This usually involves replacing the damaged shingles and any underlying roofing materials that may have been compromised.
Moderate Hail Damage Repair
If the hail damage is more widespread, with several sections of the roof requiring attention, the repair costs can range from $3,000 to $10,000. This may include partial roof replacement, repairing flashing and vents, and addressing any structural issues caused by the hail impact.
Major Hail Damage Roof Replacement
In cases of severe hail damage, where the roof has sustained widespread and significant damage, a full roof replacement may be necessary. The average cost for a complete hail damage roof replacement can range from $10,000 to $30,000 or more, depending on the size and complexity of the roof.
Additional Considerations
When budgeting for hail damage roof repair, it’s essential to factor in the following: – Deductibles and Insurance Coverage: Your homeowner’s insurance policy may cover a portion of the repair costs, but you’ll likely need to pay a deductible, which can range from $500 to $2,000 or more. – Roof Inspection and Assessment: Before beginning any repair work, you may need to have a professional roofing inspector assess the extent of the damage, which can add $200 to $500 to the overall cost. – Temporary Roof Protection: In some cases, you may need to install temporary roof coverings to protect your home until the repairs can be completed, which can cost an additional $500 to $2,000. Remember, these are just general estimates, and the actual cost of your hail damage roof repair may vary significantly based on your unique circumstances. It’s always best to obtain multiple quotes from reputable roofing contractors to ensure you get the best value for your investment.
Maximizing Your Investment: Tips for Effective Hail Damage Roof Repair
Now that you have a better understanding of the costs involved in repairing a hail-damaged roof, let’s explore some strategies to ensure you get the most value out of your investment.
Work with Experienced Roofing Contractors
Hiring a reputable and experienced roofing contractor is crucial for the success of your hail damage roof repair. Look for contractors with a proven track record of quality workmanship, customer satisfaction, and proper licensing and insurance. A skilled contractor can help you navigate the repair process, identify hidden issues, and ensure the longevity of your roof.
Understand Your Insurance Coverage
Carefully review your homeowner’s insurance policy to understand the extent of your coverage for hail damage. Work closely with your insurance provider to file a claim and ensure you receive the maximum benefits available to you. This can help offset a significant portion of the repair costs.
Consider Upgrades and Enhancements
While repairing the hail damage should be your primary focus, you may also want to consider upgrading or enhancing your roof during the repair process. This could include upgrading to more durable roofing materials, improving ventilation, or adding features like solar panels or roof-mounted snow guards. Although these upgrades will increase the initial cost, they can provide long-term benefits and improve the overall value of your home.
Prioritize Preventive Maintenance
Regular roof maintenance and inspections can help extend the lifespan of your roof and potentially reduce the severity of future hail damage. Set aside a budget for annual roof checks and address any minor issues before they escalate. This proactive approach can save you money in the long run by avoiding costly full-scale repairs.
Explore Financing Options
If the cost of hail damage roof repair is beyond your immediate financial means, consider exploring financing options such as home equity loans, personal loans, or even payment plans offered by your roofing contractor. Carefully weigh the pros and cons of each option to ensure you make the best decision for your financial situation. By following these tips and strategies, you can maximize the value of your hail damage roof repair investment, ensuring your home is protected and your investment pays off in the long run.
A hail damage roof repair costs $1,500 to $8,000 out-of-pocket in 2026 , most of the total $8,000-$20,000 repair cost is covered by homeowners insurance, leaving you to pay the deductible. The actual repair cost depends on hail size, number of damaged shingles, and whether insurance pays at ACV (Actual Cash Value) or RCV (Replacement Cost Value). Understanding the difference between these two payout types can swing your out-of-pocket cost by thousands of dollars.
Average Cost Breakdown
The table below summarizes 2026 pricing across the most common configurations. Costs include both materials and professional labor.
Option
2026 Price Range
Notes
Standard deductible (1% of home value)
$1,500 – $4,000
Typical out-of-pocket
Wind/hail rider deductible (2%)
$3,000 – $8,000
Common in CO, TX, OK
Small spot repair (no insurance claim)
$350 – $900
Under deductible
Partial roof replacement (1 slope)
$2,500 – $6,500
Visible damage on 1 side
Full roof replacement
$8,000 – $20,000+
Insurance usually covers
Impact-resistant Class 4 upgrade
+$1,500 – $3,500
Often qualifies for 5-30% premium discount
Advertisement
What Drives the Cost
The total price comes down to five main factors. Understanding each helps you spot when a contractor’s quote is reasonable , and when it is padded.
Insurance deductible type
Standard deductible is a flat $500-$2,500. Wind/hail rider deductibles are a PERCENTAGE of home value (1-5%), which can mean $4,000-$15,000 out-of-pocket on a $400k home. Check your policy before the storm.
ACV vs RCV payout
ACV pays depreciated value (a 12-year-old roof at 50% depreciation = $5k payout on a $10k loss). RCV pays full replacement cost. Most policies pay ACV first, then the depreciation amount AFTER you complete the repair and submit invoices.
Number of slopes damaged
If only one slope is damaged, insurance pays for that slope only. Most insurers no longer “match” undamaged shingles to new ones , meaning your roof may have visible color differences after repair.
Hail size
Pea-sized hail (¼”) rarely damages a good roof. Quarter-sized (1″) starts to bruise shingles. Golf-ball (1¾”) and larger creates obvious cracks and torn mat. Document hail size with comparison photos.
Class 4 upgrade
Many insurers offer 5-30% wind/hail premium discounts for impact-resistant Class 4 shingles. Adds $1,500-$3,500 to a replacement but typically pays back in 4-7 years through premium savings.
How to Save Money on This Project
Most homeowners can shave 10-25% off the quoted price by following a few simple practices:
Get at least 3 written quotes from licensed local contractors. Pricing varies dramatically , the lowest and highest quotes on the same job often differ by 40%.
Schedule in the off-season. Late winter (February-March) and late fall (October-November) prices are 10-20% lower than peak summer.
Bundle with other roof work. If you need other repairs (gutters, flashing, ventilation), bundle them , contractors discount bundled jobs because the setup labor is fixed.
Check for insurance coverage. Storm-related damage is usually covered. Filing a claim within the policy window is critical.
Verify the contractor’s license and insurance before signing. Use our contractor directory to find verified local pros.
Some common signs of hail damage on a roof include: – Dented, cracked, or missing shingles – Granule loss on asphalt shingles – Damage to flashing, vents, or other roof components – Visible impact marks on the roof surface If you suspect hail damage, it’s best to have a professional roofing inspector assess the extent of the issue.
Does homeowner’s insurance cover hail damage?
Most standard homeowner’s insurance policies do provide coverage for hail damage to your roof. However, the specifics of the coverage can vary, so it’s important to review your policy and work closely with your insurance provider to understand the extent of your coverage and the claims process.
How long does a hail damage roof repair take?
The timeline for a hail damage roof repair can vary depending on the severity of the damage and the scope of the project. Minor repairs may be completed in a day or two, while more extensive work, such as a partial or full roof replacement, can take several days to a week or more.
Can I do the hail damage roof repair myself?
While some minor hail damage, such as replacing a few shingles, may be within the capabilities of a skilled DIYer, it’s generally recommended to hire a professional roofing contractor for most hail damage repair projects. Roofing work can be dangerous and complex, and a professional contractor will have the necessary expertise, tools, and warranties to ensure the job is done correctly and safely.
What is the typical timeline for roof repairs after hail damage?
Tie frames can vary based on severity but expect about 1-3 days for minor repairs. Full replacements may take longer, depending on contractor availability and weather conditions.
What should I do if my roof is severely damaged?
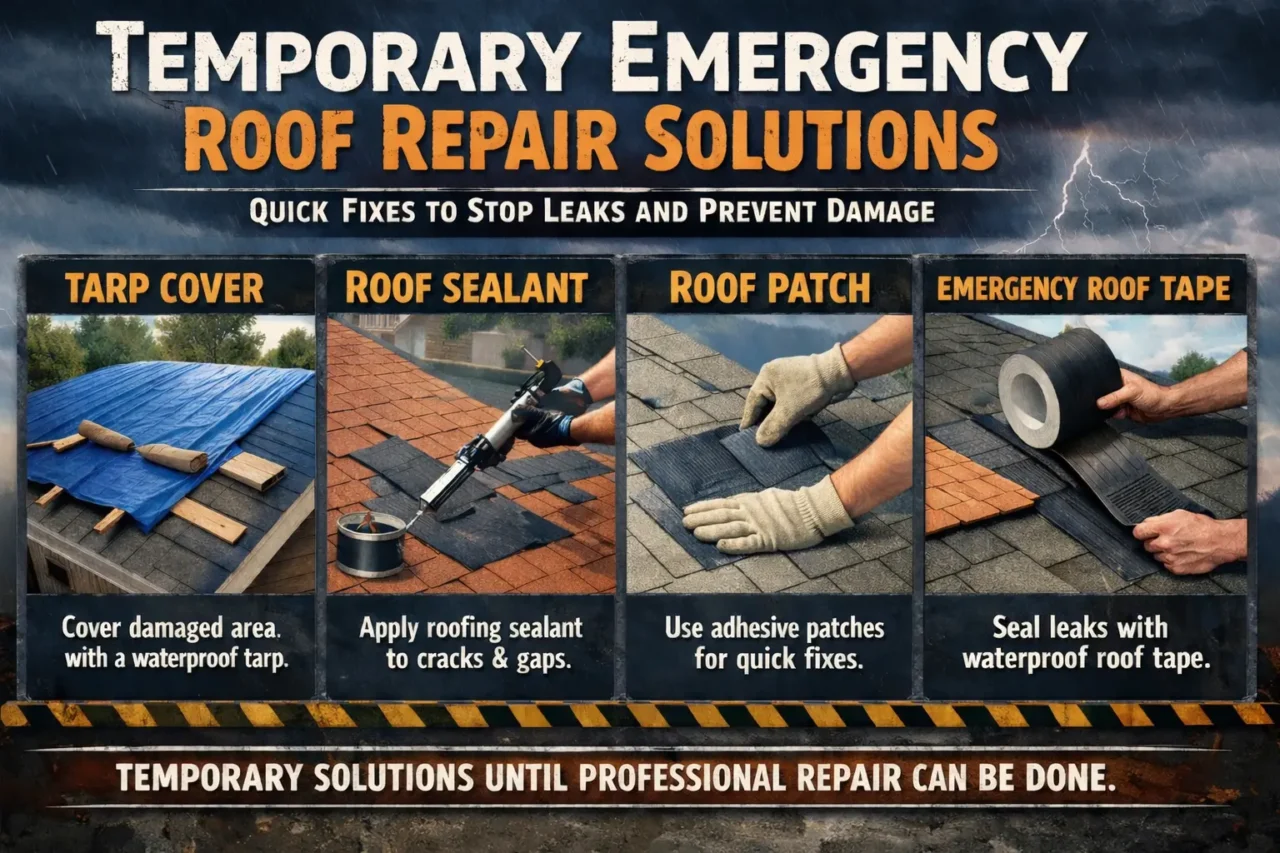
If your roof has severe damage, contact a contractor immediately for an evaluation. In some cases, temporary measures may be needed to protect your home from weather exposure.
Are there preventative measures I can take against future hail damage?
Hail damage can be a daunting and costly challenge for homeowners, but with the right information and approach, you can navigate the repair process with confidence. By understanding the factors that influence the cost of hail damage roof repair, budgeting effectively, and working with experienced professionals, you can protect your home and maximize the value of your investment. Remember, regular roof maintenance and proactive planning can help you be better prepared for the unexpected. Take the time to review your insurance coverage, explore financing options, and consider upgrades that can enhance the long-term durability and value of your roof. With this comprehensive guide, you’re now equipped with the knowledge and tools to make informed decisions about the cost of repairing a hail-damaged roof. Stay vigilant, work with trusted experts, and keep your home safe from the elements. Your roof is a critical investment, and with the right approach, you can weather the storm and maintain the integrity of your most valuable asset.
Final Thoughts
Knowing roof replacement cost by state helps plan your project better. By understanding labor, materials, and regional differences, you can budget wisely.
Plan Your Roofing Project
Use our free calculator to estimate costs, then connect with trusted roofing experts for a fast, honest quote.
Roofing content specialist with 5+ years researching U.S. residential and commercial roofing. Has documented 200+ projects covering installation costs, material selection, contractor vetting, and DIY guides for homeowners across all climate zones.
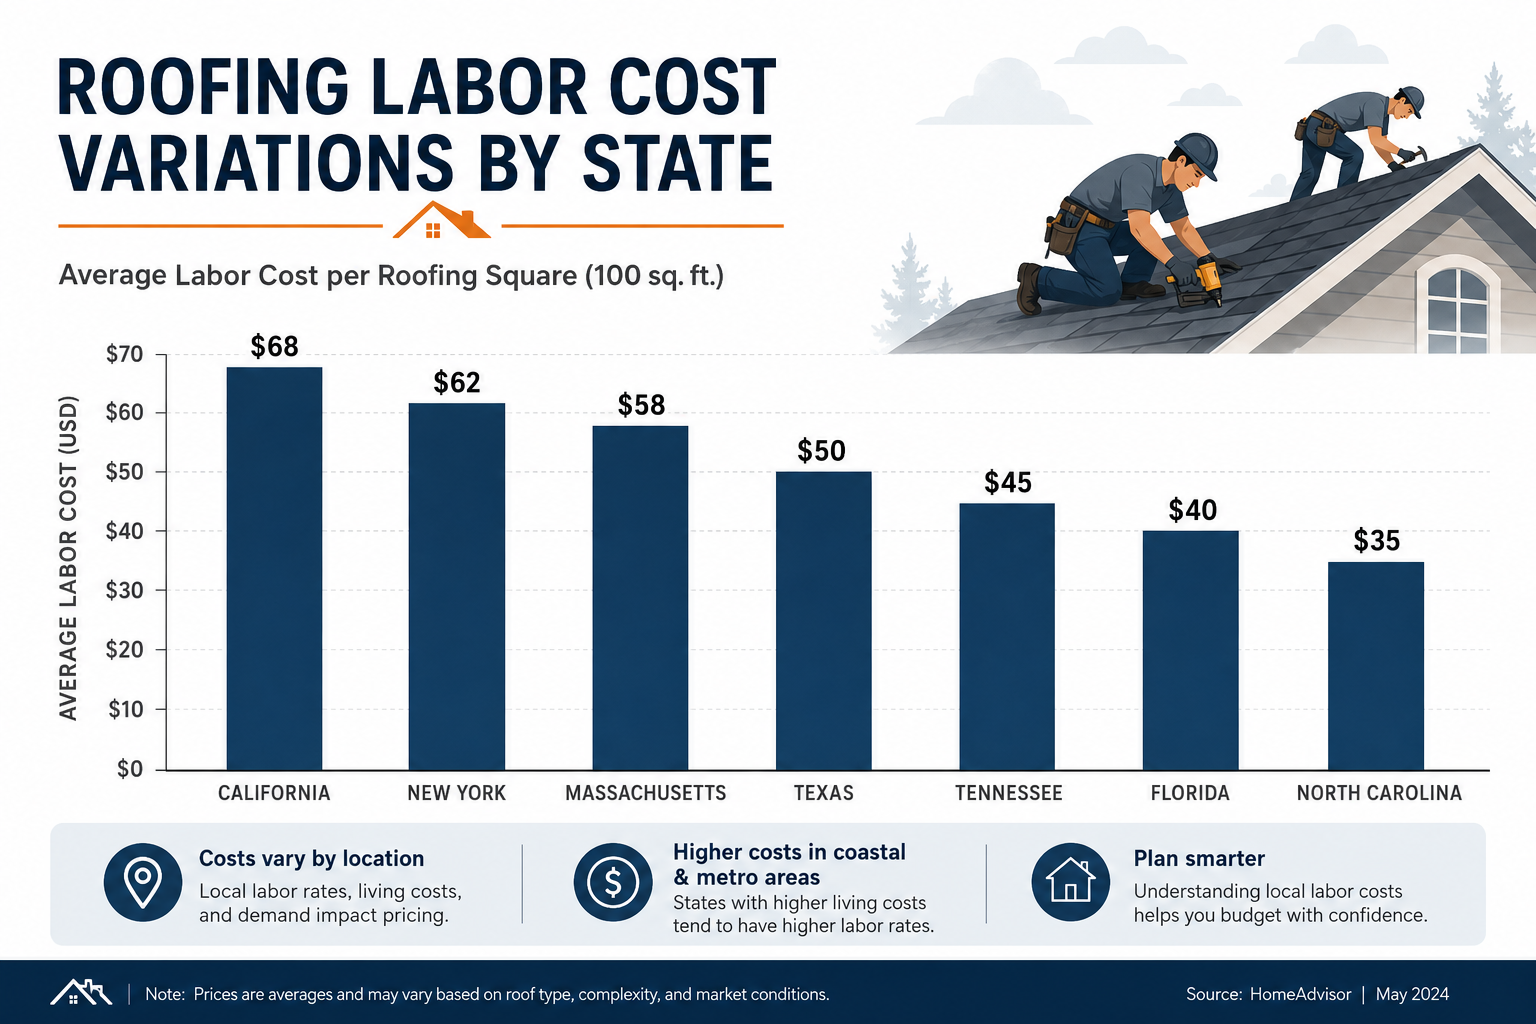
Roof Replacement Cost by State in 2026: Full 50-State Breakdown
Roof replacement cost by state is a key consideration for homeowners planning renovations in 2026. Whether addressing storm damage or upgrading an old roof, knowing these costs helps budget effectively. This article explains average roof replacement cost by state to help you plan your project. Roofing costs differ across the U.S. due to local labor rates, material availability, and weather conditions. Understanding these variations prevents overpaying. This guide shares practical insights to help you make smart decisions. We’ll break down roof replacement costs for all 50 states. You’ll learn what affects prices, typical costs per square foot, and ways to save money. By the end, you’ll know what to expect in your area.
What Affects Roof Replacement Cost by State
Several factors change roof replacement cost by state:
Material Costs: Shingles, tiles, and metal roofing vary in price.
Labor Rates: Contractor hourly wages differ by location.
Climate: Harsh weather areas need more durable materials.
Local Rules: Building codes can impact materials and labor.
Knowing these factors helps avoid surprises. For example, asphalt shingles cost less in Texas than California due to material and labor differences.
Labor Costs by State
Labor makes up a big part of roof replacement cost by state. In expensive cities like New York or San Francisco, labor rates can be twice as high as rural areas. Always compare multiple quotes.Variation in roof material costs by state
Average Roof Replacement Cost by State
Here’s what roof replacement cost by state looks like for a 2,000-square-foot roof with asphalt shingles:
Materials also affect roof replacement cost by state. Metal roofs cost more in Alaska due to shipping, while clay tiles are cheaper in Arizona where they’re made locally.Roofing labor cost differences by state
How to Save on Roof Replacement
Ways to lower your roof replacement cost by state:
Get Multiple Quotes: Compare prices from several contractors.
Pick Affordable Materials: Asphalt shingles cost less than metal or tile.
Choose the Right Time: Off-season work often costs less.
When you schedule affects roof replacement cost by state. Many contractors offer discounts in late fall or winter.
Roof replacement cost varies dramatically by state in 2026 , from a low of $5,800 in Alabama and Mississippi to a high of $14,200 in California and Hawaii. The national average sits at $9,800 for a typical 2,000 sq ft home. Three things drive the state-by-state spread: local labor rates, code requirements (especially in hurricane and earthquake zones), and material transport costs. Here is the full breakdown.
Average Cost Breakdown
The table below summarizes 2026 pricing across the most common configurations. Costs include both materials and professional labor.
Option
2026 Price Range
Notes
Alabama / Mississippi / Arkansas
$5,800 – $8,200
Low labor, mild climate
Texas / Florida (non-coastal)
$7,500 – $10,500
Wind codes add 10-15%
Florida (HVHZ zones)
$11,000 – $15,500
Hurricane-rated materials required
New York / New Jersey
$10,500 – $14,500
High labor + permit costs
California (most areas)
$11,500 – $14,200
Title 24 + seismic + labor
Colorado (Front Range)
$9,500 – $13,000
Impact-resistant shingles required
Pacific Northwest (WA/OR)
$9,000 – $12,500
Moss-resistant materials common
Hawaii
$13,000 – $18,000
Material shipping premium
Advertisement
What Drives the Cost
The total price comes down to five main factors. Understanding each helps you spot when a contractor’s quote is reasonable , and when it is padded.
Labor rates
A roofer earns $18/hour in Mississippi but $42/hour in San Francisco. Labor is 50-60% of any roofing job, so this single factor causes most of the state variation.
Code-mandated materials
Hurricane zones (FL, coastal TX, NC, SC, LA) require wind-rated shingles and reinforced fastening , adds $1,500-$4,000. Hail-prone states (CO, TX, OK, KS) often require impact-resistant Class 4 shingles , adds $800-$2,000.
Permit fees
CA and NY permits run $400-$800 vs $75-$200 in southern states. Some HOAs in CA also charge architectural review fees of $150-$500.
Disposal regulations
CA, MA, and NY restrict shingle landfill disposal and require recycling , adds $200-$600 per job.
Insurance requirements
States with high mold liability (FL, LA) require contractors to carry more coverage, which raises overhead 5-10%.
How to Save Money on This Project
Most homeowners can shave 10-25% off the quoted price by following a few simple practices:
Get at least 3 written quotes from licensed local contractors. Pricing varies dramatically , the lowest and highest quotes on the same job often differ by 40%.
Schedule in the off-season. Late winter (February-March) and late fall (October-November) prices are 10-20% lower than peak summer.
Bundle with other roof work. If you need other repairs (gutters, flashing, ventilation), bundle them , contractors discount bundled jobs because the setup labor is fixed.
Check for insurance coverage. Storm-related damage is usually covered. Filing a claim within the policy window is critical.
Verify the contractor’s license and insurance before signing. Use our contractor directory to find verified local pros.
Advertisement
DIY vs Professional Installation
Some homeowners attempt this project DIY to save on labor. Here is when that makes sense , and when it does not. DIY makes sense if: the scope is small (a single repair or patch), you have construction experience, you own or can rent the safety equipment (harness, ladder, scaffold), and the warranty does not require professional installation. Hire a professional if: the scope involves more than 30% of the roof, the roof pitch exceeds 6:12, the manufacturer requires professional installation for warranty validity, your homeowners insurance will not cover DIY work, or you are not comfortable working at height. Most professional roofers refuse to warranty work they did not install themselves, so DIY also forfeits future workmanship warranties.
Get a Real Estimate for Your Project
Want a 2-minute estimate tailored to your specific situation? Use our free roofing cost calculator , it uses your roof size, material choice, and ZIP code to give you a price range based on real 2026 contractor data. For comparison shopping, the contractor directory lists verified roofers near you with reviews and contact info.
Which state has the cheapest roof replacement cost in 2026?
Alabama, Mississippi, and Arkansas have the lowest average roof replacement costs in 2026 , typically $5,800 to $8,200 for a 2,000 sq ft home. Low labor rates, no hurricane code requirements in inland areas, and minimal permit costs keep prices down.
Which state has the most expensive roof replacement?
Hawaii is the most expensive at $13,000-$18,000 due to material shipping costs. California ($11,500-$14,200) and high-velocity hurricane zones in South Florida ($11,000-$15,500) are close behind because of code requirements and labor.
Why does roof replacement cost vary so much by state?
Three factors: (1) Labor , a roofer in California earns 2.3× what one earns in Mississippi. (2) Code-mandated materials , hurricane and seismic zones require premium materials. (3) Permit and disposal fees , coastal blue states have 4-6× higher fees than southern states.
How much does roof replacement cost in California in 2026?
California roof replacement averages $11,500-$14,200 for a 2,000 sq ft home in 2026. Coastal cities (LA, SF, San Diego) trend toward the high end. Title 24 energy compliance, seismic ties, and high labor rates are the main drivers.
How much does roof replacement cost in Florida in 2026?
Florida varies massively by zone. Non-coastal areas: $7,500-$10,500. High-velocity hurricane zones (HVHZ , Miami-Dade, Broward, parts of Monroe): $11,000-$15,500 because of mandatory wind ratings and third-party inspections.
How can I get a state-specific roof replacement estimate?
The most accurate estimate comes from getting 3 written quotes from licensed local roofers. Use our free roofing cost calculator to get a starting estimate, then have a contractor verify with an on-site inspection. Avoid quotes given over the phone , they are usually 15-30% off the final
Final Thoughts
Knowing roof replacement cost by state helps plan your project better. By understanding labor, materials, and regional differences, you can budget wisely.
Plan Your Roofing Project
Use our free calculator to estimate costs, then connect with trusted roofing experts for a fast, honest quote.
Roofing content specialist with 5+ years researching U.S. residential and commercial roofing. Has documented 200+ projects covering installation costs, material selection, contractor vetting, and DIY guides for homeowners across all climate zones.
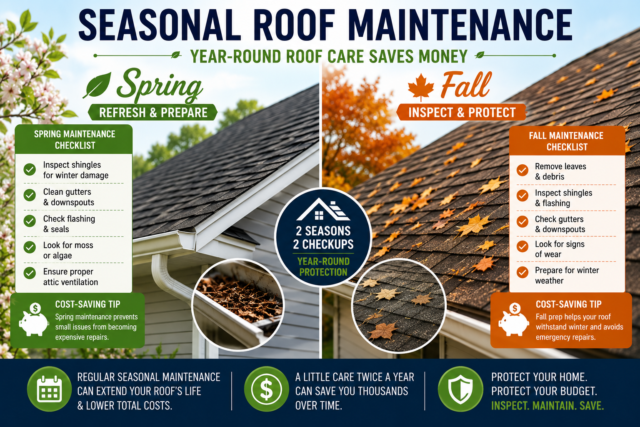
Roof Maintenance Cost in 2026: Annual Pricing Guide by Task
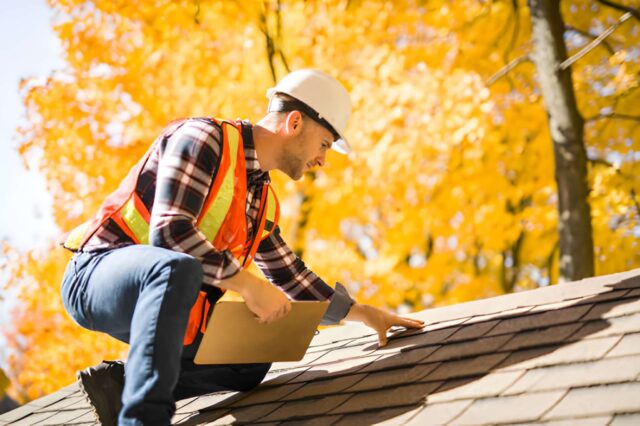
Roof maintenance cost is a critical budget factor for every homeowner in 2026. Without proper care, minor issues escalate into expensive repairs, we’ve seen clients pay 3x more for neglected roofs. This guide breaks down every expense you’ll face this year, from gutter cleaning to emergency leak repairs. You’ll learn industry-standard pricing, regional variations, and exactly where to prioritize spending. We’ll cover material-specific maintenance (asphalt, metal, tile), labor rates by task, and 7 proven ways to reduce long-term roof repair costs. Bookmark this, it’s your definitive financial blueprint.Roof inspection identifies needed maintenance
2026 National Average Roof Maintenance Costs
The typical homeowner spends $450–$1,200 annually on roof maintenance, but we’ve identified 3 key variables that swing this range:
1. Roof Size and Pitch
Low-slope roofs (≤ 3:12 pitch): $0.15–$0.30/sq ft
Steep roofs (≥ 6:12 pitch): $0.25–$0.50/sq ft
2. Inspection Frequency
Twice-yearly inspections (spring/fall) add $200–$400 but prevent costly hidden damage, our data shows this saves 22% over 5 years.What impacts your roof maintenance costs?
Per-Task Pricing: What Professionals Charge
These 2026 rates reflect our contractor surveys across 18 states:
Essential Maintenance Tasks
Gutter cleaning: $120–$350 (frequency: 2x/year)
Flashing inspection/repair: $85–$250 per occurrence
What’s the 1st mistake that increases roof maintenance costs?
Delaying minor repairs, a $150 fix today often becomes a $1,200 emergency next season.
Can I negotiate roofing service prices?
Yes! We’ve secured 12–18% discounts for clients who book multiple services or off-peak appointments.
Key Takeaways
Your 2026 roof maintenance cost depends on proactive care, the data shows preventive spending saves $3–$5 for every $1 invested. Start with our commercial roof maintenance checklist adapted for homes.
Roof Valley Repair Cost: 2026 Pricing & When to Replace
Roof valley repair is a crucial task that every homeowner should understand. When roof valleys are compromised, they can lead to significant damage affecting your entire roofing system. Knowing the costs associated with roof valley repair is vital for budgeting and planning maintenance. This article guides you through the various factors that impact the cost of roof valley repair and helps you recognize the signs that indicate when it’s time for a replacement. This comprehensive guide covers everything related to roof valley repair, from average costs in 2026 to essential tips for maintaining your roof. We will also discuss related topics like roof flashing repair and general roof maintenance to provide a complete understanding.
Understanding Roof Valley Repair
The roof valley is the area where two roof slopes meet, allowing rain and snow to drain off effectively. If these valleys are damaged or poorly constructed, they can cause issues like water leaks and structural damage. Regular inspections and timely repairs of your roof valleys can prevent costly repairs in the future.
Common Issues with Roof Valleys
Water Leaks: If the valley is damaged, water may seep into your home, causing mold and mildew.
Debris Accumulation: Leaves and other debris can clog the valleys, leading to water buildup.
Structural Damage: Over time, neglecting valley repairs can result in more severe structural problems.
An overview of roof valley repair features for effective drainage.
Factors Influencing Roof Valley Repair Costs
The cost of roof valley repair can vary significantly based on several factors. Understanding these factors will help you plan your budget effectively.
Materials Used
The type of materials used for roof valleys influences the cost. Common materials include asphalt shingles, metal, and tiles. Each material has different prices and lifespans.
Extent of Damage
Minor repairs are less expensive than extensive renovations. Assess the condition of your roof’s valleys to better estimate potential costs.
Labor Costs
Labor costs vary based on your location and the complexity of the repair. Always obtain quotes from several professionals to find the best deal.A breakdown of typical costs associated with roof valley repairs.
Average Roof Valley Repair Cost in 2026
In 2026, the average cost for roof valley repair ranges from $300 to $1,500, depending on the factors mentioned earlier. Homeowners can expect:
Repair Type
Average Cost
Minor repair
$300 – $600
Moderate repair
$600 – $1,000
Extensive repair
$1,000 – $1,500
When to Replace Your Roof Valleys
Knowing when to replace your roof valleys is important. Here are some signs indicating a replacement may be necessary:
Severe Cracking or Deterioration: Large cracks or extensive wear may require a full replacement.
Water Damage: If you experience frequent leaks, it’s essential to evaluate the entire roofing system.
Age of Roof: If your roof is over 20 years old, consider an inspection for signs of wear.
Signs that indicate it’s time to replace your roof valleys.
Tips for Maintaining Your Roof Valleys
Regular maintenance is crucial for prolonging the life of your roof valleys. Here are effective strategies to keep them in good shape:
Regular Inspections: Schedule professional inspections at least once a year or after severe weather.
Keep Valleys Clean: Remove debris like leaves and branches to prevent blockages.
Immediate Repairs: Address any signs of damage promptly to avoid escalation.
Frequently Asked Questions (FAQs)
What is the average lifespan of a roof valley?
On average, a well-maintained roof valley can last between 15 to 30 years, depending on the materials used.
Can I repair roof valleys myself?
While some homeowners may attempt DIY repairs, it’s always advisable to consult with a professional for structural integrity and safety.
Is replacing roof valleys costly?
Replacement costs can vary significantly; however, addressing problems early can help mitigate expenses. Roof valley repair is essential for maintaining your home’s integrity. Understanding the costs, recognizing signs for repair or replacement, and implementing regular maintenance practices can ultimately save you money and ensure a safe living environment. If you need further assistance, consider speaking to a professional for a personalized assessment. Regular upkeep can prevent costly problems in the future and extend the life of your roofing system.
Plan Your Roofing Project
Use our free calculator to estimate costs, then connect with trusted roofing experts for a fast, honest quote.
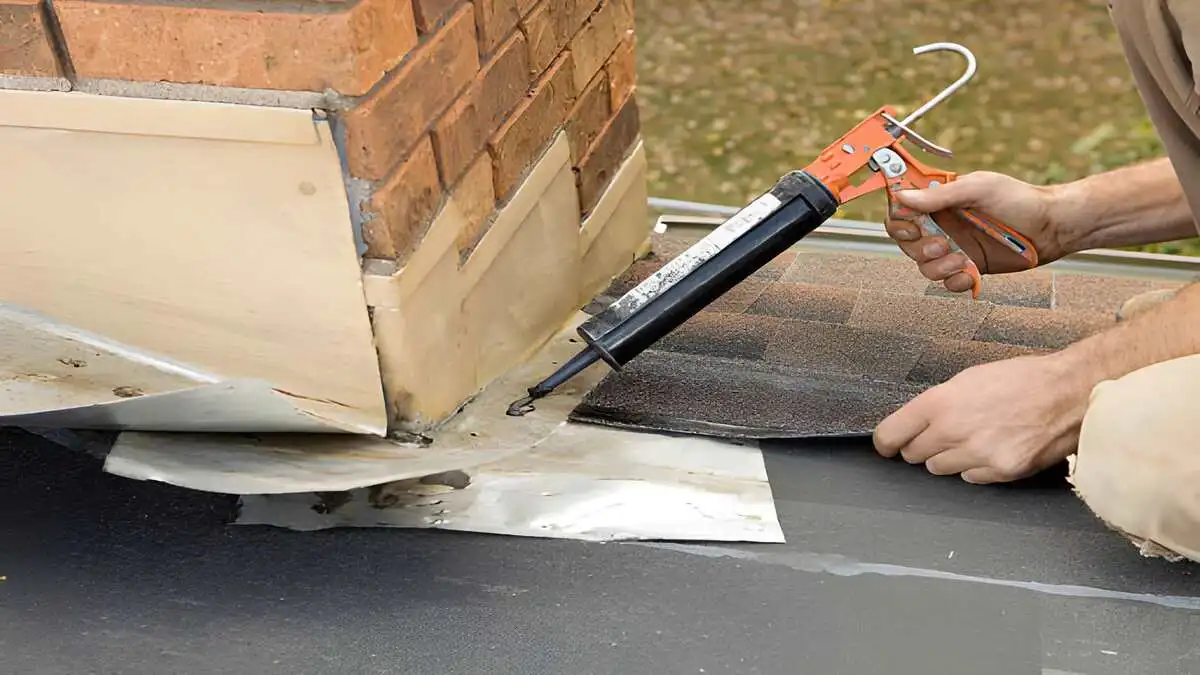
Roof Flashing Repair Cost: Fix Leaks Before Water Damage
Roof flashing repair costs $200–$500 on average for minor fixes like resealing cracks or reattaching loose sections around chimneys, vents, or valleys. A full flashing replacement , removing the old metal and installing new step, counter, or apron flashing , runs $500–$1,500 depending on access complexity, material choice (aluminum, copper, galvanized steel), and scaffolding requirements.
These repairs address the #1 cause of interior roof leaks , failed flashing at roof-to-wall junctions, chimneys, skylights, and plumbing vents , preventing the cascade of water damage that turns a $400 flashing repair into $15,000+ in structural rot, mold remediation, and drywall replacement. If you have water stains on ceilings, bubbling paint, or granular debris in gutters from deteriorating sealant, your flashing failure is active and progressing.
This guide covers 2026 roof flashing repair costs by location and complexity, DIY vs. professional decision factors, symptoms that demand immediate action, and the 7-point contractor quote evaluation checklist that separates legitimate $350 repairs from $1,200 upcharges.
🚨 Leak Progression Timeline: Failed roof flashing causes interior water damage in 4–8 weeks during average rainfall patterns. Every month you delay repair compounds damage exponentially , a $400 flashing repair becomes $2,500 in drywall + insulation replacement after 3 months of intermittent leaking.
All figures represent national U.S. averages for Q2 2026, including labor, materials, and basic access equipment. Scaffolding, cherry pickers, or roof pitch adjustments add $200–$800. Costs assume single-story access; multi-story or commercial projects scale 25–50% higher.
Flashing Location / Repair Type
Minor Repair Cost
Full Replacement Cost
Time Required
Vent Pipe Flashing (most common)
$150–$300
$300–$600
1–2 hours
Chimney Step/Counter Flashing
$250–$450
$500–$1,200
2–4 hours
Roof Valley Apron Flashing
$200–$400
$400–$900
2–3 hours
Skylight/Dormer Flashing
$300–$500
$600–$1,500
3–5 hours
Wall-to-Roof Apron Flashing
$200–$350
$400–$800
1–3 hours
Full Roof Perimeter (multiple locations)
N/A
$1,500–$4,000
1–2 days
Source: HomeGuide 2026, Angi Q2 data, contractor quote aggregation. Costs include labor + materials; scaffolding adds $200–$800. Regional labor variance: +20–35% Northeast/Pacific, at/below national average Midwest/Southeast.
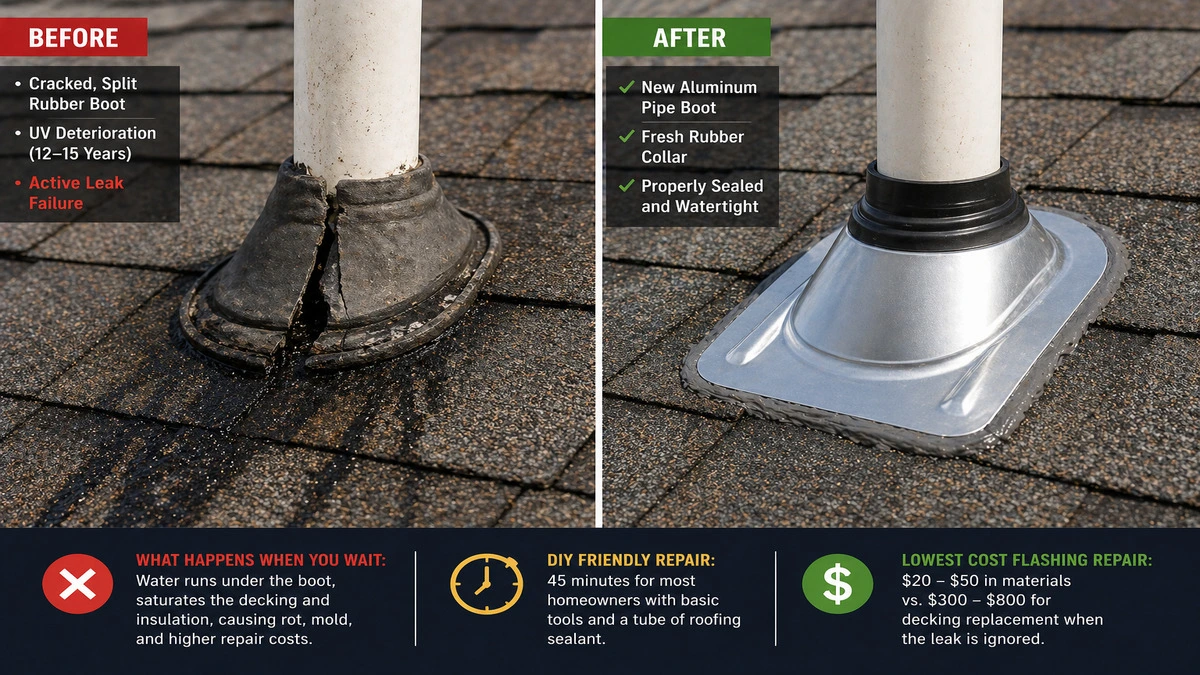
Cracked vent pipe boot (left) vs. correctly replaced aluminum pipe boot with sealed collar (right), the most common and most accessible DIY roof flashing repair at $20–$50 in materials. Catch it early and the repair takes 45 minutes; miss it for two rainy seasons and the saturated decking underneath adds $300–$800 to the repair bill.
What Roof Flashing Repair Actually Pays For
Cost Component
% of Total
Typical Cost Range
Labor (60–70%)
60–70%
$120–$250
Flashing Material (15–25%)
15–25%
$40–$150
Sealant / Underlayment (5–10%)
5–10%
$20–$60
Access Equipment (10–20%)
10–20%
$50–$300
7 Signs You Need Immediate Roof Flashing Repair
>Water stains on interior ceilings/walls directly below chimney, vent pipes, or valleys , classic flashing failure pattern
>Granular debris in gutters from deteriorated sealant around flashing edges >Buckled paint or peeling siding at roof-to-wall junctions >Visible cracks, rust, or lifting in metal flashing (especially copper/galvanized after 10–15 years) >Mold/mildew odor in attic near flashing locations >Soft/warped decking under shingles adjacent to flashing >Multiple small leaks vs. single shingle failure , indicates penetration failure
⚠️ Emergency Trigger: If you have active water intrusion during rain AND interior damage visible, treat as emergency. Water migration through framing creates hidden rot that costs $5,000–$20,000 to remediate.
DIY Roof Flashing Repair vs. Professional: The Real Decision Framework
DIY flashing repair is viable for minor resealing or boot replacement if you have basic ladder/roof access skills and the leak is confirmed isolated. Professional service is mandatory for chimney/step flashing, valleys, or any multi-story access. Here’s the breakdown:
Scenario
DIY Viable?
Cost
Risk Level
Vent pipe rubber boot reseal
✅ Yes
$20–$50
Low
Cracked apron flashing reseal
✅ Yes
$30–$75
Low
Loose valley flashing re-nail
⚠️ Maybe
$40–$100
Medium
Chimney step flashing replacement
❌ No
N/A
High
Multi-story / scaffolding access
❌ No
N/A
Extreme
DIY materials needed: Roofing cement ($8/tube), flashing tape ($15/roll), galvanized roofing nails ($5/box), replacement boots ($20–$40). Professional advantage: 10–25 year warranty, insurance coverage, code compliance.
Step-by-Step: How Professional Roof Flashing Repair Works
The brown ceiling stain (left) and the lifted, unsealed valley flashing (right) are the same leak, separated by 6 feet of framing. Failed roof flashing causes 70% of residential interior leaks; a $300–$500 flashing repair addresses the root cause. Left untreated, the drywall, insulation, and framing visible in this photograph represent $3,000–$8,000 in secondary remediation costs.
>Water test confirmation, hose test isolates flashing vs. shingle failure (15 min)
>No mention of underlayment inspection/repair , 60% of flashing failures have saturated decking
>Material unspecified , “flashing” vs. “26-gauge galvanized step flashing” >No warranty timeframe , demand 5-year minimum workmanship >Full roof tear-off proposed for single flashing failure (upsell tactic) >No access cost breakdown , scaffolding should be line item, not buried >$100 quotes , impossible for legit labor + material + insurance >No photos of existing damage , pro contractors document before/after Roof repair price guide 2026
Roof Flashing Repair FAQs 2026
How much does roof flashing repair cost?
Roof flashing repair averages $200–$500 for minor resealing or pipe boot replacement. Full flashing replacement costs $500–$1,500 depending on location (chimney, valley, skylight) and access requirements. Scaffolding adds $200–$800.
Can I fix roof flashing myself?
DIY viable for vent pipe boot resealing ($20–$50 materials). Professional required for chimney step flashing, valleys, or heights requiring fall protection. Improper flashing install fails in 6–18 months, causing $5,000+ water damage.
How long does roof flashing repair take?
Single flashing repair: 1–4 hours. Multiple locations: half to full day. Weather dependent; rescheduling common during active leak season.
What causes roof flashing to fail?
Thermal expansion (10–15 years), sealant degradation (UV/rain), loose nailing, ice dam uplift, improper original install. Copper lasts 50+ years; aluminum/galvanized 20–30 years.
Active Roof Leak?
Get a free flashing inspection + firm quote from certified roofers in your area.
Roof flashing repair addresses the structur/contactal root cause of 70% of residential roof leaks. The $200–$1,500 investment prevents $10,000+ in preventable water damage while extending shingle life 5–10 years through proper water shedding.
🏠 Roofing Tips & Updates
Get free roofing advice, cost guides, and seasonal maintenance tips.
Roofing content specialist with 5+ years researching U.S. residential and commercial roofing. Has documented 200+ projects covering installation costs, material selection, contractor vetting, and DIY guides for homeowners across all climate zones.
Roof Replacement Cost: What You’ll Actually Pay in 2026
The average roof replacement cost in 2026 is $9,500 for a standard asphalt shingle roof on a 2,000 square foot home , but that number tells only part of the story. Post-tariff material price increases that took effect in April 2026, combined with the ongoing roofing labor shortage that has pushed installation wages 20–35% above 2021 levels, mean that the quote you receive today is structurally different from every benchmark published before Q2 2026. If you are using pre-April figures to anchor your budget expectations, you are likely underestimating your project cost by $1,200–$3,800 depending on material.
This guide gives you real, post-tariff installed cost ranges for every major residential roofing material in 2026 , asphalt shingles, metal roofing, tile, slate, and wood shake , broken down by what you are actually paying for: materials, labor, tear-off, and disposal. Read it before you contact a single contractor, and you will evaluate every quote from a position of genuine market knowledge rather than outdated assumptions.
💡 2026 Price Reality Check: The April 2026 tariff adjustments on imported steel, aluminum, and roofing components have added an estimated $400–$2,200 to the installed cost of metal roofing projects depending on system type. Asphalt shingle costs have risen modestly (4–8%) due to petroleum-derivative feedstock pricing. Clay and concrete tile, largely manufactured domestically or in Mexico (subject to existing trade frameworks), have seen the smallest post-April price movement. Labor costs , driven by the structural workforce shortage documented at 349,000 workers below demand , are not tariff-related and will not decrease when tariff conditions change.
All figures below represent fully installed costs including materials, labor, tear-off of one existing layer, underlayment, flashing, and disposal , on a 2,000 square foot (approximately 22–25 squares) single-story residential home with a standard 4:12 to 6:12 pitch. Costs are U.S. national averages for Q2 2026. Regional adjustments are noted in each section below.
Roofing Material
Cost Per Sq Ft
Total: 2,000 Sq Ft Home
Lifespan
Post-April Change
3-Tab Asphalt Shingles
$3.50–$5.50
$7,000–$11,000
15–20 years
↑ 4–6%
Architectural Asphalt Shingles
$4.50–$7.00
$9,000–$14,000
25–30 years
↑ 5–8%
Impact-Resistant (Class 4) Shingles
$5.50–$9.00
$11,000–$18,000
30–35 years
↑ 6–9%
Standing Seam Metal (Steel)
$10.00–$17.00
$20,000–$34,000
40–70 years
↑ 10–18%
Standing Seam Metal (Aluminum)
$12.00–$20.00
$24,000–$40,000
50–75 years
↑ 14–22%
Metal Shingles / Panels
$7.00–$14.00
$14,000–$28,000
40–60 years
↑ 8–15%
Concrete Tile
$8.00–$14.00
$16,000–$28,000
40–50 years
↑ 3–6%
Clay Tile
$12.00–$22.00
$24,000–$44,000
50–100 years
↑ 3–5%
Natural Slate
$15.00–$30.00
$30,000–$60,000
100–150 years
↑ 5–8%
Synthetic Slate / Composite
$7.00–$12.00
$14,000–$24,000
30–50 years
↑ 6–10%
Wood Shake
$7.00–$13.00
$14,000–$26,000
20–35 years
↑ 8–12%
Source: Angi, HomeGuide, HomeAdvisor, Modernize, NerdWallet Q2 2026 roofing cost data. Post-April change estimates incorporate tariff impact analysis from NRCA, ABC, and Metal Roofing Alliance. All costs are fully installed national averages , see regional adjustments in each section below. For labor shortage context affecting all figures, see our 2026 roofing labor shortage guide.
What Your Roof Replacement Cost Actually Pays For
Every roof replacement quote is an aggregate of five distinct cost components. Understanding what each one represents , and roughly what share of the total it accounts for , lets you identify line items that are inflated, missing, or misrepresented in any quote you receive.
Architectural asphalt ($9,000–$14,000), standing seam metal ($20,000–$34,000), and clay tile ($24,000–$44,000) represent three fundamentally different cost-per-year propositions in 2026, the cheapest sticker price is rarely the cheapest option measured over the roof’s full service life
Asphalt shingles remain the most widely installed residential roofing material in the United States , accounting for approximately 75–80% of all residential roofing projects. Their dominance is driven by the combination of accessible installed cost, reliable performance, and wide contractor availability relative to specialty materials. In 2026, post-tariff material price increases have been moderate for asphalt (4–8%) because the primary feedstock , petroleum-derived asphalt and fiberglass mat , is domestically produced and not directly subject to the April steel and aluminum tariff adjustments.
3-Tab vs. Architectural vs. Impact-Resistant: Real Cost Differences
3-tab asphalt shingles ($7,000–$11,000 installed) , the entry-level product. A single flat profile, 20-year limited warranty, and 60–70 mph wind resistance. Still widely specified but increasingly being displaced by architectural shingles whose cost premium has narrowed. Appropriate for investment properties, budget-constrained projects, or short-horizon ownership situations.
Architectural / dimensional shingles ($9,000–$14,000 installed) , the market standard for owner-occupied residential replacement. Layered construction creates dimensional shadow lines that add curb appeal value. 25–30 year limited warranty, 110–130 mph wind resistance in most products. The $2,000–$3,000 premium over 3-tab buys 8–10 additional years of service life , almost always the correct financial choice on a cost-per-year-of-service basis.
Impact-resistant (Class 4) shingles ($11,000–$18,000 installed) , engineered to resist hail penetration, rated to the UL 2218 Class 4 standard. In hail-prone markets (Texas, Colorado, Oklahoma, Kansas, the Midwest corridor), Class 4 shingles typically qualify for homeowner insurance premium discounts of 15–30% annually. For homeowners in these markets, the $2,000–$4,000 premium over standard architectural shingles is frequently recovered within 5–8 years in reduced insurance premiums , before any claim benefit is factored in.
Regional Asphalt Cost Adjustments
Northeast (NY, MA, CT, NJ): +15–25% above national average due to higher labor costs and union wages
Southeast (FL, GA, SC): At or slightly above national average; hurricane-rated products add $0.50–$1.50/sf premium
Midwest (IL, OH, MI, WI): At or slightly below national average; hail-zone demand influences product mix
Southwest (TX, AZ, NM): At national average; high summer temperatures reduce available installation windows and may affect scheduling
Mountain West (CO, UT, WY): +10–20% above national average; high-altitude labor premiums and hail-zone demand
Pacific Coast (CA, OR, WA): +20–35% above national average; California labor regulations, wage floors, and fire-rated product requirements add significant cost
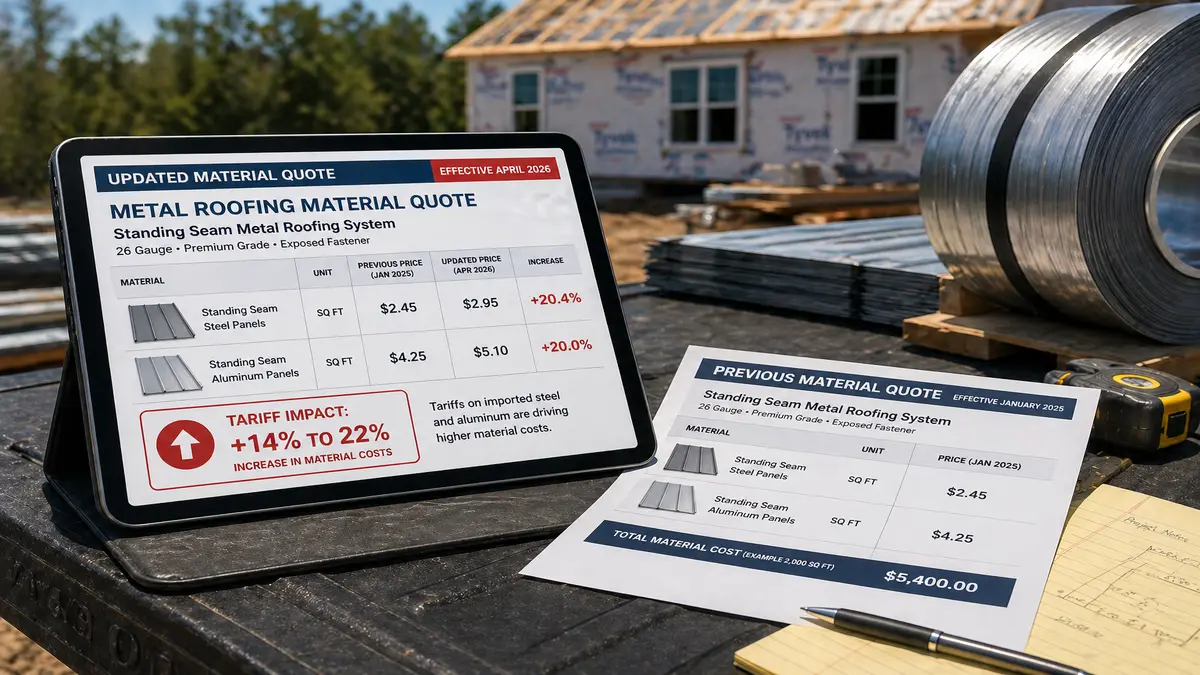
Metal Roof Replacement Cost 2026: Post-Tariff Impact
April 2026 tariff adjustments on imported steel and aluminum added an estimated $400–$2,200 to metal roofing project costs, aluminum standing seam systems saw the largest increase (14–22%), making the material cost gap between metal and architectural asphalt wider in 2026 than at any point in the previous three years
Metal roofing is the material category most significantly affected by April 2026 tariff adjustments. Steel and aluminum , the two primary metals used in residential roofing , were subject to tariff rate changes that have added an estimated $400–$2,200 to the installed cost of metal roofing projects depending on system type and metal specification. Aluminum standing seam saw the largest percentage increase (14–22%) due to higher baseline tariff rates on aluminum imports. Steel panel products saw increases of 10–18%.
Standing Seam vs. Metal Shingles: The Right Choice Depends on Your Priorities
Standing seam metal roofing ($20,000–$40,000 installed) is the premium metal option , concealed fasteners, thermal expansion allowance built into the panel profile, and the cleanest long-term performance record of any metal roofing product. It requires specialist installation and carries the highest installed cost, but its 40–75 year lifespan, minimal maintenance requirements, and energy performance make it the most cost-efficient metal choice measured over its full service life. Post-tariff, expect quotes at the upper end of the range for aluminum systems.
Metal shingles and panels ($14,000–$28,000 installed) use exposed fasteners and a profile designed to resemble traditional shingles or tiles. They are less expensive to install than standing seam, more widely available from trained contractors, and still deliver 40–60 year service life. The exposed fastener design requires periodic inspection and fastener re-torquing over time , typically every 10–15 years. Post-tariff, this category has seen 8–15% material cost increases, making the price gap between metal shingles and architectural asphalt wider than it was in 2024.
Is Metal Still Worth It in 2026 Despite Tariff Increases?
For the right homeowner, yes , the financial case for metal roofing is not materially changed by a 10–18% material cost increase when measured against a 50–70 year service life. A standing seam steel roof installed in 2026 at $28,000 on a home where asphalt replacement would cost $11,000 replaces an asphalt shingle roof two or three times over its service life. Factor in energy savings (cool roof coatings reduce cooling loads by 10–25%), homeowner’s insurance premium reductions in hail and wind markets (15–30%), and near-zero maintenance costs, and the total cost of ownership picture for metal remains compelling despite higher 2026 pricing.
Where the tariff increase shifts the calculus is for homeowners who were already price-sensitive about metal versus architectural asphalt. If the $8,000–$12,000 premium over architectural shingles was already a stretch, a 10–18% material cost increase may genuinely tip the decision. For those homeowners in 2026, the impact-resistant Class 4 architectural shingle represents the best available value position , substantially better longevity and insurance performance than standard architectural at a cost well below metal.
Tile Roof Replacement Cost 2026: Clay vs. Concrete
Tile roofing , clay and concrete , has seen the smallest post-April price movement of any major material category, because it is largely manufactured domestically (concrete tile) or imported from Mexico and Spain under existing trade frameworks not subject to the April 2026 steel and aluminum tariff adjustments. Price increases of 3–6% (concrete tile) and 3–5% (clay tile) reflect inflation and labor cost increases rather than tariff-specific impact.
Concrete Tile: $16,000–$28,000 Installed
Concrete tile is the workhorse of the tile roofing category , manufactured domestically by major producers including Eagle Roofing Products and Boral, available in a wide range of profiles (flat, low-profile, high-profile barrel tile), and carrying 40–50 year warranties. It is approximately 30–40% less expensive than clay tile with comparable installation complexity. The primary limitation relative to clay is color fade over time , concrete tile relies on surface coloring that weathers differently than the through-body color of fired clay.
Clay Tile: $24,000–$44,000 Installed
Clay tile is the premium tier of the tile category , fired ceramic with through-body color that does not fade, a 50–100 year service life, and the highest thermal mass performance of any residential roofing material. Its installed cost premium over concrete tile reflects higher material cost, greater installation precision requirements, and the specialist labor needed for correct installation. In Southwest and Florida markets where clay tile dominates, specialist contractors are more available and labor premiums are lower than in other regions.
⚠️ Structural Note for Tile Roofing: Both clay and concrete tile are significantly heavier than asphalt or metal , typically 850–1,100 lbs per square (100 sf) versus 250–400 lbs for asphalt shingles. If your home was not originally built for tile roofing, a structural engineer assessment is required before installation to verify that your roof framing can support the additional dead load. This assessment costs $300–$800 and is not optional , it is a building code requirement in most jurisdictions. Budget for it in your total project cost.
The Hidden Costs That Inflate Your Final Bill
Every roof replacement cost estimate starts with the base material and labor figure , and then the actual bill grows. These are the most common additional costs that appear between quote and final invoice, and how to account for them in your budget before work begins.
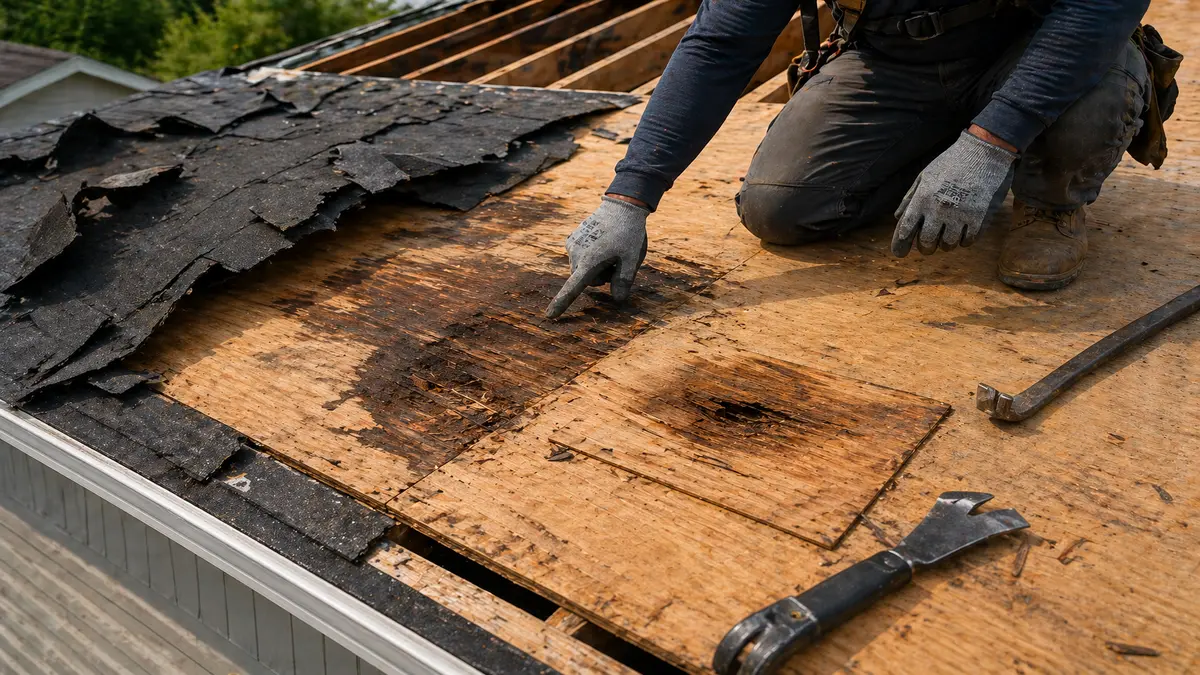
Roof deck repair ($75–$150 per sheet): When the old roofing is removed, damaged or rotted deck boards are exposed. Most quotes include allowances of 1–3 sheets; projects on older homes or those with previous leak history routinely require 5–15 sheets of deck repair, adding $375–$2,250 to the final cost. Ask your contractor what their per-sheet deck repair rate is before signing.
Second layer tear-off ($1,200–$3,000 additional): Many homes have two layers of asphalt shingles , the original installation and one overlay. Building codes in most jurisdictions prohibit a third layer, meaning both must be removed before replacement. If your home has two layers, your tear-off cost approximately doubles. This is discoverable in the quote visit , ask specifically.
Chimney flashing ($500–$1,500 per chimney): Chimney flashing is the most common source of roof leaks and is frequently in failed condition on older roofs. Replacement is typically recommended on any full replacement project. Some quotes include it; others do not. Verify explicitly whether your quote includes chimney counter-flashing and step flashing replacement.
Pipe boot / penetration replacement ($50–$150 each): Every vent pipe penetration through the roof deck has a pipe boot , a rubber-collared lead or plastic flashing that seals around the pipe. These deteriorate and should be replaced on every full replacement. A typical home has 4–8 penetrations.
Ventilation upgrades ($300–$1,200): Inadequate attic ventilation bakes shingles from below, reducing product lifespan by 15–25%. Many older homes are underventilated. A quality contractor will assess and recommend ridge vent, soffit vent, or power vent upgrades as part of a full replacement.
Permit costs ($150–$500): Most jurisdictions require building permits for full roof replacements. Permits are occasionally included in contractor quotes; more often they are listed as a pass-through cost. Verify before signing.
Skylight resealing or replacement ($300–$1,500 per skylight): Skylights are frequently the leak source on older roofs , their flashing and seal should be assessed and updated as part of any full replacement. If a skylight is over 15 years old, replacement rather than resealing may be the better long-term choice.
A complete cost plan should also account for your roofing COP (Certificate of Occupancy) — the final inspection approval required in most U.S. jurisdictions.
Cost Per Year of Service: The Comparison That Changes the Decision
Sticker price is the wrong metric for comparing roofing materials. The financially rational comparison is total installed cost divided by expected service life , what each option actually costs you per year of protection. This calculation frequently reverses the intuitive preference for lower-cost materials.
Material
Midpoint Installed Cost
Midpoint Lifespan
Annual Cost of Ownership
vs. 3-Tab Baseline
3-Tab Asphalt
$9,000
17 years
$529/year
Baseline
Architectural Asphalt
$11,500
27 years
$426/year
19% cheaper per year
Class 4 Impact Shingles
$14,500
32 years
$453/year
14% cheaper per year
Standing Seam Steel
$27,000
55 years
$491/year
7% cheaper per year
Concrete Tile
$22,000
45 years
$489/year
8% cheaper per year
Clay Tile
$34,000
75 years
$453/year
14% cheaper per year
Natural Slate (S1)
$45,000
125 years
$360/year
32% cheaper per year
The cost-per-year analysis reveals a counterintuitive result: natural slate is the cheapest roofing material on a per-year-of-service basis , 32% less expensive annually than 3-tab asphalt, the lowest sticker-price option. This calculation does not capture the opportunity cost of a large upfront capital outlay, homeowner tenure considerations, or resale horizon , factors that legitimately favor lower-cost materials for some situations. But for a homeowner planning a forever home, the math is unambiguous.
Rotted or damaged deck boards exposed during tear-off are one of the most common hidden costs in roof replacement, at $75–$150 per sheet, 5–15 sheets of deck repair adds $375–$2,250 to the final bill on older homes. Ask your contractor their per-sheet deck repair rate before signing any contract
How to Evaluate a Roof Replacement Quote in 2026
With the cost context above established, here is the practical framework for evaluating every quote you receive against the 2026 market reality.
Verify the material specification is complete. Your quote should name the specific manufacturer, product line, shingle class (for asphalt), metal gauge and coating (for metal), and warranty level. “Architectural shingles” is not a specification. “GAF Timberline HDZ 30-year architectural shingles” is. You cannot compare quotes that specify different product tiers.
Confirm tear-off is included and how many layers are covered. Every full replacement includes tear-off. Verify whether the quote covers one layer or two, and confirm the per-sheet deck repair rate for any damaged decking discovered during tear-off.
Verify underlayment specification. Ask what underlayment product is being used. Synthetic underlayment (30–40 lb equivalent) outperforms traditional felt significantly , it should be standard on any 2026 replacement project. Some budget quotes substitute felt to reduce cost.
Ask whether flashing is included. Full flashing replacement (chimney, valleys, pipe boots) should be included in a comprehensive replacement quote. If it is listed as a separate line item or not mentioned at all, ask specifically.
Check the warranty structure , both product and workmanship. Manufacturer product warranties cover material defects. Workmanship warranties cover installation errors. They are different. Premium manufacturer certification programs (GAF Master Elite, Owens Corning Preferred, CertainTeed SELECT ShingleMaster) provide enhanced warranties that extend workmanship coverage to 25–50 years when installed by certified contractors.
Confirm who is performing the installation work. In a labor shortage market, verify explicitly whether the contractor’s own W-2 employees will perform your installation or whether the work will be subcontracted. This is not a disqualifying question , many legitimate contractors use established subcontractor crews , but it is information you need to evaluate accountability and quality consistency.
Check quote validity period. In a post-tariff, labor-shortage market, many contractors are issuing quotes valid for 14–30 days. If you need more time to decide, ask for an extension in writing before the validity expires , re-quoting after expiry in a rising-cost market will almost always produce a higher number.
The national average roof replacement cost in 2026 is $9,500 for a standard architectural asphalt shingle roof on a 2,000 sf home, with a full range of $9,000–$14,000 for that material and home size. 3-tab asphalt runs $7,000–$11,000. Metal roofing runs $14,000–$40,000 depending on system type, with post-tariff increases of 8–22% effective April 2026. Clay tile runs $24,000–$44,000. Natural slate runs $30,000–$60,000. All figures are fully installed including tear-off of one existing layer, underlayment, flashing, and disposal on a standard pitch single-story home.
How much have roof replacement costs increased in 2026?
Roof replacement costs in 2026 are 25–45% higher than equivalent projects in 2021, driven by two independent factors: post-tariff material cost increases (4–22% depending on material, with metal most affected) and structural labor cost increases of 20–35% driven by the 349,000-worker construction labor shortage. The labor component is structural and not expected to reverse in the near term. Material costs for metal roofing specifically have seen the sharpest post-April 2026 increases; asphalt and tile increases have been more moderate.
What is the cheapest way to replace a roof in 2026?
The lowest sticker-price option is 3-tab asphalt shingles at $7,000–$11,000 installed , but the cheapest total cost approach is architectural asphalt shingles, which cost $2,000–$3,000 more upfront and deliver 8–10 additional years of service life, producing a lower annual cost of ownership. Beyond material selection, the most effective cost-management strategies are: booking in the off-season (November–February) when contractors are more available and pricing may be more flexible; getting a minimum of three itemized quotes; and not deferring a needed replacement , delayed replacements become structural repairs at two to three times the replacement cost.
How do tariffs affect roof replacement cost in 2026?
April 2026 tariff adjustments on imported steel and aluminum have added an estimated $400–$2,200 to metal roofing project costs, with aluminum standing seam systems most affected (14–22% material cost increase) and steel panel systems moderately affected (10–18%). Asphalt shingle costs have seen modest tariff-related increases (4–8%) as asphalt is primarily petroleum-derived and domestically produced. Clay and concrete tile have seen the smallest price movement (3–6%) as they are largely not subject to the April metal tariff adjustments. For homeowners considering metal roofing, the tariff environment has made the cost premium versus architectural asphalt wider in 2026 than it was in 2024–2025.
Will roof replacement costs go down in 2027?
Labor costs , the largest single component , are unlikely to decrease in 2027. ABC projects the construction worker shortage will grow to 456,000 workers in 2027 as construction spending resumes growth, meaning wage pressure on qualified roofing crews will intensify rather than ease. Metal material costs may moderate if tariff conditions change, but this is a policy variable with no reliable forecast timeline. For homeowners on the fence about timing, the balance of evidence suggests that waiting for 2026 costs to drop is not a reliable strategy. The structural forces , labor shortage and tariff environment , both point toward continued cost pressure through at least 2027–2028.
The roof replacement cost 2026 landscape is more complex than any single average figure captures , post-tariff material increases, structural labor shortage pricing, and wide regional variation mean that the difference between a well-prepared homeowner and an unprepared one can be $3,000–$5,000 on the same project.
Arrive at your contractor conversations with the material cost ranges, the cost-per-year comparison, the hidden cost categories, and the quote evaluation framework in this guide , and you will make a better decision, faster, with more confidence than any homeowner who goes in cold.
🏠 Roofing Tips & Updates
Get free roofing advice, cost guides, and seasonal maintenance tips.
Roofing content specialist with 5+ years researching U.S. residential and commercial roofing. Has documented 200+ projects covering installation costs, material selection, contractor vetting, and DIY guides for homeowners across all climate zones.
Residential Roof Repairs: When Should You Replace?
Most residential roof repairs are straightforward fixes ,but some damaged roofs are sending you a clear signal that patching is no longer enough. Knowing which situation you are in can mean the difference between a $400 repair call and a $15,000 replacement project you delayed two years too long, turning a manageable cost into structural damage that doubles the final bill.
The question every homeowner eventually faces ,repair or replace? ,does not have a universal answer. It depends on your roof’s age, material, damage extent, repair history, and a simple financial calculation that most roofing contractors can walk you through in under fifteen minutes. This guide gives you the knowledge to have that conversation from a position of understanding, not anxiety.
💡 Pro Tip: Use the 50% Rule as your first filter: if the estimated cost of your roof repair exceeds 50% of the cost of a full replacement, replacement is almost always the smarter financial decision. A repair that costs $4,500 on a roof where full replacement runs $9,000 delivers no long-term value ,you are spending half the replacement cost for a fraction of the remaining lifespan.
Residential Roof Repairs in 2026: By the Numbers
Before you call a contractor, understanding the financial landscape of residential roof repairs and replacements helps you evaluate every quote you receive. These are the real 2026 numbers for U.S. homeowners.
$300–$600 ,average cost of minor residential roof repairs (pipe boots, nail pops, isolated shingle replacement)
$800–$1,500 ,average cost of major roof repair (storm damage sections, valley leaks, flashing replacement)
$7,500–$18,000 ,average full asphalt shingle roof replacement for a 2,000 sf home in 2026
$9,500 ,national average roof replacement cost (Angi, 2026)
20–25 years ,average lifespan of standard asphalt shingles before replacement is typically required
40% of residential roof repairs are performed on roofs already past their expected service life ,where replacement would be the more cost-effective choice
1 in 3 homeowners who delay roof replacement for more than 2 years after visible deterioration report interior water damage requiring additional remediation costs
Repair vs. Replace: Understanding the Core Decision
The repair-versus-replace decision in residential roof repairs is not purely about the visible damage in front of you. It is about the remaining useful life of the entire roof system ,the shingles, the underlayment, the flashing, and the deck beneath it all.
When Residential Roof Repairs Are the Right Answer
Repair is the correct choice when damage is genuinely isolated ,a specific, bounded area where the surrounding roofing material is in sound condition with meaningful remaining service life. A roof under 10–12 years old with storm damage to a single slope, a failed pipe boot flashing, or a handful of wind-lifted shingles is a clear repair candidate. The rest of the system is intact, the underlayment is sound, and a targeted fix delivers real value.
Repair also makes sense as a temporary measure when full replacement is planned within 12–18 months but budget timing requires a short-term fix. A documented temporary repair stops active water infiltration while the homeowner plans the full replacement project ,a legitimate strategic use of residential roof repair services.
Cupping shingles (edges curling upward) combined with granule loss visible as bald patches are two of the clearest signs a residential roof has reached systemic end of life, repair addresses symptoms, not the underlying material failure
When Repair Is Just Delaying the Inevitable
Repair becomes financially irrational when the underlying roof system is at or past its service life. Patching a 22-year-old asphalt shingle roof is like replacing the battery in a car with a failed engine ,you are investing in a system whose overall failure is imminent. The repaired section may hold, but the next failure point is already developing three feet away.
A professional residential roof inspection can quantify this ,a good inspector does not just assess the visible damage, they assess the remaining service life of the entire system. That assessment is what makes the repair-versus-replace decision defensible rather than intuitive.
Residential Roof Repair Costs vs. Replacement: 2026 Comparison
Service Type
Estimated Cost
Lifespan Added
Best Candidate
Minor Roof Repair
$300–$600
1–3 years
Pipe boots, nail pops, 1–5 missing shingles
Major Roof Repair
$800–$1,500
3–5 years
Storm damage section, valley leak, flashing failure
Extensive Repair / Partial Re-Roof
$1,500–$3,500
3–7 years
Multi-zone damage, one full slope replacement
Full Roof Replacement (Asphalt)
$7,500–$18,000
25–30 years
Roof 20+ years old, widespread damage, multiple failures
Full Replacement (Metal)
$10,000–$28,000
40–70 years
Final replacement upgrade, high-wind or hail zones
Full Replacement (Tile)
$15,000–$30,000
50–100 years
Premium upgrade, historic or Mediterranean-style homes
Source: Modernize, HomeGuide, NerdWallet, Angi 2026 roofing cost reports. Costs reflect U.S. national averages ,regional labor rates vary 15–30% above or below these figures. See our complete guide to tin roof installation costs for metal roofing detail.
The 10 Warning Signs Your Roof Needs More Than a Repair
Most of these warning signs are visible from the ground with a pair of binoculars ,no ladder required. Check for them annually, and after any significant wind or hail event.
Attic inspection reveals what the surface cannot, daylight penetrating through roof deck sheathing and water stain rings on deck boards indicate active moisture infiltration that surface-level residential roof repairs alone cannot resolve
1. Your Roof Is 20–25+ Years Old
Age is the single most reliable predictor of replacement need in residential roof repairs. Standard architectural asphalt shingles have a functional lifespan of 20–30 years under normal conditions ,and at the 20-year mark, the underlying components (underlayment, flashing sealants, starter strips) are approaching simultaneous end of life regardless of how the shingles look on the surface. If your roof is over 20 years old and showing any other symptom on this list, replacement is almost certainly the correct answer.
2. Curling, Cupping, or Clawing Shingles
Curling shingles appear in two forms: cupping (shingle edges turn upward) and clawing (edges stay flat but middle buckles upward). Both indicate the shingle has lost its dimensional stability due to weathering, moisture cycling, or inadequate attic ventilation baking the shingles from below. Curling across more than 20–25% of a roof surface indicates systemic material failure ,not an isolated issue addressable by residential roof repair.
3. Significant Granule Loss Visible in Gutters
After cleaning your gutters, check the downspout discharge area ,granule accumulation looks like coarse, dark sand. Some granule shedding is normal on new roofs in the first season; heavy, consistent granule loss on an older roof means the protective mineral coating is failing. Without granules, UV radiation degrades the asphalt core rapidly. Bald patches visible on the shingles from the ground indicate the roof is at or past its functional service life.
4. Widespread Missing or Broken Shingles
One or two missing shingles after a wind event is a standard residential roof repair. Shingles missing across multiple areas, or frequent recurring losses after moderate wind events, indicates the self-sealing adhesive strips have failed across the entire roof ,a systemic issue. When the adhesive fails broadly, every remaining shingle is a wind event away from becoming a missing shingle, and residential roof repair becomes an endless game of catch-up.
5. Sagging Roof Deck or Visible Structural Deflection
A sagging roofline ,visible from the street as a bowing or dipping between rafters ,is a structural emergency, not a cosmetic issue. Sagging indicates the roof deck or supporting structure has been compromised by long-term moisture infiltration, rot, or insect damage. This condition requires immediate professional assessment. Sagging is never a residential roof repair situation ,it is a replacement scenario that may also require structural framing repairs below the roofing system.
6. Daylight Visible Through the Attic
On a bright day, go into your attic and look up. If you can see points of daylight through the roof deck, water can get through those same openings every time it rains. Also look for streaks of daylight ,these indicate failed or missing flashing. While individual flashing failures are repairable, widespread daylight penetration indicates a compromised deck that requires full replacement.
7. Interior Water Stains on Ceilings or Walls
Water stains on interior ceilings ,particularly brown ring stains or discoloration near exterior walls and chimneys ,indicate active water infiltration through the roof system. The moisture source may not be directly above the stain; water travels along roof framing members before dripping. A single, clearly localized leak (e.g., around a chimney or vent pipe) may be a repair. Multiple stain locations or diffuse ceiling discoloration suggests the underlayment has failed and water is entering at multiple points ,a replacement signal.
8. Mold, Mildew, or Moss Growth on Roof Surface
Surface algae (dark streaking) is a cosmetic issue addressable through roof pressure cleaning and biocide treatment. Moss with established root structures, however, traps moisture against the shingle surface and physically lifts shingle edges ,accelerating deterioration significantly. And mold detected in the attic insulation or on roof deck boards indicates moisture has been infiltrating the system for an extended period, likely requiring deck replacement as part of any full residential roof repair or replacement project.
9. Repeated Repairs Over the Past 3–5 Years
If you have called a residential roof repair contractor two or more times in the past three years for different issues on the same roof, the pattern itself is diagnostic. A roof that keeps failing in different locations is telling you it has reached systemic end of life. Add up what you have spent on those repeated repairs ,in many cases, homeowners discover they have paid 30–50% of replacement cost in piecemeal residential roof repairs over a two-to-three-year period.
10. Neighbors Are Replacing Their Roofs
This one surprises homeowners, but it’s a legitimate diagnostic signal. Homes in the same subdivision built in the same era typically have roofs installed within a few years of each other. When multiple neighbors begin replacing their roofs, it often signals that roofs of that age in that region are reaching end of life simultaneously. If three homes on your street have been re-roofed in the past 24 months and your home was built at the same time, a proactive inspection is strongly warranted.
Step-by-Step: How to Assess Whether You Need Residential Roof Repairs or Replacement
Apply the 50% Rule before signing any residential roof repair contract: if the repair estimate exceeds 50% of your full replacement cost, replacement is almost always the smarter long-term financial decision
Follow this assessment sequence before calling any contractor. Arriving informed saves you time, money, and the risk of being steered toward a more expensive solution than your roof actually needs.
Determine your roof’s age. Check your home purchase inspection report, permit records from your local building department, or contact the previous owner if purchased within the last 15 years. Age is your single most important data point ,everything else is context around it.
Conduct a ground-level visual inspection. On a clear day, walk around your home with binoculars and systematically inspect every visible roof slope. Look for curling, missing, or discolored shingle sections; moss or algae growth; sagging ridgelines; and lifted flashing at chimneys, skylights, and vent pipes. Photograph everything you see.
Inspect the attic on a bright day. Look for daylight penetration, water staining on the roof deck boards, wet or discolored insulation, and any visible mold on structural wood. These interior signs often reveal more than the exterior surface, particularly for slow leaks that have not yet produced visible ceiling staining.
Check your gutters after rain. Look for granule accumulation ,the dark sand-like mineral coating that washes off deteriorating shingles. Check gutter seams for brown staining indicating water overflowing at the roofline rather than channeling through the gutter system.
Apply the 50% Rule. Get a rough estimate of your local full replacement cost (use the table above as a baseline, adjusted for your home size). Calculate 50% of that figure. If any single repair estimate you receive exceeds that number, replacement is the financially rational choice.
Review your repair history. Pull together receipts for any residential roof repairs over the past five years. If total repair spending over that period exceeds $2,000–$3,000, or if you have had two or more separate repair calls in three years, the pattern strongly suggests systemic failure.
Get a professional inspection ,from an inspector, not a salesperson. A paid professional inspection ($150–$350) provides an independent assessment of remaining service life, specific damage documentation, and an honest repair-versus-replace recommendation. This is distinct from the “free inspection” offered by roofing contractors, which is a sales call ,a legitimate tool, but not a neutral assessment.
Obtain at minimum two contractor quotes. For residential roof repairs exceeding $1,000 or any replacement project, get two independent written quotes. Verify that both quotes are describing the same scope of work before comparing prices. The lowest bid that doesn’t specify materials by brand, weight, and warranty is not comparable to a detailed quote that does.
Residential Roof Repair Decision Checklist
Use this checklist after completing your assessment. The more items you check in the “Replace” column, the clearer the decision becomes.
✅ Signs That Support Residential Roof Repair
✅ Roof is under 12–15 years old with no previous repair history
✅ Damage is clearly isolated to one area or penetration point
✅ Surrounding shingles are in good condition with intact granule coverage
✅ No interior water staining detected in attic or ceilings
✅ Repair cost estimate is well under 50% of full replacement cost
✅ Roof has had no more than one previous repair in the last five years
✅ Damage is from a single, discrete weather event with otherwise sound surroundings
✅ Attic inspection shows no evidence of deck rot, mold, or structural damage
🚩 Signs That Indicate Replacement Over Repair
🚩 Roof is 20+ years old (asphalt shingles); 50+ years (metal); 60+ years (tile with visible issues)
🚩 Curling, cupping, or clawing shingles visible across more than 20% of the surface
🚩 Heavy granule accumulation in gutters or visible bald patches on shingles
🚩 Two or more separate repairs performed in the past three years
🚩 Repair cost estimate exceeds 50% of full replacement cost
🚩 Interior water staining on ceilings in multiple locations
🚩 Visible sagging or structural deflection in the roofline
🚩 Mold or rot detected in attic deck boards or structural framing
🚩 Daylight visible through multiple points in attic inspection
🚩 Neighboring homes of similar age have recently undergone full replacement
💡 Insurance Tip: If your residential roof repair or replacement need was triggered by a storm, hail, wind, or fallen tree ,file a homeowner’s insurance claim before authorizing any repair work. Most standard homeowner’s policies cover storm-related roof damage. Have a public adjuster or your insurance company’s adjuster inspect the roof before any contractor performs repairs ,post-repair, the evidence your insurer needs to process the claim may no longer be visible.
Roof Lifespan by Material: When Does Repair Stop Making Sense?
Roofing Material
Average Lifespan
Repair Makes Sense
Replacement Threshold
3-Tab Asphalt Shingles
15–20 years
Under 10 years old
15+ years or any widespread damage
Architectural Asphalt Shingles
20–30 years
Under 15 years old
20–25+ years or systemic failure
Metal Roofing
40–70 years
Under 35 years old
50+ years or panel/coating failure
Clay / Concrete Tile
50–100 years
Under 40 years old
60+ years with underlayment failure
Wood Shake
20–30 years
Under 12 years old
20+ years or widespread rot/splitting
Natural Slate
100–150 years
Under 80 years old
Widespread slate delamination or deck failure
Source: Peak & Valley Roofing, Lapeyre Roofing 2026 guides, Sustainable Roof, roofing manufacturer warranty documentation. Lifespans assume standard installation in moderate U.S. climates ,coastal, high-UV, and freeze-thaw environments reduce effective service life by 15–25%.
How do I know if I need a roof repair or full replacement?
The clearest indicators for replacement over repair are: roof age over 20–25 years (for asphalt shingles), repair cost exceeding 50% of replacement cost, widespread shingle deterioration (curling, granule loss, or missing shingles across multiple areas), interior water staining in multiple ceiling locations, visible deck sagging, or two or more separate repair calls within the past three years. A professional inspection from an independent inspector ,not a contractor with a financial interest in the outcome ,is the most reliable way to get an objective answer.
How much does residential roof repair cost in 2026?
Residential roof repair costs in 2026 range from $300–$600 for minor repairs (replacing 1–5 shingles, resealing a pipe boot, fixing nail pops) to $800–$1,500 for major repairs (storm damage sections, valley flashing replacement, chimney flashing work) and $1,500–$3,500 for extensive repairs involving multiple damage zones or partial re-roofing of one slope. Full replacement ranges from $7,500–$18,000 for standard asphalt shingle roofs on a 2,000 sf home, with the national average around $9,500.
Can I repair a roof myself, or do I need a professional?
Minor residential roof repairs ,replacing a handful of damaged shingles, resealing a lifted flashing edge, or applying roofing cement around a pipe boot ,are DIY-feasible for homeowners comfortable working at height with fall protection on single-story homes with accessible roof pitch. Any repair involving structural damage, significant flashing work, valley repairs, or roofs steeper than 6:12 pitch should be performed by a licensed roofing contractor. Improper residential roof repair work that subsequently fails can void your homeowner’s insurance coverage for related damage claims.
Will my homeowner’s insurance cover roof repair or replacement?
Most standard homeowner’s insurance policies cover sudden, accidental damage from storms, hail, wind, and fallen trees ,but do not cover damage resulting from normal wear, age, or lack of maintenance. File your claim before authorizing any repair work; once repairs are made, the evidence the insurer needs to process the claim may no longer be visible. Policies vary significantly in how they calculate roof damage payments ,Replacement Cost Value (RCV) policies pay the full cost to replace, while Actual Cash Value (ACV) policies deduct depreciation based on roof age. Know which type of policy you hold before filing.
How long does a residential roof repair typically last?
The lifespan of a residential roof repair depends entirely on the condition of the surrounding roof system. A quality minor repair (shingle replacement, flashing seal) on a roof with 10+ years of remaining life can last the remainder of that roof’s service period without additional attention. The same repair on a 22-year-old roof may hold for 12–18 months before an adjacent area fails. A major repair on an otherwise sound roof adds 3–5 years of service life. An extensive partial re-roof adds 5–7 years ,but only on the replaced sections, while the remaining original material continues aging.
The question is never just whether your roof can be repaired ,it’s whether repairing it is the smartest use of the money you are about to spend. A roof that has been sending you warning signs for two years will keep sending them until you address the system, not just the symptoms.
The right residential roof repair decision ,whether that’s a targeted fix or a full replacement ,starts with an honest inspection and ends with a contractor who tells you what your roof actually needs, not what generates the biggest ticket.
🏠 Roofing Tips & Updates
Get free roofing advice, cost guides, and seasonal maintenance tips.
Roofing content specialist with 5+ years researching U.S. residential and commercial roofing. Has documented 200+ projects covering installation costs, material selection, contractor vetting, and DIY guides for homeowners across all climate zones.
Mobile Home Roof Repair: Common Problems & Solutions
Mobile home roof repair tackles unique challenges specific to manufactured homes, including flat or low-slope roofs prone to ponding water, metal roof screw failures, rubber membrane seam separation, and coating deterioration. Understanding mobile home roofing materials TPO, EPDM rubber, metal panels, and reflective coatings plus repair techniques for leaks, holes, and aging systems helps homeowners choose between DIY fixes, professional repairs, or full roof replacement.
This guide covers the most common mobile home roof problems, step-by-step repair methods, when to repair vs replace, mobile home roofing material options, cost breakdowns, and how to extend your roof’s lifespan.
Table of Contents
What makes mobile home roof repair different from traditional roofs
Mobile homes have unique roofing needs that require specific attention because they typically feature flat or low-slope roofs, lightweight construction, narrower roof spans, and factory-installed roofing systems designed for portability rather than permanence. Unlike traditional site-built homes with pitched roofs and asphalt shingles, mobile home roofing systems often use single-ply membranes (TPO, EPDM), metal panels, or specialized coatings applied directly over the roof structure.
These differences mean mobile home roof repair techniques, materials, and costs differ significantly from traditional residential roofing, and using the wrong approach can void warranties or create new problems.
Mobile home roof repair vs traditional roof repair: key differences
Mobile home roof repair requires different techniques, materials, and expectations than traditional site-built home roofing because of fundamental structural differences. Mobile homes typically use engineered wood trusses spaced wider apart (often 24–36 inches on center vs 16–24 inches for traditional homes), thinner roof decking (often 1/2-inch OSB or even metal panels), and lighter-weight framing designed to meet DOT transportation weight limits rather than permanent foundation standards. This lighter construction means mobile home roofs cannot support the weight of multiple roof layers you cannot simply install asphalt shingles over an existing rubber membrane the way you might overlay shingles on a traditional home, and walking on mobile home roofs requires more caution to avoid damaging thin decking or denting metal panels.
The flat or low-slope design common in mobile home roofing also creates drainage challenges that don’t exist with traditional pitched roofs, making ponding water and membrane-based waterproofing systems the norm rather than the exception. Traditional roofing contractors may not understand these nuances using standard residential repair methods on a mobile home can void warranties, create new leaks, or even damage the roof structure, so it’s essential to hire roofers with specific mobile home roofing experience or carefully research mobile-home-appropriate repair techniques before attempting DIY work. Understanding these differences helps you avoid costly mistakes and ensures your mobile home roof repair delivers long-lasting results rather than temporary fixes that fail within months.
Common mobile home roof problems (and what causes them)
Understanding the root causes of mobile home roof issues helps you catch problems early and choose the right repair strategy.
Problem #1: Roof leaks
Leaks are one of the most common issues with mobile home roofs and can be caused by damaged shingles, cracks in the roof, worn sealant around roof penetrations (vents, skylights), seam separation in rubber or TPO membranes, or screw/fastener failures in metal roofs. On metal roofs, leaks primarily occur at roofing screws used to attach panels to the frame, as screw design, installation method, and angle significantly impact roof performance over time.
Problem #2: Ponding water and poor drainage
Flat or low-slope mobile home roofs are susceptible to ponding water standing water that remains on the roof surface for more than 48 hours after rainfall. Ponding water accelerates roof membrane deterioration, increases leak risk, and adds weight that can stress the roof structure.
Problem #3: Seam separation and membrane tears
Single-ply roofing membranes like TPO and EPDM rely on heat-welded or adhesive seams to create watertight barriers. Over time, seams may separate due to thermal expansion/contraction, improper installation, or UV degradation, allowing water to infiltrate under the membrane. Punctures and tears from foot traffic, falling branches, or hail create immediate leak points.
Problem #4: Metal roof screw and fastener issues
Metal roofing screws and fasteners are the most common leak source on mobile home metal roofs because rubber washers degrade over time, creating openings for moisture. Defective screws with misaligned threads or breakage, missing sealants at screw holes and panel seams, overlapping seams where liquid can pool, and misplaced screws (such as strays used for wood framing) all contribute to leaks.
Problem #5: Coating deterioration and blistering
Reflective roof coatings (elastomeric, acrylic, silicone) extend mobile home roof life but eventually crack, peel, or blister from UV exposure, temperature cycling, and moisture trapped under the coating. Blistering occurs when moisture or air gets trapped between roofing layers, creating bubble-like raised areas that weaken the roof surface.
Problem #6: Flashing problems
Flashing around vents, chimneys, skylights, and roof edges prevents water intrusion at vulnerable transitions. Poorly installed, missing, or degraded flashing is a major cause of mobile home roof leaks, especially around penetrations.
Mobile home roofing materials: options for repair and replacement
Choosing the right mobile home roofing material depends on your budget, climate, roof slope, and whether you’re repairing or replacing.
TPO (Thermoplastic Olefin) roofing
TPO Roofing Installation Guide
TPO is a white, single-ply roofing membrane made for flat and low-slope roofs, heat-welded at the seams to create a watertight, durable surface that’s great for mobile homes. TPO roofing reflects the sun’s UV rays, reducing heat absorption and cooling costs; is highly resistant to tears, punctures, and UV damage; and is environmentally friendly (often made from recyclable materials).
Cons: Color may fade over time, and seams may be prone to leaks if not installed properly.
Cost: $2,000–$12,000 for materials, $4,000–$20,000 installed (typical mobile home).
EPDM (rubber roofing)
EPDM (Ethylene Propylene Diene Monomer) is a durable synthetic rubber membrane popular for mobile home roofs because of its flexibility, weather resistance, and ease of installation. EPDM is available in black or white, with white reflecting more heat.
Cost: $2,000–$12,000 for materials, $4,000–$20,000 installed.
Metal roofing (steel, aluminum)
20 Ft Metal Roofing
Metal roofs typically corrugated steel or aluminum panels are common on older mobile homes and offer long lifespan (40+ years) and fire resistance. However, metal roofs require regular maintenance to address screw/fastener issues and prevent rust.
Cost: $5–$16 per square foot installed (varies widely by gauge and profile).
Roof coatings and sealants
Roof coating systems (elastomeric, acrylic, silicone) are applied over existing mobile home roofs to seal minor cracks, reflect heat, and extend roof life by 5–15 years. Reflective systems and properly installed materials can help reduce heat buildup and ease the load on air conditioning.
Cost: $250–$5,400 for materials, $500–$9,000 installed.
How to repair a mobile home roof: step-by-step DIY methods
Many common mobile home roof repair jobs can be handled by homeowners with basic tools and materials.
To repair a hole in a metal mobile home roof, clean the area, apply butyl tape, place a metal patch, screw it down, and seal edges with caulk.
Repairing a leaky mobile home roof (general method)
To repair a leaky mobile home roof, follow these steps: locate the leak (check inside for water stains, then trace outside to the source), clear debris from the repair area, remove damaged shingles or membrane sections if needed, install underlayment or patch material, and cut new shingles or membrane to match existing materials.
Repairing a hole in a metal mobile home roof
For holes created by falling tree limbs, large hail, or rust-through, this patch method is straightforward and effective. Clean the area around the hole thoroughly, apply butyl tape around the perimeter of the hole, cut a metal patch slightly larger than the hole, place the metal patch on butyl tape, screw along the perimeter into the tape and roofing, apply caulk along the edges of the patch, and apply liquid sealants or roof cement for additional waterproofing.
Fixing metal roof screw and fastener leaks
Metal roof repairs typically use liquid sealants and roof cement. To address screw leaks: inspect all visible screws for missing or cracked rubber washers, remove screws with failed washers and replace with new roofing screws with fresh neoprene washers, apply sealant around screw heads, and check overlapping seams and apply sealant tape or caulk where panels meet.
Most mobile home repair professionals recommend using neoprene or polyurethane flashing sealant to seal seams and vents.
Repairing TPO or EPDM membrane seams
For seam separation on rubber or TPO roofs: clean both sides of the separated seam with membrane cleaner, apply TPO or EPDM seam primer (match to your membrane type), apply seam tape or adhesive per manufacturer instructions, press firmly with a roller to ensure full contact, and allow proper cure time before exposing to water.
Seams in TPO roofing systems may be prone to leaks if not installed properly, so regular maintenance is required to check for seam deterioration.
Temporary flat roof leak fixes
To temporarily fix a leaking flat mobile home roof: apply bitumen primer to the damaged area, apply bitumen-based waterproof sealant or paint over the primer, and for larger cracks, use self-adhesive heat-applied bitumen flashing tape or fit a torched-on layer of roofing felt. These temporary fixes prevent further damage while you plan a permanent repair or replacement.
When to repair vs replace a mobile home roof
Deciding between mobile home roof repair and full replacement depends on age, damage extent, and cost-benefit analysis.
Repair makes sense when:
Leaks or damage are localized (small areas, single penetrations).
The roof is less than 15 years old and otherwise in good condition.
Repair cost is less than 30% of replacement cost.
The roof is over 20 years old (near end of design life).
Membrane or coating has widespread cracking, blistering, or delamination.
Repair costs approach 40–50% of replacement cost.
You’re selling soon and need a warranty to transfer to buyers.
Mobile home roof replacement cost (2026 pricing)
Understanding mobile home roof replacement cost helps you budget for the project and compare contractor bids.
Mobile home roofing options include TPO ($4,000–$20,000 installed), EPDM rubber ($4,000–$20,000), and metal ($6,000–$16,000)
Cost per square foot
Mobile home roof replacement costs $3 to $8 per square foot on average, depending on the type and material.
Cost factor
Price per square foot
Remove old roof
$1.00–$2.00
Roof materials
$2.00–$4.50
Installation labor
$1.00–$3.50
Total cost
$4.00–$10.00
Total project cost by roof type
For a typical single-wide mobile home (600–800 square feet of roof area):
Roofing material
Material cost
Installed cost
TPO roofing membrane
$2,000–$12,000
$4,000–$20,000
Rubber roofing (EPDM)
$2,000–$12,000
$4,000–$20,000
Metal roofing
$3,000–$9,600
$6,000–$16,000
Roof coating & sealing
$250–$5,400
$500–$9,000
A mobile home roof-over (installing new roof material over the existing roof) costs $1,000 to $4,500 on average, saving money by avoiding tear-off but potentially decreasing the roof’s lifespan.
Mobile home roof coating: a cost-effective repair option
Roof coating systems are popular for mobile home roof repair because they’re affordable and extend roof life without full replacement.
How roof coatings work
Elastomeric, acrylic, or silicone coatings are rolled or sprayed over an existing mobile home roof to seal cracks, reflect UV rays, reduce heat absorption, and waterproof the surface. Coatings can be applied over metal, rubber (EPDM), TPO, or built-up roofs.
Benefits of roof coatings
Lower cost: $500–$9,000 installed vs $4,000–$20,000 for full replacement.
Energy savings: Reflective coatings reduce cooling costs by lowering roof surface temperature.
Extends roof life: Adds 5–15 years to an aging roof.
Minimal disruption: Can be completed in 1–3 days with no tear-off.
Limitations of roof coatings
Coatings work best on structurally sound roofs with minor surface damage; they cannot fix deep cracks, structural issues, or widespread rot. Proper surface preparation (cleaning, priming) is critical for coating adhesion.
Mobile home roof maintenance: preventing future repairs
Proactive maintenance reduces mobile home roof repair frequency and extends roof life.
Annual inspection checklist
Inspect seams for separation or lifting (TPO, EPDM roofs).
Check all roofing screws and fasteners for rust, loose washers, or missing sealant (metal roofs).
Look for ponding water areas after rain; address drainage issues immediately.
Examine flashing around vents, skylights, and edges for cracks or gaps.
Clear debris (leaves, branches) from the roof surface and gutters.
Routine maintenance tasks
Reseal vents and penetrations every 3–5 years with compatible sealant.
Refresh roof coatings every 5–10 years (if using a coating system).
Replace deteriorated rubber washers on metal roofing screws before leaks develop.
Trim overhanging tree branches to prevent physical damage and debris accumulation.
Preventive mobile home roof repair: catching problems before they become emergencies
The most cost-effective mobile home roof repair is the one you prevent through regular inspection and proactive maintenance, because catching small issues early a single loose screw, a tiny seam separation, a small blister in the coating costs pennies to fix, while ignoring them leads to interior water damage, insulation replacement, and ceiling repairs that can cost thousands. Set a recurring calendar reminder to inspect your mobile home roof every spring and fall, focusing on the most vulnerable areas: all seams in TPO or EPDM membranes (especially where field sheets meet perimeter edges), every roofing screw on metal roofs (look for rust stains, missing washers, or screws that have backed out), flashing around vents and skylights (check for cracks or gaps), and any areas where ponding water collects after rain (mark these spots and monitor whether pooling is getting worse).
During each inspection, bring a notepad and camera to document conditions so you can track changes over time a small crack that grows from 2 inches to 8 inches between inspections signals the need for immediate mobile home roof repair before it becomes a full breach. Keep a basic mobile home roof repair kit on hand: a tube of mobile-home-compatible roof sealant (polyurethane or butyl-based), spare roofing screws with neoprene washers (match the size and thread pattern of your existing screws), a roll of TPO or EPDM seam tape (matched to your membrane type), and basic tools (caulk gun, drill, utility knife). With this kit and a twice-yearly inspection routine, you can address 80% of common mobile home roof problems before they cause interior damage, extending your roof’s lifespan by years and avoiding emergency repair calls that cost 3–5 times more than preventive maintenance.
DIY vs professional mobile home roof repair
Some mobile home roof repair jobs are DIY-friendly, while others require professional expertise.
Good DIY candidates
Small isolated leaks and patches (under 2 square feet).
Screw/fastener replacement and re-sealing.
Minor seam repairs with tape or adhesive.
Applying roof coatings (if you have spray equipment or patience for rolling).
Hire professionals for
Full roof replacement or roof-overs.
TPO heat welding (requires specialized tools and training).
Structural repairs or deck replacement.
Complex flashing work around HVAC units or dormers.
Repairs that affect warranties.
FAQ: mobile home roof repair
What are the most common mobile home roof problems?
The most common issues include leaks from damaged membranes or screw failures, ponding water on flat roofs, seam separation in TPO/EPDM systems, coating deterioration, and flashing problems around penetrations.
How much does mobile home roof repair cost?
Small repairs (patching, sealing) cost $200–$1,500; coating systems cost $500–$9,000; full replacement costs $4,000–$20,000 depending on material and size.
Can I repair a mobile home roof myself?
Yes small leaks, metal roof patches, screw replacement, and seam repairs are DIY-friendly, but full replacement or TPO heat welding requires professional skills.
How long does a mobile home roof last?
TPO and EPDM roofs last 15–30 years; metal roofs last 30–50 years; roof coatings add 5–15 years to existing roofs.
What is the best roofing material for mobile homes?
TPO is popular for energy efficiency and durability; EPDM is cost-effective and flexible; metal is longest-lasting but requires maintenance.
How do I fix a leaking metal mobile home roof?
Locate the leak, clean the area, replace screws with failed washers, apply sealant around screw heads and seams, or patch holes with metal and butyl tape.
What causes ponding water on mobile home roofs?
Ponding water results from inadequate roof slope, clogged drains, sagging roof deck, or poor initial design.
Should I repair or replace my mobile home roof?
Repair if damage is localized and the roof is under 15 years old; replace if multiple leaks exist, the roof is over 20 years old, or repairs cost more than 40% of replacement.
What is a mobile home roof-over?
A roof-over installs new roofing material over the existing roof, costing $1,000–$4,500 and avoiding tear-off, but it may reduce roof lifespan.
How often should I inspect my mobile home roof?
Inspect at least once per year and after major storms to catch leaks, seam separation, and fastener issues early.
🏠 Roofing Tips & Updates
Get free roofing advice, cost guides, and seasonal maintenance tips.
Roofing content specialist with 5+ years researching U.S. residential and commercial roofing. Has documented 200+ projects covering installation costs, material selection, contractor vetting, and DIY guides for homeowners across all climate zones.
Adhesive for Roof Shingles: Types, Brands & How to Apply
Adhesive for roof shingles falls into three main categories: factory-applied self-sealing strips (standard on most asphalt shingles), asphalt roof cement for repairs and hand-sealing, and specialty caulks or polyurethane sealants for small fixes and flashing. Understanding the best way to adhere shingles to a roof whether you’re installing new shingles, repairing lifted tabs, or hand-sealing for high winds requires knowing which adhesive type matches your roofing materials, temperature conditions, and performance needs.
This guide explains what each adhesive type does, when to use asphalt roof cement vs caulk, how to apply adhesive correctly, common mistakes that cause premature failure, and standards like ASTM D4586 that define quality roofing adhesives.
Table of Contents
What is adhesive for roof shingles (and why it matters)
Adhesive for roof shingles serves two critical jobs: bonding shingles to each other (shingle-to-shingle seal) and bonding shingles or flashing to roof decks or substrates. Most modern asphalt shingles rely on a factory-applied self-sealing adhesive strip activated by heat from the sun, which is the primary defense against wind uplift.
IBHS wind testing demonstrates that the most important factor affecting high-wind performance for self-sealing asphalt shingles is the strength of the seal between shingles, and that seal depends on the temperature-activated adhesive strip applied during manufacturing. When that factory seal isn’t enough steep slopes, cold climates, or repair situations you’ll need the right supplemental adhesive for roof shingles to maintain wind resistance and prevent leaks.
Types of adhesive for roof shingles
Different applications require different adhesives, and using the wrong type can accelerate weathering or cause bond failure.
Factory self-sealing adhesive strips
Self-sealing asphalt shingles contain a temperature-activated adhesive strip applied during manufacturing, which adheres the lower-edge bottom surface of the exposed top shingle to the top surface of the shingle below. This strip typically activates when ambient temperatures exceed 60–80°F and forms a strong bond within days to weeks of installation.
The seal strength directly impacts wind ratings shingles tested under ASTM D3161 or D7158 achieve Class D (90 mph), Class F (110 mph), or Class H (150 mph) ratings based on how well the adhesive holds during sustained wind exposure.
Asphalt roof cement (plastic cement)
Asphalt roof cement often called plastic roof cement is a trowel-grade adhesive for roof shingles used for hand-sealing, repairs, and flashing applications. ASTM D4586 is the standard specification for asbestos-free asphalt roof cement and covers two types and two classes:
Type I: Made from asphalts characterized as self-healing, adhesive, and ductile.
Type II: Made from asphalt with high softening point and relatively low ductility.
Class I: For application to essentially dry surfaces.
Class II: For application to damp, wet, or underwater surfaces.
Asphalt roof cement meeting ASTM D4586 is the go-to adhesive for roof shingles when you need to bed patches, seal lifted tabs, or bond flashing.
Roofing caulk and polyurethane sealants
For small punctures, gaps around penetrations, or minor shingle edge repairs, roof-grade polyurethane or butyl sealants offer flexibility and adhesion to asphalt substrates. These products are typically applied with a caulk gun and cure faster than trowel-grade asphalt cement, but they must be labeled for roofing use and compatible with asphalt shingles.
Avoid general-purpose silicone or acrylic sealants that do not bond chemically to asphalt and can cause accelerated weathering.
Best way to adhere shingles to a roof: installation vs repair
The best adhesive strategy depends on whether you’re installing new shingles or repairing existing ones.
New shingle installation (factory sealant strips)
For standard new installations, the factory self-sealing strip is the primary adhesive for roof shingles, and proper nailing is what holds shingles until the strip activates. Nails should be placed just below the sealant strip to ensure the next course of shingles covers and protects nail heads.
Correct placement of asphalt nails in the manufacturer’s nailing zone helps shingles resist wind uplift and perform as designed.
In high-wind zones (110+ mph wind regions) or on steep slopes (greater than 12:12 or 45 degrees), manufacturers and ARMA recommend hand-sealing shingles with asphalt roof cement in addition to the factory strip. Despite these recommendations, hand-sealing is not common practice, which can lead to premature failures in these conditions.
Repairing lifted or damaged shingles
When repairing lifted tabs, cracked shingles, or torn edges, the best way to adhere shingles to a roof is with polymer-modified asphalt roof cement or roof-grade polyurethane sealant compatible with asphalt.
Steps for a reliable repair:
Clean the area of loose granules and debris.
Lift shingle tabs gently with a flat tool.
Force the sealant under tabs or apply trowel-grade roof cement to bed a patch shingle.
Press firmly and weight or nail as needed.
Allow proper curing time before exposure to water.
How to apply adhesive for roof shingles (step-by-step)
Correct application technique makes the difference between a repair that lasts years and one that fails in the next storm.
Self-sealing asphalt shingles contain a temperature-activated adhesive strip that bonds shingles together and provides wind resistance.
Surface preparation
Clean the repair area of loose granules, dirt, moss, and old sealant residue so the new adhesive bonds properly. Even asphalt roof cement rated for damp surfaces (ASTM D4586 Class II) performs better on clean, dry substrates.
Temperature and timing
Apply when shingles are dry and ambient temperature is within the product’s recommended range typically above 40°F for many asphalt-based cements. Cold temperatures slow curing and reduce bond strength, while excessive heat can make the adhesive too fluid to stay in place.
Follow manufacturer curing times before exposing the repair to water; most asphalt roof cements need 24–72 hours to develop full bond strength.
Application technique
For lifted shingle tabs, apply a small bead of adhesive under the tab and press firmly. For torn shingles, use trowel-grade roof cement to bed a patch shingle or dress seams, applying an 1/8 to 1/4 inch thickness. Feather the edges smooth to avoid visible lumps and reduce water pooling.
Avoid over-application
Excess adhesive that squeezes out from under shingles can attract dirt, become visible, and look unsightly. Use only as much adhesive as needed to achieve a bond more is not better.
ASTM D4586: the standard for asphalt roof cement quality
ASTM D4586 is the specification that defines composition, workability, and performance requirements for asbestos-free asphalt roof cement.
Composition limits
Asphalt roof cement complying with ASTM D4586 must meet strict limits for water content (max 3.0%), nonvolatile content (min 70%), and bitumen (asphalt) content. It consists of an asphalt base, volatile petroleum solvents, and mineral and/or other stabilizers, mixed to a smooth, uniform consistency suitable for trowel application.
Physical requirements
The standard requires the cement to be uniform, workable, and pliable, and specifies behavior at given temperatures to ensure it performs across a range of climates. Products that meet ASTM D4586 Type 1 are labeled as such, giving contractors and homeowners confidence in quality.
Why ASTM D4586 matters for adhesive selection
When choosing adhesive for roof shingles, look for products labeled ASTM D4586 Type I or Type II so you know you’re getting a tested, standardized formulation. Generic “tar” or unlabeled products may not meet these standards and can fail prematurely.
Hand-sealing shingles in high-wind and cold-weather conditions
Even though factory sealant strips are standard, certain conditions require supplemental hand-sealing with adhesive for roof shingles.
When hand-sealing is recommended
ARMA and shingle manufacturers typically recommend hand-sealing for:
Slopes greater than 12:12 (45 degrees).
Very cold weather installations where factory strips may not activate before winter storms.
High-wind zones (110+ mph design wind speeds).
Despite these recommendations, hand-sealing of self-sealing asphalt shingles is not common practice for winter or steep-slope installations, which increases blow-off risk.
How to hand-seal shingles
Apply a small dab (quarter-size) of asphalt roof cement under each shingle tab at the locations where the factory sealant strip would normally bond. Press the tab down firmly and allow the cement to cure before exposing the roof to wind or rain.
Hand-sealing adds labor time and material cost but dramatically improves wind resistance and is the best way to adhere shingles to a roof in challenging conditions.
Common mistakes when using adhesive for roof shingles
These errors cause repairs to fail and adhesive bonds to break prematurely.
Look for adhesive for roof shingles that meets ASTM D4586 standards to ensure tested, reliable performance.
Using the wrong adhesive type
General-purpose silicone, acrylic caulks, or household sealants do not bond chemically to asphalt and can cause accelerated weathering. Always use roofing-specific asphalt-compatible sealants that explicitly state compatibility with asphalt shingles.
Applying in cold or wet conditions
Applying asphalt roof cement below the manufacturer’s minimum temperature (often 40°F) or to wet surfaces reduces bond strength and extends cure time. If you must work in marginal conditions, choose an ASTM D4586 Class II product rated for damp or wet surfaces.
Skipping surface preparation
Loose granules, dirt, moss, and old sealant prevent proper adhesion. Even a few seconds spent cleaning the repair area significantly improves bond durability.
Over-relying on adhesive instead of nails
Adhesive for roof shingles supplements proper nailing it doesn’t replace it. Factory sealant strips and hand-sealing cement work with correctly placed nails to resist wind uplift; adhesive alone cannot hold shingles under sustained wind loads.
Adhesive for metal roofing vs asphalt shingles
While this guide focuses on adhesive for asphalt shingles, it’s worth noting that metal roofing uses different adhesive systems.
Metal roofs typically rely on butyl tape sealants at panel seams and silicone or polyurethane caulks at penetrations and trim, not asphalt-based cements. If you’re working on a mixed roof (metal flashing over asphalt shingles), verify that your adhesive is compatible with both substrates or use a product specifically designed for dissimilar materials.
How long does adhesive for roof shingles last?
Adhesive lifespan depends on product type, application quality, and exposure conditions.
Factory sealant strips
Properly activated factory sealant strips last the life of the shingle (20–50 years) when installation and climate conditions are favorable. Shingles installed in very cold climates or on north-facing slopes may experience slower or incomplete seal activation, reducing wind resistance.
Asphalt roof cement repairs
Trowel-grade asphalt roof cement repairs can last 5–15 years depending on exposure, UV degradation, and thermal cycling. Polymer-modified cements generally outlast unmodified formulations.
Caulk and sealant repairs
Roof-grade polyurethane and butyl sealants typically last 10–20 years when properly applied, but may require reapplication sooner in harsh climates with extreme temperature swings.
FAQ: adhesive for roof shingles
What is the best adhesive for roof shingles?
For new installations, factory self-sealing strips are standard; for repairs and hand-sealing, asphalt roof cement meeting ASTM D4586 is the best adhesive for roof shingles.
Can I use regular caulk on roof shingles?
No general-purpose silicone or acrylic caulks do not bond chemically to asphalt and can cause accelerated weathering; use roof-grade polyurethane or asphalt-compatible sealants.
What is ASTM D4586?
ASTM D4586 is the standard specification for asbestos-free asphalt roof cement, covering composition, workability, and performance requirements.
When should I hand-seal shingles?
Hand-sealing is recommended for slopes greater than 12:12, cold-weather installations, and high-wind zones (110+ mph).
How do self-sealing shingles work?
Self-sealing shingles contain a temperature-activated adhesive strip that bonds the shingle above to the shingle below when heated by the sun.
What temperature do I need to apply asphalt roof cement?
Most asphalt roof cements require ambient temperatures above 40°F for proper application and curing.
How long does asphalt roof cement take to cure?
Asphalt roof cement typically needs 24–72 hours to develop full bond strength before exposure to water.
Can I apply adhesive to wet shingles?
ASTM D4586 Class II asphalt roof cement is rated for damp, wet, or underwater surfaces, but performance is best on dry, clean substrates.
How do I remove old roof cement from shingles?
Old, hardened asphalt cement can be softened with mineral spirits or a specialized remover, then scraped carefully to avoid damaging shingles.
Does adhesive replace nails on roof shingles?
No adhesive for roof shingles supplements proper nailing; it does not replace it.
🏠 Roofing Tips & Updates
Get free roofing advice, cost guides, and seasonal maintenance tips.
Roofing content specialist with 5+ years researching U.S. residential and commercial roofing. Has documented 200+ projects covering installation costs, material selection, contractor vetting, and DIY guides for homeowners across all climate zones.
Getting Rid of Ice Dams on Roof: Safe Removal Guide
Getting rid of ice dams on roof is possible without wrecking your shingles start by removing snow near the eaves with a roof rake, then melt drainage channels through the dam using calcium chloride (in a nylon stocking/sock) instead of chopping ice with tools. A roof ice dam forms when snow melts higher up the roof, runs down to colder eaves, refreezes, and creates an ice “wall” that traps water; the backed-up water can leak under shingles and into your home.
This guide is written for U.S. homeowners dealing with winter storms and freeze-thaw cycles: you’ll learn what a roof ice dam is, how to spot it early, the safest DIY steps for getting rid of ice dams on roof, when to call pros, what to do if you already have interior leaks, and how to prevent roof ice dam problems long-term through air sealing, insulation, ventilation, and ice-dam protection layers at the eaves.
Table of Contents
What is a roof ice dam?
A roof ice dam is a ridge of ice that forms along the roof edge (often at the gutters) when melted snow refreezes at the colder eaves and blocks water from draining off the roof. The trapped water pools behind the ice dam and can work its way under shingles and into the roof deck, leading to leaks, stained ceilings, wet insulation, and mold risk.
In many U.S. climates, roof ice dam issues appear after heavy snow followed by sunny days and nighttime freezing classic freeze‑thaw conditions that repeatedly melt and refreeze water at the eaves. If you’re focused on getting rid of ice dams on roof, remember: the ice is the symptom, but heat loss + refreezing at the eaves is the mechanism you must stop.
completed snow guard installation on residential metal roof
Why ice dams happen (root causes)
A roof ice dam almost always requires two things: heat that melts snow higher up, and a cold roof edge where water refreezes. That heat typically comes from attic heat loss warm air leaks from the home into the attic and warms the roof deck above it.
Building Science guidance emphasizes the three best ways builders combat ice dam formation: air seal the ceiling plane, thoroughly insulate the attic, and ventilate the roof to keep the roof deck cold. University extension-style guidance likewise stresses sealing air leaks first, then increasing insulation thickness, and improving ventilation to maintain a cold roof surface.
Signs you have an ice dam (and when it’s urgent)
You may need immediate action for getting rid of ice dams on roof if you see any of these:
Thick ice buildup along the eaves/gutters, often with icicles forming.
Water stains, bubbling paint, or wet drywall on exterior walls/ceilings (especially near eaves).
Drips coming from soffits or behind gutters, indicating water is backing up.
Damp attic insulation or visible moisture on roof sheathing above living spaces.
If interior leaking is active, treat it as urgent: stop water damage inside (buckets, towels, dehumidification) and start safe roof ice dam mitigation immediately.
Getting rid of ice dams on roof: the safest DIY methods
Getting rid of ice dams on roof
The safest DIY goal is not “remove every bit of ice”; it’s to restore drainage so trapped water can escape.
1) Rake snow 3–4 feet from the roof edge
Travelers recommends using a roof rake to remove snow 3–4 feet from the edge of your roof, being careful not to damage the roof covering. This reduces the amount of meltwater that will run down and refreeze at the eaves and can slow the growth of a roof ice dam.
Tips that reduce roof damage risk:
Pull snow downward gently; don’t scrape aggressively on shingles.
Stand clear of falling snow/ice zones.
Avoid piling snow where it blocks exits or walking paths, as Travelers cautions.
2) Melt a channel through the dam using calcium chloride “socks”
A calcium chloride-filled nylon stocking placed vertically across the dam can melt a channel so trapped water can drain off the roof.
Travelers and The Hanover both recommend using calcium chloride ice melt (not rock salt/sodium chloride) placed in a nylon stocking to melt a channel through the ice dam. Travelers’ steps: fill a nylon stocking with calcium chloride and position it vertically across the ice dam so it melts a channel through which water can flow.
Key points for getting rid of ice dams on roof using this method:
Use calcium chloride; Travelers warns against rock salt/sodium chloride because it can damage your roof.
Place the stocking vertically across the dam so it melts a drain path to the roof edge.
Keep people away from the drop zone because chunks can release unexpectedly.
3) Keep gutters and downspouts clear (when safe)
ARMA’s ice dam protection bulletin notes gutters and downspouts should be free of debris, and gutter edges should be lower than the roof’s slope line to help snow and ice slide clear. During active winter conditions, only clear gutters if you can do it safely from the ground or a stable ladder with proper precautions.
4) When to use a professional steam service
If you have a large, dense roof ice dam or repeated interior leaks, professional ice dam removal using steam can reduce damage risk compared to chiseling or hammering. Steam removal is especially useful when homeowners can’t safely access the roof edge or when the dam is too thick for calcium chloride channeling to keep up.
5) Getting rid of ice dams on roof without damaging shingles
Getting rid of ice dams on roof should focus on restoring drainage, not smashing ice. Travelers’ guidance emphasizes a safer approach: rake snow back from the roof edge and melt a channel through the dam using calcium chloride in a nylon stocking. This avoids the most common DIY mistake chipping ice with tools which can tear shingles and create new leak points that cost more than the original roof ice dam problem.
If you only do one thing today, reduce the snow load near the eaves. Travelers recommends removing snow 3–4 feet from the roof edge using a roof rake while being careful not to damage the roof covering. Less snow at the edge means less meltwater feeding the dam, which makes every other method work faster.
6) Roof ice dam “calcium chloride sock” method (details people skip)
The calcium chloride sock method works because it creates a vertical melt channel that lets trapped water escape. Travelers’ steps are simple: fill a nylon stocking with calcium chloride ice melt and position it vertically across the ice dam to melt a channel through the ice. They also warn not to use rock salt/sodium chloride because it can damage your roof.
Protect landscaping while you’re getting rid of ice dams on roof. Travelers recommends covering shrubbery and plants near gutters/downspouts with lightweight tarps while the calcium chloride stockings remain in place, since calcium-chloride-saturated water dripping off the roof may damage plants. This small step prevents a roof ice dam repair from turning into dead landscaping in spring.
7) When to stop DIY and call a pro
If you can’t safely reach the roof edge, don’t force it. Travelers explicitly warns that using a ladder in snowy and icy conditions may be dangerous and suggests hiring a contractor if you cannot safely reach the roof. For severe or recurring roof ice dam situations especially with active interior leaking professional removal can reduce both injury risk and roof damage compared to aggressive DIY attempts.
What NOT to do (common mistakes that damage roofs)
If your priority is getting rid of ice dams on roof without causing expensive roof repair, avoid these:
Do not chip or hammer ice with sharp tools (risk: shingle damage, punctures, leaks).
Do not use rock salt (sodium chloride); Travelers warns it can damage your roof.
Do not climb on an icy roof; falls are a major winter hazard, and safe removal methods emphasize ground-based work where possible.
Do not ignore active leaks; the longer water backs up behind a roof ice dam, the higher the chance of hidden damage.
If you already have a leak: emergency interior steps
Getting rid of ice dams on roof goes faster when you also reduce indoor moisture and limit damage.
Catch dripping water with buckets and protect floors.
Use fans and a dehumidifier to slow mold growth in wet materials.
If you can access the attic safely, place a container under drips and avoid disturbing wet insulation until leak stops.
Once conditions improve, document damage for insurance and repair planning.
Permanent fixes: stop ice dams from coming back
Temporary removal solves today’s roof ice dam, but prevention is what saves money long-term.
Air sealing (the #1 long-term fix)
Building Science guidance states the first best way to combat ice dams is to fully air seal the ceiling plane. Air sealing reduces warm air escaping into the attic, which lowers roof deck temperatures and reduces melting that creates the dam cycle.
High-impact air leak points to seal:
Attic hatches and pull-down stairs.
Plumbing stacks and vent chases.
Recessed can lights and wiring penetrations.
Top plates of exterior walls (where accessible).
Add attic insulation (after air sealing)
Keeping the roof deck cold by air sealing the ceiling plane, adding insulation, and maintaining ventilation is a proven strategy to reduce ice dam formation.
Building Science guidance lists thorough attic insulation as a top strategy to combat ice dams because it reduces heat transfer to the roof deck. University extension-style guidance also recommends increasing insulation thickness after sealing air leaks.
A well-insulated attic keeps the roof surface colder, so snow doesn’t melt unevenly and refreeze at the eaves.
Improve ventilation (keep the roof deck cold)
Building Science guidance emphasizes ventilating the roof assembly to keep it cool and minimize snow melt that leads to ice dams. This typically means ensuring soffit-to-ridge airflow is not blocked by insulation and using baffles to maintain a clear ventilation path.
Missouri Extension guidance provides a rule-of-thumb ventilation target at least 2 square feet of attic vent per 150 square feet of attic area and notes the need for clearance between roof sheathing and ceiling insulation at the eaves to allow ventilation.
Install ice-dam protection at the eaves during reroofing
ARMA recommends installing an ice dam protection layer along eaves and notes that self-adhering membranes (ice and water shield style) are commonly used, with an alternative of two layers of asphalt-saturated felt cemented together depending on manufacturer instructions and local code. Even if a roof ice dam forms, this eave protection helps keep backed-up water from reaching the roof deck.
Roof repair after an ice dam (what to inspect)
After getting rid of ice dams on roof, plan a targeted inspection as soon as it’s safe:
Shingle edges along the eaves (lifting, cracking, missing granules).
Flashing at valleys, chimneys, and roof-to-wall joints (common leak paths during backup).
Gutters and fascia damage from heavy ice loads.
Attic insulation condition (wet insulation loses performance and can contribute to repeat ice dams).
If you see recurring roof ice dam problems, treat it as a building envelope issue (air leakage + insulation + ventilation), not just a roof surface issue.
Why ice dams keep coming back (the real reason)
Getting rid of ice dams on roof is temporary if warm air keeps leaking into the attic. Building-science guidance explains that air sealing the ceiling plane, adding insulation, and ensuring roof ventilation are key measures to prevent ice dams because they help keep the roof deck cold and reduce uneven snowmelt. If you only remove the ice but ignore heat loss, you often end up repeating the same roof ice dam cycle after the next snowfall.
Ventilation and gutter setup (often overlooked)
ARMA’s bulletin notes you should keep gutters and downspouts free of debris and that the outer edges of gutters should be lower than the roof’s slope line so snow and ice can slide clear. It also points out the importance of unobstructed airflow at the eaves to support ventilation. These details matter because clogged gutters and blocked airflow both increase the chance that a roof ice dam will build and hold water at the eaves.
The “ice barrier” that protects roofs when dams form
Even with good insulation and ventilation, some climates still see roof ice dam events during harsh winters. ARMA recommends installing an ice dam protection layer along eaves to protect against leakage from ice dams should they form. ARMA also notes building codes (IBC/IRC and others) require an ice barrier in areas with a history of ice forming along eaves and causing water backup.
For reroofing projects, ARMA describes one common approach: a polymer-modified bitumen self-adhering underlayment that complies with ASTM D1970 in the U.S. ARMA recommends this ice dam protection extend at least 24 inches (610 mm) inside the interior wall line of the building, while also noting some jurisdictions require more or less and that you must follow local code and manufacturer instructions.
Quick homeowner inspection after getting rid of ice dams on roof
After you’ve started getting rid of ice dams on roof, check for warning signs indoors so you can limit damage early. Look for new water stains on ceilings near exterior walls, damp attic insulation, or dripping around soffits these can indicate backup water is getting past roofing layers. If you spot moisture, keep documenting it and prioritize permanent fixes (air sealing + insulation + ventilation) so the next roof ice dam doesn’t become a repeated roof repair.
Costs: what U.S. homeowners usually pay
Costs vary widely by region, roof complexity, and severity, but this breakdown helps plan:
DIY roof rake + calcium chloride method: low cost, but limited by dam thickness and safety.
Professional steam removal: higher cost, often justified if you have active leaks or severe dams.
Prevention upgrades (air sealing, insulation, ventilation): moderate cost, highest long-term ROI because it addresses root causes.
Reroof upgrades (ice-dam protection membrane at eaves): best done during replacement to avoid paying for tear-off twice.
FAQ: getting rid of ice dams on roof
What is the fastest way to remove an ice dam?
A common first approach is to rake snow 3–4 feet back from the roof edge and use calcium chloride in a nylon stocking to melt a channel through the dam so water can drain.
Can I use rock salt to melt a roof ice dam?
Travelers advises not to use rock salt/sodium chloride because it can damage your roof; calcium chloride is the recommended alternative in their removal steps.
Will ice dams come back after I remove them?
They often return if the underlying cause heat loss to the roof deck and refreezing at the eaves remains, which is why air sealing, insulation, and ventilation are key prevention measures.
Does ice and water shield help with roof ice dams?
ARMA recommends an ice dam protection layer along eaves (often a self-adhering membrane) to protect against water backup from ice dams.
🏠 Roofing Tips & Updates
Get free roofing advice, cost guides, and seasonal maintenance tips.
Roofing content specialist with 5+ years researching U.S. residential and commercial roofing. Has documented 200+ projects covering installation costs, material selection, contractor vetting, and DIY guides for homeowners across all climate zones.
Roof repair price ranges from $600 to $6,000 for most residential projects, with the typical homeowner spending $1,147 for standard repairs in 2026. Understanding the cost of roof per square (one square equals 100 square feet) helps estimate total project expenses: standard asphalt shingle repairs average $4.25–$8.25 per square foot, while full replacements cost $375–$550 per square for basic materials and $800–$2,500+ per square for premium options like metal, tile, or slate.
Minor repairs like replacing damaged shingles typically cost $600–$1,200, while major structural work or extensive leak repairs can reach $4,000–$6,000. This comprehensive guide breaks down roof repair priceby damage type, material, and project scope, plus explains when repair makes financial sense versus full replacement.
Table of Contents
Average roof repair price in 2026
Roof repair price guide 2026
The national average roof repair price is $1,147, with most homeowners paying between $392 and $1,913 depending on materials, damage type, and labor requirements. Most professional roof repair projects fall between $600 and $6,000, with the typical range sitting around $1,500 to $3,000 for standard repairs done properly with quality materials.
Minor repairs we see regularly include replacing damaged or missing shingles ($600–$1,200), fixing small leaks around vents or chimneys ($800–$2,000), repairing flashing ($1,000–$2,500), and patching small holes ($600–$1,000). When repairs get into the major category, structural problems, extensive water damage, or large sections needing replacement can push costs well above the typical range.
Cost of roof per square by material type
Understanding the cost of roof per square is essential for estimating repair and replacement expenses accurately. One “square” equals 100 square feet of roofing material, and prices vary dramatically based on material type.
Replacement cost per square (2026 data)
Replacing a roof typically costs between $375 and $850 per square for standard projects. The national average total replacement cost falls between $5,867 and $13,213, depending on home size, roof pitch, material, and labor.
Material Type
Cost Per Square
Example (20 Squares / 2,000 sq ft)
Asphalt Shingles (3-tab)
$375–$550
$7,500–$11,000
Architectural Shingles
$450–$700
$9,000–$14,000
Metal Roofing
$800–$1,200
$16,000–$24,000
Wood Shakes/Shingles
$700–$1,000
$14,000–$20,000
Clay or Concrete Tiles
$900–$1,800+
$18,000–$36,000+
Slate Roofing
$1,200–$2,500+
$24,000–$50,000+
Most roofers charge between $350 and $550 per square for shingle roof replacement, depending on materials, roof complexity, and location. Premium materials like metal or tile can cost $700 to $1,000+ per square.
Repair cost per square foot by material
When calculating roof repair price for partial work, costs are often quoted per square foot rather than per square.
Roof Type
Cost Per Square Foot
Average Repair Cost
Asphalt shingles
$4.25–$8.25
$875
Cedar shingles/shakes
$8–$14.30
$750
Clay or ceramic tiles
$12–$24.75
$1,000
Concrete tiles
$11–$19.80
$2,400
Flat roofing (rubber/PVC)
$5.50–$7.50
$400
Slate tiles
$12–$22
$1,550
Standing seam metal
$10–$17.05
$1,600
Steel shingles
$10–$20
$1,600
Roof repair price by damage type
Different types of damage require different repair approaches, which significantly affects roof repair price.
Shingle replacement
Roof Needs Fixing Complete Emergency Repair and Replacement Guide
Replacing damaged or missing shingles typically costs $600–$1,200 depending on how many need replacement. If you catch wind damage quickly, this stays manageable. Standard asphalt shingle repair averages $875, while premium materials cost more.
Leak repair
Roof Leak Repair Cost Guide 2025
Fixing small leaks around vents or chimneys runs $800–$2,000, while more extensive leak repairs with water damage remediation can reach $4,000–$6,000. Leak repair costs vary based on location difficulty and whether interior damage must also be addressed.
Flashing repair
Repairing flashing around chimneys, vents, valleys, or roof edges costs $1,000–$2,500 on average. Flashing is critical for preventing water intrusion at vulnerable transition points.
Structural repairs
Structural problems, extensive water damage, or large sections needing replacement push costs well above typical ranges. Major structural work can easily reach $4,000–$6,000 depending on extent.
Patching and minor fixes
Patching small holes typically costs $600–$1,000, making these among the most affordable repair options when addressed promptly.
Minor vs major roof repair costs
Understanding the difference between minor and major repairs helps homeowners set realistic budget expectations for roof repair price.
Minor roof repair costs
Minor roof repairs generally run $600 to $2,000 and handle issues before they become major problems.
Common minor repairs include:
Missing or damaged shingles: Usually $600–$1,200 depending on how many need replacement.
Small leak patches: $800–$1,500 when caught early.
Flashing touch-ups: $600–$1,200 for limited areas.
Minor hole patching: $600–$1,000 for small punctures.
Major roof repair costs
When repairs get into the major category, you’re looking at bigger numbers. Structural problems, extensive water damage, or large sections needing replacement can reach $4,000–$6,000 or more.
Major repairs typically involve:
Extensive leak repairs with interior damage remediation.
Large flashing replacement projects.
Structural deck or framing repairs.
Multiple system failures requiring comprehensive fixes.
Factors affecting roof repair price
Several variables influence the total roof repair price beyond just damage type and material selection.
Roof size and pitch
Larger roofs require more materials and labor, directly increasing costs. Steep pitch roofs are more dangerous and time-consuming to work on, adding 10–30% to labor costs.
Material quality and availability
Standard materials cost less than premium options, and matching existing discontinued styles can increase costs. The cost of roof per square varies significantly: 3-tab asphalt shingles are the cheapest at $375–$450 per square, while slate can exceed $2,500 per square.
Labor rates by location
Labor costs vary by region, with urban areas and high-cost-of-living regions charging 20–40% more than rural areas. Most roofers charge between $350 and $550 per square depending on location and complexity.
Accessibility and complexity
Difficult roof access, multiple levels, numerous penetrations (chimneys, skylights, vents), or complex architectural features increase labor time and roof repair price.
Permit and code requirements
Some jurisdictions require permits even for repairs, adding $100–$500 to total costs depending on local regulations.
Repair vs replacement cost comparison
Deciding between repair and full replacement is one of the most important financial decisions homeowners face when confronting roof repair price estimates.
When repair makes financial sense
Repair is typically the smart choice when:
Damage is isolated to a small area.
Your roof is under 15 years old with significant life remaining.
Repair costs are under 30% of full replacement cost.
The roof has been well-maintained with no systemic failures.
When replacement is more cost-effective
Full replacement makes better long-term sense when:
Your roof is 20+ years old approaching typical lifespan.
You’ve had multiple repairs over recent years.
Repair costs exceed 50% of replacement cost.
There are widespread issues like granule loss, curling, or repeated leaks.
Cost comparison breakdown
Roof repairs typically range $600–$6,000 per project. Full roof replacement runs $9,500–$28,000 for an average home as of 2026, depending on materials and roof complexity. The investment difference is significant, but so is the long-term value.
As of 2026, the average homeowner pays between $9,500 and $28,000 for a full roof replacement, though factors like roofing material, roof size, pitch, labor rates, and code requirements can raise or lower those costs significantly.
Beautiful, long-lasting, but heavy and labor-intensive
Slate Roofing
$25,000–$70,000+
Premium material with 75–100+ year lifespan
Flat Roofing (TPO)
$8,500–$18,500
Used on low-slope or flat homes
How to get accurate roof repair estimates
Getting accurate roof repair price quotes requires understanding what should be included and how to compare estimates effectively.
Request detailed written estimates
Ask contractors to provide itemized estimates that break down:
Materials with specific brands and quantities.
Labor costs separated from materials.
Permit fees if applicable.
Timeline for completion.
Warranty coverage on work performed.
Compare multiple quotes
Obtain at least three estimates from licensed, insured contractors to understand fair market pricing for your area. Be wary of quotes significantly lower than others, which may indicate cut corners or hidden costs.
Understand what’s included
Ensure estimates include tear-off and disposal of old materials, deck repairs if needed, underlayment replacement, flashing work, and cleanup. The cost of roof per square should include both material and labor unless specifically noted otherwise.
Ask about cost-saving options
Discuss whether timing flexibility (scheduling during slower seasons) or material alternatives might reduce costs without compromising quality.
Ways to save on roof repair costs
Understanding strategies to reduce roof repair price helps homeowners balance budget constraints with quality work.
Address problems early
Catching minor issues before they become major problems is the most effective way to control costs. A $600 shingle replacement now prevents a $4,000 structural repair later.
Schedule during off-season
Roofers may offer better rates during slower months (typically late fall through early spring, excluding winter in cold climates).
Bundle multiple repairs
If you have several small issues, addressing them in one project reduces per-visit costs compared to multiple service calls.
Maintain your roof regularly
Regular maintenance such as gutter cleaning and replacing damaged shingles prevents future crises and extends roof lifespan.
Check insurance coverage
Many homeowners can get roof repairs or replacement covered for only the cost of their deductible if insurance covers storm, wind, hail, or debris damage.
Consider financing options
Some roofing companies offer financing programs that spread costs over time, making larger repairs more manageable.
FAQ
What is the average roof repair price in 2026? The national average roof repair price is $1,147, with most homeowners paying between $600 and $6,000 depending on damage type, materials, and labor requirements.
How much is the cost of roof per square? The cost of roof per square (100 square feet) typically ranges from $375 to $850 for standard materials, with basic asphalt shingles at $375–$550 per square and premium materials like metal ($800–$1,200) or slate ($1,200–$2,500+) costing significantly more.
What do most roofers charge per square? Most roofers charge between $350 and $550 per square for shingle roof replacement, depending on materials, roof complexity, and location, with premium materials costing $700 to $1,000+ per square.
When should I repair vs replace my roof? Repair makes sense when damage is isolated, your roof is under 15 years old, and repair costs are under 30% of replacement cost; replace when the roof is 20+ years old, has widespread issues, or repair costs exceed 50% of replacement.
How much is 10 squares of roofing? The cost of 10 squares of roofing typically ranges from $3,500 to $5,500 for asphalt shingles including labor and materials, while premium materials like metal or tile can exceed $7,000 to $10,000.
What is the cheapest roof repair option? 3-tab asphalt shingles are typically the most affordable roofing material, costing around $375 to $450 per square for replacement work.
Does insurance cover roof repairs? Many homeowners can get roof repairs or replacement covered for only the cost of their deductible if damage was caused by storms, wind, hail, or debris.
🏠 Roofing Tips & Updates
Get free roofing advice, cost guides, and seasonal maintenance tips.
Roofing content specialist with 5+ years researching U.S. residential and commercial roofing. Has documented 200+ projects covering installation costs, material selection, contractor vetting, and DIY guides for homeowners across all climate zones.
Composite Roof Repair: Emergency Guide & What to Do
Composite roof repair becomes urgent when storm damage, falling debris, or sudden leaks threaten your home’s interior, requiring immediate temporary fixes followed by professional assessment to determine whether spot repairs or full replacement make financial sense. Emergency situations demand swift action covering damaged areas with tarps to prevent water ingress, securing the edges against wind, and contacting emergency roofing services that respond 24/7 to protect your property.
Most composite roof repair projects cost between $780 and $2,080, with an average of $1,150, though minor fixes may run as low as $400 while extensive structural damage can exceed $3,000. This guide covers emergency response steps, temporary stabilization techniques, repair vs replacement decisions, and what to expect when you call professionals for composite roof repair after disaster strikes.
Table of Contents
What is composite roofing and why emergency repair matters
Emergency roof repair fast , quick solutions 2025
Composite roofing (also called composition shingles or asphalt-fiberglass shingles) is the most common residential roofing material in North America, made from a fiberglass mat coated with asphalt and topped with protective granules. This roofing system comes in three main types: basic 3-tab ($4–$7 per square foot for repairs), architectural/dimensional ($6–$10 per square foot), and premium specialty finishes ($8–$12 per square foot).
Emergency composite roof repair matters because composite shingles, while durable, can fail suddenly from wind uplift, hail impact, falling branches, or age-related brittleness—and once the protective barrier is breached, water enters the home quickly. Addressing emergency roof repair promptly prevents further damage to property, with temporary fixes mitigating immediate issues until professional help arrives.
Signs you need emergency composite roof repair
Recognizing when your composite roof needs immediate attention helps homeowners respond before minor damage becomes catastrophic.
Active water leaks during or after storms
Storm Damage Roof costs and DIY guide 2025
Water dripping through ceilings or staining interior walls during rain indicates your composite roof’s protective barrier has failed and emergency action is required. Locate the affected area and contain interior water damage while arranging professional assessment.
Missing or severely damaged shingles
Shingles scattered in your yard after windstorms, or visible gaps on the roof where composite material has torn away, expose underlayment and decking to weather. Damage to shingles and flashing can lead to water leaks in the next storm if not correctly addressed.
Structural sagging or visible deformation
Sagging sections, dips in the roofline, or bowing indicate serious structural damage that poses immediate risk and requires professional emergency services. Fire-related damage is another category that demands fast intervention, as even small fires can weaken roof structures enough to risk collapse.
Storm or impact damage
emergency roof repair contractor tarping damaged roof during storm
Fallen tree limbs, hail strikes, or debris impact can crack, puncture, or dislodge composite shingles even when no immediate leak is visible. If your roof damage is severe and poses immediate threat to your home, professionals will take quick action to stabilize it.
Immediate emergency response steps
emergency roof repair contractor tarping damaged roof during storm
When you discover your composite roof needs emergency repair, taking proper immediate steps minimizes damage while you arrange professional help.
Step 1: Ensure safety first
Before attempting any assessment or temporary fixes, prioritize personal safety by avoiding damaged roof areas during storms, staying clear of power lines, and never walking on structurally compromised sections. When structural damage is evident, prioritize safety by evaluating roof stability and consulting a professional before attempting repairs.
Step 2: Assess the damage extent
Inspect the affected area from ground level or safe vantage points to determine the scale of damage, which will guide the repair process. Document all visible damage with photographs and video for insurance claims.
Step 3: Contain interior water damage
Move furniture and valuables away from active leak areas, place buckets under drips, and use towels or tarps to protect flooring from water. This immediate containment prevents secondary damage to interior finishes and belongings.
Step 4: Apply emergency covering if safe
In emergencies, swiftly cover affected areas with tarps or heavy-duty plastic to prevent further water ingress, securing edges to avoid wind displacement and ensuring adequate drainage. Deploy tarps or heavy-duty plastic covers to provide a quick, effective barrier against water ingress, securing them firmly to prevent wind displacement.
Step 5: Contact emergency roofing services
It is crucial to contact emergency roofing services, as these professionals are equipped to handle such situations efficiently—emergency roof repair services are available 24 hours a day, ensuring immediate help is available to protect roof integrity. Contact a reputable roofing company that provides emergency roof services for professional assessment and permanent solutions.
Temporary fixes for composite roof damage
Temporary measures protect your home until professional composite roof repair can be scheduled, but should never replace permanent solutions.
Emergency tarping technique
Roof Tarp Installation Costs and DIY Guide 2025
Using tarps or heavy-duty plastic covers provides quick protection for damaged composite roofs, though proper installation is critical. Secure tarps firmly to prevent wind displacement, extend coverage beyond damaged areas by at least 3-4 feet, and ensure water can drain off rather than pool.
Waterproof sealant for small cracks
Use waterproof sealant for immediate temporary fixes on small cracks or splits in composite shingles. Apply roofing cement to fill in cracks and to curled edges of the roof. This works only for minor damage—extensive cracking requires professional replacement.
Quick shingle replacement for limited damage
How to Install Asphalt Shingles
For broken shingles, pry out nails and pull out damaged material, then cut notches in new shingles to match nail tears in old ones, place new shingles in position, and secure with nails. When changing shingles, aim to match shingle thickness to achieve a fairly even surface.
When temporary fixes aren’t enough
If roof damage is severe and poses immediate threat, professionals will take quick action to stabilize it using high-quality, professional-grade materials to secure damaged areas and prevent further harm from weather or debris. Temporary stabilization ensures property and family safety while reducing risk of additional damage as you prepare for permanent repairs.
Professional emergency roof repair services
Professional Roof Inspection Service
Understanding what emergency roofing professionals provide helps homeowners know what to expect when calling for composite roof repair after disaster strikes.
24/7 emergency response
Professional services offer immediate response to emergency calls at any hour, with rapid deployment to assess damage and implement protective measures.
Temporary protective measures
Contractors install tarps or other temporary materials to prevent further damage while permanent repairs are arranged. Using high-quality, professional-grade materials, they secure damaged areas to prevent further harm.
Comprehensive damage assessment
Detailed evaluation identifies all affected areas and determines damage extent, guiding repair recommendations. Roofing contractors assess damage and recommend more permanent solutions, ultimately fixing the roof to safeguard buildings from future leaks and weather-related vulnerabilities.
Permanent repair execution
Skilled execution of necessary repairs ranges from replacing shingles to fixing structural damage, ensuring roof integrity and longevity are restored. After taking necessary precautions, contacting a commercial roofing expert ensures faster repair timelines.
Composite roof repair costs by type (2025-2026 data)
Repair Commercial Roof Guide 2025
Composite roof repair costs vary significantly based on damage type, materials used, and labor requirements.
Average cost ranges
Most composite roof repairs cost between $780 and $2,080, with most homeowners paying an average of $1,150. Minor repairs may cost as little as $400, while extensive damage can exceed $3,000. The average cost to repair a roof in 2025 is $1,147, but it can range from $350 to $2,500 depending on damage severity and materials.
Cost by repair type
Repair Type
Description
Average Cost
Shingle replacement
Replace cracked, curled, or missing shingles
$150–$1,000
Leak repair
Locate and patch leaks, address water intrusion
$200–$1,500
Flashing repair
Fix or replace metal flashing around edges
$200–$500
Underlayment repair
Repair or replace protective underlayment layers
$300–$1,200
Structural repairs
Fix decking rot, sagging, or framing issues
$500–$3,000
Cost by composite roof type
Composite Type
Description
Average Cost per Sq. Ft.
3-tab
Flat, basic composite shingle
$4–$7
Architectural
Thicker, layered, dimensional look
$6–$10
Premium
High-end, extra thick, specialty finishes
$8–$12
Factors affecting composite roof repair cost
Main cost drivers are repair type, roof size, labor rates, and quality of composite shingles used. Labor costs $50 to $150 per hour and ensures warranty compliance, safety, and durable results. Material quality, color, and finish affect costs—standard composite shingles are more affordable, while premium or specialty finishes cost more, and matching existing shingles can increase costs if original style or color is discontinued.
Repair vs replacement decision guide
Determining whether to repair or replace your composite roof after emergency damage involves evaluating age, damage extent, and cost thresholds.
When composite roof repair makes sense
Repair is the smart choice when damage is isolated to a small area, your roof is under 15 years old with significant life remaining, and repair costs are under 30% of full replacement cost. Minor shingle replacement for wind damage or limited leak repairs extend roof life without major investment.
When full replacement is better
If your composite roof is 20+ years old approaching typical lifespan, has widespread damage across multiple areas, or shows signs of systemic failure (curling, granule loss, repeated leaks), replacement may be more cost-effective long-term. Calculate the repair-to-replacement cost ratio—if repair exceeds 50% of replacement cost, new roofing usually makes better financial sense.
Emergency damage assessment
Roofing contractors can assess damage and recommend more permanent solutions, collaborating with you to plan thorough repairs that address all structural damage effectively. Once immediate threat is mitigated, professionals help determine whether repair or replacement provides better value.
DIY vs professional composite roof repair
Understanding when DIY is appropriate versus when professionals are necessary helps homeowners make safe, cost-effective decisions.
DIY composite roof repair considerations
It’s better to repair and replace broken shingles on warm days so shingles are more flexible and able to lift and bend with ease. If it’s freezing outside, a propane torch can warm them up. Replace shingles from bottom up, with the top row going under ridge cap, nailing each 3-tab shingle to the printed line with 4-8 nails.
DIY vs professional cost comparison
Repair Type
DIY Materials Cost
Pro Labor + Materials
Shingle Replacement
$100–$200
$300–$600
Flashing Repair
$50–$100
$300–$500
Leak Patching
$80–$150
$450–$1,000
When to call professionals
Emergency situations, structural damage, widespread failures, and situations requiring warranty compliance all demand professional expertise. Professionals have equipment, safety systems, and experience to handle complex repairs that pose serious risk to DIYers. Emergency roofing services are equipped to handle urgent situations efficiently, providing 24-hour availability.
Preventing future composite roof emergencies
Regular maintenance and inspections are key to avoiding roofing emergencies and extending composite roof lifespan.
Routine maintenance practices
Regular maintenance such as gutter cleaning and replacing damaged shingles can prevent future crises. Schedule annual professional inspections to catch minor issues before they become emergencies.
Proactive repairs
Address small problems like cracked or curling shingles promptly before they expand into leak-prone failures. Use roofing cement to fill in cracks and apply it to curled edges before they tear away.
Professional assessment value
Consult a professional roofing service promptly for thorough assessment and durable repairs—their expert intervention can drastically reduce risk of recurring issues.
FAQ
How much does composite roof repair cost? Most composite roof repairs cost between $780 and $2,080, with an average of $1,150. Minor repairs may cost as little as $400, while extensive damage can exceed $3,000.
What should I do immediately when my composite roof is damaged? Swiftly cover affected areas with tarps or heavy-duty plastic to prevent water ingress, secure edges against wind, contain interior damage, and contact emergency roofing services available 24/7.
Can I repair composite shingles myself? Minor repairs like replacing a few damaged shingles can be DIY-friendly on warm days when shingles are flexible, but emergency situations and structural damage require professional help.
When is composite roof repair an emergency? Active leaks, missing shingles after storms, structural sagging, fire damage, or severe impact damage all constitute emergencies requiring immediate professional response.
Should I repair or replace my damaged composite roof? Repair makes sense for isolated damage on roofs under 15 years old when costs are under 30% of replacement; replace if the roof is 20+ years old, has widespread damage, or repair exceeds 50% of replacement cost.
🏠 Roofing Tips & Updates
Get free roofing advice, cost guides, and seasonal maintenance tips.
Roofing content specialist with 5+ years researching U.S. residential and commercial roofing. Has documented 200+ projects covering installation costs, material selection, contractor vetting, and DIY guides for homeowners across all climate zones.
Best Way to Remove Roof Shingles: DIY Tear-Off Guide
The best way to remove roof shingles (3‑tab) is to set up a safe work zone, remove ridge caps, then systematically tear off shingles in top‑down sections using a roofing tear‑off shovel—slowing down around flashing and valleys to avoid damage that could lead to leaks. Once the roof is stripped, the safest way to change roof shingles is to rebuild the roof layers in the correct order: inspect and repair the deck, install drip edge and underlayment, add starter strips, lay field shingles with proper nailing and alignment, and finish with ridge caps.
This guide is written for your exact project: 3‑tab shingles, a moderate pitch, and a full tear‑off (not a roof-over). The goal is a clean tear‑off that protects the deck, a solid inspection phase, and a straight, professional-looking 3‑tab install that performs correctly.
Table of Contents
Why the best way to remove roof shingles matters
The industry-standard method for asphalt shingle removal
Learning the best way to remove roof shingles isn’t just about speed—it’s about protecting the roof deck, preserving reusable flashing, and creating a clean foundation for the new roof. A rushed or careless tear‑off can gouge decking, bend valley metals, or leave hundreds of nails behind that telegraph through underlayment and create leak points. Understanding the correct technique helps DIYers avoid these problems and sets up a successful installation when you change roof shingles.
Tools and safety essentials (moderate pitch)
A roofing tear‑off shovel (roofing spade) is commonly recommended for shingle removal because it’s designed to slide under shingles and pop nails efficiently, which is why it’s central to the best way to remove roof shingles. A flat pry bar is still required around edges and flashing because those areas can be damaged if you force a shovel under them.
Core tear‑off tools
Roofing tear‑off shovel (primary removal tool).
Flat pry bar (flashing, tight corners, valley edges).
Hammer or nail puller (cleanup nails, stubborn fasteners).
Utility knife with hook blades (cutting underlayment cleanly).
Push broom (keeping the deck walkable as you go).
Magnetic nail sweeper (ground cleanup after tear‑off).
On a moderate slope, you still need fall protection appropriate for sloped roofs because loose granules and shingle fragments can reduce traction during tear‑off. Avoid working in rain, frost, or high winds because stability and control drop quickly in those conditions.
Site setup that improves safety
Create a drop zone below the eaves so nobody walks under falling debris.
Stage disposal (dumpster/trailer) close enough that you can toss debris with minimal carrying.
Keep your “walking lane” clear—don’t let broken shingles stack where you step.
Photo of roofing tear-off shovel in use on 3-tab shingles
Best way to remove roof shingles: step-by-step tear-off
Step 1: Protect the ground and plan debris flow
Lay tarps or plywood where debris will land, and choose where shingles will slide or be tossed so cleanup is predictable. If disposal is far away, tear‑off becomes slower and messier, which increases fatigue and can increase risk.
Step 2: Remove ridge caps first
The best way to remove roof shingles starts at the ridge. Remove ridge caps first because they overlap the top edges of the field shingles. Use the tear‑off shovel or pry bar to pop nails, then move ridge pieces off the walking path immediately so you’re not stepping on loose caps.
Step 3: Start a few courses below the ridge
Starting a few rows down makes it easier to get the shovel under multiple tabs and pop nails in batches. Work left‑to‑right (or right‑to‑left) in a strip so you’re not creating random “holes” across the roof that are harder to navigate.
Step 4: Tear off in top‑down sections
Continue stripping shingles in manageable strips from top to bottom, removing overlaps in the direction they were installed. This systematic approach is part of the best way to remove roof shingles because keeping sections controlled helps you maintain footing and limits accidental deck damage from aggressive prying.
Step 5: Adjust technique for steep or slippery areas
If your moderate-pitch roof has sections that feel slippery due to granule buildup or morning dew, slow down and consider repositioning your safety anchor points. The best way to remove roof shingles safely is to work at a pace that maintains control rather than rushing and risking a fall.
Detail zones: valleys, vents, chimneys, and walls
How to install roof vents on metal roof step by step Guide
Around flashing, walls, and valleys, switch to a pry bar and lift shingles carefully because these areas are easy to bend or tear. Flashing issues are a common leak source, so if flashing is corroded, loose, or damaged, replacement during re-roofing is often the safer move than trying to reuse questionable metal.
Best practices for tear‑off near details
Use the shovel to get close, then switch to a pry bar for the last inches.
Lift fasteners rather than ripping shingles sideways around metal edges.
Plan to replace old flashing if it shows obvious deterioration because re-roofing is the easiest time to do it correctly.
If you’re unsure whether your roof decking needs replacement, inspect carefully during tear-off for soft spots and staining.
Nail and underlayment removal (full tear‑off)
After shingles are removed, pull protruding nails so the deck is smooth for underlayment and shingles. Leaving nails behind creates bumps under the underlayment and can cause tears that compromise water protection.
In a full tear‑off, removing old underlayment helps expose the deck for inspection and can reveal moisture problems that might remain hidden under a new roof-over. This step also helps you see whether any areas need decking replacement before you move on to the installation phase where you change roof shingles.
Deck inspection and repairs (what to look for)
A major advantage of learning the best way to remove roof shingles through a full tear‑off is that it allows deck inspection and replacement of compromised sheathing before you change roof shingles. Signs associated with roof deck rot include soft spots, staining, and moisture-related indicators, and those conditions should be addressed before installing new roofing layers.
Deck inspection checklist
Walk the deck carefully and identify any soft or spongy areas.
Look for dark staining patterns that suggest past leak paths.
Inspect plywood/OSB edges for swelling, delamination, or crumbling.
Watch for sagging or uneven planes that may indicate broader structural concerns.
If rot is found, replace the affected decking sections before proceeding so the new roof isn’t installed over a weak base. If deterioration appears widespread or suggests framing issues, consider professional assessment before continuing. For guidance on minimum roof pitch requirements when replacing damaged sections, consult local building codes.
How to change roof shingles (3‑tab installation steps)
Once the deck is solid, dry, and clean, you’re ready to change roof shingles by rebuilding the roof layers in the correct order. While local codes and exact manufacturer instructions vary, the workflow below reflects commonly referenced sequencing and manufacturer guidance examples.
Step 1: Install drip edge and underlayment in proper sequence
A commonly referenced guideline is drip edge under underlayment at the eaves and drip edge over underlayment at the rakes. IKO also describes the sequence as eaves drip edge → underlayment → rake drip edge. This order supports proper water shedding at edges and helps protect the deck.
Step 2: Lay underlayment smoothly and straight
Install underlayment flat and straight, with proper overlaps, because wrinkles can telegraph through shingles and create weak points. Follow your product guidance for extra protection at vulnerable areas like valleys and eaves where leaks are more likely.
Step 3: Snap chalk lines for straight courses
Chalk lines are commonly recommended to keep courses straight and consistent, especially across long roof runs. Snap reference lines for the starter strip and the first course, then add additional guide lines as needed so rows don’t drift. This precision is an important part of how to change roof shingles correctly.
Step 4: Install the starter strip
Starter strips help seal the eave edge and improve wind resistance at the first course. Depending on the system, you can use manufactured starter strips or cut tabs off 3‑tab shingles.
Step 5: Lay 3‑tab shingles (layout and nailing)
Begin at the bottom and work upward course by course, aligning to chalk lines. Stagger vertical seams so joints do not line up in a straight pathway. Follow manufacturer guidance for nail type, nail length, and placement; for example, an IKO bulletin outlines nail requirements and penetration guidance for 3‑tab shingles.
Step 6: Handle valleys and penetrations carefully
Manufacturer training emphasizes careful valley handling, including keeping nails away from the valley line and using adhesive in that area to reduce intrusion risk. Avoid improvising on details—follow the instructions for your chosen shingle and flashing system.
Step 7: Install ridge caps last
Install ridge caps last to cover the top joints, keeping consistent exposure and nailing per manufacturer guidance. This completes the process of how to change roof shingles properly.
Final checks and cleanup
Before leaving the roof, do a quality pass: confirm rows are straight, details are properly integrated, and edge sequencing is correct. Cleanup matters because nails and sharp debris can cause injuries and property damage, so keep debris controlled during work and do a final ground sweep at the end.
For future maintenance tips and guidance on when your roof needs fixing versus full replacement, bookmark relevant resources.
Common mistakes to avoid when you remove and change roof shingles
Even when following the best way to remove roof shingles, DIY roofers can make costly errors that compromise the new roof’s performance or create safety hazards during the project. One of the most frequent mistakes is starting the tear-off without adequate disposal planning, which leads to debris piles that block walking paths and increase fall risk while making cleanup significantly harder. Another common error is working too aggressively around valleys and flashing transitions, where rushed prying can bend or tear metal that should be preserved for reuse or proper replacement.
Failing to pull all remaining nails after shingle removal creates bumps and puncture points under the new underlayment, while skipping the deck inspection phase means hidden rot gets sealed under new materials where it continues to spread. Many DIYers also underestimate how quickly weather can damage an exposed deck, starting tear-off projects without confirming they have enough dry time to complete underlayment installation before the next rain. Additionally, improper drip edge sequencing or skipping chalk lines during installation results in wavy courses and edge vulnerabilities that reduce the roof’s water-shedding effectiveness and professional appearance.
When to call a professional instead of DIY
While learning the best way to remove roof shingles empowers homeowners to tackle straightforward re-roofing projects, certain situations require professional expertise and equipment for safety and code compliance. If your roof pitch exceeds moderate slopes and approaches steep territory, or if the roof has multiple levels, dormers, or complex valley configurations, professional roofers have the experience and fall-protection systems to work safely in conditions that pose serious risk to DIYers. Similarly, if the tear-off reveals widespread structural damage, sagging sections, or rot that extends beyond isolated spots, the project has shifted from a shingle replacement to a structural repair that typically requires engineering assessment and professional framing work.
You should also consider professional help when local building codes require permits and inspections for re-roofing, when the project timeline is tight and weather windows are unpredictable, or when physical limitations or lack of comfortable roof experience make the safety risks outweigh the cost savings. Professional roofers can complete tear-off and installation in days rather than weekends, carry comprehensive liability insurance that protects homeowners from jobsite injury claims, and provide workmanship warranties that give long-term protection DIY projects cannot match. For emergency situations where your roof needs fixing immediately due to storm damage or active leaks, professional response and temporary stabilization may be necessary before any tear-off or installation work begins.
FAQ
Is a roofing tear‑off shovel really necessary for the best way to remove roof shingles? A roofing tear‑off shovel is commonly recommended because it’s designed to slide under shingles and pop nails efficiently, making it the primary tool for the best way to remove roof shingles.
Should ridge caps always come off first? Yes—ridge caps overlap field shingles, so removing them first is part of the best way to remove roof shingles systematically.
Why do a full tear‑off instead of a roof-over? A full tear‑off allows deck inspection and replacement of compromised sheathing before you change roof shingles, which prevents installing a new roof over a weak base.
What’s the correct drip edge and underlayment order? A commonly referenced guideline is drip edge under underlayment at eaves and drip edge over underlayment at rakes.
Can I reuse old flashing when I change roof shingles? If flashing is straight, rust-free, and in good condition you may reuse it, but damaged or corroded flashing should be replaced during re-roofing.
🏠 Roofing Tips & Updates
Get free roofing advice, cost guides, and seasonal maintenance tips.
Roofing content specialist with 5+ years researching U.S. residential and commercial roofing. Has documented 200+ projects covering installation costs, material selection, contractor vetting, and DIY guides for homeowners across all climate zones.
When your roof needs fixing immediately after a storm, leak, or wind damage, quick action prevents minor problems from escalating into expensive structural damage, mold growth, and interior destruction. Emergency roof repair costs range from $300 to $1,500 for most residential issues, with temporary tarping running $200-$500 and minor shingle replacement costing $300-$800. However, knowing when your roof needs fixing through repair versus complete replacement saves money and protects your home long-term.
Understanding the warning signs that your roof needs fixing urgently including active leaks, missing shingles, sagging sections, or water stains on ceilings helps homeowners respond appropriately before weather causes additional damage. This comprehensive 2025 guide explains emergency steps when your roof needs fixing now, temporary versus permanent repair options, typical costs for emergency services, and the critical decision point between patching damaged areas or changing new roofing entirely.
Whether you’ve discovered water dripping through your ceiling during a rainstorm, noticed shingles scattered across your yard after high winds, or spotted concerning signs during a routine inspection, this guide provides actionable steps for addressing situations where your roof needs fixing immediately.
Table of Contents
Warning Signs Your Roof Needs Fixing Now
Roof damage repair 2025
Recognizing critical signs that your roof needs fixing immediately helps homeowners act quickly before minor damage becomes catastrophic. These warning signals indicate urgent repair needs that shouldn’t wait for scheduled maintenance.
Active Water Leaks During Rain
Roof Leak Repair Cost Guide 2025
Water leaking through the ceiling during storms represents the most obvious sign your roof needs fixing urgently. Active leaks indicate the roofing system has been compromised and water is penetrating through shingles, underlayment, and decking to reach your home’s interior.
Common leak locations include:
Around chimneys where flashing has failed
Near skylights with damaged seals
In valleys where two roof planes meet
Along eaves where ice dams form in winter
At vent pipes and roof penetrations
Even small leaks that only appear during heavy rain demand immediate attention because water damage spreads rapidly through insulation, ceiling materials, and wall cavities.
Missing or Damaged Shingles
Storm Damage Roof costs and DIY guide 2025
Visible gaps where tiles have dislodged or broken expose underlying roof components to weather and create immediate vulnerability. After windstorms, homeowners often find shingles scattered in yards or gutters—clear evidence their roof needs fixing before the next rain.
Signs of shingle damage requiring urgent repair:
Bare spots on roof where shingles have blown off completely
Sections of underlay, insulation, or battens exposed to elements
Curling or lifting shingle edges that catch wind
Cracked or broken shingles showing wear
Granule loss leaving bald spots on asphalt shingles
Missing shingles can definitely lead to leaks and water damage because these unprotected areas expose the underlayment and allow water to seep inside.
Sagging Roof Sections
Sagging is one of the biggest roof damage warning signs that your roof needs fixing immediately, often indicating structural failure requiring emergency attention. Sagging appears as visible dips, curves, or depressions in the roofline when viewed from ground level or inside the attic.
Causes of roof sagging include:
Weakened supports from prolonged water exposure
Trapped moisture rotting roof decking and trusses
Excessive weight from accumulated snow or debris
Age-related deterioration of structural components
Improper original construction or undersized framing
Once the roof starts sagging, major issues need immediate professional repair to prevent potential collapse.
Water Stains on Ceilings or Walls
Roof Replacement Cost Guide step by step
Brown stains, discoloration, or water marks on interior ceilings or upper walls indicate your roof needs fixing even if you haven’t observed active dripping. These stains show that water has penetrated the roof system and traveled through structural components to reach visible surfaces.
Water stain patterns help diagnose problems:
Circular stains often indicate vent or penetration leaks
Stains appearing only after specific weather (wind-driven rain, ice dams) point to directional vulnerabilities
Don’t ignore water stains even if the roof currently appears dry—the damage is already occurring and will worsen with each storm.
Damaged or Missing Flashing
Detached or curling flashing around chimneys, vents, or valleys creates entry points for water infiltration, signaling your roof needs fixing to restore waterproof seals. Flashing failures are common causes of leaks even when shingles appear intact.
Flashing problems requiring emergency repair:
Gaps at roof intersections or edges
Rusted flashing with visible holes or cracks
Loose or separated flashing pieces
Missing sealant around penetrations
Without proper flashing, even moderate rain can find its way indoors, making emergency repair critical to keep water out.
Visible Storm Damage
After severe weather, visible dents, punctures, or cracks in roofing material indicate your roof needs fixing even if leaks haven’t appeared yet. Storm impacts from hail, falling branches, or blown debris can compromise roof integrity.
Post-storm damage signs:
Loose tiles or displaced sheets near impact zones
Punctures or tears in membrane roofing
Crushed or broken shingles from hail
Interior leaks or drips appearing after the storm
Even if damage seems slight, an expert should assess the area promptly because hidden fractures can lead to leaks or structural compromise later.
Granules Accumulating in Gutters
Excessive shingle granules collecting in gutters indicate advanced shingle deterioration—a clear sign your roof needs fixing or replacement soon. Granules protect asphalt shingles from UV damage, and their loss accelerates roof aging.
Normal new roofs shed some granules initially, but heavy accumulation or bald spots on shingles indicate the roof is nearing the end of its service life.
Exposed Roof Deck or Underlayment
National Roof Decking Replacement Cost Averages
Sections of underlay, insulation, or battens exposed to the elements represent emergency situations where your roof needs fixing immediately. Exposed underlayment cannot withstand weather long-term and will quickly degrade, allowing water penetration.
Even small areas of exposure can lead to significant internal water damage in a single downpour, making quick action essential to cover or repair these spots.
Immediate Emergency Steps
When you discover your roof needs fixing urgently during or immediately after a storm, taking proper emergency steps minimizes damage while you arrange professional repairs.
Ensure Safety First
Before attempting any assessment or temporary fixes when your roof needs fixing, prioritize personal safety:
Never go on the roof during storms, high winds, or when wet from rain or ice
Avoid walking on damaged roofs that may have structural weakness or soft spots
Stay clear of power lines that may have contacted your roof
Use proper ladder safety if accessing roof edges for inspection
Wear appropriate footwear with good traction if roof access is necessary
If you feel uncomfortable on a ladder or the damage appears severe, wait for professional help rather than risking injury.
Locate the Water Source
Finding the leak source is the critical first step when your roof needs fixing for water infiltration. From inside your attic (if accessible), trace water stains on the underside of the roof deck back toward the highest point—water often travels along rafters or sheathing before dripping through ceilings.
Common leak entry points to check:
Chimneys and their flashing
Plumbing vent pipes
Roof valleys where planes intersect
Damaged or missing shingles visible from attic
Skylight frames and seals
Identifying the approximate exterior location of the leak helps roofers target repairs efficiently.
Contain Interior Water Damage
While determining if your roof needs fixing with temporary or permanent solutions, protect your home’s interior:
Move furniture and valuables away from active leak areas to prevent water damage to belongings.
Place buckets or containers under drips to catch water and prevent floor/ceiling saturation.
Use towels or tarps to protect flooring from splashing or overflow.
Consider drilling small drainage holes in bulging ceiling sections (if you’re comfortable) to relieve pooled water and prevent ceiling collapse—though this should generally be left to professionals.
Document All Damage
Thorough documentation supports insurance claims when your roof needs fixing after storm damage:
Photograph all visible damage from multiple angles, both exterior roof damage and interior water stains
Video walkthrough showing the extent of problems
Note the date and time damage was discovered
Document weather conditions that caused the damage
Save receipts for any emergency tarping or temporary repairs
List damaged personal property affected by leaks
Insurance companies require documentation to process claims for emergency roof repairs.
Call a Professional Roofer
Roofer Near You 2025
Contact a roofing contractor immediately when your roof needs fixing urgently, especially if active leaks are present or storm damage is extensive. Emergency roof repair services prioritize urgent calls and can often respond within hours for temporary stabilization.
When calling emergency roofers:
Explain the nature and severity of damage
Indicate if water is actively leaking
Ask about response time for emergency calls
Confirm licensing, insurance, and emergency service fees
Request temporary tarping if repair cannot occur immediately
Emergency services usually cost more than scheduled repairs because of manpower requirements and quick mobilization, but immediate response prevents additional damage.
Install Temporary Protection
If you feel comfortable on a ladder and weather permits, laying a tarp over the damaged area helps mitigate damage until professional repairs can be completed. Temporary tarping typically costs $200-$500 when done by professionals, or you can attempt it yourself if safe.
Basic temporary protection steps:
Use heavy-duty waterproof tarps, not lightweight plastic sheeting
Extend tarp at least 4 feet beyond damaged area in all directions
Secure tarp with 2×4 boards rather than nails that create additional holes
Weight boards with sandbags or tie-downs
Ensure water will drain off tarp, not pool on it
Temporary repairs buy time but should be replaced with permanent fixes as soon as possible.
Temporary Emergency Roof Repairs
When your roof needs fixing immediately but permanent repairs must wait for materials, scheduling, or insurance approval, temporary solutions prevent ongoing damage. Understanding the limitations and proper application of temporary fixes helps homeowners protect their property.
Emergency Tarping
Roof Tarp Installation Costs and DIY Guide 2025
Tarping is the most common temporary fix when your roof needs fixing after storm damage, covering damaged areas to keep water out until permanent repairs occur. Professional temporary tarp installation costs $200-$500, while DIY tarping requires proper materials and technique.
Proper tarping technique:
Select heavy-duty polyethylene tarps rated for outdoor use, not thin plastic sheeting
Choose tarp size that extends at least 3-4 feet beyond damaged area on all sides
Position tarp to overlap the roof ridge if damage is near the peak, allowing water to shed both directions
Secure edges with 2×4 lumber boards rather than nailing through tarp, which creates leak points
Use sandbags, tie-downs, or fasteners on boards to hold tarps against wind
Inspect tarps after storms to ensure they remain secure and properly positioned
Tarp limitations: Emergency tarps protect for days to weeks but aren’t permanent solutions—UV exposure degrades plastic, wind works edges loose, and pooling water can tear tarps. Plan for permanent repairs within 30-60 days maximum.
Plastic Sheeting for Minor Leaks
Plastic sheeting applied from inside the attic can temporarily redirect small leaks when your roof needs fixing but exterior access is unsafe due to weather. This interior approach catches or channels water until exterior repairs are possible.
Interior plastic sheeting approach:
Locate the leak entry point on the underside of roof deck
Drape heavy plastic sheeting over rafters near the leak
Channel plastic to drain into buckets positioned below
Secure plastic with staples to prevent sagging
Monitor regularly and empty collection buckets
Interior plastic doesn’t stop water from entering the roof system—it only manages where that water goes, making it a very temporary measure.
Roofing Cement for Small Holes
Roofing cement or sealant can temporarily patch very small punctures or cracks when your roof needs fixing but minor damage doesn’t warrant full emergency service calls. This works only for pinhole leaks or small splits, not large damaged areas.
Temporary cement patch process:
Clean and dry the damaged area as much as possible
Apply thick coat of roofing cement over hole or crack
Extend cement several inches beyond damage on all sides
Press a piece of flashing or sheet metal into wet cement over larger holes
Apply additional cement layer over metal patch
Allow to cure per product directions
Roofing cement patches are short-term fixes lasting weeks to months before requiring replacement or proper repair.
Emergency Shingle Replacement
A roofing hammer and a bundle of replacement shingles sit nearby
Replacing one or two missing shingles represents a more permanent temporary fix when your roof needs fixing after limited wind damage. This requires basic roofing skills and appropriate safety measures.
Emergency shingle replacement steps:
Obtain matching or compatible replacement shingles
Carefully remove damaged shingle remnants
Slide new shingle into place under upper course
Secure with roofing nails just below seal strip
Apply dab of roofing cement under edges to seal
Press firmly to activate adhesive strips
Minor shingle replacement costing $300-$800 professionally can prevent leaks until comprehensive roof work is scheduled.
Safety Warnings for DIY Temporary Repairs
Homeowners should exercise extreme caution when attempting temporary fixes—falls from roofs cause serious injuries and deaths annually. Consider these safety factors:
When to avoid DIY repairs:
Roof pitch exceeds 6:12 (too steep for safe footing)
Weather conditions include rain, wind, or temperatures near freezing
Roof shows signs of structural damage or sagging
Damage is extensive or requires multiple repair locations
You lack experience with ladder safety or heights
Professional emergency services are always safer and typically complete temporary stabilization faster than homeowner attempts.
Permanent Repair Options
After temporary measures stabilize the situation when your roof needs fixing, permanent repairs restore full protection and address underlying problems. Understanding repair options helps homeowners make informed decisions.
Shingle Replacement and Repair
A professional photorealistic close-up of a steep asphalt shingle roof installation complete guide 2025
Replacing damaged, missing, or worn shingles is the most common permanent fix when your roof needs fixing from storm damage or age-related wear. Minor shingle replacement costs $300-$800 for small areas, while more extensive work increases proportionally.
Professional shingle repair process:
Remove all damaged shingles in affected area
Inspect underlying felt or synthetic underlayment for damage
Replace compromised underlayment sections
Install new shingles matching existing roof in color and style
Properly nail shingles per manufacturer specifications
Seal edges and tabs with roofing cement where needed
Roof repair is typically the best route when damage is minor or localized, such as a few shingles blown off after a windstorm, especially if your roof is under 10 years old with life remaining.
Flashing Repair and Replacement
Repairing or replacing damaged flashing permanently fixes leaks when your roof needs fixing around chimneys, vents, valleys, or roof edges. Flashing and leak repair typically costs $400-$1,000 depending on location and extent.
Flashing repair work includes:
Removing old, damaged, or corroded flashing
Installing new step flashing, counter flashing, or valley flashing
Properly integrating flashing with surrounding shingles
Sealing all joints with appropriate caulk or sealant
Ensuring proper overlap and water-shedding geometry
Without proper flashing installation, even new shingles cannot prevent leaks at critical junctions.
Roof Deck and Structural Repairs
Replacing damaged decking or repairing structural components becomes necessary when your roof needs fixing after prolonged leaks have caused wood rot. Structural work or framing repair costs $1,200-$3,000+ depending on extent.
Structural repairs involve:
Removing shingles and underlayment over damaged sections
Cutting out rotted or damaged plywood/OSB decking
Installing new decking panels properly fastened to rafters
Repairing or sistering damaged rafters if needed
Reinstalling underlayment and shingles over repaired areas
Structural damage discovered during repairs indicates prolonged moisture exposure that may have affected multiple areas.
Partial Roof Section Replacement
Replacing an entire roof section makes sense when your roof needs fixing in one area but damage is too extensive for spot repairs. This approach costs less than full replacement while addressing concentrated problems.
Situations warranting section replacement:
Damage concentrated on one side from directional storms
Valley failure affecting substantial area
Aging limited to one section while rest of roof is newer
Different sections installed at different times with varying condition
Section replacement costs fall between spot repairs ($300-$800) and full replacement ($5,000-$15,000+), typically running $1,500-$4,000 for standard residential sections.
Underlayment Upgrades During Repairs
Installing improved underlayment when your roof needs fixing provides enhanced protection beyond just replacing shingles. Upgrading from felt to synthetic underlayment or adding ice-and-water shield in vulnerable areas prevents future problems.
Underlayment improvements include:
Synthetic underlayment instead of traditional felt for better durability
Self-adhering ice-and-water shield at eaves in cold climates
Full coverage of valleys with premium membrane
Enhanced protection around all penetrations
These upgrades add moderate cost ($150-$500 for typical repairs) but significantly improve long-term performance.
Preventive Repairs During Fixes
Addressing nearby problem areas while fixing primary damage prevents future emergencies when your roof needs fixing for other issues. Roofers already on site can efficiently handle additional small repairs at reduced cost.
Preventive work to consider:
Replacing worn shingles near damaged areas
Re-sealing all flashing, not just damaged sections
Adding roof vents if ventilation is inadequate
Installing gutter guards to prevent ice dams
Trimming overhanging tree branches that pose damage risk
Comprehensive repairs cost more initially but reduce likelihood of repeat emergency service calls.
Roof Repair vs Replacement Decision
Photorealistic wide-angle shot of a modern manufactured home undergoing a professional roof replacement
Determining whether your roof needs fixing through repair or complete replacement represents one of the most important financial decisions homeowners face. Multiple factors influence this choice beyond just current repair costs.
When Roof Repair Makes Sense
Roof repair is the smart, cost-effective choice when certain conditions are met, allowing you to extend your existing roof’s life without the expense of full replacement.
Repair is the better option when:
Damage is isolated: Such as a few shingles blown off after a windstorm or leak limited to one small area
Your roof is under 10 years old: A newer roof still has significant life remaining and justifies repair investment
No structural damage is present: If the decking is solid, rafters are sound, and leaks are rare
Cost of repairs is under 30% of replacement cost: General rule suggests repair when fix costs less than one-third of full replacement
Insurance will cover repair costs: When storm damage qualifies for insurance coverage, repair may be fully or partially covered
Minor repairs costing $300-$1,500 make financial sense compared to replacement costs of $5,000-$15,000+ for average homes.
When Roof Replacement Is Better
Full roof replacement may be the best investment despite higher upfront cost when continuing to patch becomes more expensive and risky than starting fresh.
Replacement makes sense when:
Your roof is 15-20+ years old: Asphalt shingle roofs approaching or exceeding typical 20-30 year lifespan should be replaced rather than repeatedly repaired
You’ve had multiple roof repairs over the years: Recurring problems indicate systemic failure rather than isolated damage
Leaks are recurring in several places: Multiple leak locations suggest widespread deterioration
Shingles are heavily worn or bald: Extensive granule loss indicates the roof is at end of life
There are visible signs of sagging or rot: Structural issues require comprehensive replacement
You plan to sell the home soon: New roof significantly increases property value and marketability
While repairs might seem economical short-term, older roofs with widespread problems often cost more over 3-5 years in repeated fixes than a single replacement investment.
Quick Comparison: Repair vs Replacement
Understanding trade-offs helps decide if your roof needs fixing through repair or changing new roofing:
Factor
Roof Repair
Roof Replacement
Cost
Lower upfront ($300-$1,500)
Higher upfront ($5,000-$15,000+)
Lifespan Added
2-10 years
20-50 years
Warranty
Limited or none
Full manufacturer + contractor
Time to Complete
1 day or less
1-5 days
Best For
Minor damage, newer roofs
Widespread damage, aging roofs
Insurance Coverage
Often covered for storm damage
Sometimes covered if damage extensive
Property Value
Maintains current value
Increases value significantly
Age-Based Decision Guidelines
Roof age provides the clearest guidance when your roof needs fixing:
Under 10 years: Almost always repair unless damage is catastrophic
10-15 years: Repair for isolated issues; consider replacement if problems are widespread
15-20 years: Evaluate carefully—repair costs may not be worthwhile if replacement is needed within 3-5 years anyway
Over 20 years: Strongly favor replacement in most cases, as roof is near or beyond typical lifespan
Cost Threshold Analysis
Calculate the repair-to-replacement cost ratio to make informed decisions when your roof needs fixing:
If repair cost is under 25% of replacement cost: Repair is almost always the right choice
If repair cost is 25-50% of replacement cost: Consider roof age and condition—lean toward repair for roofs under 15 years, replacement for older roofs
If repair cost exceeds 50% of replacement cost: Replacement usually makes better financial sense
For example, if repair estimates are $4,000 and replacement quotes are $8,000, the 50% ratio combined with roof age over 18 years strongly suggests replacement.
Insurance Influence on Decision
Insurance coverage significantly impacts the repair versus replacement decision when your roof needs fixing after storms:
If insurance will pay for repairs minus deductible, and roof is relatively young (under 15 years), repair makes sense.
If damage is extensive enough that insurance will cover partial or full replacement, upgrade to new roof rather than simply repairing to old condition.
If multiple claims have been filed over recent years, insurers may require replacement or non-renewal.
Work with your insurance adjuster to understand coverage before committing to repair when replacement might be partially covered.
Getting Professional Assessment
Professional inspection provides objective evaluation of whether your roof needs fixing through repair or changing new roofing. Reputable contractors assess condition honestly rather than automatically recommending the most expensive option.
Obtain multiple opinions from licensed, insured roofing contractors, explaining your situation and requesting candid recommendations about the most cost-effective approach given your roof’s age and condition.
Emergency Roof Repair Costs
Understanding typical costs when your roof needs fixing urgently helps homeowners budget appropriately and recognize fair pricing versus price gouging. Emergency repairs command premium rates due to immediate response requirements and often after-hours service.
National Average Emergency Repair Costs
Emergency roof leak repair costs up to twice as much as regular roof repair and may include an additional fee of $100 to $300 on top of standard repair costs. The average cost of roof repair ranges between $380 and $1,770, with emergency repairs commanding premium pricing due to urgency and after-hours service needs.
Most homeowners spend an average of $1,158 for roof repair, but depending on type and extent of damage, costs may range from $150 to $8,000. Simple emergency repairs like patching can take 20-30 minutes, while more substantial repairs requiring professional assessment and permanent fixes may take hours to days to complete.
Cost by Repair Type
When your roof needs fixing urgently, costs vary significantly based on the specific work required:
Type of Repair
Average Cost Range
Temporary tarp installation
$200-$500
Minor shingle replacement
$300-$800
Flashing and leak repair
$400-$1,000
Structural work or framing
$1,200-$3,000+
Emergency service call
$100-$300 additional
Severity of damage significantly impacts cost: Minor issues like replacing a few shingles may cost between $150 and $500, while major repairs can exceed $1,000.
Regional Cost Variations
Emergency repair costs when your roof needs fixing vary by location:
Dallas, Texas: Emergency roof repair generally falls between $300 and $1,500, though price can be higher depending on complexity, labor, materials, and response time.
National averages: Most regions see similar ranges of $300-$1,500 for standard emergency repairs, with high-cost metropolitan areas pushing 20-40% above these figures.
Labor rates significantly influence total costs, with hiring a roofer typically costing $45 to $75 per hour, and emergency repairs adding $100 to $300+ in urgency fees.
Emergency vs Scheduled Repair Costs
Understanding cost differences between emergency and routine service helps explain premium pricing when your roof needs fixing immediately:
Service Type
Usual Cost
Timing
Regular roof inspection
$100-$300 (or free with service)
Scheduled
Regular roof repair services
$250-$750
Within days
Emergency repair
$300-$1,500+
Same-day/Immediate
Emergency services cost more than scheduled repairs because of manpower requirements, quick mobilization, after-hours rates, and priority scheduling.
Factors Affecting Emergency Repair Costs
Several variables influence the total expense when your roof needs fixing urgently:
Type of roofing material: Asphalt shingles are more affordable to repair than slate, tile, or metal roofing
Extent of repairs needed: Temporary fixes such as tarping are less expensive than permanent repairs
Labor costs: Emergency repairs often require overtime or after-hours rates, which increase costs
Roof type complexity: Gable roofs average $300-$1,200 for repairs, while complex roofs like butterfly or mansard cost $1,200-$6,000+
Accessibility: Difficult roof access, steep pitch, or multi-story buildings increase labor time and safety equipment needs
Time of day/week: After-hours, weekend, or holiday service commands highest emergency premiums
Insurance Coverage for Emergency Repairs
Insurance often covers emergency roof repairs when your roof needs fixing due to covered perils like storms, hail, wind, or falling trees. Understanding coverage helps manage out-of-pocket costs:
What’s typically covered:
Storm damage repairs (wind, hail, tornado)
Emergency tarping to prevent further damage
Temporary repairs pending permanent fixes
Full repair or replacement if damage is extensive
What’s typically not covered:
Wear and tear from age or neglect
Maintenance-related failures
Damage from lack of upkeep
Pre-existing conditions
Homeowners typically pay their deductible ($500-$2,500 common range) and insurance covers remaining approved costs. Document all damage thoroughly with photos and save all receipts for emergency services to support insurance claims.
Hidden Costs to Consider
When your roof needs fixing urgently, additional expenses beyond basic repair may arise:
Interior damage repair: Water damage to ceilings, walls, insulation, or belongings
Mold remediation: If leaks persisted long enough to cause mold growth
Structural assessment: Engineering inspection if sagging or major damage is present
Permit fees: Some jurisdictions require permits even for emergency repairs
Temporary housing: Severe damage may necessitate temporary relocation during repairs
Budget 10-20% above initial repair estimates to cover unexpected issues commonly discovered once work begins.
How to Choose an Emergency Roofer
Selecting a qualified contractor when your roof needs fixing urgently prevents scams, ensures quality work, and protects your investment. Storm damage brings out both reputable professionals and fly-by-night operators.
Verify Licensing and Insurance
All legitimate roofers carry proper licensing and insurance, which protect homeowners when your roof needs fixing:
Required credentials:
State contractor license (verify current status)
General liability insurance ($1 million minimum recommended)
Workers’ compensation coverage (prevents homeowner liability for injuries)
Business license and tax registration
Request certificates of insurance and verify coverage directly with insurers before allowing work to begin—fraudulent certificates are common in emergency situations.
Check Reviews and References
Research reputation quickly even in emergency situations when your roof needs fixing:
Better Business Bureau ratings and complaint history
Google reviews from multiple recent customers
Local social media groups and neighborhood forums
References from recent similar emergency repairs in your area
Quality emergency contractors have established reputations—be extremely cautious of door-to-door solicitors appearing immediately after storms with no verifiable local presence.
Get Written Estimates
Obtain written estimates detailing work scope and costs before committing when your roof needs fixing, even in emergency situations:
Estimates should specify:
Exact work to be performed (temporary vs permanent)
Materials to be used (brands, quantities, specifications)
Labor costs and timeline
Emergency service fees clearly itemized
Payment terms and schedule
Warranty coverage on work performed
Compare estimates from 2-3 contractors if time permits, though immediate stabilization (tarping) may need to proceed before full repair quotes are obtained.
Red Flags to Avoid
Watch for warning signs of unreliable contractors when your roof needs fixing urgently:
Danger signals:
Requesting full payment upfront (legitimate contractors take deposits of 10-25%)
Offering to waive insurance deductibles (insurance fraud)
Pressure tactics demanding immediate decision
No local address, only cell phone contact
Arriving unsolicited door-to-door after storms
Unusually low bids compared to competitors
No written contract or vague work descriptions
Unwillingness to provide proof of licensing/insurance
Emergency situations create urgency, but rushing into contracts with questionable contractors creates worse problems than the original roof damage.
Questions to Ask Emergency Roofers
Ask critical questions before hiring when your roof needs fixing:
How quickly can you respond to emergency situations?
What is your emergency service fee?
Can you provide temporary stabilization today and schedule permanent repair?
Do you handle insurance claims and documentation?
What warranty do you provide on emergency repairs?
Will you provide written estimate before starting work?
Who will supervise the work on-site?
How long will temporary repairs last?
When can permanent repairs be completed?
Contractors who answer clearly and provide documentation inspire more confidence than those who evade specifics or pressure immediate decisions.
Frequently Asked Questions
What should I do immediately when I discover my roof needs fixing?
When you discover your roof needs fixing from active leaks or visible damage, take these immediate steps: First, ensure personal safety by avoiding damaged roof areas and staying clear of electrical hazards from water. Locate the water source by tracing leaks back to their entry point from inside the attic if accessible. Contain interior water damage by placing buckets under leaks, moving furniture, and protecting flooring. Document all damage with photographs and video for insurance claims. If you feel comfortable on a ladder, lay a tarp over the damaged area to mitigate additional damage. Finally, call a professional roofing contractor immediately for emergency repairs, especially if water is actively leaking.
Emergency roof leak repair costs up to twice as much as regular roof repair and may include an additional fee of $100 to $300 on top of standard repair costs. When your roof needs fixing urgently, expect costs between $300 and $1,500 for most residential emergency repairs. Specific costs vary by repair type: temporary tarp installation runs $200-$500, minor shingle replacement costs $300-$800, flashing and leak repair averages $400-$1,000, and structural work or framing ranges from $1,200-$3,000+. The average cost of roof repair overall is between $380 and $1,770, but emergency situations command premium pricing due to immediate response requirements and often after-hours service.
Should I repair or replace my roof?
Deciding if your roof needs fixing through repair or complete replacement depends on several factors: Choose repair when damage is isolated (like a few blown-off shingles), your roof is under 10 years old with life remaining, no structural damage is present, and repair costs are under 30% of replacement cost. Choose replacement when your roof is 15-20+ years old, you’ve had multiple repairs over recent years, leaks are recurring in several places, shingles are heavily worn or bald, or there are visible signs of sagging or rot. Generally, if repair cost exceeds 50% of replacement cost and your roof is over 15 years old, replacement makes better financial sense long-term.
How long can I rely on a temporary tarp?
Temporary tarps provide short-term protection when your roof needs fixing but permanent repairs must wait, lasting days to weeks under normal conditions. Emergency tarps protect against immediate weather but aren’t permanent solutions—UV exposure degrades plastic, wind works edges loose, and pooling water can tear tarps over time. Plan for permanent repairs within 30-60 days maximum after tarp installation. Inspect tarps regularly after storms to ensure they remain secure and properly positioned, and be prepared to re-secure or replace tarps that shift or tear. Professional temporary tarp installation costs $200-$500 and provides more secure coverage than most DIY attempts.
Is emergency roof repair covered by insurance?
Insurance often covers emergency roof repairs when your roof needs fixing due to covered perils like storms, hail, wind, or falling trees. Covered situations typically include storm damage repairs (wind, hail, tornado), emergency tarping to prevent further damage, temporary repairs pending permanent fixes, and full repair or replacement if damage is extensive. However, insurance typically doesn’t cover wear and tear from age or neglect, maintenance-related failures, damage from lack of upkeep, or pre-existing conditions. Homeowners pay their deductible (commonly $500-$2,500) and insurance covers remaining approved costs. Document all damage thoroughly with photos and save receipts for emergency services to support insurance claims.
Can I do temporary roof repairs myself?
While possible, DIY temporary repairs when your roof needs fixing require extreme caution due to serious fall risks. Homeowners should avoid DIY repairs when roof pitch exceeds 6:12 (too steep for safe footing), weather conditions include rain, wind, or freezing temperatures, roof shows structural damage or sagging, damage is extensive, or they lack ladder safety experience. If you feel comfortable on a ladder and conditions are safe, you can lay tarps over damaged areas to mitigate damage temporarily. However, professional emergency services are always safer and typically complete temporary stabilization faster than homeowner attempts. Simple emergency repairs like tarping can take professionals 20-30 minutes versus hours for inexperienced homeowners, and professional installation ($200-$500) provides more secure coverage.
What are the warning signs my roof needs immediate repair?
Critical signs that your roof needs fixing immediately include: Active water leaking through the ceiling during storms, which indicates compromised roofing allowing water penetration. Missing or damaged shingles leaving bare spots or exposed underlayment vulnerable to weather. Sagging roof sections showing dips or curves indicating structural failure from weakened supports or trapped moisture. Water stains on ceilings or walls even without active dripping, indicating water has penetrated the roof system. Damaged or missing flashing around chimneys, vents, or valleys creating entry points for water. Visible storm damage including dents, punctures, cracks, or displaced materials from hail or impacts. Any of these signs demand immediate professional evaluation.
How do I find a reliable emergency roofer?
Finding trustworthy contractors when your roof needs fixing urgently requires quick verification: Verify licensing and insurance by requesting current certificates and confirming coverage with insurers directly. Check online reviews on Better Business Bureau, Google, and local social media groups for established reputation. Get written estimates detailing work scope, materials, costs, and timelines even in emergencies. Avoid red flags including requests for full payment upfront, offers to waive insurance deductibles (fraud), pressure tactics, lack of local presence, or door-to-door solicitation immediately after storms. Ask critical questions about response time, emergency fees, insurance claim handling, warranties, and permanent repair scheduling. Legitimate emergency roofers have established local reputations, proper credentials, and provide clear documentation.
When your roof needs fixing after storm damage, leaks, or visible deterioration, quick response prevents minor problems from escalating into major structural damage and costly interior destruction. Emergency roof repair costs between $300 and $1,500 for most residential situations, with temporary tarping running $200-$500 and permanent repairs varying based on damage extent. Understanding critical warning signs—including active leaks, missing shingles, sagging sections, and water stains—enables homeowners to act promptly before additional weather causes compounding damage.
The decision between repairing damage or changing new roofing depends primarily on roof age and damage extent: roofs under 10 years old with isolated damage typically warrant repair, while roofs 15-20+ years old with widespread problems or recurring leaks make better candidates for full replacement. By following proper emergency steps when your roof needs fixing, obtaining multiple estimates from licensed and insured contractors, and making informed repair versus replacement decisions based on age and condition, homeowners protect their investment while managing costs effectively.
🏠 Roofing Tips & Updates
Get free roofing advice, cost guides, and seasonal maintenance tips.
Roofing content specialist with 5+ years researching U.S. residential and commercial roofing. Has documented 200+ projects covering installation costs, material selection, contractor vetting, and DIY guides for homeowners across all climate zones.