
How to Design Gambrel Roof Trusses: Complete Guide
Gambrel roof trusses are engineered roof support structures featuring two distinct slopes on each side a steep lower slope that transitions to a shallower upper slope designed to maximize interior headroom and usable attic space without increasing building footprint. Typical gambrel roof design spans range from 24 to 48 feet, with truss spacing commonly set at 24 inches on center for residential and agricultural buildings, though engineered designs may allow spacing up to 36 inches depending on load requirements.
This complete guide covers gambrel roof truss dimensions, spacing requirements, materials (wood vs steel), load capacity considerations, step-by-step construction methods, cost factors, and when gambrel roof design makes the most sense for barns, sheds, homes, and garages.
What are gambrel roof trusses?
A gambrel truss is a type of roof support structure with two different slopes on each side, featuring a steep lower slope that meets a less steep upper slope. This distinctive design provides additional headroom without requiring additional building footprint, delivering extra usable space and better ventilation at reduced material expenses compared to traditional gable or hip roofs.
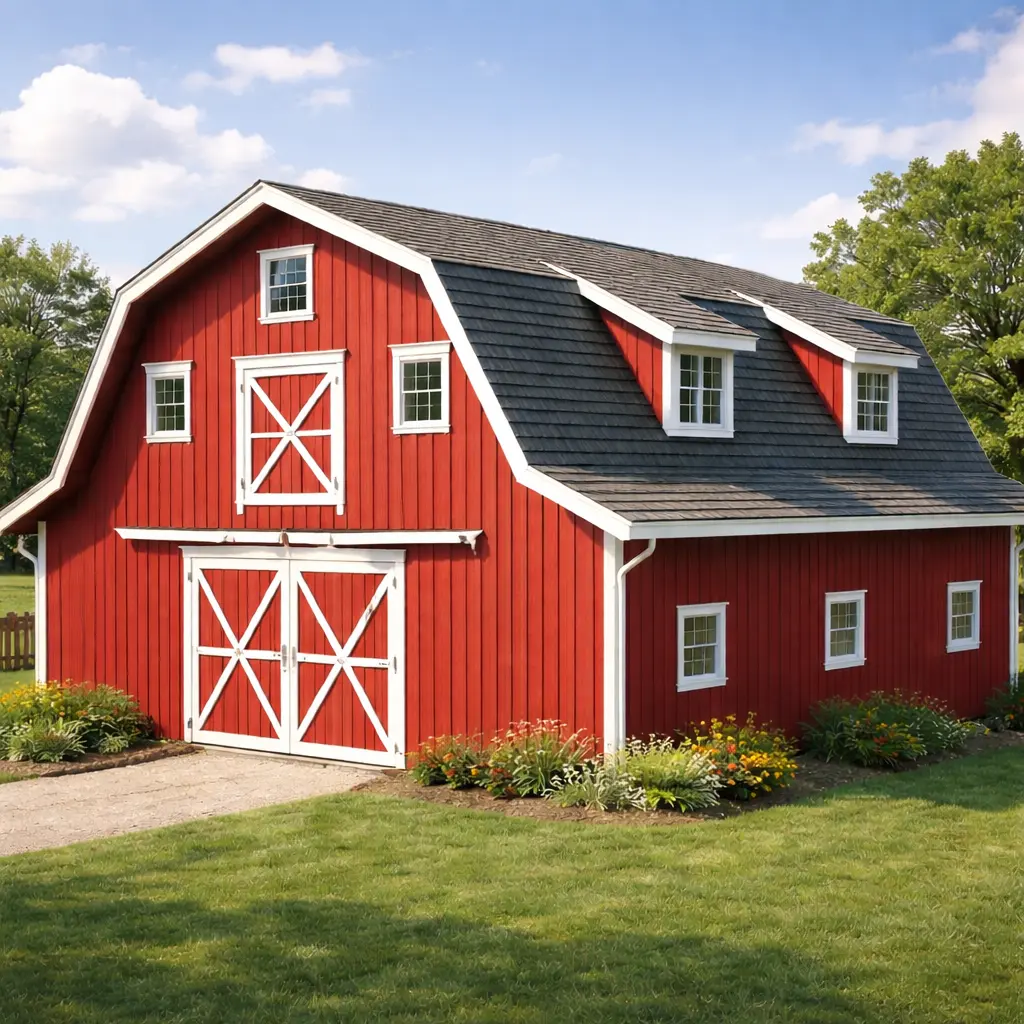
The double-slope gambrel roof design has become iconic in barn architecture, but it’s increasingly popular for residential homes with attic rooms, storage sheds, and garages where maximizing interior space is a priority.
Gambrel roof trusses: typical dimensions and spans
Understanding standard gambrel roof truss dimensions helps you plan materials, estimate costs, and ensure your design meets structural requirements.
Standard span ranges
Gambrel trusses are configurable in a range of sizes with typical spans between 24’–48′ (7.3–14.6 m) and overall heights of 4’–24′ (1.22–7.31 m). Timber gambrel trusses can span between 24 to 48 feet without internal supports, but deeper or reinforced trusses may span even farther.
Common lumber thickness
The thickness of wood trusses is commonly 1.5″, 3″, or 4.5″ (3.8, 7.6, 11.4 cm), corresponding to nominal 2x, 4x, or 6x dimensional lumber. Trusses have a pitch ratio typically between 1:1 to 1:6, with the steeper lower slope often around 60–70 degrees and the upper slope around 20–30 degrees.
Truss spacing guidelines
Spacing between gambrel roof trusses is commonly 24 inches on center for most residential and agricultural roofs, but with engineered designs and specific materials, spacing up to 36 inches or more may be used depending on roof load factors like snow, wind, and roofing weight. Proper truss dimensions and spacing ensure your roof can safely support loads without sagging or failure.
Gambrel roof design: slope angles and geometry
The key design feature of gambrel roof trusses is the double slope shape, which creates the signature barn-style profile.
Lower slope angle
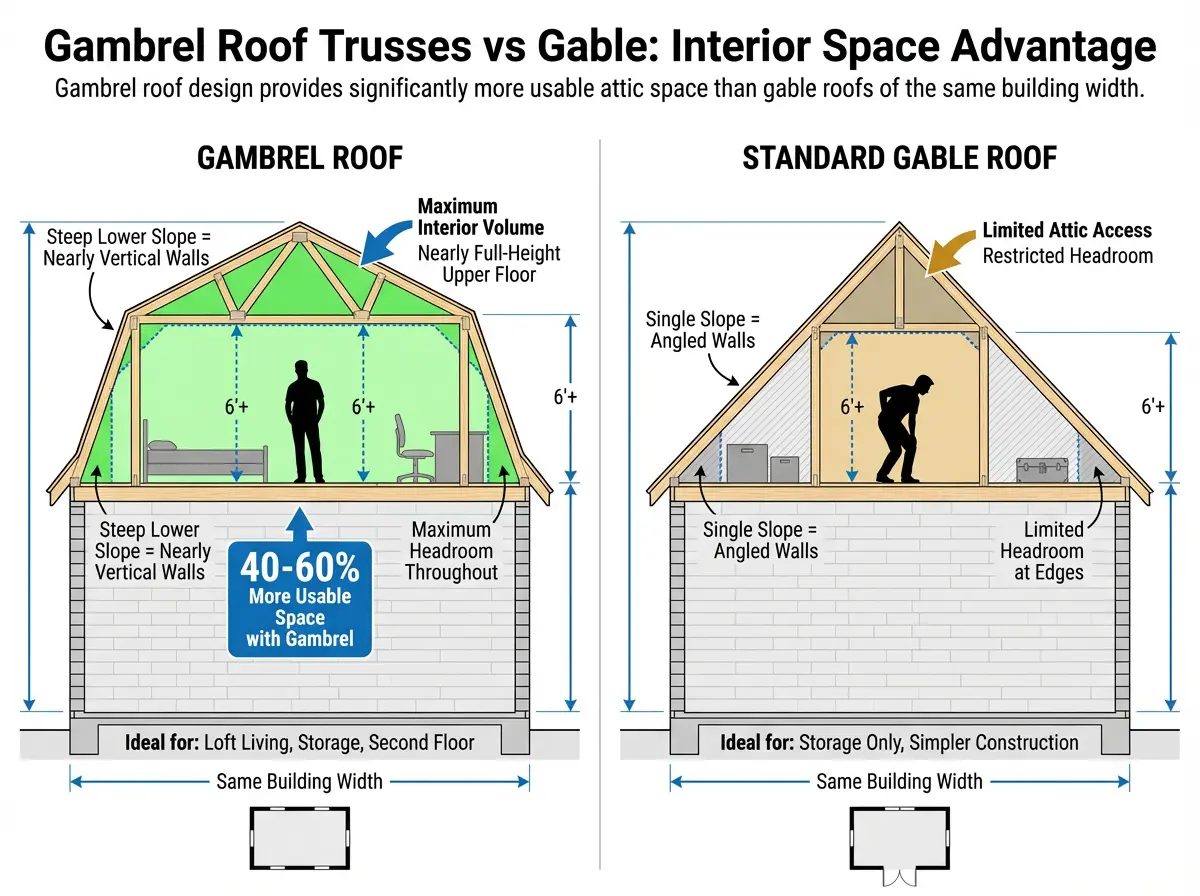
The lower slope is usually steeper typically 60–70 degrees and about twice the height of the upper slope. A standard gambrel roof truss often has a second slope angle of 60 degrees.
Upper slope angle
The upper slope is shallower, commonly 20–30 degrees, creating the distinctive “broken back” appearance that maximizes attic headroom. A standard gambrel roof truss has a peak angle of 30 degrees.
Why the double slope matters
This dual-angle gambrel roof design helps maximize interior space while keeping the roof structurally balanced, allowing for full-height walls in attic spaces rather than sloped ceilings that limit usability.
Materials for gambrel roof trusses: wood vs steel
Materials influence truss dimensions, spacing, cost, and load capacity.
Wood gambrel trusses
Wood trusses are the most common choice for residential and agricultural gambrel roof design because they’re cost-effective, easy to work with, and widely available. Typical lumber choices include 2×4, 2×6, or 2×8 dimensional lumber for top and bottom chords, with 24-inch on-center spacing for the truss members.
Wood gambrel trusses can be site-built or pre-engineered, with pre-engineered trusses saving time and ensuring consistent quality compared to building from scratch.
Steel gambrel trusses
Steel trusses can span longer distances with fewer supports and support heavier loads than wood. Steel is often chosen for large commercial or industrial buildings needing extra strength, though it costs more and requires specialized fabrication and installation.
Gambrel roof truss spacing and span chart
Spacing and dimensions for gambrel roof trusses vary widely depending on building size and requirements.
| Building width (ft) | Typical span (ft) | Common spacing (in OC) | Notes |
|---|---|---|---|
| 10–20 | 10–20 | 16–24 | Small sheds, garages |
| 20–30 | 20–30 | 24 | Standard residential, small barns |
| 30–36 | 30–36 | 24 | Medium barns, larger garages |
| Over 36 | 40+ | 24–36 | Requires engineered design and approval |
Note: Always check local regulations and consult a structural engineer, especially for large or complex buildings, to ensure safety and compliance.
Gambrel roof trusses load capacity and engineering
Gambrel roof trusses are engineered to support significant loads, including the weight of roofing materials (dead load), snow, wind pressure, and any live load from maintenance or equipment.
Understanding load types
- Dead load refers to the permanent weight of roofing components like shingles, sheathing, and insulation.
- Live load includes temporary forces such as snow accumulation, wind, and maintenance workers.
Both loads must be carefully considered in the gambrel roof design to prevent sagging or structural failure.
Materials matter for load capacity
Timber gambrel trusses are common and cost-effective, but steel trusses can support heavier loads and longer spans. The overall load capacity depends on several key factors, such as the materials used, truss dimensions, and spacing between individual trusses.
How to build gambrel roof trusses: step-by-step construction
Building gambrel roof trusses can save money and give you full control over your roof design, but precision is critical.
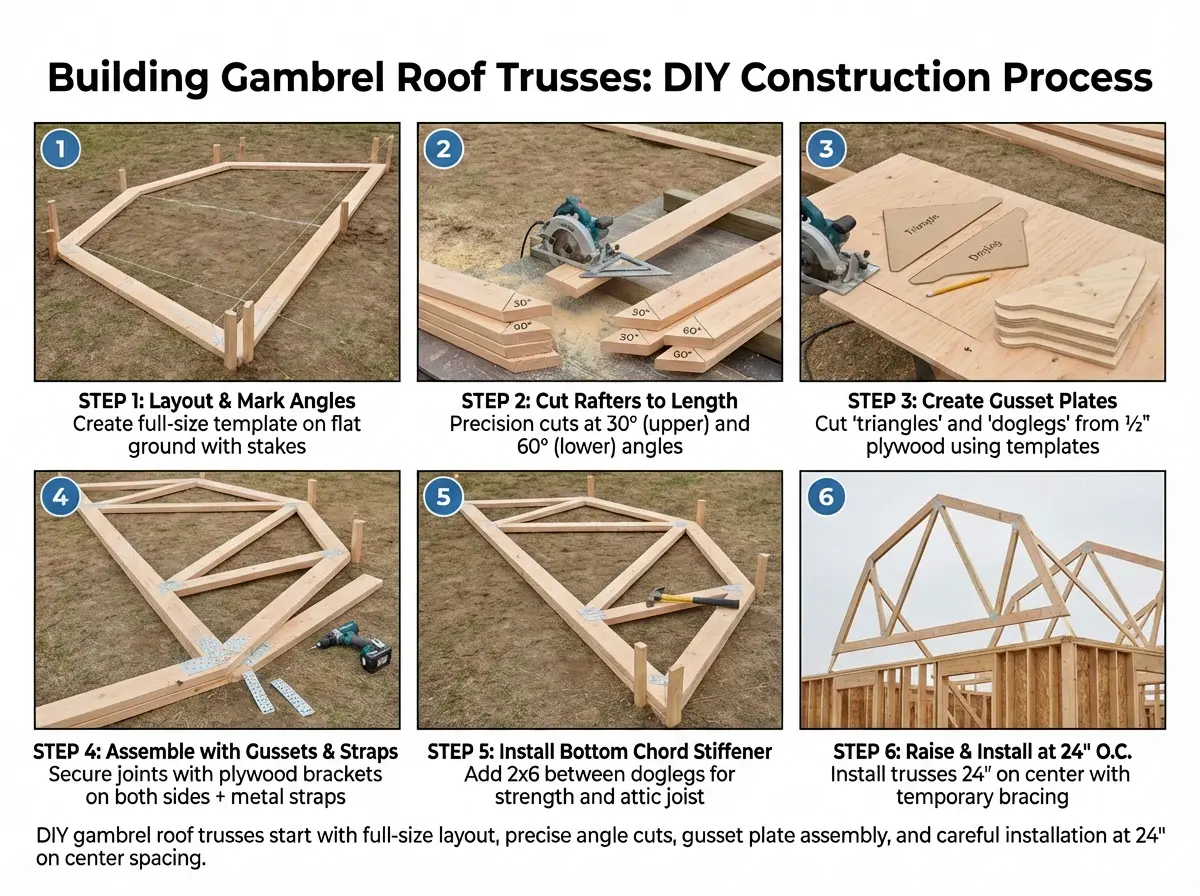
Step 1: Create a full-size layout
Make a full-size layout of your gambrel on smooth, level ground and drive stakes into the earth to mark the locations of the four rafters in each truss. Start by carefully measuring your building’s width and desired roof height to calculate the correct gambrel roof truss dimensions.
Step 2: Calculate angles and dimensions
Use a gambrel truss design calculator or detailed plans to get precise angles and lengths. Draw lines between three points to represent the top of the trusses, and measure down 3 1/2″ off each line to represent a full 2×4.
The middle line should be at a 45-degree angle, resulting in end angles of 22.5 degrees each on the truss pieces, which can be achieved using a speed square. Each truss piece will be a specific length on the top measurement precision here is vital, as even small errors can affect the truss fit and roof shape.
Step 3: Cut lumber to size
Using your measurements, cut the rafters, chords, and supports to the correct lengths and angles. Lay four 2-by-6 beams (or appropriate lumber) out flat in their proper positions and using a string line mark the correct lengths and angles to cut them.
Step 4: Assemble the trusses
Join the cut pieces to form the gambrel truss shape. Use metal connector plates or gussets at joints to secure the rafters and chords firmly 1/2 inch plywood gussets are commonly used for DIY builds. Make sure all connections are tight and aligned, and check that the width of your truss is exactly correct (e.g., 10′ from one bottom side to the other for a 10′ building).
Step 5: Install trusses on the building
Position trusses at the planned spacing (typically 24″ on center), secure them to wall plates, and brace them properly before adding sheathing.
Step 6: Add sheathing and roofing
Cover the trusses with plywood or oriented strand board sheathing, roll out an underlayment layer, then add your shingles, metal panels, or other roofing material of your choice. This final step locks in your gambrel shape and makes your roof weatherproof.
DIY gambrel roof truss construction tips
Building your own gambrel roof trusses requires attention to detail and the right approach.
- Use a gambrel truss design calculator throughout the process to verify angles, lengths, and load capacity accuracy here saves time and money by avoiding costly mistakes.
- Cut 4 pieces to form your first truss and make sure the dimensions are exact before cutting the remaining trusses; if your first truss doesn’t measure up, make necessary adjustments and record these so that the remaining trusses will be identical.
- Pre-engineered gambrel trusses can save time and ensure consistent quality compared to building from scratch, especially for larger or complex projects.
- Always consult a structural engineer for large or complex buildings to ensure safety and compliance with local codes.
Common mistakes when building gambrel roof trusses (and how to avoid them)
Even experienced DIY builders make errors when constructing gambrel roof trusses that can compromise structural integrity and create costly problems down the road. The most critical mistake is inaccurate angle cuts—because gambrel roof design requires two different slopes per side, even a one-degree error in your lower slope angle (typically 60 degrees) or upper slope angle (typically 30 degrees) compounds across multiple trusses and results in a roof that won’t align properly or sit square on the building. Always use a speed square or angle finder to verify cuts, and build a test truss first to confirm dimensions match your building width exactly before cutting lumber for the remaining trusses.
Another common error is inadequate gusset plate attachment—using too few nails or screws, or placing gussets on only one side of the truss, weakens the critical joints where upper and lower slopes meet and where rafters connect to the bottom chord. Professional truss manufacturers use metal connector plates pressed into both sides of every joint; DIY builders should use 1/2-inch plywood gussets on both sides of each connection point, secured with construction adhesive and closely spaced screws or nails to distribute load evenly. Finally, improper truss spacing or inadequate bracing during installation can cause trusses to rack (twist out of plumb) before sheathing is applied—always install temporary diagonal bracing between trusses and double-check that each truss is perfectly vertical before securing it permanently to the wall plates. Taking time to avoid these three mistakes ensures your gambrel roof trusses will perform safely for decades
Gambrel roof design pros and cons
Like all roof types, gambrel roof trusses have advantages and trade-offs.
Advantages of gambrel roof design
- Maximized interior space: The two-slope design creates full-height attic rooms without increasing building footprint.
- Cost-effective: Uses less material than comparable full second-story construction.
- Better ventilation: The design naturally promotes airflow and can reduce cooling costs.
- Aesthetic appeal: The classic barn-style look is attractive for residential, agricultural, and garage buildings.
Disadvantages of gambrel roof design
- More complex construction: Requires precise angles and measurements compared to simple gable roofs.
- Higher wind vulnerability: The large surface area and upper slope can catch wind; proper engineering is essential in high-wind zones.
- Maintenance access: The steep lower slope can make exterior maintenance more challenging.
Gambrel roof trusses: maintenance and long-term durability
Once installed, gambrel roof trusses require minimal maintenance compared to the roof covering itself, but periodic inspections help catch potential issues before they become expensive repairs. Inspect truss connections annually—especially gusset plates and metal connector plates—for signs of rust, loosening, or wood rot, paying extra attention after severe storms or heavy snow events that may have stressed the structure. The dual-slope gambrel roof design naturally sheds water and snow efficiently, but check that roof sheathing remains firmly attached and that no sagging or deflection has occurred in the truss members, as this can indicate overloading or inadequate spacing.
Attic ventilation is particularly important in gambrel roof design because the large enclosed space can trap heat and moisture, accelerating wood decay and reducing insulation effectiveness. Install ridge vents, soffit vents, or gable end vents to maintain airflow and prevent condensation buildup that can weaken truss lumber and encourage mold growth. If you’re using your gambrel attic space as a finished room, ensure proper vapor barriers and insulation are installed between living space and the roof deck to prevent moisture migration into truss cavities. With proper installation, adequate ventilation, and occasional inspections, wood gambrel roof trusses can last 50+ years, while steel gambrel trusses can exceed 100 years with virtually no maintenance beyond rust prevention in humid environments.
Gambrel roof trusses cost factors
Several variables affect the total cost of a gambrel roof truss project.
Material costs
Wood lumber prices fluctuate, but a typical DIY gambrel roof truss project using dimensional lumber and plywood gussets can cost $2–$5 per linear foot of truss. Pre-engineered trusses cost more upfront but save labor time.
Labor costs
If you’re hiring professionals to build and install gambrel roof trusses, labor typically adds 50–70% to material costs, depending on complexity and regional rates.
Engineering and permits
Complex or large gambrel roof designs (spans over 36 feet) often require engineered truss plans and building permits, adding $500–$2,000+ to project costs.
When to choose gambrel roof trusses
Gambrel roof design makes the most sense in specific situations.
Best applications for gambrel roof trusses
- Barns and agricultural buildings: The classic gambrel shape maximizes hay storage and equipment clearance.
- Sheds and workshops: Provides standing-height lofts for storage without building a larger footprint.
- Garages with bonus rooms: Creates full-height second-floor space for living, office, or hobby areas.
- Homes with attic bedrooms: Delivers usable headroom and floor area in upper levels.
When other roof types may be better
If your priority is simplicity and lowest cost, a standard gable or shed roof may be more practical. If you’re in a high-wind or hurricane zone, consult an engineer to ensure gambrel roof trusses are properly braced and anchored.
Gambrel roof trusses vs other truss types
Understanding how gambrel roof trusses compare to other common truss designs helps you choose the right structure.
| Truss type | Slopes | Interior space | Complexity | Typical use |
|---|---|---|---|---|
| Gambrel | Two per side (steep + shallow) | Maximum attic height | Moderate | Barns, garages, sheds, homes with lofts |
| Gable | One per side | Moderate attic | Simple | Standard residential roofs |
| Hip | Four sloping sides | Limited attic | Moderate | Wind-resistant residential |
| Scissor | Sloped bottom chord | Vaulted ceiling | Moderate | Cathedral ceilings |
| Attic | Horizontal bottom chord | Walk-in attic | Complex | Older residential construction |
Gambrel roof design strikes the best balance between interior space and material efficiency for buildings where attic usability matters.
FAQ: gambrel roof trusses
What are gambrel roof trusses?
Gambrel roof trusses are engineered support structures with two slopes per side a steep lower slope and shallow upper slope designed to maximize interior attic space.
What is the typical span for gambrel roof trusses?
Gambrel roof trusses typically span between 24’–48′ (7.3–14.6 m) without internal supports.
What is the standard spacing for gambrel roof trusses?
Spacing between gambrel roof trusses is commonly 24 inches on center for residential and agricultural buildings, though engineered designs may allow up to 36 inches.
What angles are used in gambrel roof design?
A standard gambrel roof truss has a peak angle of 30 degrees and a second (lower) slope angle of 60 degrees.
Can I build gambrel roof trusses myself?
Yes DIY gambrel roof trusses can be built using dimensional lumber (2×4, 2×6, 2×8) and plywood gusset plates, but precision in measurements and angles is critical.
What size lumber is used for gambrel roof trusses?
Common lumber sizes include 2×4, 2×6, or 2×8 for chords and rafters, depending on span and load requirements.
How much weight can gambrel roof trusses support?
Load capacity depends on materials, dimensions, and spacing, but properly engineered gambrel roof trusses can support typical residential dead loads plus snow and wind loads.
Do I need an engineer for gambrel roof trusses?
For buildings over 36 feet wide or in high-load areas, consult a structural engineer to ensure safety and code compliance.
What is the difference between gambrel and mansard roofs?
Gambrel roofs have two slopes per side on two sides of the building; mansard roofs have steep lower slopes on all four sides.
Are gambrel roof trusses more expensive than gable trusses?
Gambrel roof trusses cost slightly more due to additional cuts and complexity, but they deliver far more usable interior space per dollar.
Get free roofing advice, cost guides, and seasonal maintenance tips.

Roofing content specialist with 5+ years researching U.S. residential and commercial roofing. Has documented 200+ projects covering installation costs, material selection, contractor vetting, and DIY guides for homeowners across all climate zones.
Leave A Comment