Getting Rid of Ice Dams on Roof: Safe Removal Guide
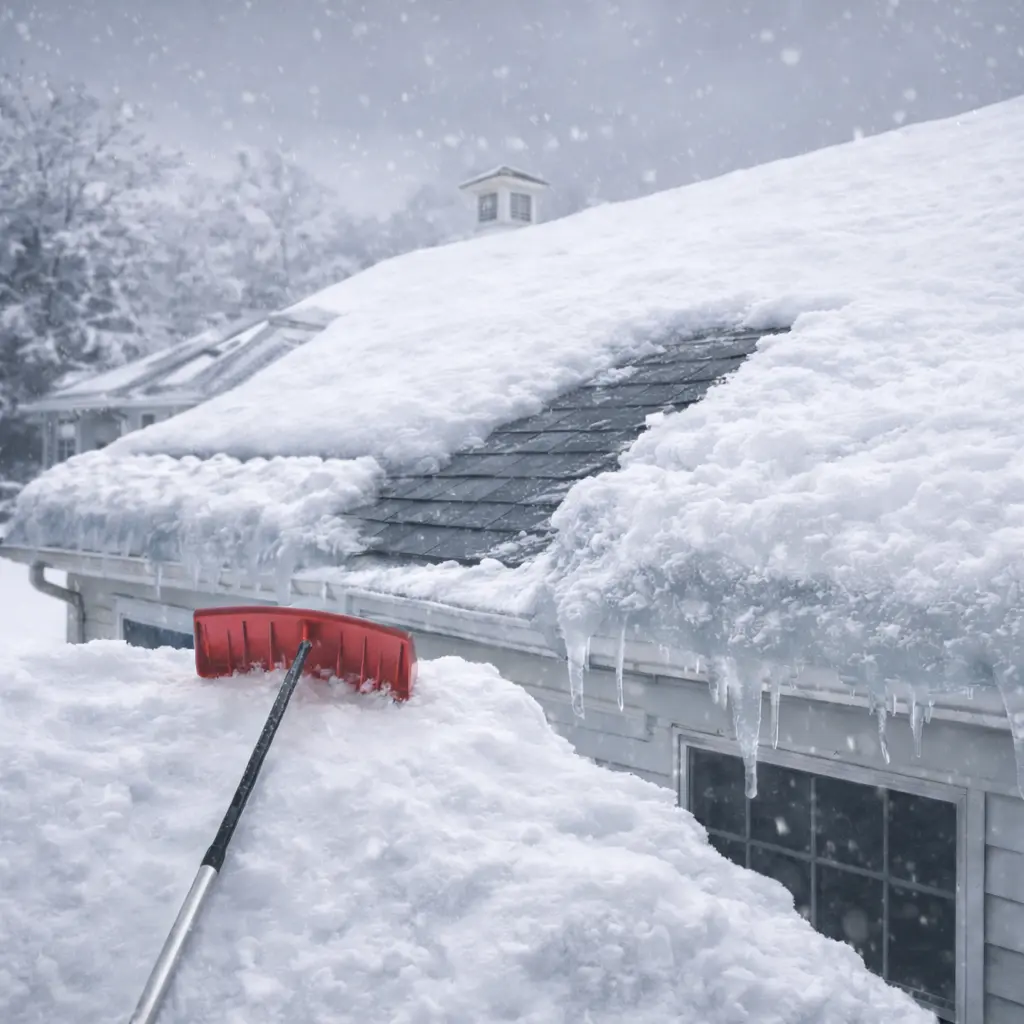
Getting rid of ice dams on roof is possible without wrecking your shingles start by removing snow near the eaves with a roof rake, then melt drainage channels through the dam using calcium chloride (in a nylon stocking/sock) instead of chopping ice with tools. A roof ice dam forms when snow melts higher up the roof, runs down to colder eaves, refreezes, and creates an ice “wall” that traps water; the backed-up water can leak under shingles and into your home.
This guide is written for U.S. homeowners dealing with winter storms and freeze-thaw cycles: you’ll learn what a roof ice dam is, how to spot it early, the safest DIY steps for getting rid of ice dams on roof, when to call pros, what to do if you already have interior leaks, and how to prevent roof ice dam problems long-term through air sealing, insulation, ventilation, and ice-dam protection layers at the eaves.
Table of Contents
What is a roof ice dam?
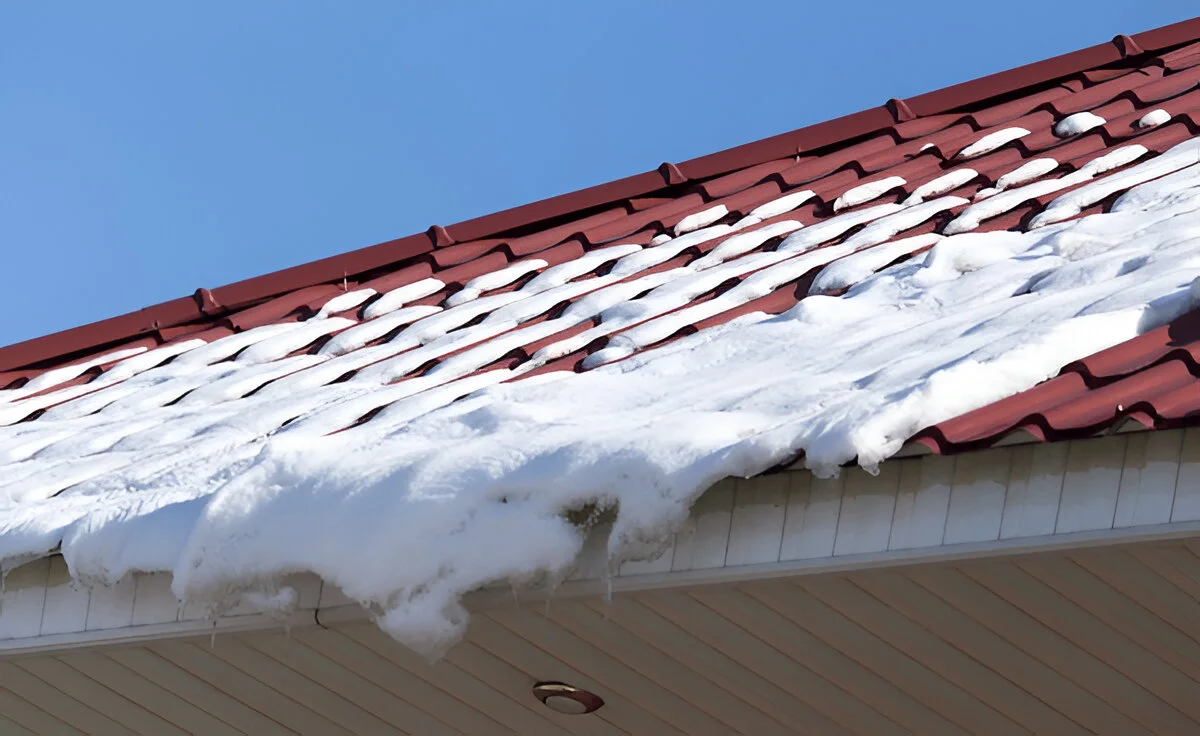
A roof ice dam is a ridge of ice that forms along the roof edge (often at the gutters) when melted snow refreezes at the colder eaves and blocks water from draining off the roof. The trapped water pools behind the ice dam and can work its way under shingles and into the roof deck, leading to leaks, stained ceilings, wet insulation, and mold risk.
In many U.S. climates, roof ice dam issues appear after heavy snow followed by sunny days and nighttime freezing classic freeze‑thaw conditions that repeatedly melt and refreeze water at the eaves. If you’re focused on getting rid of ice dams on roof, remember: the ice is the symptom, but heat loss + refreezing at the eaves is the mechanism you must stop.
Why ice dams happen (root causes)
A roof ice dam almost always requires two things: heat that melts snow higher up, and a cold roof edge where water refreezes. That heat typically comes from attic heat loss warm air leaks from the home into the attic and warms the roof deck above it.
Building Science guidance emphasizes the three best ways builders combat ice dam formation: air seal the ceiling plane, thoroughly insulate the attic, and ventilate the roof to keep the roof deck cold. University extension-style guidance likewise stresses sealing air leaks first, then increasing insulation thickness, and improving ventilation to maintain a cold roof surface.
Signs you have an ice dam (and when it’s urgent)
You may need immediate action for getting rid of ice dams on roof if you see any of these:
- Thick ice buildup along the eaves/gutters, often with icicles forming.
- Water stains, bubbling paint, or wet drywall on exterior walls/ceilings (especially near eaves).
- Drips coming from soffits or behind gutters, indicating water is backing up.
- Damp attic insulation or visible moisture on roof sheathing above living spaces.
If interior leaking is active, treat it as urgent: stop water damage inside (buckets, towels, dehumidification) and start safe roof ice dam mitigation immediately.
Getting rid of ice dams on roof: the safest DIY methods
The safest DIY goal is not “remove every bit of ice”; it’s to restore drainage so trapped water can escape.
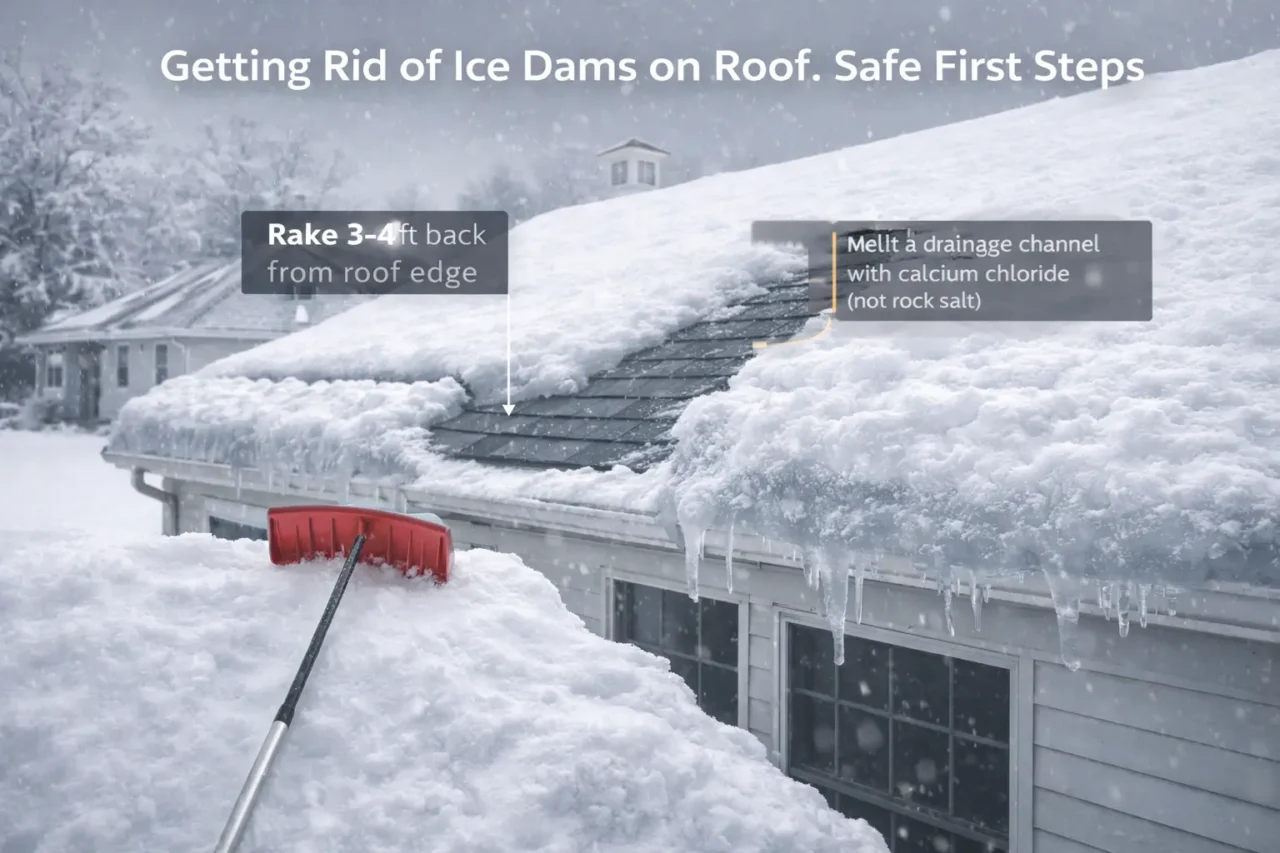
1) Rake snow 3–4 feet from the roof edge
Travelers recommends using a roof rake to remove snow 3–4 feet from the edge of your roof, being careful not to damage the roof covering. This reduces the amount of meltwater that will run down and refreeze at the eaves and can slow the growth of a roof ice dam.
Tips that reduce roof damage risk:
- Pull snow downward gently; don’t scrape aggressively on shingles.
- Stand clear of falling snow/ice zones.
- Avoid piling snow where it blocks exits or walking paths, as Travelers cautions.
2) Melt a channel through the dam using calcium chloride “socks”
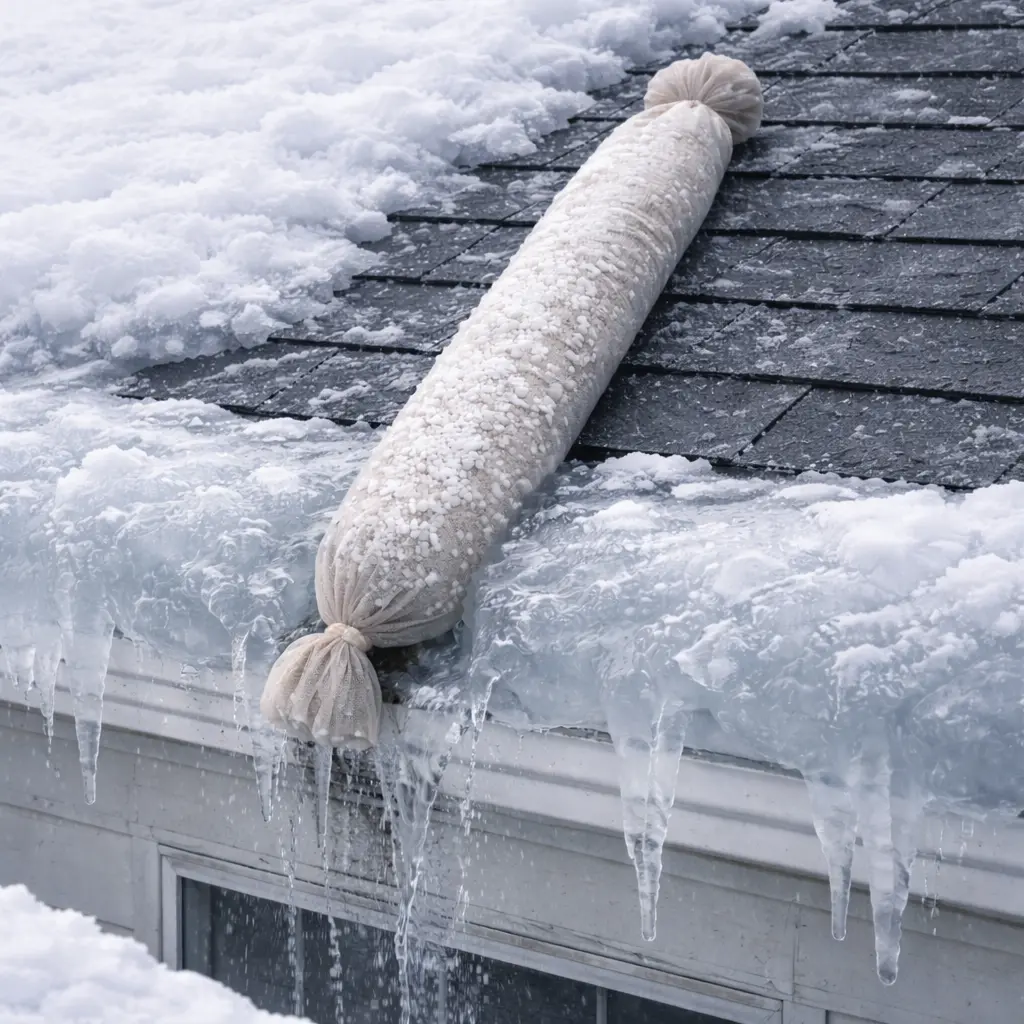
Travelers and The Hanover both recommend using calcium chloride ice melt (not rock salt/sodium chloride) placed in a nylon stocking to melt a channel through the ice dam. Travelers’ steps: fill a nylon stocking with calcium chloride and position it vertically across the ice dam so it melts a channel through which water can flow.
Key points for getting rid of ice dams on roof using this method:
- Use calcium chloride; Travelers warns against rock salt/sodium chloride because it can damage your roof.
- Place the stocking vertically across the dam so it melts a drain path to the roof edge.
- Keep people away from the drop zone because chunks can release unexpectedly.
3) Keep gutters and downspouts clear (when safe)
ARMA’s ice dam protection bulletin notes gutters and downspouts should be free of debris, and gutter edges should be lower than the roof’s slope line to help snow and ice slide clear. During active winter conditions, only clear gutters if you can do it safely from the ground or a stable ladder with proper precautions.
4) When to use a professional steam service
If you have a large, dense roof ice dam or repeated interior leaks, professional ice dam removal using steam can reduce damage risk compared to chiseling or hammering. Steam removal is especially useful when homeowners can’t safely access the roof edge or when the dam is too thick for calcium chloride channeling to keep up.
5) Getting rid of ice dams on roof without damaging shingles
Getting rid of ice dams on roof should focus on restoring drainage, not smashing ice. Travelers’ guidance emphasizes a safer approach: rake snow back from the roof edge and melt a channel through the dam using calcium chloride in a nylon stocking. This avoids the most common DIY mistake chipping ice with tools which can tear shingles and create new leak points that cost more than the original roof ice dam problem.
If you only do one thing today, reduce the snow load near the eaves. Travelers recommends removing snow 3–4 feet from the roof edge using a roof rake while being careful not to damage the roof covering. Less snow at the edge means less meltwater feeding the dam, which makes every other method work faster.
6) Roof ice dam “calcium chloride sock” method (details people skip)
The calcium chloride sock method works because it creates a vertical melt channel that lets trapped water escape. Travelers’ steps are simple: fill a nylon stocking with calcium chloride ice melt and position it vertically across the ice dam to melt a channel through the ice. They also warn not to use rock salt/sodium chloride because it can damage your roof.
Protect landscaping while you’re getting rid of ice dams on roof. Travelers recommends covering shrubbery and plants near gutters/downspouts with lightweight tarps while the calcium chloride stockings remain in place, since calcium-chloride-saturated water dripping off the roof may damage plants. This small step prevents a roof ice dam repair from turning into dead landscaping in spring.
7) When to stop DIY and call a pro
If you can’t safely reach the roof edge, don’t force it. Travelers explicitly warns that using a ladder in snowy and icy conditions may be dangerous and suggests hiring a contractor if you cannot safely reach the roof. For severe or recurring roof ice dam situations especially with active interior leaking professional removal can reduce both injury risk and roof damage compared to aggressive DIY attempts.
What NOT to do (common mistakes that damage roofs)
If your priority is getting rid of ice dams on roof without causing expensive roof repair, avoid these:
- Do not chip or hammer ice with sharp tools (risk: shingle damage, punctures, leaks).
- Do not use rock salt (sodium chloride); Travelers warns it can damage your roof.
- Do not climb on an icy roof; falls are a major winter hazard, and safe removal methods emphasize ground-based work where possible.
- Do not ignore active leaks; the longer water backs up behind a roof ice dam, the higher the chance of hidden damage.
If you already have a leak: emergency interior steps
Getting rid of ice dams on roof goes faster when you also reduce indoor moisture and limit damage.
- Catch dripping water with buckets and protect floors.
- Use fans and a dehumidifier to slow mold growth in wet materials.
- If you can access the attic safely, place a container under drips and avoid disturbing wet insulation until leak stops.
- Once conditions improve, document damage for insurance and repair planning.
Permanent fixes: stop ice dams from coming back
Temporary removal solves today’s roof ice dam, but prevention is what saves money long-term.
Air sealing (the #1 long-term fix)
Building Science guidance states the first best way to combat ice dams is to fully air seal the ceiling plane. Air sealing reduces warm air escaping into the attic, which lowers roof deck temperatures and reduces melting that creates the dam cycle.
High-impact air leak points to seal:
- Attic hatches and pull-down stairs.
- Plumbing stacks and vent chases.
- Recessed can lights and wiring penetrations.
- Top plates of exterior walls (where accessible).
Add attic insulation (after air sealing)
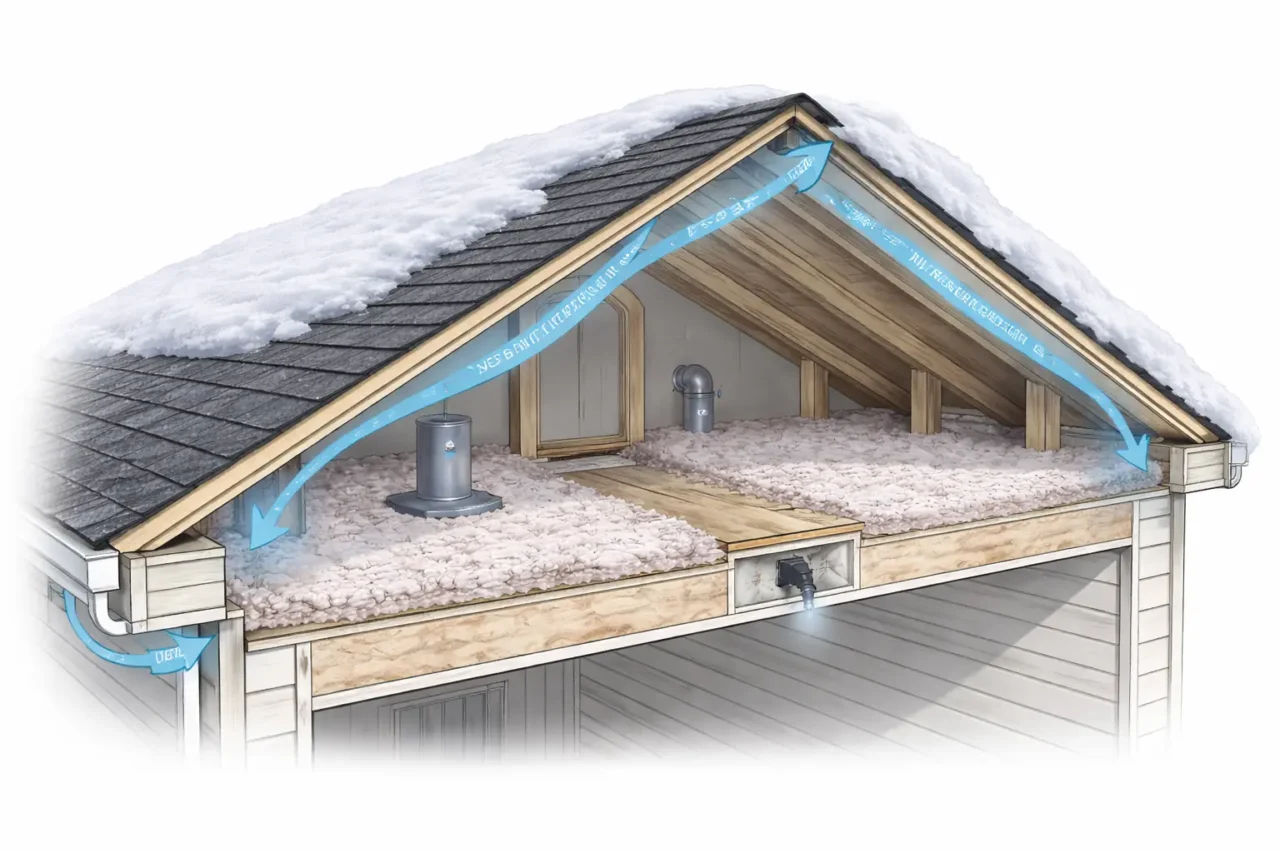
Building Science guidance lists thorough attic insulation as a top strategy to combat ice dams because it reduces heat transfer to the roof deck. University extension-style guidance also recommends increasing insulation thickness after sealing air leaks.
A well-insulated attic keeps the roof surface colder, so snow doesn’t melt unevenly and refreeze at the eaves.
Improve ventilation (keep the roof deck cold)
Building Science guidance emphasizes ventilating the roof assembly to keep it cool and minimize snow melt that leads to ice dams. This typically means ensuring soffit-to-ridge airflow is not blocked by insulation and using baffles to maintain a clear ventilation path.
Missouri Extension guidance provides a rule-of-thumb ventilation target at least 2 square feet of attic vent per 150 square feet of attic area and notes the need for clearance between roof sheathing and ceiling insulation at the eaves to allow ventilation.
Install ice-dam protection at the eaves during reroofing
ARMA recommends installing an ice dam protection layer along eaves and notes that self-adhering membranes (ice and water shield style) are commonly used, with an alternative of two layers of asphalt-saturated felt cemented together depending on manufacturer instructions and local code. Even if a roof ice dam forms, this eave protection helps keep backed-up water from reaching the roof deck.
Roof repair after an ice dam (what to inspect)
After getting rid of ice dams on roof, plan a targeted inspection as soon as it’s safe:
- Shingle edges along the eaves (lifting, cracking, missing granules).
- Flashing at valleys, chimneys, and roof-to-wall joints (common leak paths during backup).
- Gutters and fascia damage from heavy ice loads.
- Attic insulation condition (wet insulation loses performance and can contribute to repeat ice dams).
If you see recurring roof ice dam problems, treat it as a building envelope issue (air leakage + insulation + ventilation), not just a roof surface issue.
Why ice dams keep coming back (the real reason)
Getting rid of ice dams on roof is temporary if warm air keeps leaking into the attic. Building-science guidance explains that air sealing the ceiling plane, adding insulation, and ensuring roof ventilation are key measures to prevent ice dams because they help keep the roof deck cold and reduce uneven snowmelt. If you only remove the ice but ignore heat loss, you often end up repeating the same roof ice dam cycle after the next snowfall.
Ventilation and gutter setup (often overlooked)
ARMA’s bulletin notes you should keep gutters and downspouts free of debris and that the outer edges of gutters should be lower than the roof’s slope line so snow and ice can slide clear. It also points out the importance of unobstructed airflow at the eaves to support ventilation. These details matter because clogged gutters and blocked airflow both increase the chance that a roof ice dam will build and hold water at the eaves.
The “ice barrier” that protects roofs when dams form
Even with good insulation and ventilation, some climates still see roof ice dam events during harsh winters. ARMA recommends installing an ice dam protection layer along eaves to protect against leakage from ice dams should they form. ARMA also notes building codes (IBC/IRC and others) require an ice barrier in areas with a history of ice forming along eaves and causing water backup.
For reroofing projects, ARMA describes one common approach: a polymer-modified bitumen self-adhering underlayment that complies with ASTM D1970 in the U.S. ARMA recommends this ice dam protection extend at least 24 inches (610 mm) inside the interior wall line of the building, while also noting some jurisdictions require more or less and that you must follow local code and manufacturer instructions.
Quick homeowner inspection after getting rid of ice dams on roof
After you’ve started getting rid of ice dams on roof, check for warning signs indoors so you can limit damage early. Look for new water stains on ceilings near exterior walls, damp attic insulation, or dripping around soffits these can indicate backup water is getting past roofing layers. If you spot moisture, keep documenting it and prioritize permanent fixes (air sealing + insulation + ventilation) so the next roof ice dam doesn’t become a repeated roof repair.
Costs: what U.S. homeowners usually pay
Costs vary widely by region, roof complexity, and severity, but this breakdown helps plan:
- DIY roof rake + calcium chloride method: low cost, but limited by dam thickness and safety.
- Professional steam removal: higher cost, often justified if you have active leaks or severe dams.
- Prevention upgrades (air sealing, insulation, ventilation): moderate cost, highest long-term ROI because it addresses root causes.
- Reroof upgrades (ice-dam protection membrane at eaves): best done during replacement to avoid paying for tear-off twice.
FAQ: getting rid of ice dams on roof
What is the fastest way to remove an ice dam?
A common first approach is to rake snow 3–4 feet back from the roof edge and use calcium chloride in a nylon stocking to melt a channel through the dam so water can drain.
Can I use rock salt to melt a roof ice dam?
Travelers advises not to use rock salt/sodium chloride because it can damage your roof; calcium chloride is the recommended alternative in their removal steps.
Will ice dams come back after I remove them?
They often return if the underlying cause heat loss to the roof deck and refreezing at the eaves remains, which is why air sealing, insulation, and ventilation are key prevention measures.
Does ice and water shield help with roof ice dams?
ARMA recommends an ice dam protection layer along eaves (often a self-adhering membrane) to protect against water backup from ice dams.
Get free roofing advice, cost guides, and seasonal maintenance tips.

Roofing content specialist with 5+ years researching U.S. residential and commercial roofing. Has documented 200+ projects covering installation costs, material selection, contractor vetting, and DIY guides for homeowners across all climate zones.
Leave A Comment