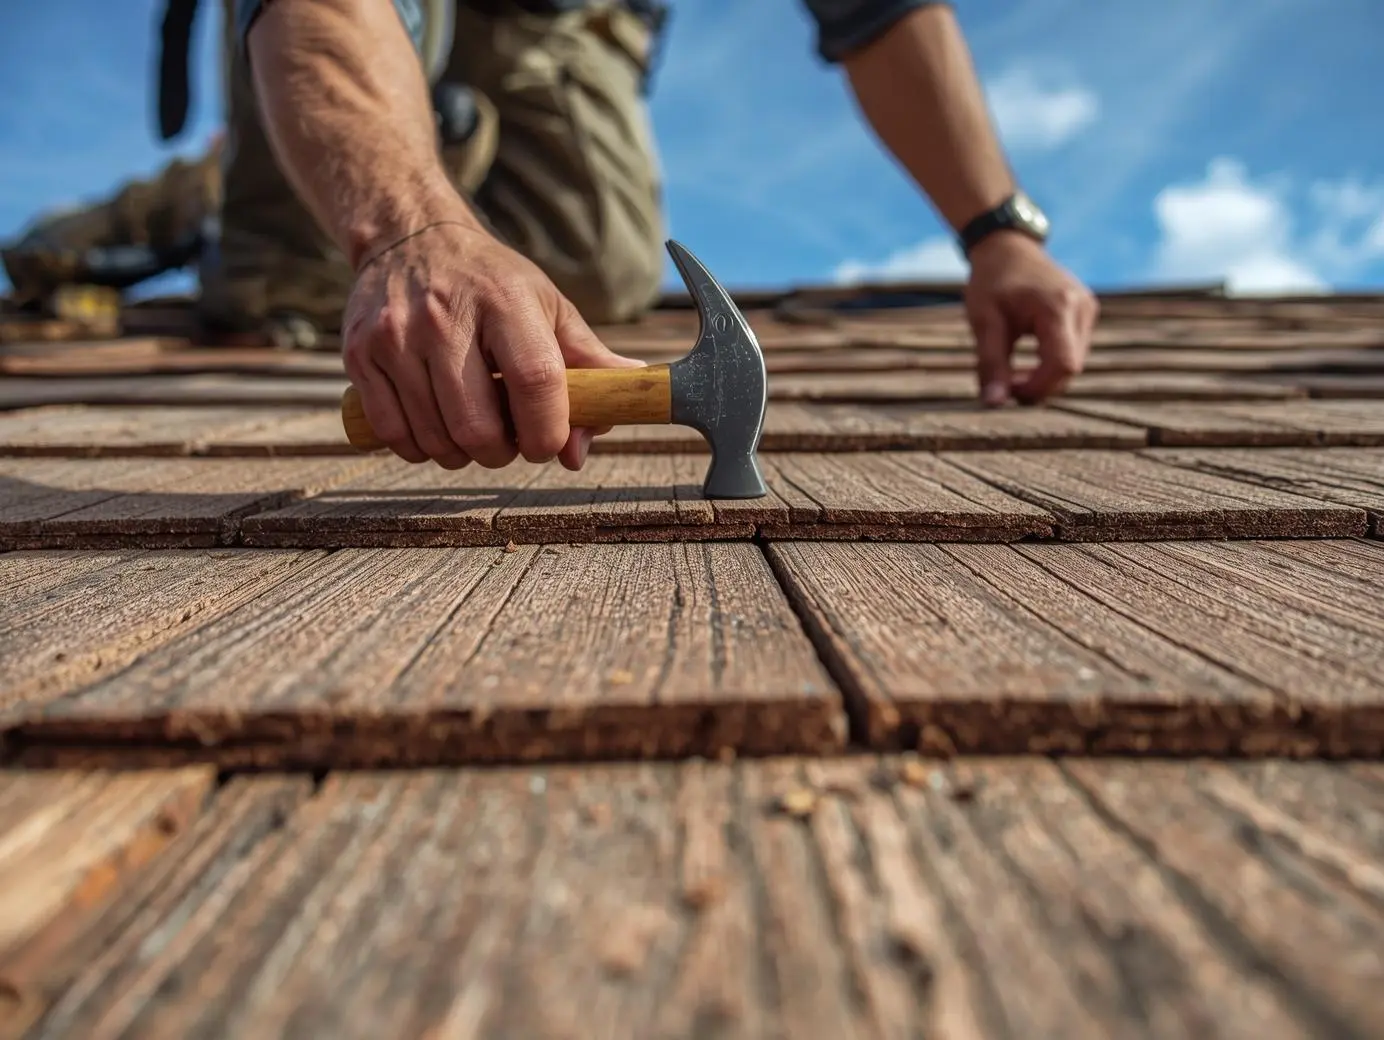
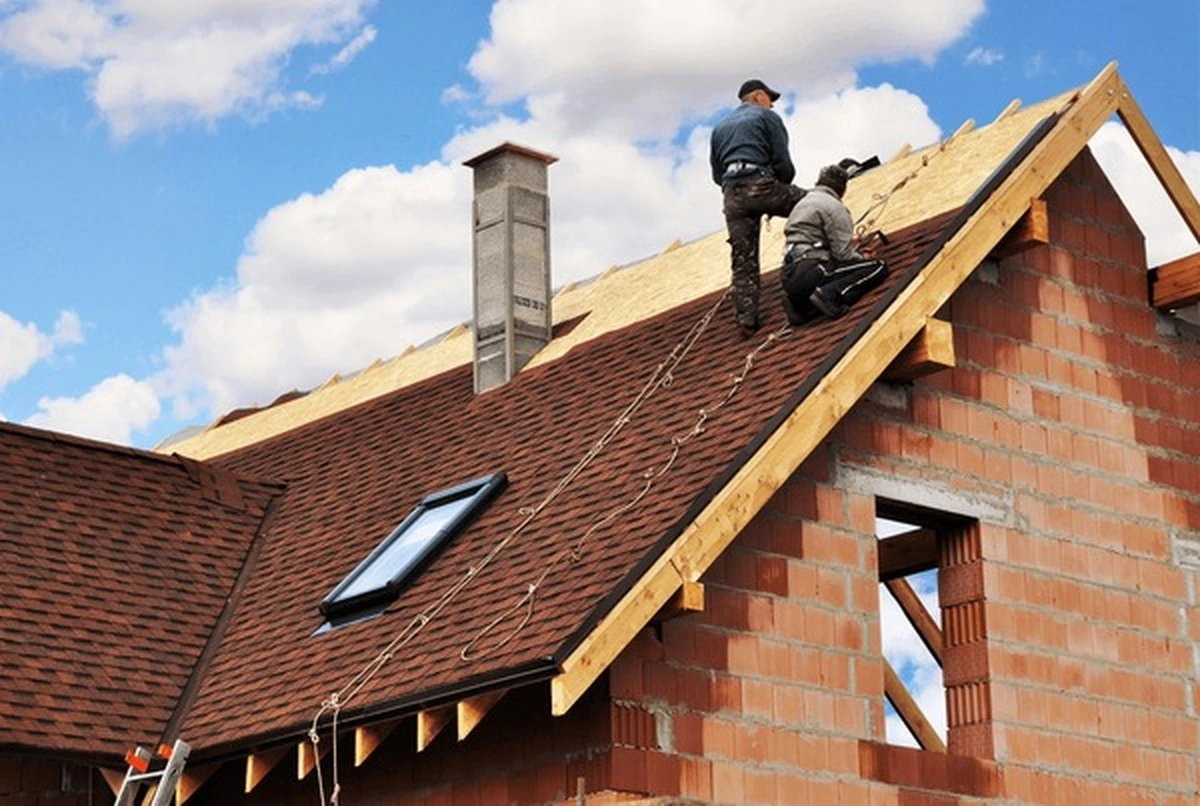
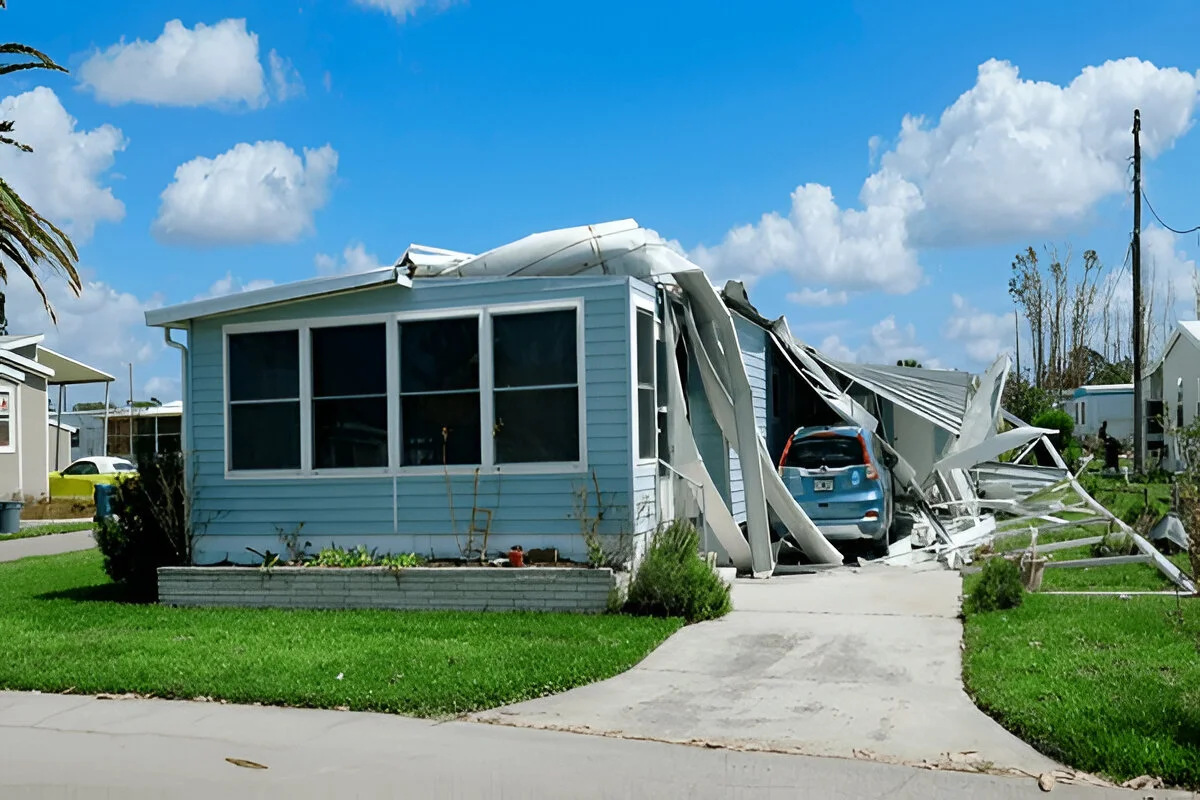
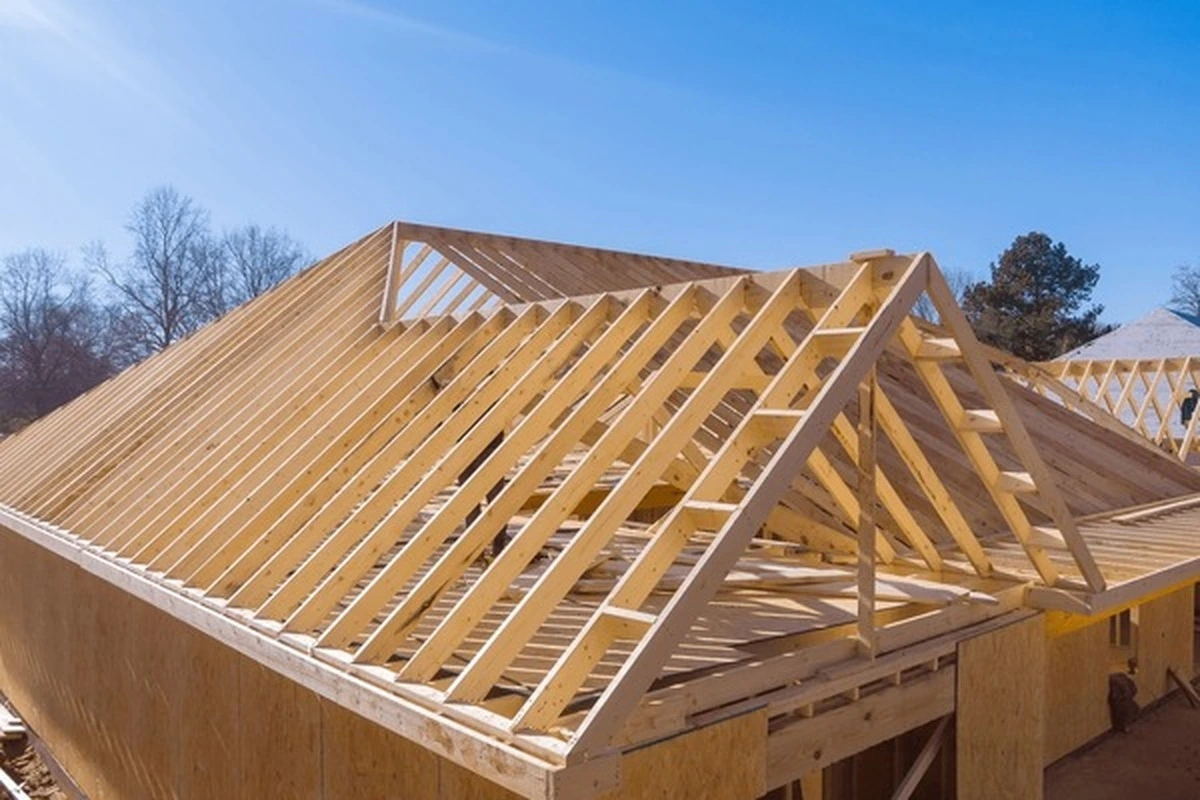
Installing shed roof shingles ranks among the most manageable DIY roofing shingles projects for homeowners with basic construction skills, requiring simple tools, straightforward techniques, and approximately 4-6 hours for typical 8×10 or 10×12 shed roofs. This DIY roof installation transforms bare plywood sheathing into weatherproof protection using asphalt three-tab shingles, drip edge, roofing underlayment, and proper nailing patterns that prevent leaks while lasting 15-25 years with minimal maintenance. Learning correct installation sequences underlayment first, drip edge placement, starter strip creation, proper shingle overlap, and ridge cap finishing ensures professional results without expensive contractor fees averaging $3-$5 per square foot.
Shed roof shingles installation succeeds when DIYers master five critical techniques: installing drip edge below underlayment on eaves but above underlayment on rakes, creating starter strips by cutting tabs off full shingles, maintaining 5-inch overlap between courses, using 4-6 roofing nails per shingle positioned in manufacturer nail zones, and capping ridge lines with bent shingle tabs secured in overlapping pattern. These fundamental DIY roofing shingles methods apply universally whether installing on gable sheds, lean-to sheds, gambrel barns, or simple storage structures, making shed roofing an ideal first roofing project before tackling residential applications.
This comprehensive guide walks through complete shed roof shingles installation from preparation through final inspection, including required tools and materials, safety protocols, step-by-step instructions with visual references, common mistakes to avoid, and troubleshooting tips ensuring watertight roofs protecting equipment, tools, and stored belongings for decades.
Table of Contents
Is installing shed roof shingles a realistic DIY project?
Most homeowners with basic tool skills can successfully install shed roof shingles on simple structures, though certain conditions favor DIY approaches while others warrant professional help.
When DIY shed roofing makes sense
Appropriate DIY scenarios:
Small to medium sheds (8×10, 10×12, 12×16 common sizes) with manageable roof areas under 200 square feet
Simple gable or lean-to roof designs without complex valleys, dormers, or architectural features
Low to moderate roof pitch (4:12 to 6:12 slopes) allowing comfortable standing and working
Sound existing roof sheathing requiring only shingle replacement, not structural repairs
Homeowners with previous construction experience (framing, basic carpentry, or home improvement projects)
Projects where building codes don’t require licensed contractors for accessory structures
Skills assessment: DIY shed roof shingles installation requires ability to safely work at heights using ladders, measure and cut materials accurately, use hammer or pneumatic nailer consistently, follow sequential steps methodically, and maintain quality control throughout project.
Cost comparison: DIY vs professional
DIY material costs for typical 10×12 shed:
Asphalt three-tab shingles: 3 bundles at $30-$35 each = $90-$105
Roofing underlayment (felt paper): 1 roll = $25-$40
Drip edge (aluminum): 40 linear feet = $40-$60
Roofing nails: 1 box = $25-$35
Ridge cap shingles: $15-$25
Total DIY materials: $195-$265
Professional installation costs:
Labor and materials: $3-$5 per square foot installed = $360-$600 for 120 square foot shed roof
Additional charges for tear-off, disposal, complex features
Total professional cost: $400-$700+
DIY savings: $200-$450 on typical small shed, though investing 4-6 hours labor.
Safety considerations for shed roofing
Essential safety equipment:
Sturdy extension ladder rated for your weight plus materials (minimum Type I, 250-pound capacity)
Non-slip rubber-soled work boots with ankle support preventing slips on shingles
Work gloves protecting hands from sharp shingle edges and nail punctures
Safety glasses preventing debris and nail fragments from entering eyes
Fall protection harness and rope for pitches exceeding 6:12 or roof heights over 10 feet
Safe working practices:
Never work alone—have someone nearby for emergencies and tool/material passing
Avoid wet, windy, or icy conditions—shingles become slippery when damp
Install roof jacks and planks on steep pitches creating stable work platforms
Keep work area organized preventing trip hazards from scattered tools and materials
Use proper ladder setup—maintain 3-point contact, extend 3 feet above roof edge, secure at top
Tools and materials needed for shed roof shingles
Gathering all required tools and materials before starting prevents frustrating mid-project delays and ensures proper installation.
Essential tools for DIY roofing shingles
Measuring and marking tools:
Tape measure (25-foot minimum for accurate roof measurements)
Chalk line for snapping straight horizontal reference lines across roof
Speed square or framing square for marking cut lines and checking angles
Pencil or marker for marking measurements and cuts
Cutting tools:
Utility knife with hooked roofing blades (straight blades slip)
Tin snips for cutting metal drip edge and flashing
Circular saw (optional, for cutting plywood sheathing repairs)
Fastening tools:
Hammer (16-ounce roofing hammer with hatchet blade if hand-nailing)
Air compressor (if using pneumatic tools—requires 2.5+ CFM at 90 PSI)
Staple gun for securing underlayment felt paper
Additional helpful tools:
Pitchfork or shingle removal tool (if tearing off old shingles)
Straight edge (4-6 feet) for guiding utility knife cuts
Ladder stabilizer preventing gutter damage and improving safety
Required materials for complete installation
Roofing shingles: Calculate coverage by dividing roof square footage by bundle coverage (typically 33 square feet per three-tab bundle). Add 10% waste factor for cuts and mistakes. Standard color choices include charcoal gray, weathered wood, and black providing universal aesthetic compatibility.
Roofing underlayment (felt paper): #15 felt paper suffices for most shed applications, though #30 offers superior tear resistance and waterproofing. Synthetic underlayment provides premium alternative with better durability and slip resistance during installation.
Drip edge: Purchase aluminum or galvanized steel drip edge measuring 1.5×1.5 inches or 2×2 inches, covering all eave and rake edges. Calculate linear feet needed by measuring roof perimeter plus 10% for overlaps and cuts.
Fasteners:
Roofing nails: 1¼-inch galvanized roofing nails with large heads (approximately 320-400 nails per square)
Staples: ½-inch galvanized staples for securing underlayment
Calculate 4-6 nails per shingle depending on wind exposure
Additional materials:
Ridge cap shingles (pre-cut or created from full shingles)
Roofing cement/mastic for sealing flashing and exposed nail heads
Caulk for sealing drip edge joints
Material shopping list for 10×12 shed (120 sq ft roof):
4 bundles three-tab shingles (allowing for waste)
1 roll 15-pound felt (covers 400 square feet)
40 linear feet drip edge
5 pounds roofing nails
1 tube roofing cement
Ridge cap shingles (typically 1 bundle covers 20 linear feet)
Successful DIY roofing shingles projects require gathering all tools and materials before starting—pneumatic nailer, asphalt shingles, underlayment, drip edge, measuring tools, and safety equipment
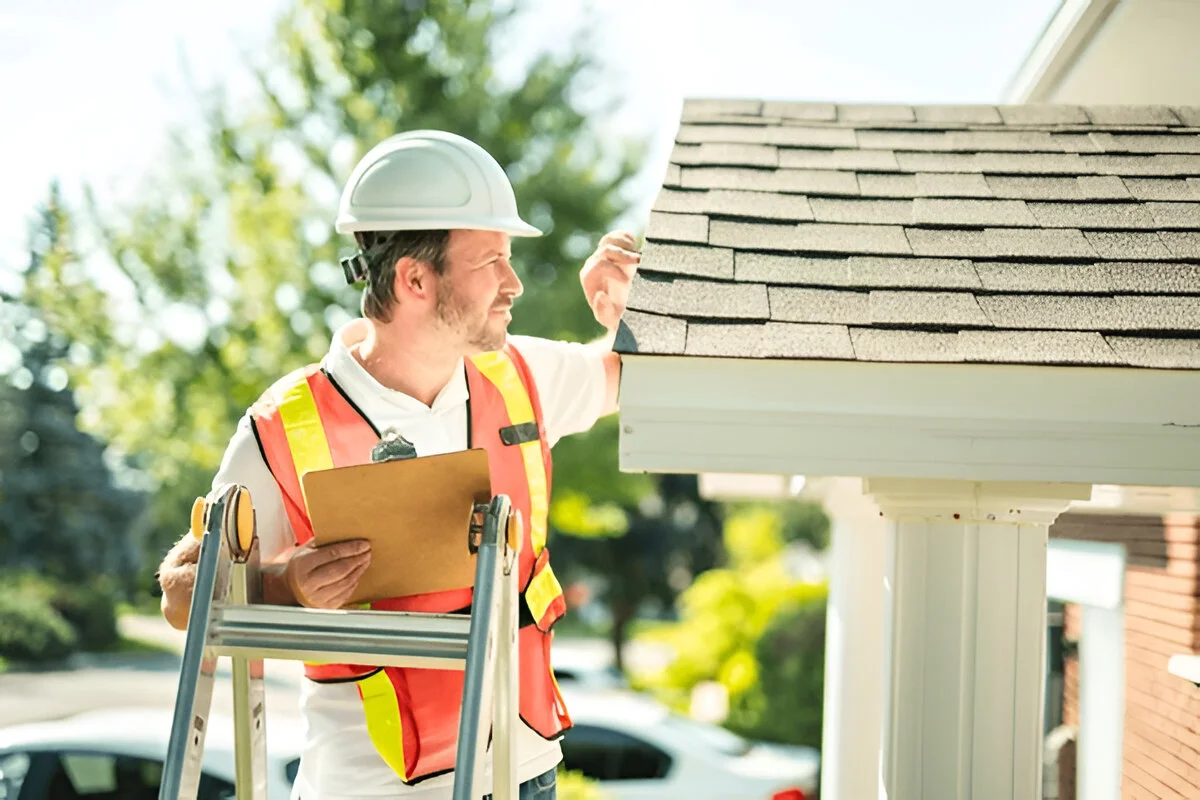
Step-by-step shed roof shingles installation
Following proper sequence ensures watertight DIY roofing shingles installation that protects shed contents for 15-25 years.
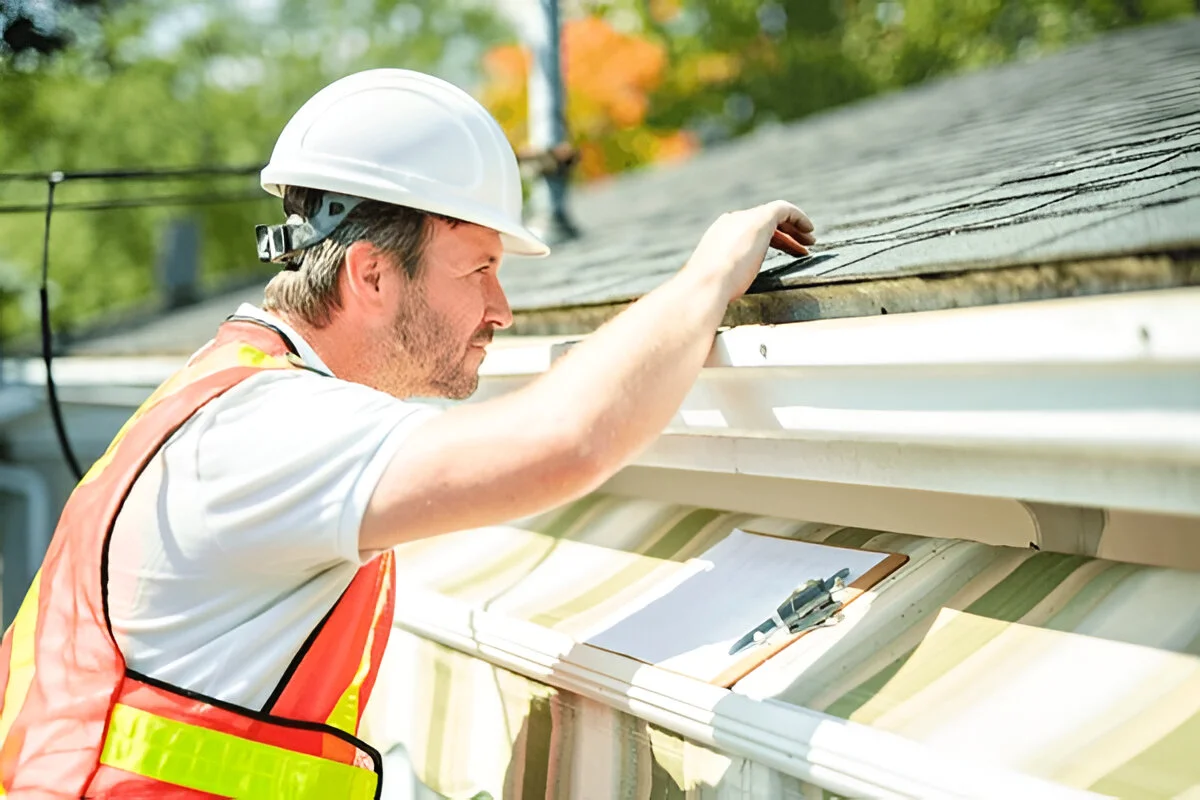
Step 1: Prepare roof deck and install underlayment
Deck inspection and preparation:
Remove old shingles if replacing existing roof using pitchfork or shingle removal tool
Inspect plywood or OSB sheathing for soft spots, rot, water damage, or loose panels
Replace any damaged sheathing sections with new 7/16-inch OSB or ½-inch plywood
Remove all protruding nails and ensure clean, dry surface before proceeding
Sweep deck clear of debris that could create bumps under shingles
Installing roofing underlayment:
Start at bottom eave edge, unroll felt paper horizontally across roof width
Allow ¼-inch overhang beyond roof edge
Secure felt with staples every 12-16 inches along top edge and center
Overlap vertical seams 4 inches preventing water infiltration
Continue rolling felt paper up roof until reaching ridge, extending 4-6 inches over peak
On opposite roof slope, repeat process overlapping ridge by 6 inches creating weather seal
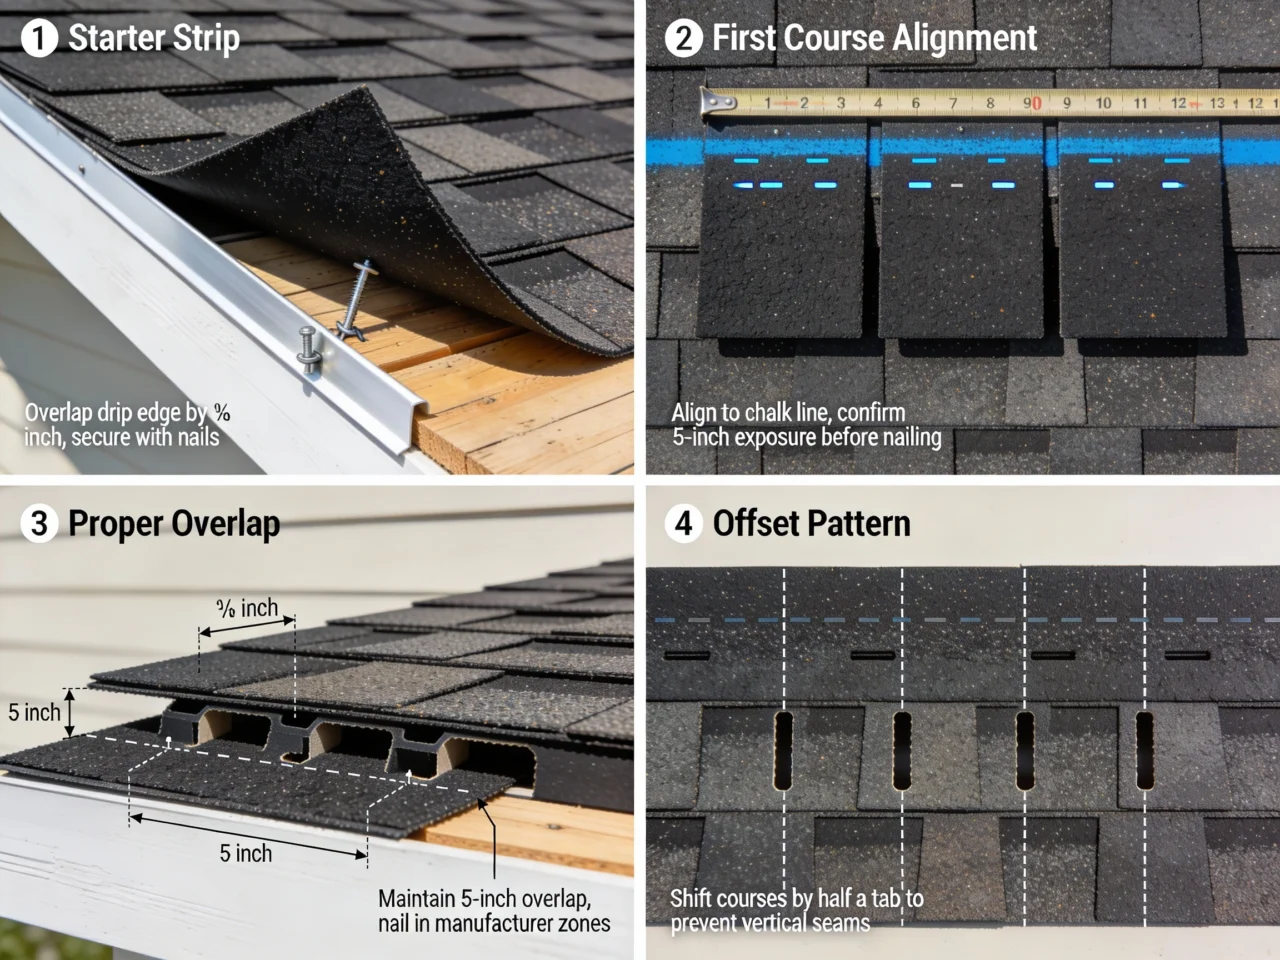
Step 2: Install drip edge on eaves and rakes
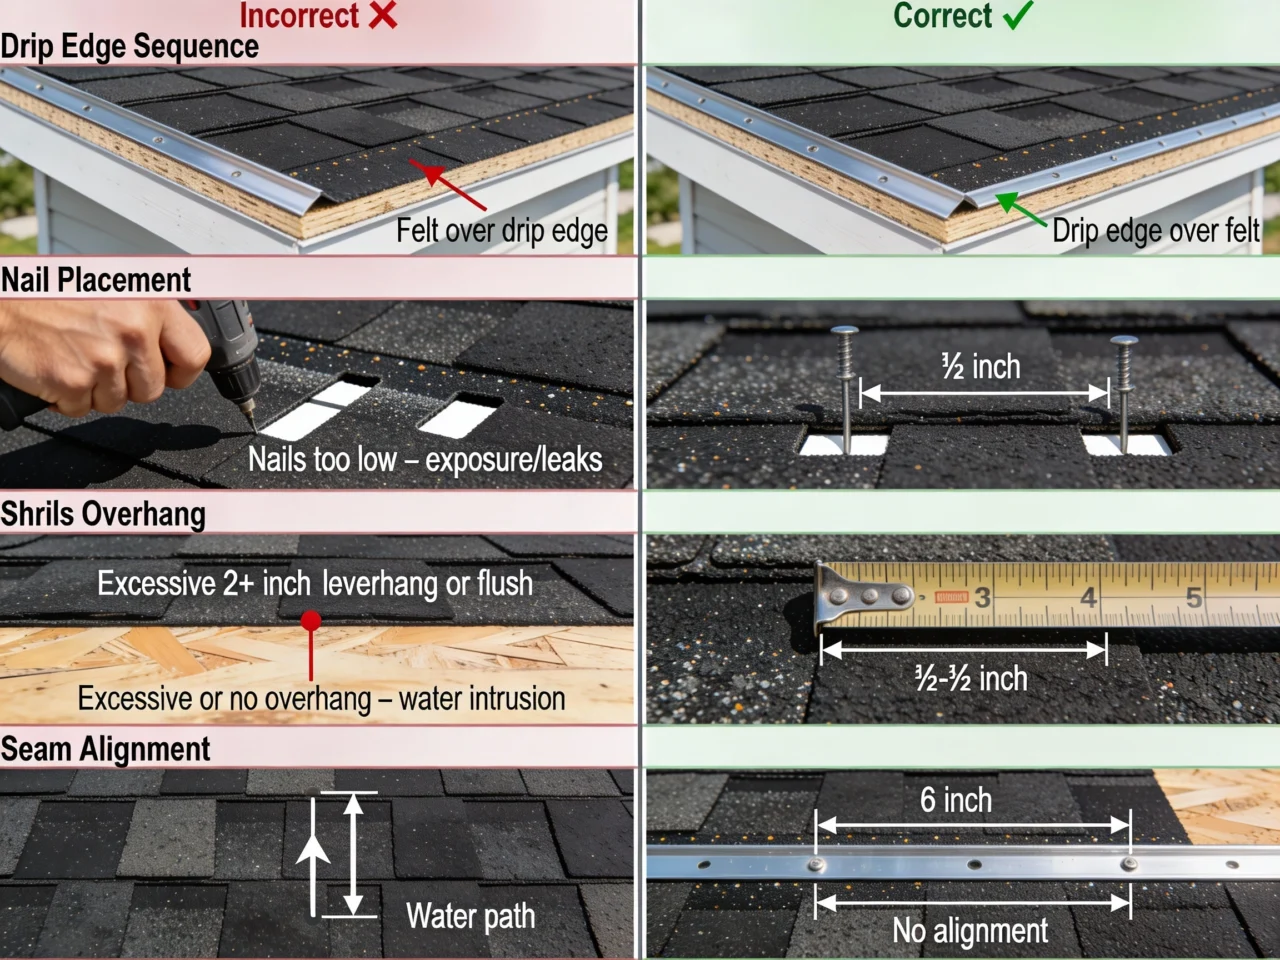
Critical installation sequence: Drip edge installs UNDER felt paper on eaves (bottom edge) but OVER felt paper on rakes (side edges)—this directs water away from fascia while preventing wind-driven rain from penetrating under felt.
Eave drip edge installation (bottom):
Position drip edge flush with eave edge before installing felt paper
Nail drip edge every 8-12 inches through pre-drilled holes using roofing nails
Overlap drip edge sections 2 inches at joints
Cut 45-degree miters at corners using tin snips creating clean transitions
Rake drip edge installation (sides):
Install rake drip edge OVER felt paper after underlayment in place
Extend drip edge from eave corner up to ridge
Overlap eave drip edge by 1 inch at bottom corner
Nail every 8-12 inches securing to roof deck
Trim drip edge flush with ridge using tin snips
Purpose of drip edge: Metal drip edge protects fascia boards from water damage by directing runoff into gutters while preventing water from wicking back under shingles through capillary action.
Step 3: Create and install starter strip
Why starter strips matter: Starter strips fill gaps between three-tab shingle cutouts preventing wind-driven rain from penetrating at vulnerable eave edge while providing adhesive surface for first full shingle course.
Creating starter strips:
Take full three-tab shingles and flip upside down
Using utility knife and straight edge, cut off all three tabs leaving only top portion (approximately 7 inches tall)
Alternative method: Cut shingles in half lengthwise
Create enough starter strips to cover entire eave length plus 10% waste
Installing starter course:
Position first starter strip at rake edge with adhesive strip facing DOWN toward eave
Overhang drip edge by ¼ to ½ inch on both eave and rake edges
Nail starter strip approximately 2.5-3 inches above bottom edge (nails will be covered by first full course)
Use 4 nails per starter strip piece
Butt adjacent starter strips tightly together with no gaps
Continue along entire eave until starter strip complete
Trim final starter piece flush with rake drip edge
Step 4: Install first full shingle course
Establishing reference line:
Snap chalk line 11¾ inches above starter strip bottom edge (exposes 5 inches of starter)
This chalk line marks TOP of first full shingle course ensuring straight alignment
Verify chalk line parallel to eave—measure multiple points confirming consistent distance
First shingle placement:
Position full three-tab shingle at rake edge with bottom edge aligned on chalk line
Overhang rake drip edge by ¼ to ½ inch matching starter strip overhang
Overhang eave by ¼ to ½ inch covering starter strip adhesive
Ensure shingle lies flat without buckling or gaps
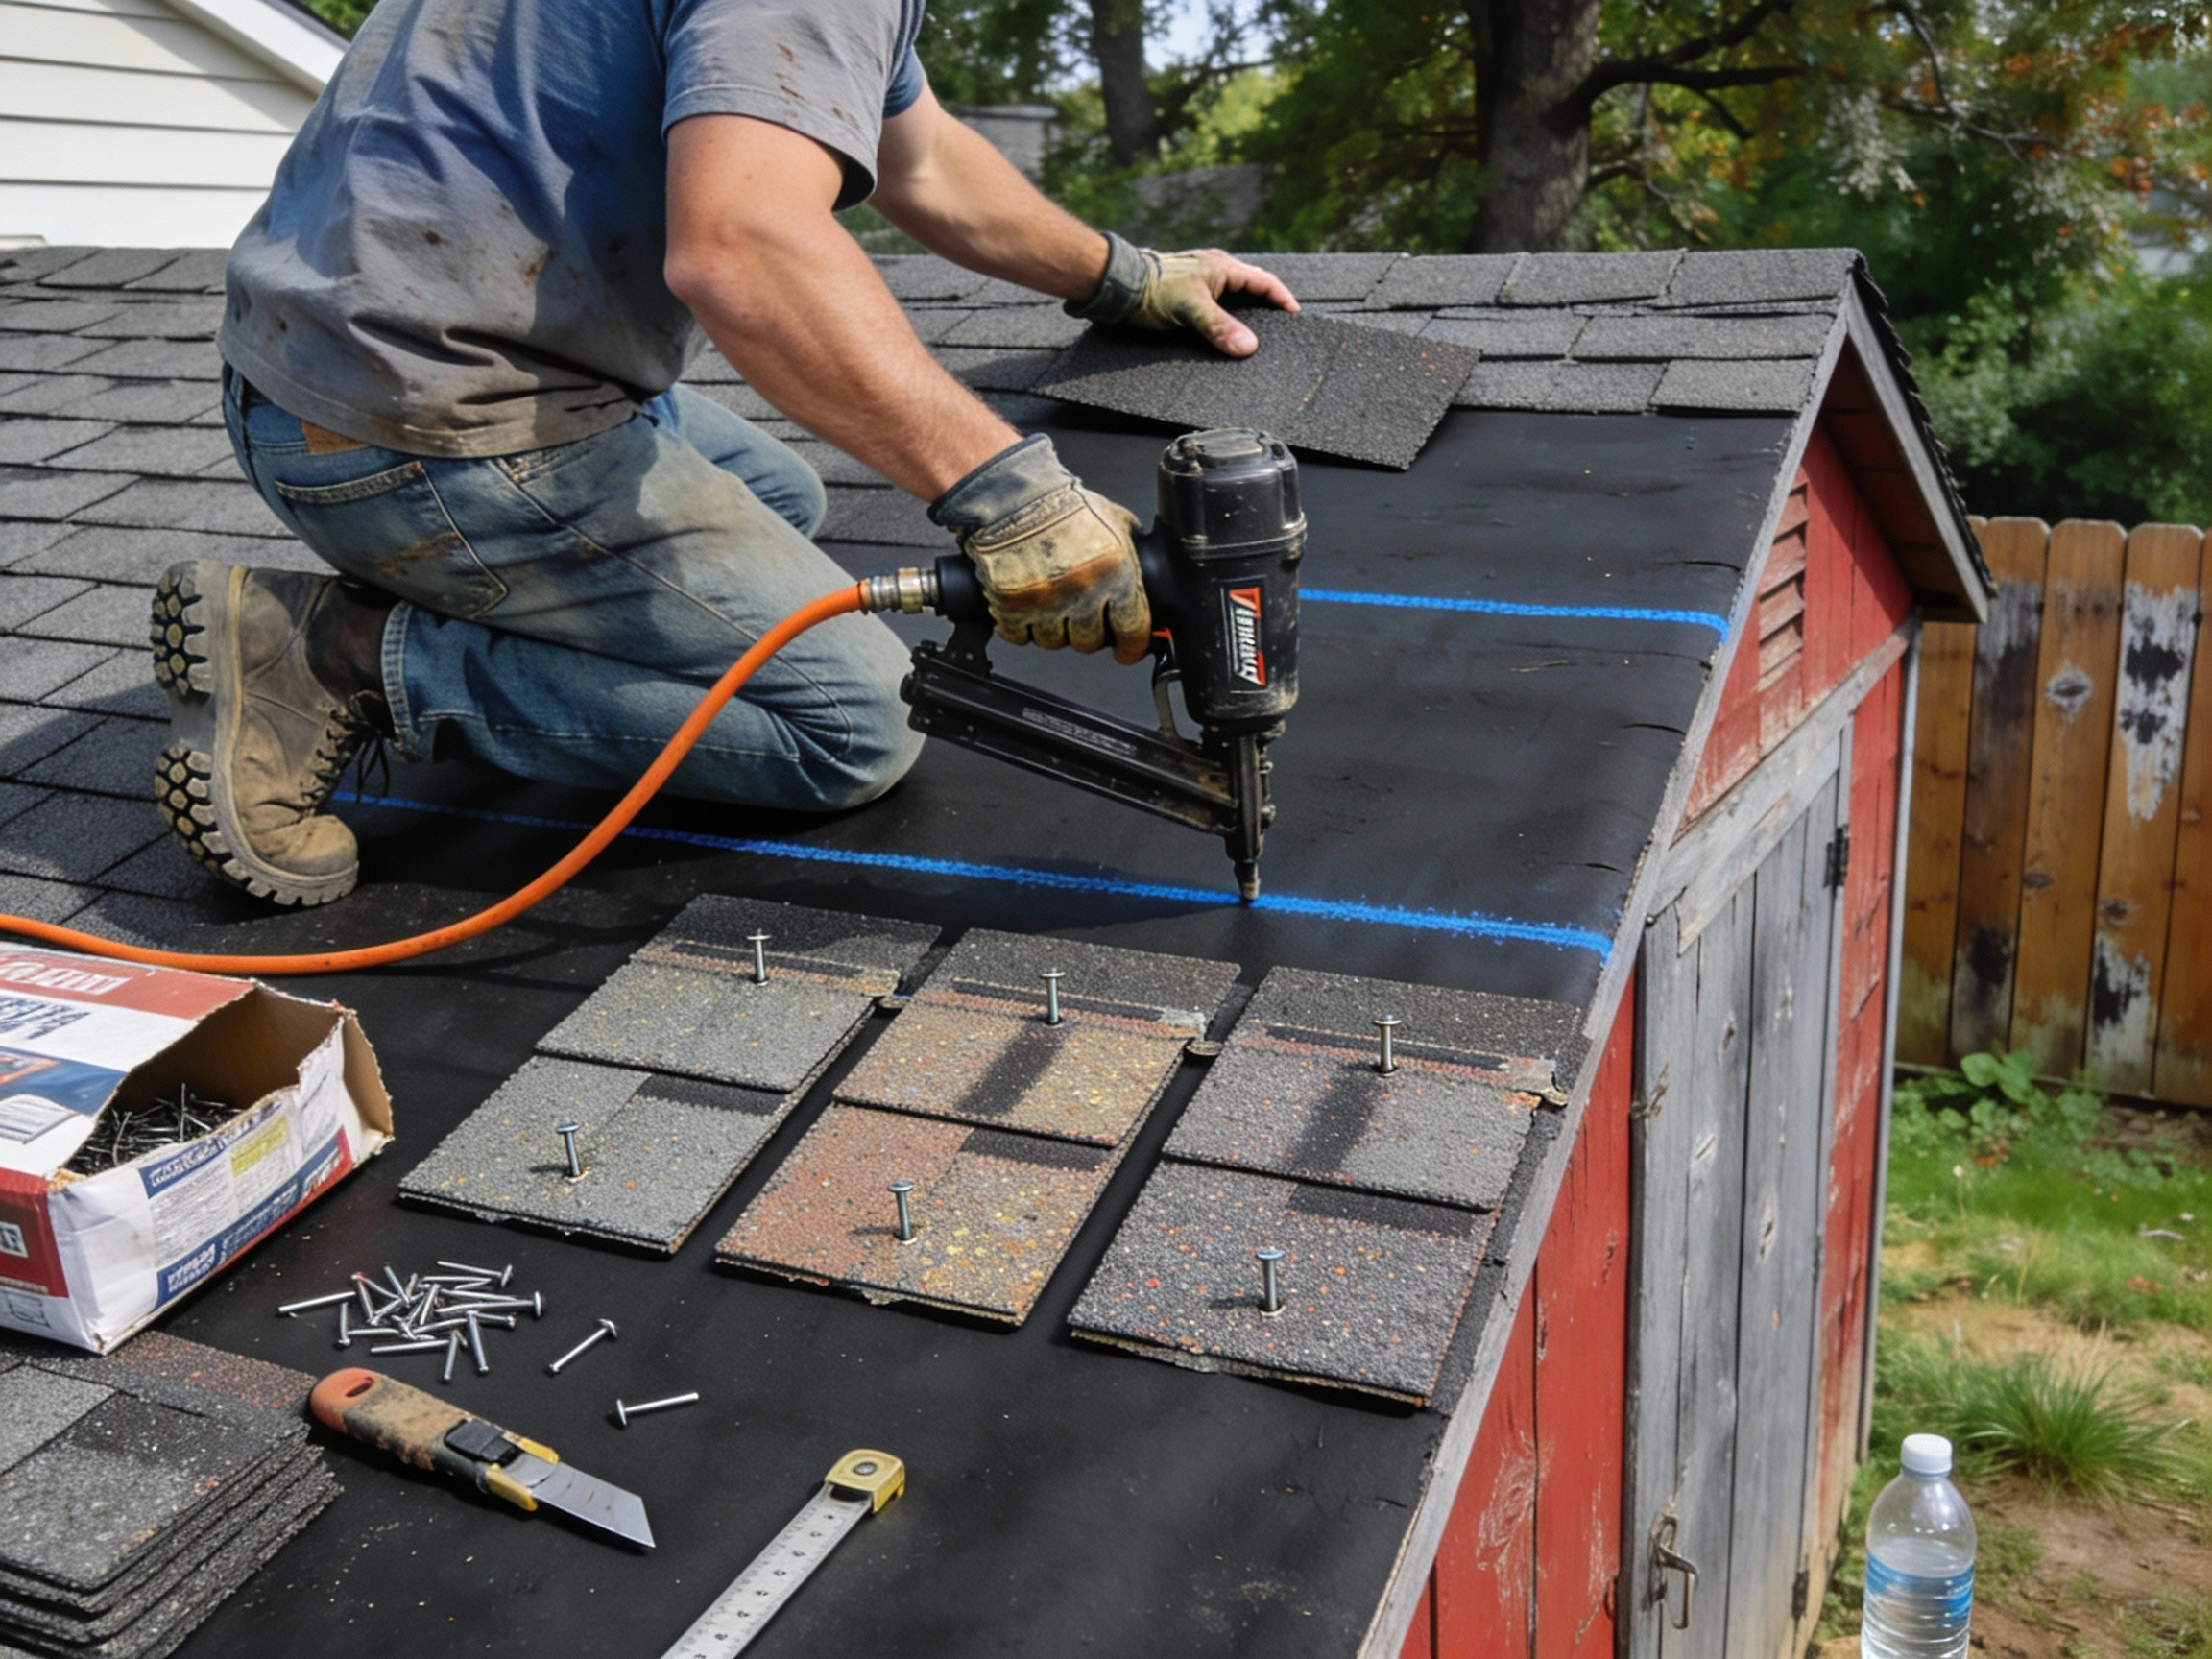
Nailing pattern for shed roof shingles:
Use 4 nails per shingle for standard applications, 6 nails in high-wind areas
Position nails ¾ inch above cutouts (top of tab section) in manufacturer nail zone
Space nails approximately 1 inch from each edge and evenly across width
Drive nails flush—not overdriven (breaking through) or underdriven (protruding)
Nail through shingle AND starter strip below securing both layers
Completing first course:
Install second shingle butted tightly against first shingle with no gaps
Align top edge on chalk line maintaining straightness
Nail using same 4-6 nail pattern
Continue across roof until reaching opposite rake edge
Trim final shingle flush with rake drip edge using utility knife
Step 5: Continue shingling up roof maintaining proper offset
Calculating shingle offset: To create proper staggered pattern preventing vertical alignment of seams, offset each course by 6 inches (half a tab width on three-tab shingles).
Second course offset method:
Cut 6 inches (half tab) off first shingle of second course
Snap chalk line 5 inches above first course (this creates standard 5-inch exposure)
Position cut shingle at rake edge aligned on chalk line
This offset ensures cutout slots don’t align with course below
Install remaining full shingles across course
Third course offset:
Cut 12 inches (full tab) off first shingle
Continue pattern: fourth course starts with full shingle, fifth course cuts 6 inches, sixth course cuts 12 inches
This 6-inch repeating offset pattern continues up entire roof
Maintaining consistent exposure:
Snap chalk line every 2-3 courses ensuring parallel alignment
Standard exposure: 5 inches (showing 5 inches of shingle below)
Measure periodically from multiple points checking consistency
Minor adjustments (within ¼ inch) acceptable and visually unnoticeable
Shingling technique:
Work from bottom to top, one course at a time
Overlap each course 5 inches covering nails from course below
Maintain ¼-½ inch overhang on rake edges
Check alignment every few courses, adjust gradually if drifting
Keep work area clear, storing materials on ground until needed
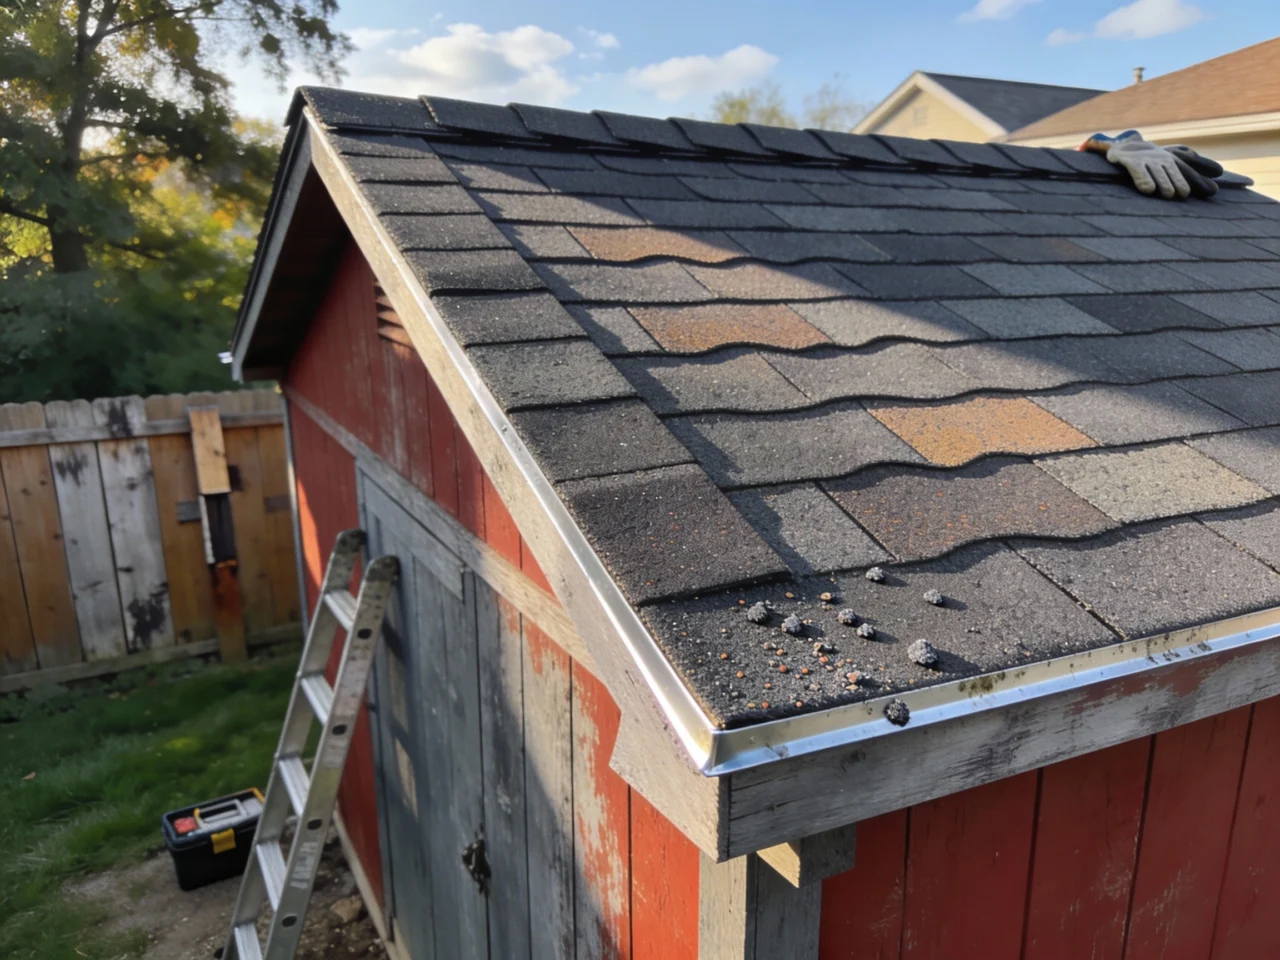
Step 6: Install ridge cap shingles
Preparing ridge caps: Three methods create ridge cap shingles:
Pre-cut ridge cap shingles: Purchase dedicated ridge cap bundle with pre-cut pieces (easiest method)
Cut from full shingles: Cut three-tab shingles into individual tabs creating 12×12-inch ridge pieces
Fold method: Cut shingles into thirds along perforation lines, creating bendable pieces
Installing ridge caps:
Start at rake end (not prevailing wind direction if known)
Bend ridge cap piece over ridge peak centering equally on both sides
Secure with 2 nails per side (4 nails total) positioned to be covered by next cap
Install second cap piece overlapping first by approximately 5-6 inches
Continue overlapping pattern along entire ridge
Final ridge cap should fully cover exposed nails from previous cap
Nail final cap and cover exposed nail heads with dab of roofing cement
Step 7: Install ridge flashing on lean-to sheds
For lean-to or shed roofs meeting wall:
Cut angle flashing (L-shaped metal) to roof width
Apply two beads of roofing mastic on both sides of flashing
Position flashing covering exposed nail heads at top shingle course
Extend flashing ¼ inch beyond rake edges
Nail every 12 inches along flashing securing to wall and roof
Apply roofing mastic over all exposed nail heads
If multiple flashing sections needed, overlap 6 inches with mastic between
Step 8: Final inspection and cleanup
Quality inspection checklist:
Walk roof surface checking for missed nails, loose shingles, or gaps
Verify all rake overhangs consistent
Confirm ridge caps securely fastened with no exposed nails
Check drip edge properly secured along entire perimeter
Ensure no underlayment felt visible between shingles
Inspect around any roof penetrations for proper sealing
Cleanup procedures:
Use magnetic sweeper removing all nails and metal debris from roof and ground
Collect scrap shingle pieces and underlayment scraps for disposal
Clean gutters of installation debris
Dispose of materials properly at waste facility accepting construction debris
Store leftover shingles in dry location for future repairs
Successful DIY roofing shingles installation follows systematic steps—starter strip at eaves, chalk line reference for first course, 5-inch overlap between courses, and proper nailing in manufacturer zones.
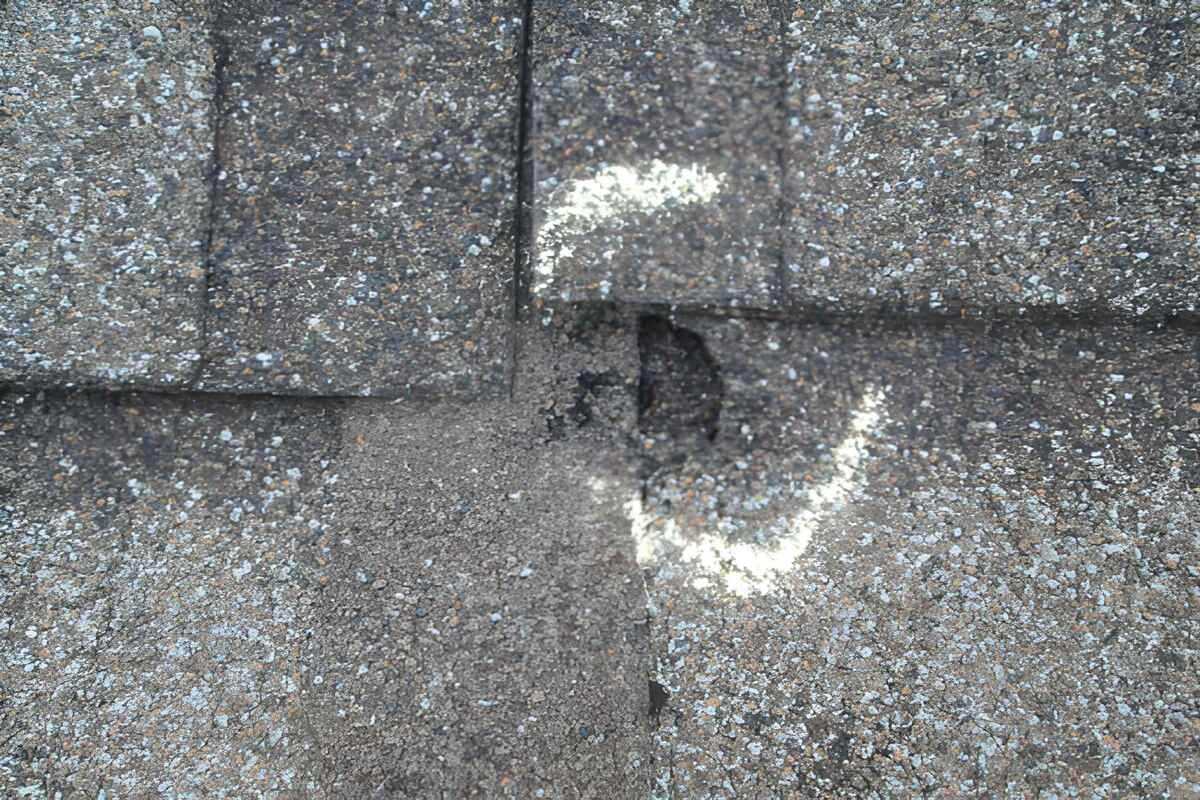
Common mistakes when installing shed roof shingles
The mistake: Installing drip edge over felt paper on eaves, or under felt on rakes—reversing the correct sequence allows water to penetrate behind drip edge causing fascia rot.
Correct method:
Eave drip edge: UNDER felt paper (install first, then felt over it)
Rake drip edge: OVER felt paper (install after felt in place)
Why it matters: This specific sequence channels water correctly—eave water flows over felt onto drip edge into gutter, while rake water flows over shingles onto drip edge without getting under felt.
Improper nail placement
Nailing too high: Positioning nails above manufacturer nail zone (more than 1 inch above cutouts) leaves lower shingle portion unfastened—wind catches tabs causing blow-offs.
Nailing too low: Driving nails below cutout line exposes nail heads to weather causing rust and leak points.
Correct nail placement: Position nails ¾ inch above cutout slots in designated nail zone where next course covers nails by minimum 2 inches.
Wrong nail quantity: Using only 2-3 nails per shingle instead of required 4-6 nails reduces holding power—shingles blow off during windstorms.
Insufficient or excessive overhang
No overhang: Installing shingles flush with roof edge allows water to run behind drip edge and wick back under shingles through capillary action.
Excessive overhang: Extending shingles more than ¾ inch beyond drip edge creates stress points where wind lifts tabs causing breaks and blow-offs.
Correct overhang: Maintain ¼ to ½ inch overhang beyond drip edge on both eaves and rakes providing proper water shedding without wind vulnerability.
Vertical seam alignment
The problem: When cutout slots align vertically through consecutive courses, water channels straight through roof layers bypassing overlaps—major leak potential.
Correct pattern: Offset each course by 6 inches (half tab width) ensuring three-course vertical spacing between any aligned seams.
Visual check: Step back periodically viewing roof from distance—vertical alignment appears as obvious “zipper lines” ruining aesthetics and weatherproofing.
Skipping chalk lines
Shortcut temptation: Experienced DIYers sometimes skip chalk lines after first few courses, eyeballing alignment instead—courses gradually drift creating wavy appearance.
Professional practice: Snap chalk line every 2-3 courses maintaining perfect horizontal alignment, especially critical as you work higher where minor angle errors compound into obvious visual problems.
Improper ridge cap installation
Common errors:
Installing ridge caps with prevailing wind exposing seams to weather
Inadequate overlap (less than 5 inches) exposing nail heads
Using full shingles instead of bent caps creating rigid peak vulnerable to cracking
Correct technique: Start opposite prevailing wind direction, maintain 5-6 inch overlap, use flexible ridge cap pieces bent over peak, secure with 4 nails per cap positioned for next cap coverage.
Avoiding common DIY roof installation errors—proper drip edge sequence, correct nail placement in manufacturer zones, adequate overhang, and staggered seam offsets—ensures waterproof shed roof shingles lasting 15-25 years.
Maintenance and troubleshooting shed roof shingles
Proper maintenance extends shed roof shingles lifespan while addressing minor issues prevents costly repairs.
Check for blown-off or damaged shingles from winter storms
Clear debris accumulated in valleys and along eaves
Inspect flashing around any penetrations
Look for moss or algae growth requiring treatment
Verify ridge caps securely fastened
Fall preparation (before winter):
Clean gutters preventing ice dam formation
Trim overhanging branches threatening roof during storms
Replace any damaged shingles before snow season
Check attic ventilation ensuring proper airflow
Repairing damaged individual shingles
Replacing single shingle:
Gently lift shingles above damaged shingle
Remove nails securing damaged shingle using flat pry bar
Slide damaged shingle out
Slide new shingle into position matching overlap
Nail new shingle in proper nail zones
Apply dab of roofing cement under tabs sealing against wind
Temporary leak repairs:
Apply roofing cement under lifted tabs
Use roofing cement to seal small cracks or punctures
Consider temporary tarp covering if major damage until permanent repair possible
Frequently asked questions about shed roof shingles
How long does it take to install shed roof shingles?
Installing shed roof shingles takes approximately 4-6 hours for an experienced DIYer working on typical 8×10 or 10×12 shed with simple gable roof, though first-time installers should budget 6-8 hours accounting for learning curve and careful attention to proper techniques. Complex gambrel or hip roofs add 2-4 hours due to additional cutting and fitting required.
How many bundles of shingles do I need for a shed roof?
Calculate shingle bundles by dividing total roof square footage by 33 (coverage per three-tab bundle), then adding 10% waste factor—typical 10×12 shed with both roof slopes totals 120 square feet requiring 4 bundles (120÷33=3.6, plus 10% waste). Measure roof length times width for each slope, add together, then divide by coverage per bundle.
Can I install shed roof shingles over existing shingles?
While possible to install new shingles over one existing layer, best practice removes old shingles allowing inspection of roof deck for water damage, rot, or structural issues requiring repair before shingling. Single-layer installations also lie flatter, last longer, and avoid excessive weight on shed framing.
What’s the proper exposure for three-tab shingles?
Standard exposure for three-tab asphalt shingles measures 5 inches, meaning each course overlaps the course below by 5 inches exposing 5 inches of the underlying shingles while covering 7 inches at the overlap. This creates proper double-coverage protection ensuring waterproof installation.
Do I need drip edge on my shed roof?
Yes drip edge is essential for protecting fascia boards from water damage by directing runoff away from wood trim, preventing water from wicking back under shingles through capillary action, and providing clean finished edge preventing shingle deterioration. Installing drip edge adds minimal cost while dramatically extending fascia board lifespan.
Lean-to shed roof shingles install using same basic process—underlayment, drip edge, starter strip, full courses working up slope—but require angle flashing where roof meets wall instead of ridge caps. Install L-shaped metal flashing over top shingle course, securing to both roof deck and wall with roofing cement sealing all gaps.
Should I use a roofing nailer or hammer for shed shingles?
Pneumatic roofing nailers dramatically speed installation while ensuring consistent nail depth and reducing fatigue, making them worthwhile investment for shed projects and future roofing work, though quality hammers work fine for small sheds if budget constrained. Rental stores offer pneumatic nailer and compressor packages for $40-$60 per day.
What’s the difference between starter strips and regular shingles?
Starter strips are full shingles with tabs cut off (or shingles cut in half lengthwise) installed with adhesive strip facing downward along eave edges, filling gaps between three-tab cutouts to prevent wind-driven rain penetration while providing adhesive surface bonding first full shingle course. Never skip starter strips—they’re critical for proper weatherproofing.
Properly installed shed roof shingles deliver 15-25 years of weatherproof protection with professional appearance when DIYers follow correct techniques—straight courses, proper overlap, and ridge cap finishing
Achieving professional results with DIY shed roofing
Installing shed roof shingles successfully requires mastering fundamental DIY roofing shingles techniques—proper underlayment installation, correct drip edge sequencing (under felt on eaves, over felt on rakes), accurate starter strip creation, systematic chalk line use maintaining straight courses, appropriate 4-6 nail placement in manufacturer zones, 5-inch exposure between courses, six-inch offset pattern preventing seam alignment, and professional ridge cap finishing overlapping 5-6 inches. These proven DIY roof installation methods enable homeowners to complete typical 8×10 or 10×12 shed roofs in 4-6 hours using basic tools and $195-$265 in materials while saving $200-$450 compared to professional installation.
Understanding critical details separates successful from failed installations—installing drip edge in correct sequence prevents fascia rot, maintaining proper ¼-½ inch overhang prevents water wicking, using 4-6 nails per shingle prevents wind blow-off, snapping chalk lines every 2-3 courses ensures straight rows, offsetting each course six inches prevents leak-prone seam alignment, and properly overlapping ridge caps creates weathertight peak protection. Simple shed roofing represents ideal first roofing project teaching fundamental skills applicable to residential applications while protecting valuable equipment and tools stored in backyard structures.
Ready to tackle shed roof shingles installation? Gather quality three-tab shingles, roofing felt underlayment, aluminum drip edge, pneumatic nailer or hammer, and safety equipment, choose mild weather day with low wind, follow systematic step-by-step process from underlayment through ridge caps, maintain consistent quality control checking alignment and nail placement, and complete professional-quality waterproof roof protecting your shed for 15-25 years. Remember—patience and attention to detail matter more than speed when learning DIY roofing techniques that deliver lasting results.
🏠 Roofing Tips & Updates
Get free roofing advice, cost guides, and seasonal maintenance tips.
Roofing content specialist with 5+ years researching U.S. residential and commercial roofing. Has documented 200+ projects covering installation costs, material selection, contractor vetting, and DIY guides for homeowners across all climate zones.
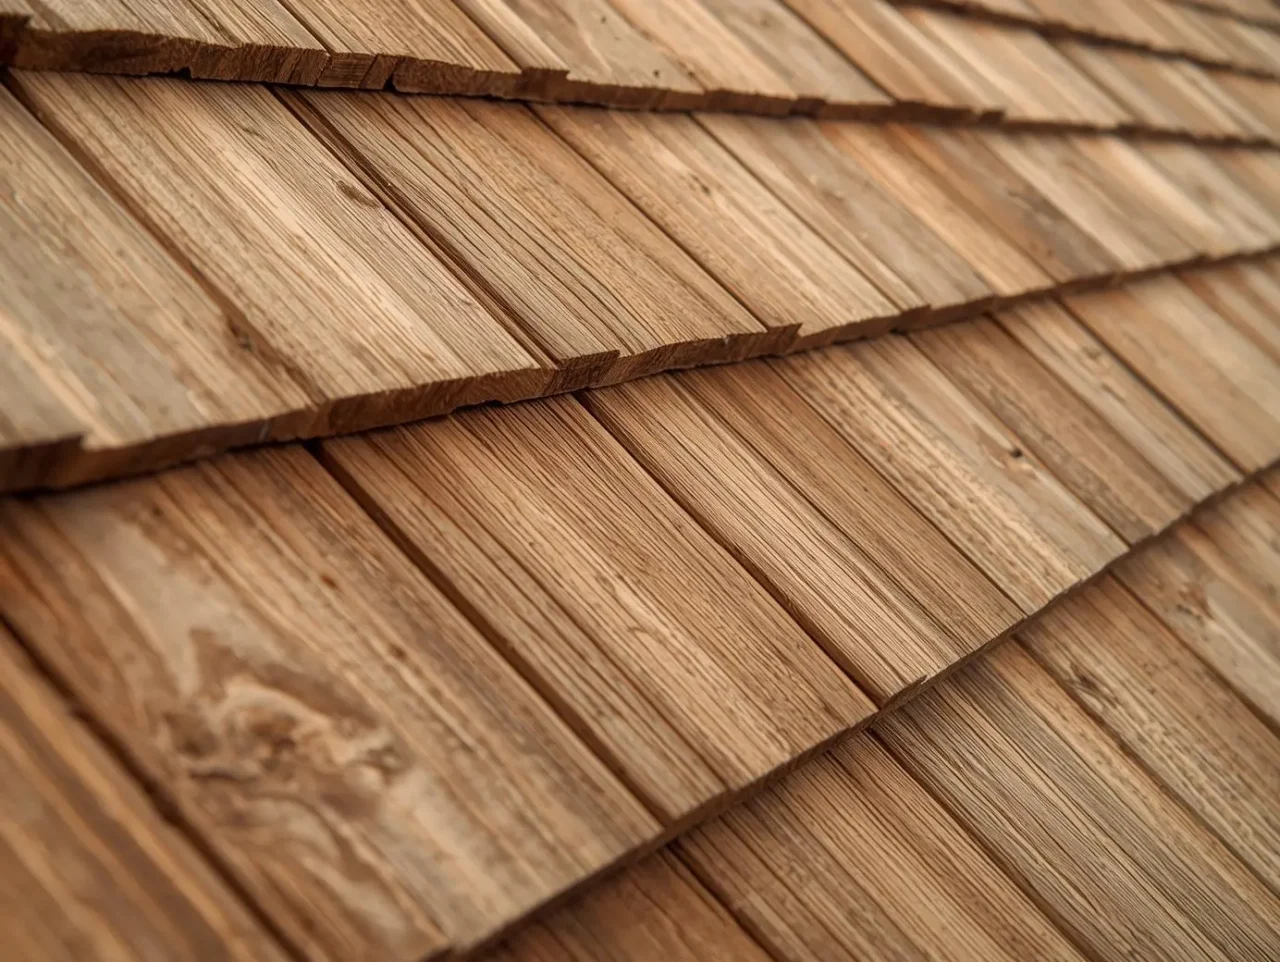
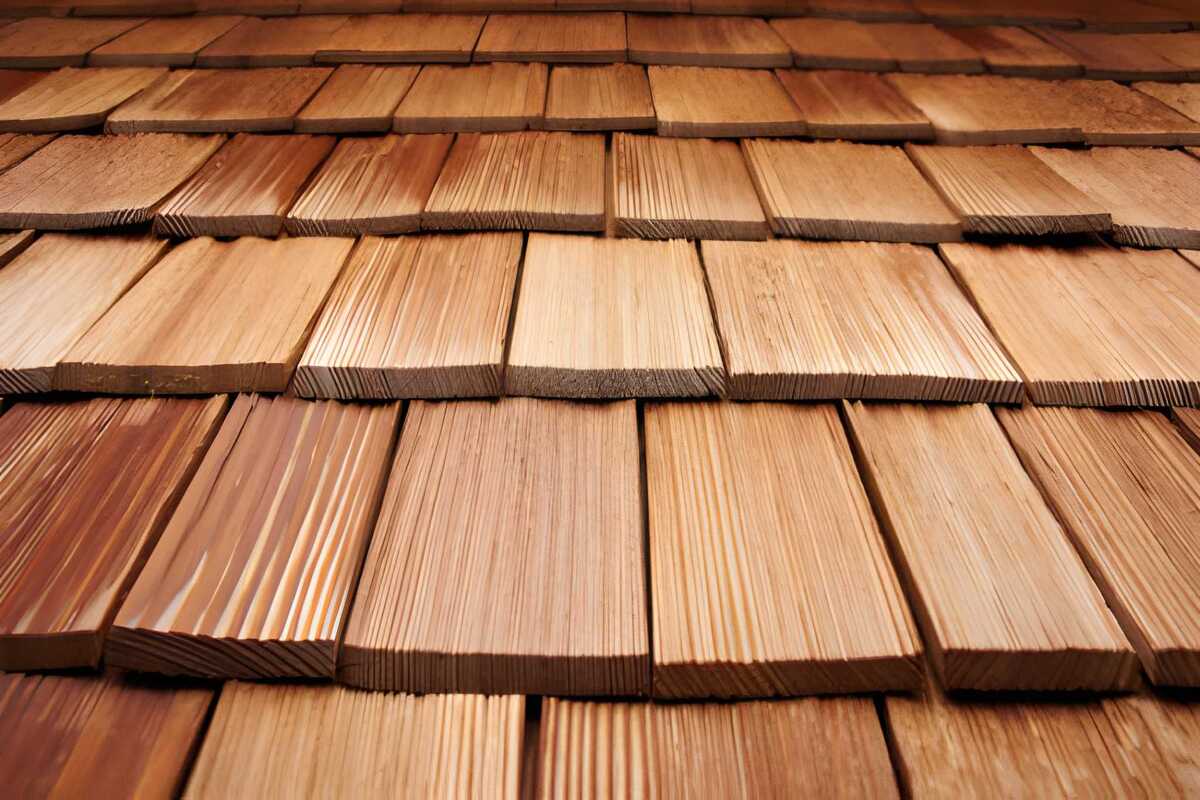
Installing wood shake shingles requires careful attention to exposure spacing, proper nailing techniques, and interlayer felt application that differs significantly from standard asphalt shingle installation. Cedar shake roofs deliver 30-50 year lifespans when installed correctly using hot-dipped galvanized nails, maintaining 1/4-inch spacing between shingles, and ensuring each course overlaps nails by 40mm for proper weather protection. This comprehensive DIY roof installation guide provides step-by-step instructions, detailed diagrams showing how to install roof shingles made from wood, and professional techniques enabling experienced DIYers to achieve contractor-quality results.
Wood shake installation differs from asphalt in critical ways each course requires 18-inch felt interlayers positioned to cover the top portion of shakes below, nail placement must sit 2 inches above the exposure line of the next course, and maintaining offset joints of at least 1.5 inches prevents water infiltration. While installing wood shake shingles demands more precision than asphalt, DIYers with roofing experience, proper safety equipment, and patience can successfully complete projects on low-to-moderate pitch roofs.
This guide covers essential preparation, required tools, detailed installation steps with visual diagrams, common mistakes to avoid, and when to call professionals for complex roof geometries.
Table of Contents
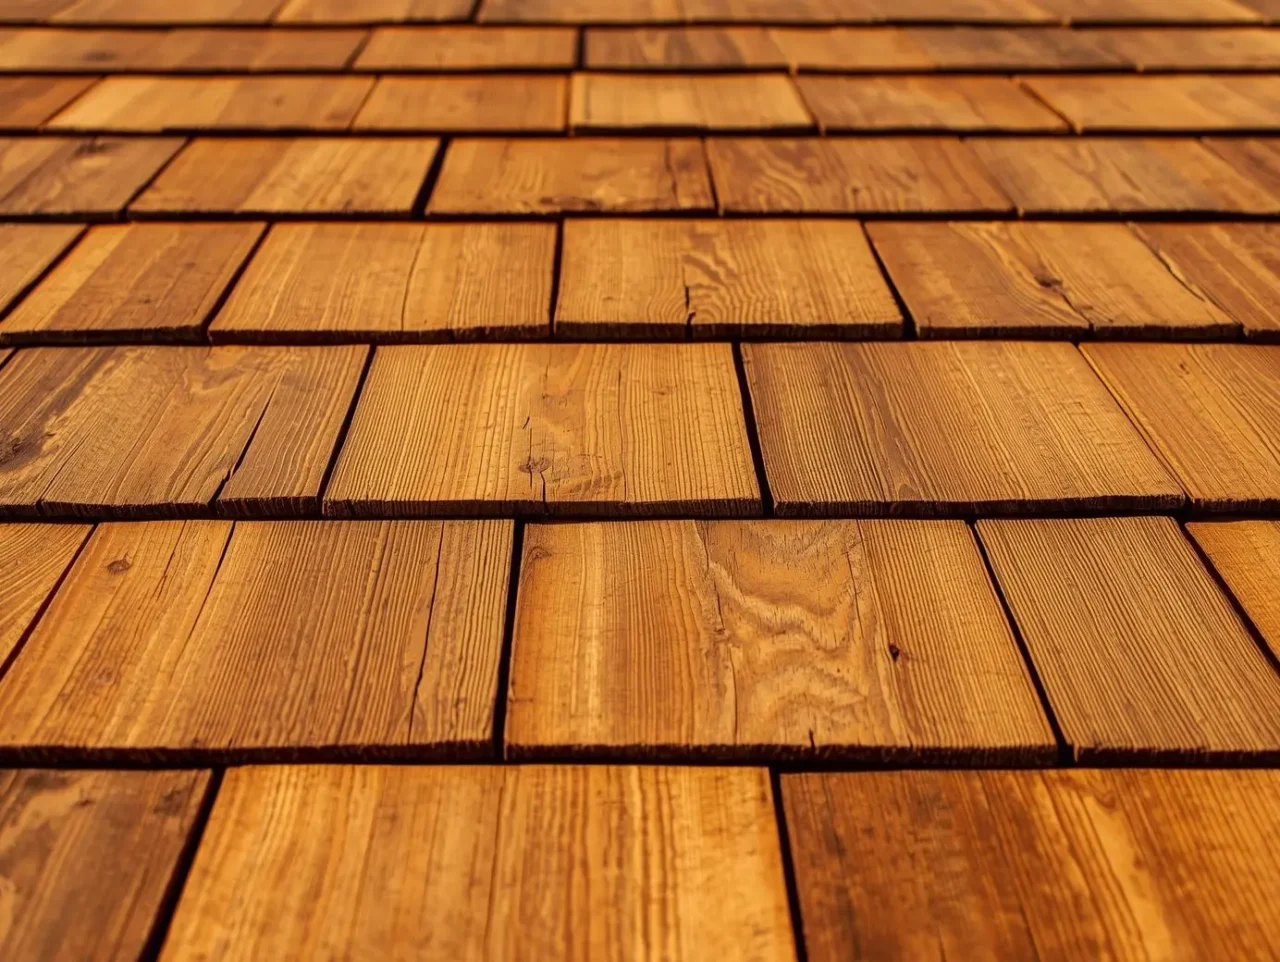
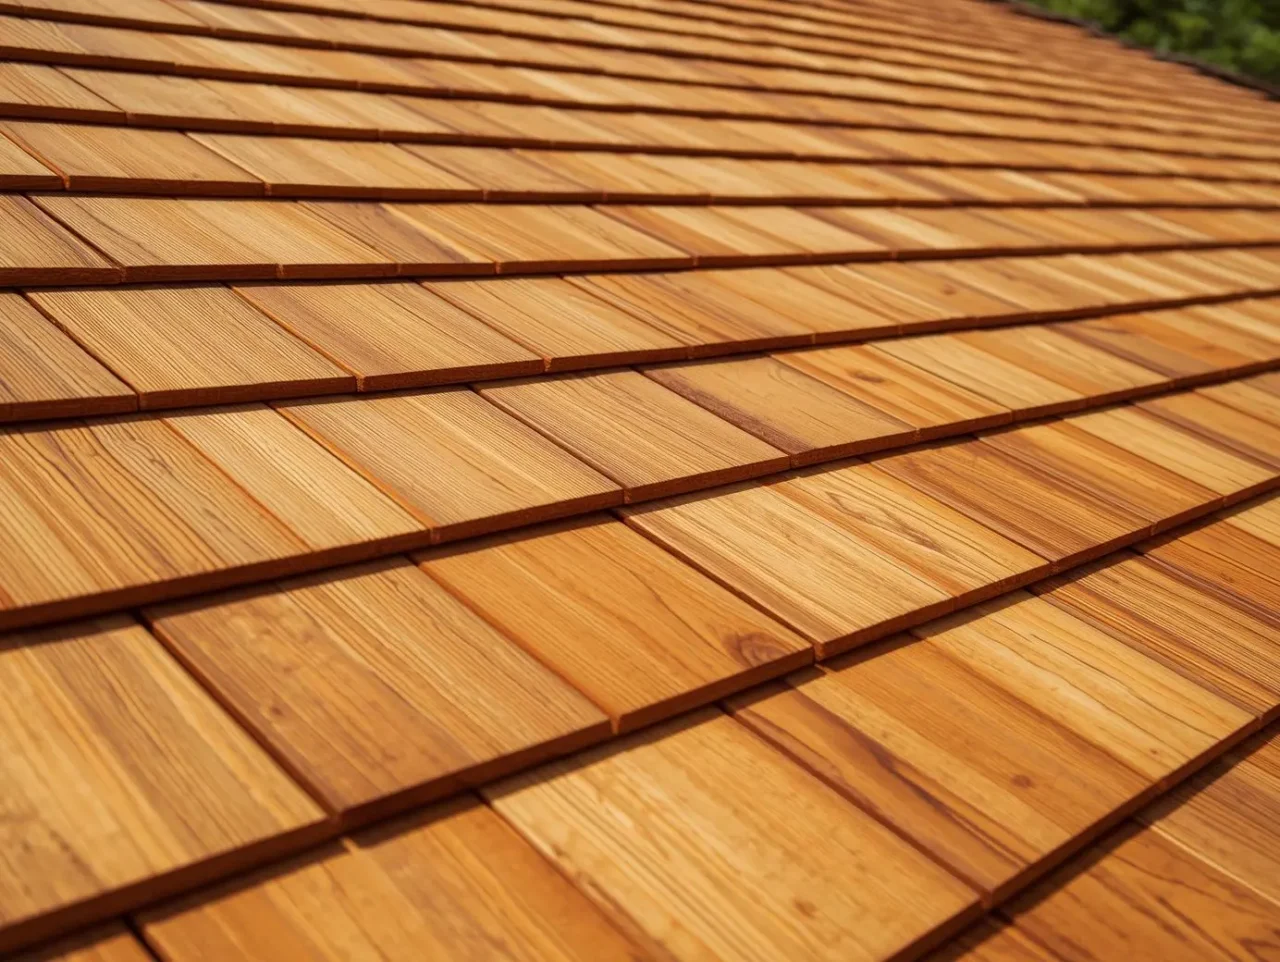
Installing wood shake shingles on roof showing proper exposure and spacing techniques for DIY roof installation
Is installing wood shake shingles a realistic DIY project?
Determining whether installing wood shake shingles suits DIY capabilities requires honest assessment of experience, physical ability, and roof complexity.
When DIY wood shake installation makes sense
Appropriate DIY scenarios:
Previous roofing experience (at least basic shingle replacement or repair work)
Simple roof geometry (basic gable or hip, no complex valleys or dormers)
Low to moderate pitch (4:12 to 6:12 slopes manageable with proper safety equipment)
Small to medium projects (sheds, garages, porches before attempting full home roofs)
Access to experienced mentor who can guide first-time installation
Adequate time commitment (wood shakes install 3-4 times slower than asphalt for beginners)
Required skills and experience:
Comfortable working at heights with proper fall protection
Ability to maintain consistent measurements and spacing
Experience using pneumatic nailers or hammer with precision
Understanding of roofing fundamentals (water drainage, flashing principles, ventilation)
Physical stamina for repetitive overhead work in various weather conditions
Complex architectural features (multiple valleys, dormers, turrets, skylights)
Three-story homes or roof heights exceeding 25 feet
Full-house reroofs on your primary residence (insurance and warranty considerations)
Intricate flashing requirements around chimneys, vent pipes, and roof penetrations
No prior roofing experience (attempting cedar shake as first roofing project extremely risky)
Professional cedar shake installation costs $8-$15 per square foot installed—a significant investment justified by warranty protection, proper techniques, and avoiding costly water damage from DIY mistakes.
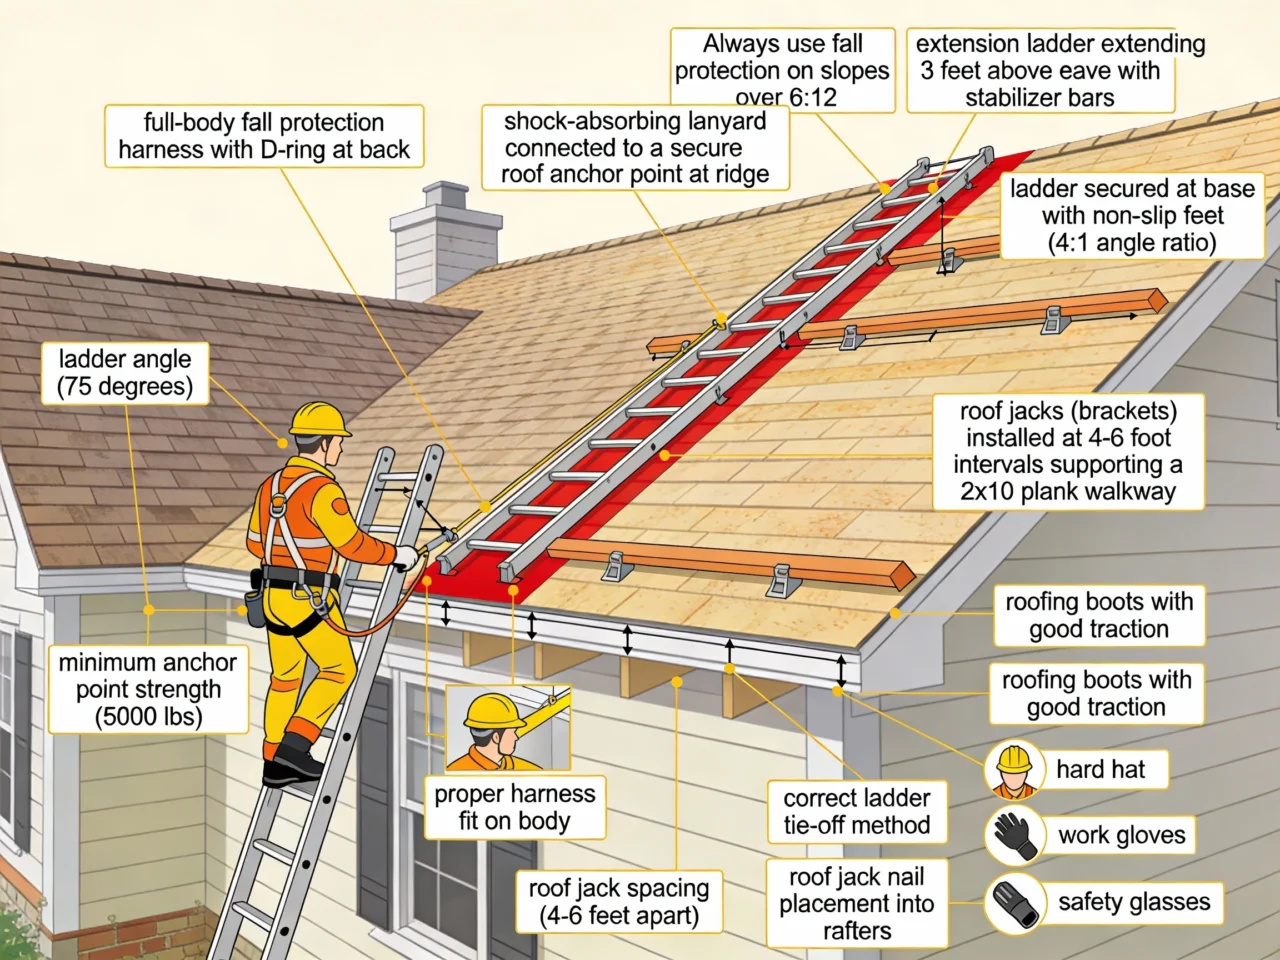
Safety considerations for DIY wood shake projects
Essential safety equipment:
OSHA-compliant fall arrest system for roofs above 6 feet
Proper ladder with stabilizers, secured at top and bottom
Non-slip work boots with ankle support
Safety glasses protecting against wood splinters and nail fragments
Work gloves preventing hand injuries from rough cedar edges
Hearing protection when using pneumatic nailers
Safety protocols:
Never work alone—have someone nearby for emergencies
Avoid roofing during wet, icy, or high-wind conditions
Use roof jacks and planks on pitches exceeding 5:12 for stable work platform
Keep work area clear of tools and materials preventing trip hazards
Stay hydrated and take breaks—heat exhaustion common on roof surfaces
Diagram showing proper safety equipment setup for installing wood shake shingles including fall protection and roof jacks
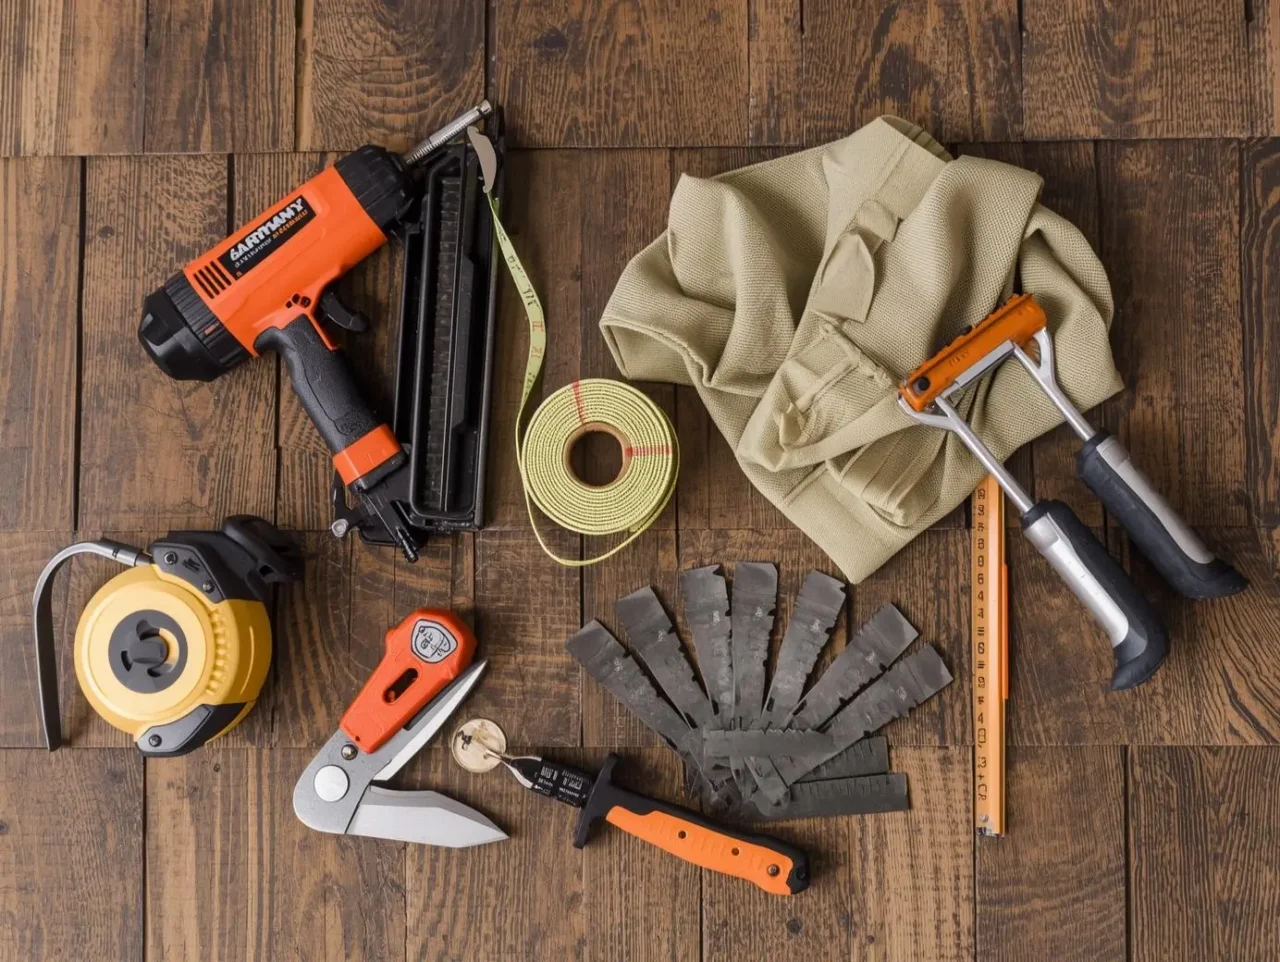
Tools and materials needed for installing wood shake shingles
Gathering correct tools and materials before starting prevents mid-project delays and ensures proper installation.
Essential tools for wood shake installation
Cutting and measuring tools:
Tape measure (25-foot minimum for accurate layout)
Chalk line for establishing straight coursing lines
Utility knife with hooked blades for trimming felt underlayment
Hand saw or circular saw for cutting shakes to length
Hatchet for splitting shakes and making custom cuts
Straight edge (6-8 feet) for aligning shake courses
Fastening tools:
Hammer (if hand-nailing—16 oz framing hammer with smooth face)
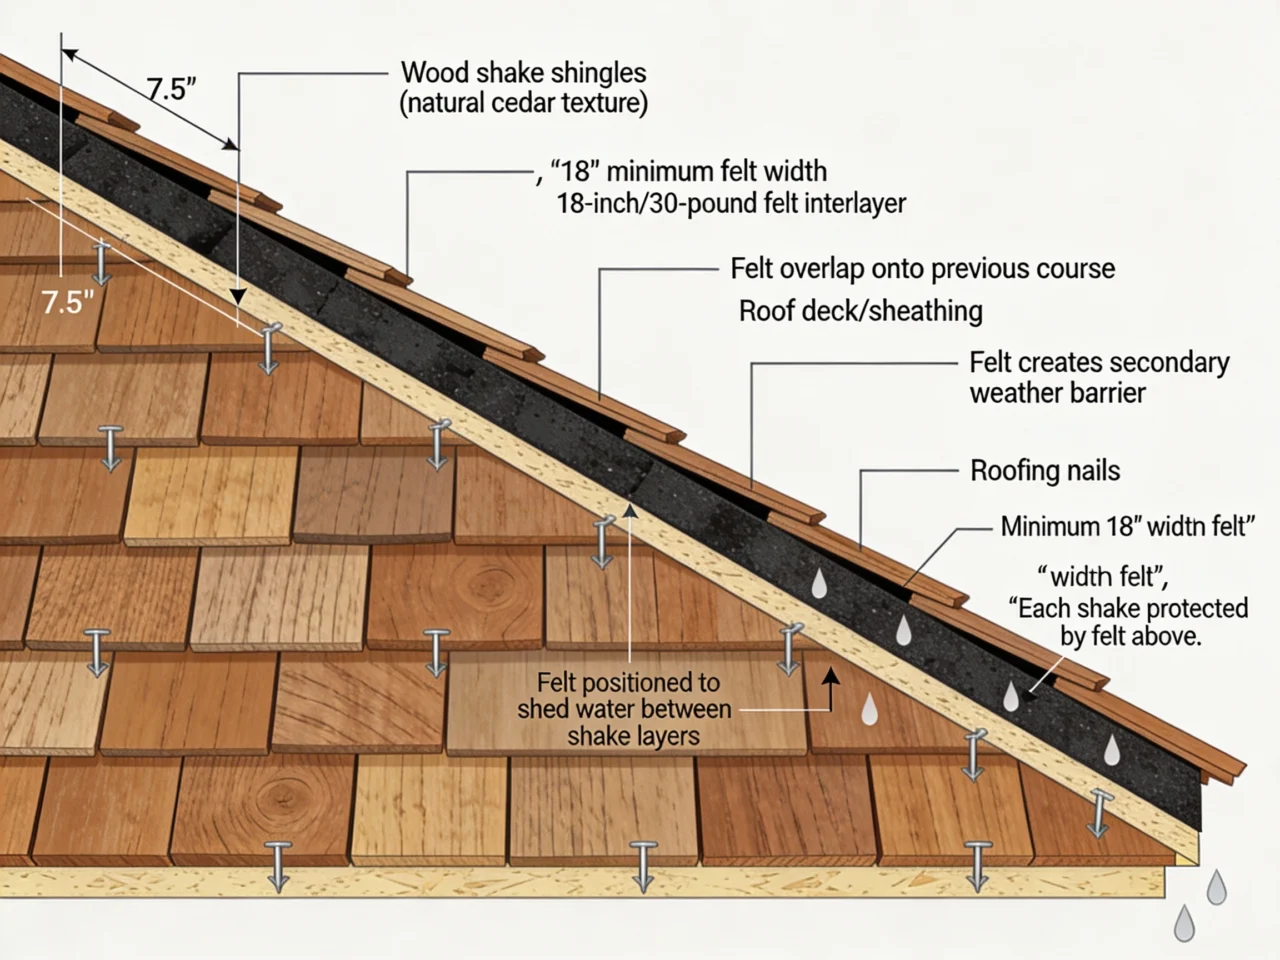
Why interlayers matter: Felt creates water barrier at joint lines where adjacent shake edges meet, preventing water infiltration if wind drives moisture upward.
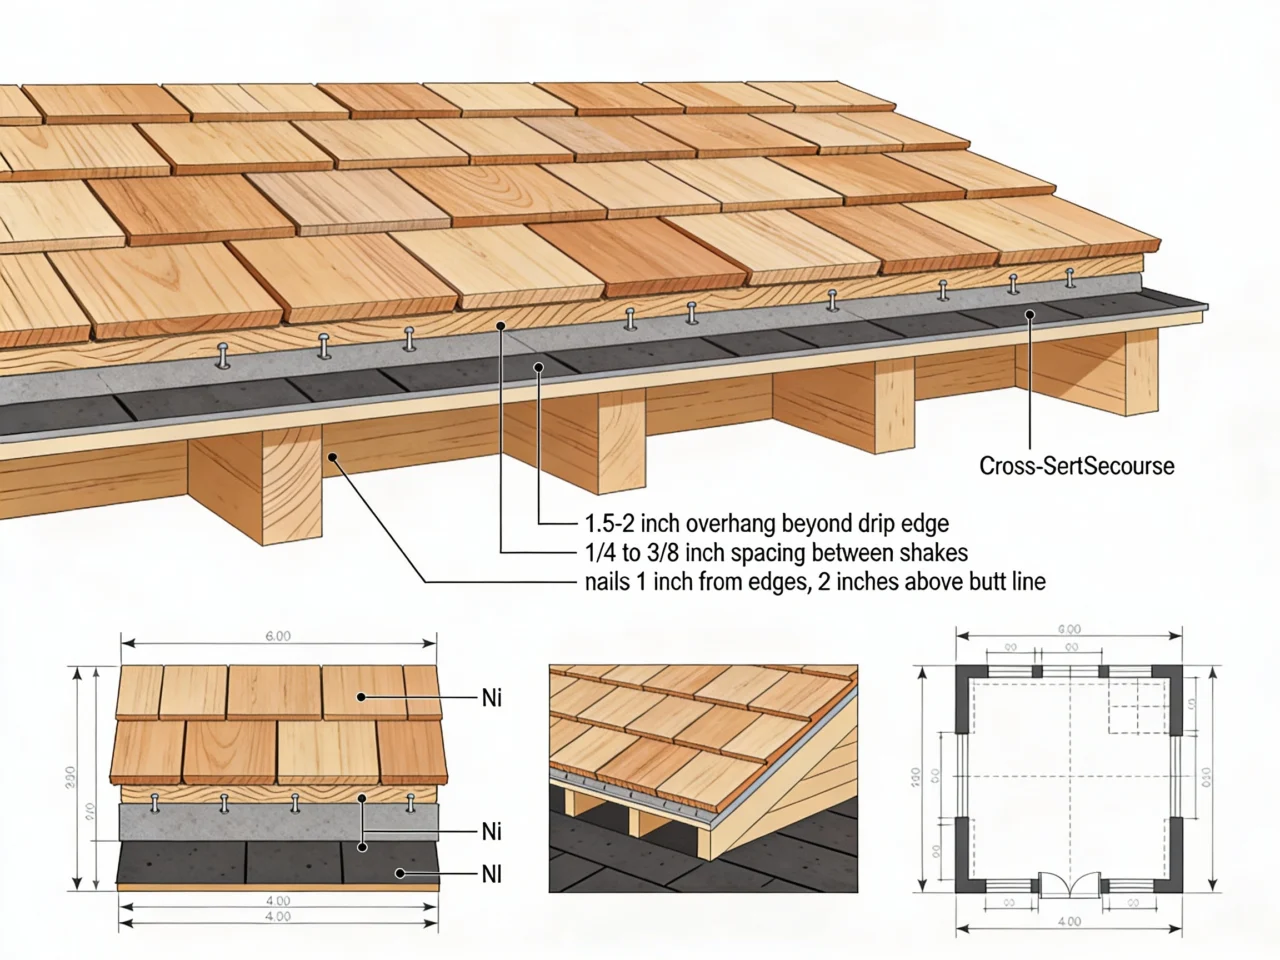
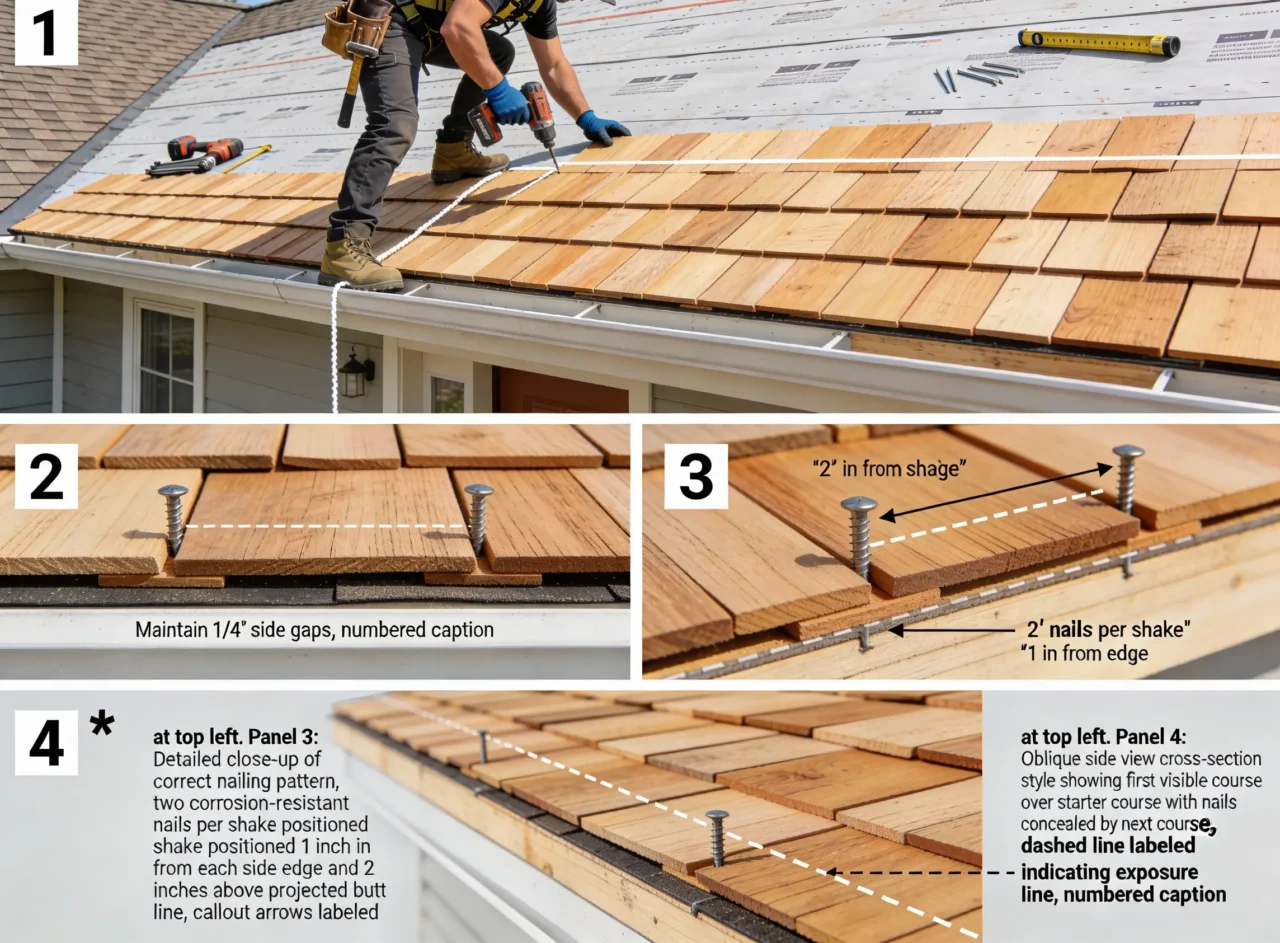
Nailing too low: When nails sit below the butt line of the next course, they become exposed to weather and create leak points—nails must sit 1-2 inches above the exposure line ensuring next course covers them by minimum 40mm.
Nailing too close to edges: Positioning nails less than 3/4 inch from shake edges causes splitting, especially as wood expands and contracts with moisture changes.
Overdriving nails: Driving nails too deep crushes wood fibers, reducing holding power and potentially cracking shakes—nails should sit flush with shake surface, not countersunk.
Wrong nail type: Using non-galvanized or aluminum nails results in premature corrosion, staining, and fastener failure—only hot-dipped galvanized or stainless steel fasteners acceptable.
Insufficient joint offset
Aligned vertical joints: When joints in consecutive courses align within 1.5 inches, water channels straight through roof layers bypassing felt protection.
Three-course alignment: Most critical mistake: vertical joints aligning through three consecutive courses creates direct water infiltration path compromising weathertightness.
Omitting or incorrectly positioning interlayer felt
Skipping interlayers: Some DIYers assume felt over entire deck sufficient like asphalt installation—wood shakes absolutely require 18-inch felt strips between each course.
Wrong felt positioning: Placing felt too high or too low fails to provide proper coverage over top portion of shakes below while extending under shakes above.
Correct method: Position bottom edge of 18-inch felt strip at distance from shake butt equal to twice your exposure, ensuring felt covers top 4 inches of shakes below.
Improper spacing between shakes
Tight spacing (no gap): Installing shakes touching without 1/4-inch expansion gap causes buckling when wood swells during wet periods.
Excessive spacing: Gaps wider than 3/8 inch allow excessive water penetration and visual appearance suffers.
Correct spacing: Maintain consistent 1/4 to 3/8 inch (5-6mm) spacing between all shakes allowing natural expansion while preventing water infiltration.
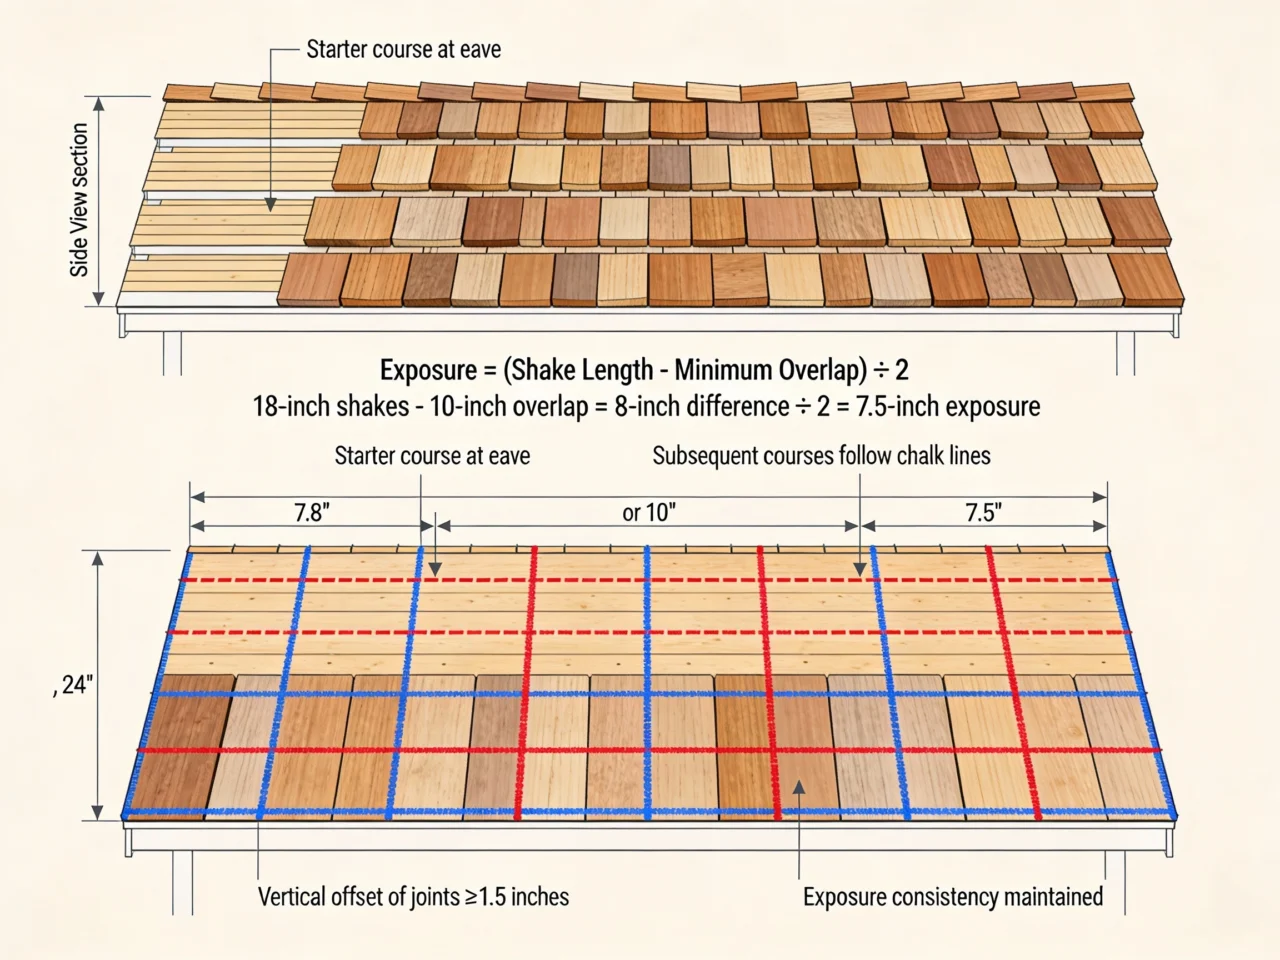
Incorrect exposure
Excessive exposure: Using exposure greater than shake length divided by 3 results in single coverage instead of double coverage, reducing weather protection to unacceptable levels.
Inconsistent exposure: Varying exposure across roof creates wavy appearance and compromises weathertightness—maintain uniform exposure throughout.
Calculations:
18-inch shakes: Maximum 7.5 inches (conservative 7 inches recommended)
24-inch shakes: Maximum 10 inches (conservative 8-9 inches recommended)
Maintenance and longevity of wood shake roofs
Proper maintenance extends wood shake shingle lifespan to 30-50 years.
Expected lifespan
Factors affecting longevity:
Installation quality (proper techniques add 10-15 years to lifespan)
Wood quality (#1 grade cedar lasts longest)
Climate (humid regions see 25-35 years, dry climates 40-50+ years)
Maintenance frequency (annual inspections extend life significantly)
Roof pitch (steeper pitch sheds water better, lasts longer)
Routine maintenance requirements
Annual inspections:
Check for split, cracked, or loose shakes requiring replacement
Inspect flashing around penetrations for deterioration
Clear debris from valleys and gutters preventing water backup
Examine ridge caps for wind damage or loosened fasteners
Cleaning recommendations:
Remove moss, algae, and lichens annually with gentle brushing or low-pressure washing
Trim overhanging branches preventing constant shade and moisture retention
Clear accumulated needles and leaves from roof surface
Treatment options:
Apply wood preservatives every 3-5 years in humid climates preventing rot
Consider clear sealers maintaining natural appearance while enhancing water resistance
Avoid oil-based treatments promoting mildew growth in some climates
When to replace individual shakes
Signs requiring replacement:
Splits longer than 1/3 shake width
Complete breakage or missing shakes
Severe cupping preventing water shedding
Rot or soft spots when pressed
Widespread granular loss (in treated shakes)
Replacement technique:
Split damaged shake with chisel, remove pieces
Cut nails underneath with hacksaw blade or nail ripper
Slide new shake into position, trimming if needed
Nail top edge where next course covers (may need to lift slightly)
Apply roofing cement under edges for temporary hold
Frequently asked questions about installing wood shake shingles
How difficult is installing wood shake shingles for DIYers?
Installing wood shake shingles requires intermediate-to-advanced roofing skills and takes 3-4 times longer than asphalt shingle installation due to interlayer felt requirements, precise spacing, and careful nail placement. DIYers with previous roofing experience can successfully complete simple structures like sheds and garages, but full house installations should be tackled only after gaining experience on smaller projects.
What’s the proper exposure for wood shake shingles?
Proper exposure for wood shake shingles depends on shake length: 18-inch shakes use maximum 7.5-inch exposure, while 24-inch shakes allow maximum 10-inch exposure, calculated as shake length divided by 3 to ensure double coverage protection. Conservative exposures of 7 inches (18-inch shakes) and 8-9 inches (24-inch shakes) provide enhanced weather resistance and longer roof life.
Do wood shakes require felt between each course?
Yes—wood shake installation absolutely requires 18-inch wide strips of #30 felt positioned between each shake course, with the bottom edge placed at a distance from the shake butt equal to twice the exposure, ensuring the felt covers the top portion of shakes below while extending under shakes above. This interlayer felt prevents water infiltration at shake joints and is critical for proper weatherproofing.
How far apart should wood shake shingles be spaced?
Wood shake shingles require 1/4 to 3/8 inch (5-6mm) spacing between adjacent shakes to accommodate natural wood expansion when wet without causing buckling. Spacing closer than 1/4 inch causes compression and buckling during expansion, while gaps exceeding 3/8 inch compromise water resistance.
What type of nails for installing wood shake shingles?
Use hot-dipped galvanized steel or stainless steel ring shank nails sized 31mm x 1.8mm (approximately 1.25 inches long), with 2 nails per shake positioned 3/4 inch from each edge and 1-2 inches above the butt line of the next course. Never use copper nails with cedar products as chemical reactions cause deterioration.
No—wood shake shingles require removal of existing roofing materials and installation over clean deck with proper underlayment and interlayer felt system. The specialized installation technique including felt interlayers between courses cannot be properly executed over existing roofing, and old materials trap moisture accelerating wood deterioration.
How long do wood shake shingles last?
Wood shake shingles last 30-50 years when properly installed with high-quality #1 grade cedar, correct nail placement, appropriate exposure, interlayer felt, and regular maintenance. Lifespan varies by climate, installation quality, and maintenance frequency, with humid regions seeing shorter lifespans (25-35 years) and dry climates exceeding 40 years.
What roof pitch is required for wood shake installation?
Minimum recommended pitch for hand-split wood shake shingles is 4:12 (4 inches of rise per 12 inches of horizontal run) for standard double coverage installation. Slopes between 3:12 and 4:12 require special installation techniques including double-roof systems with hot-mopped underlayment, while slopes below 3:12 are not suitable for wood shake application.
Achieving professional results with DIY wood shake installation
Installing wood shake shingles successfully requires mastering exposure calculations, interlayer felt positioning, proper nail placement 2 inches above exposure lines, and maintaining 1.5-inch minimum joint offsets between consecutive courses. This DIY roof installation technique differs significantly from asphalt shingle methods through mandatory 18-inch felt strips between each shake course, 1/4-inch spacing between shingles for expansion, and double starter courses creating uniform first-course height.
Following this comprehensive diagram how to install roof shingles guide enables experienced DIYers to achieve 30-50 year roof lifespans rivaling professional installations by using hot-dipped galvanized nails, calculating correct exposure (maximum shake length divided by 3), and positioning nails where next course provides minimum 40mm coverage. Wood shake roofs deliver unmatched natural beauty and durability when installation fundamentals are respected, though complex geometries, steep pitches, or first-time roofers should consider professional contractors ensuring proper techniques and warranty protection.
Ready to start installing wood shake shingles? Gather quality #1 grade cedar, hot-dipped galvanized nails, #30 felt, and proper safety equipment, practice techniques on small structures before tackling primary residences, and maintain consistent exposure and spacing throughout installation. Remember: patience and precision matter more than speed—properly installed wood shakes protect homes for decades while rushed installations fail within years.
🏠 Roofing Tips & Updates
Get free roofing advice, cost guides, and seasonal maintenance tips.
Roofing content specialist with 5+ years researching U.S. residential and commercial roofing. Has documented 200+ projects covering installation costs, material selection, contractor vetting, and DIY guides for homeowners across all climate zones.
Metal Roofing Denver: Cost Guide & Why It’s Worth It
Metal roofing Denver installations average $15,626 for typical homes, with most homeowners paying between $7,115 and $26,266 depending on home size, metal type, and roof complexity. Standing seam metal roofing the premium choice for Denver’s harsh climate costs $8-$14 per square foot installed, while budget-friendly corrugated metal panels run $7-$12 per square foot. Denver homeowners increasingly choose metal roofing for its superior hail resistance, critical protection in Colorado’s “Hail Alley” where severe storms routinely destroy traditional asphalt shingles.
Metal roofs deliver exceptional value through 40-70 year lifespans compared to asphalt’s 20-30 years, superior energy efficiency from reflective coatings, and insurance premium reductions for Class 4 impact-rated installations. The Denver market shows 60-70% return on investment for metal roofing significantly higher than the 50% national average making metal roofs one of the smartest home improvement investments in Colorado’s challenging climate.
This comprehensive guide explains metal roofing Denver costs, hail protection benefits, contractor selection strategies, and why metal outperforms asphalt in the Front Range’s extreme weather conditions.
Table of Contents
Metal roofing Denver installation showing standing seam panels on Colorado home
Why Denver homeowners choose metal roofing
Denver’s unique climate and weather patterns make metal roofing the logical choice for long-term home protection and value.
Denver’s unique climate challenges
Frequent hailstorms and severe weather patterns: Denver sits in “Hail Alley,” experiencing some of North America’s most damaging hail events annually. Hailstones exceeding golf-ball size regularly devastate traditional roofing materials, creating costly insurance claims and frequent roof replacements.
Heavy snow loads and rapid temperature swings: Mile High altitude combined with Front Range weather patterns creates extreme conditions—freezing temperatures followed by rapid snowmelt, intense UV exposure at 5,280+ feet elevation, and thermal cycling that degrades lesser roofing materials.
Intense UV exposure at high altitude: Denver’s high elevation means 25% more UV radiation than sea-level locations, accelerating asphalt shingle degradation and causing premature granule loss, cracking, and brittleness.
Wind uplift concerns in Front Range areas: Chinook winds and mountain downdrafts create sudden high-wind events reaching 60-90 mph, tearing underlayments and lifting improperly secured roofing materials.
Metal roofing performance in Colorado weather
Superior hail impact resistance compared to asphalt: Metal roofing withstands severe hail without cracking, puncturing, or requiring replacement—the material absorbs and disperses impact energy rather than fracturing like brittle asphalt shingles. Class 4 impact-rated metal roofs protect homes even during catastrophic hail events that destroy neighboring asphalt roofs.
Snow shedding properties prevent ice dam formation: Metal’s smooth, non-porous surface allows snow to slide off before accumulating dangerous weight loads, while the material’s thermal properties and proper installation prevent ice dam formation that plagues asphalt roofs.
UV resistance and color retention over decades: High-performance coatings on quality metal roofing resist UV degradation, maintaining color integrity and protective properties for 40+ years while asphalt shingles fade, crack, and lose granules within 15-20 years in Denver’s intense sunlight.
Wind rating advantages (Class 4 impact resistance): Metal roofing systems feature interlocking panels with concealed fasteners creating wind resistance up to 120 mph—far exceeding asphalt shingles’ typical 60-90 mph ratings and preventing blow-offs during Front Range wind events.
Long-term value for Denver properties
40-70 year lifespan vs 20-30 for asphalt: Metal roofing lasts two to three times longer than premium asphalt shingles, eliminating the need for mid-life roof replacement that asphalt requires.
Reduced maintenance and repair frequency: Metal roofs require minimal maintenance beyond occasional inspections and gutter cleaning, avoiding the frequent repairs asphalt demands after each hail event.
Insurance premium reductions for hail-resistant roofing: Many Denver-area insurance carriers offer 20-35% premium discounts for Class 4 impact-rated metal roofing due to dramatically reduced claim frequency compared to asphalt.
Increased home resale value in Denver metro market: Metal roofing installations in Denver generate 60-70% return on investment—the highest ROI of any exterior improvement—adding $9,400-$10,950 in property value for average installations.
Metal roofing Denver cost breakdown
Understanding metal roofing Denver pricing helps homeowners budget accurately and compare contractor quotes effectively.
Average project costs (2026 data)
Denver-specific average: $15,626 total project cost: Denver homeowners pay $15,626 on average for complete metal roof installations, with typical ranges from $7,115 to $26,266 depending primarily on home size and metal type selection.
National context: $14-$40+ per square foot: National metal roofing costs range from $14-$40+ per square foot installed, with total projects averaging $46,233 nationally ($23,890-$68,575 range) for 1,700 square foot homes.
Typical Denver 1,700 sq ft home cost ranges by metal type:
Denver metal roofing material costs vary significantly by type:
Metal Type
Cost Per Sq Ft (Installed)
Lifespan
Best For
Corrugated steel
$7-$12
40-50 years
Budget-conscious, barns/sheds
Coated steel (Galvalume)
$5-$14
40-60 years
Most popular Denver choice
Aluminum
$4-$10
50+ years
Corrosion resistance, coastal
Tin
$5-$12
50+ years
Vintage aesthetic
Zinc
$6-$12
80-100 years
Self-healing patina, premium
Copper
$15-$30
100+ years
Luxury, distinctive appearance
Stainless steel
$10-$16
50+ years
Maximum durability
Stone-coated steel
$7-$13
50 years
Traditional shingle look
Installation styles and their costs
Different installation methods affect total metal roofing Denver project costs:
Installation Style
Cost Range (Per Sq Ft)
Advantages
Best Applications
Standing seam
$8-$14
Concealed fasteners, superior weather protection, modern aesthetic
Primary residences, premium installations
Corrugated panels
$7-$12
Budget-friendly, easy installation, good performance
Garages, sheds, pole barns, budget projects
Metal shingles/tiles
$7-$15
Traditional appearance, versatile styling
Historic homes, HOA restrictions
Exposed fastener panels
$4-$8
Lowest cost, simple installation
Agricultural, commercial, outbuildings
Standing seam represents the premium choice for Denver homes, offering concealed fasteners that eliminate leak points and superior wind/hail resistance.
Factors affecting your metal roofing Denver quote
Multiple variables influence final project costs:
Roof size and complexity:
Basic gable roofs cost less per square foot than complex designs
Multiple valleys, dormers, and angles increase labor hours 20-40%
Each additional penetration (vents, skylights, chimneys) adds $150-$300
Pitch/slope considerations:
Low-slope roofs (3:12-4:12): Standard labor rates
Medium pitch (5:12-7:12): 10-15% labor premium
Steep roofs (8:12+): 25-40% labor increase for safety equipment and slower installation
Tear-off requirements:
Single layer asphalt removal: $1-$3 per square foot
Multiple layer removal: $3-$5 per square foot
Disposal fees: $50-$150 per ton
Deck repair if rot discovered: $3-$8 per square foot
Accessibility and multi-story considerations:
Single-story homes: Standard pricing
Two-story homes: 10-20% labor premium
Three+ stories or difficult access: 25-35% premium
Limited street parking or equipment access: Additional $500-$1,500
Permit fees specific to Denver municipalities:
Denver city limits: $100-$300 typical
Suburban jurisdictions: $75-$250
HOA approval fees: $50-$200 (some neighborhoods)
Seasonal demand fluctuations:
Spring (April-June): Peak season, highest prices, 2-6 week waits
Summer (July-August): High demand, moderate premiums
Fall (September-November): Good availability, moderate pricing
Winter (December-March): Best pricing (15-25% discounts), weather-dependent scheduling
Metal roofing types available in Denver
Denver contractors offer multiple metal roofing styles suited to different budgets and aesthetic preferences.
Standing seam metal roofing
5V Metal Roofing vs standing seam 2025
Description and system details: Standing seam features vertical panels with raised seams connecting adjacent panels, using concealed fasteners hidden beneath weathertight seams rather than exposed screws penetrating the roofing surface.
Why it’s the premium choice for Denver homes: The concealed fastener system eliminates screw holes—the primary leak source in exposed-fastener systems—while interlocking panel edges create superior wind and hail resistance critical for Denver’s severe weather.
Cost analysis: $8-$14/sq ft installed: Standing seam installations in Denver range from $8-$14 per square foot installed ($16,000-$28,000 for 2,000 sq ft roofs), representing the premium tier of metal roofing but delivering maximum performance and longevity.
Aesthetic versatility and color options: Available in dozens of colors from earth tones to bold contemporary shades, with finishes ranging from matte to high-gloss, allowing homeowners to complement any architectural style.
Warranty coverage typical for standing seam: Premium standing seam systems carry 40-50 year paint warranties and limited lifetime structural warranties, with many manufacturers offering 2-inch hail warranties protecting against Denver’s severe storms.
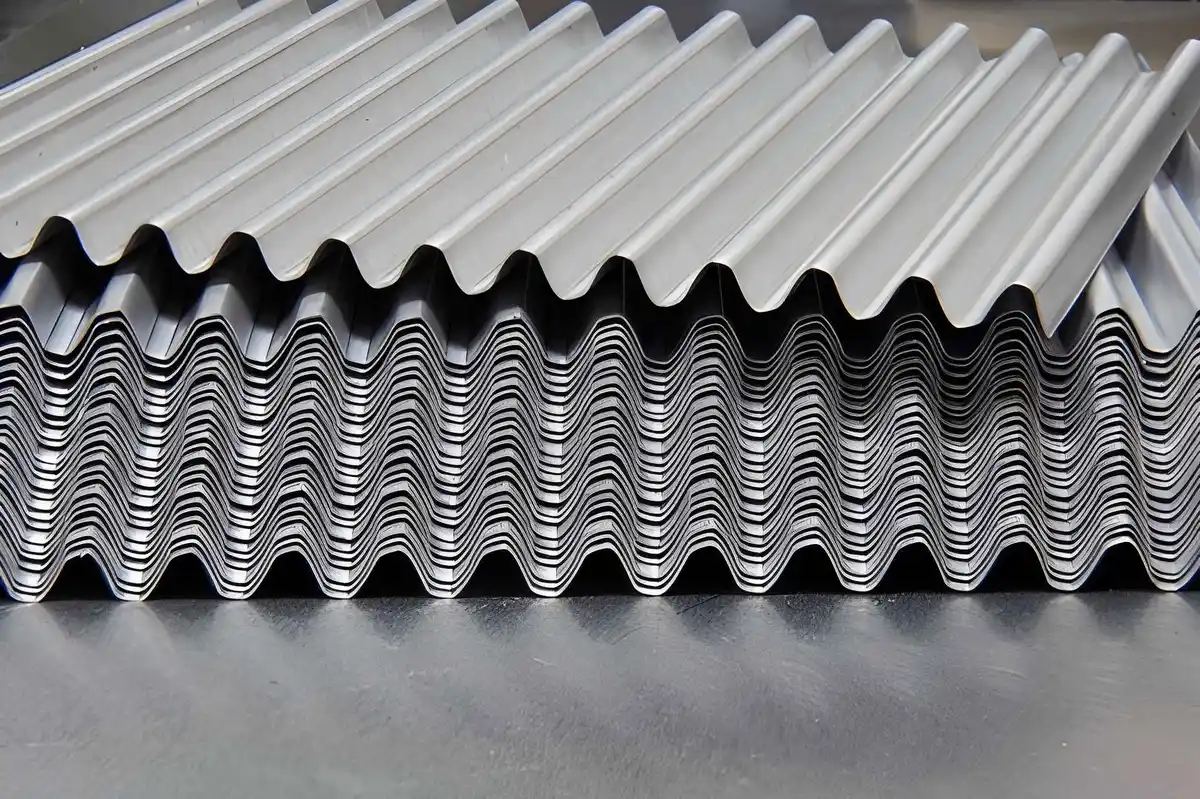
Corrugated and ribbed metal panels
Traditional agricultural/industrial look gaining residential popularity: Originally designed for barns and commercial buildings, corrugated metal now appears on modern farmhouse and contemporary residential designs seeking industrial-chic aesthetics.
Cost advantage: $7-$12/sq ft: Corrugated metal delivers solid performance at 30-40% lower cost than standing seam, making quality metal roofing accessible to budget-conscious Denver homeowners.
Durability in Denver’s weather conditions: Properly installed corrugated metal withstands hail, snow, and wind effectively, though exposed fasteners require periodic inspection and gasket replacement after 15-20 years.
Best applications: Ideal for garages, pole barns, sheds, workshops, and architectural accent areas, plus primary homes where budget constraints make standing seam impractical.
Metal shingles and tiles
photorealistic architectural Capstone Shingles
Replicating traditional roof aesthetics with metal performance: Metal shingles and tiles mimic wood shakes, slate, or clay tiles while delivering metal’s durability, fire resistance, and hail protection—perfect for historic Denver neighborhoods with architectural restrictions.
Cost range: $7-$15/sq ft: Positioned between corrugated panels and standing seam, metal shingles offer traditional appearance at moderate pricing.
Styles available:
Shake profile: Replicates cedar shake texture
Slate look: Diamond or rectangular panels mimicking slate
Installation considerations for Denver climate: Metal shingles provide excellent hail resistance and snow shedding while maintaining traditional neighborhood aesthetics, making them popular in older Denver communities.
Specialty metal options
Aluminum for corrosion resistance: Lightweight aluminum ($4-$10/sq ft) resists rust indefinitely, ideal for areas with heavy snow load concerns or homes near water features, though softer than steel and more prone to denting.
Copper for premium aesthetics and longevity: Copper roofing ($15-$30/sq ft) develops distinctive patina over decades while lasting 100+ years, representing the ultimate luxury choice for high-end Denver properties.
Zinc for self-healing patina: Zinc roofing ($6-$12/sq ft) develops protective patina that self-heals minor scratches, offers 80-100 year lifespan, and provides distinctive European styling.
When to choose premium metals: Consider copper or zinc for architecturally significant homes, properties where owner plans 30+ year ownership, or neighborhoods where distinctive appearance adds substantial resale value.
Hail resistance & weather protection
Denver’s location in “Hail Alley” makes hail resistance the primary consideration when selecting metal roofing Denver systems.
Understanding metal roofing’s hail performance
How metal absorbs and disperses hail impact energy: Metal roofing flexes slightly upon hail impact, absorbing kinetic energy and distributing force across larger panel area rather than concentrating stress at single points like brittle asphalt shingles.
Advanced alloy compositions for maximum strength: Modern steel roofing uses G90 Galvanized Steel with Galvalume coatings—aluminum-zinc alloy layers providing corrosion resistance and enhanced impact strength specifically engineered for severe weather zones.
Protective coatings: Factory-applied coatings including ceramic-based paints and PVDF (polyvinylidene fluoride) finishes add protective layers enhancing both impact resistance and UV stability critical for Denver’s high-altitude sun exposure.
Class 4 impact rating significance: UL 2218 Class 4 represents the highest impact resistance rating, requiring materials to withstand 2-inch steel ball drops from 20 feet without failure—metal roofing easily achieves this while most asphalt fails at Class 3 or below.
Denver’s hail history and risk
Frequency of hail events in Front Range: Denver experiences significant hail events 7-9 days per year on average, with severe (1+ inch) hail occurring 2-4 times annually in metro areas.
Average hail size and damage patterns: Front Range hailstorms produce stones ranging from quarter-size to baseball-size, with golf ball-size (1.75 inches) representing common severe events causing total asphalt roof losses.
“Hail Alley” designation: Colorado’s Front Range corridor from Fort Collins through Colorado Springs ranks among North America’s most hail-prone regions, earning the “Hail Alley” designation from insurance industry due to catastrophic damage frequency.
Insurance claim statistics: Hail damage represents the #1 homeowners insurance claim type in Denver metro, with billions in annual claims—primarily roof replacements—driving premium increases for properties with vulnerable roofing materials.
Comparing metal vs asphalt in hail events
Asphalt shingle failure modes: Hail impacts crack asphalt shingles’ brittle surface, knock off protective granules exposing black mat underneath, and create fractures allowing water penetration—damage often invisible immediately but leading to leaks within months.
Metal roofing resilience: Metal roofs may show cosmetic denting from severe hail but maintain complete waterproof integrity—no cracks, no granule loss, no structural compromise requiring replacement.
Long-term cost comparison after hail damage: Asphalt roofs require full replacement after severe hail ($8,000-$15,000 every 15-20 years in Denver), while metal roofs continue protecting indefinitely despite cosmetic marks, eliminating repeated replacement costs.
Insurance premium differences: Insurers offer 20-35% premium discounts for Class 4 impact-rated metal roofs, recognizing drastically reduced claim frequency—savings often cover metal roof premium over system lifespan.
Other weather protection benefits
Heavy snow load capacity: Metal roofing’s structural strength handles Colorado’s heavy wet spring snow without sagging or stress, while smooth surface allows safe shedding before dangerous accumulation.
Ice dam prevention: Metal’s thermal properties combined with proper ventilation and insulation eliminate temperature differentials causing ice dams that plague asphalt roofs along Denver eaves.
Wind uplift resistance: Four-way interlocking metal panel systems resist winds up to 120 mph—far exceeding chinook wind speeds and preventing blow-offs common with inadequately fastened asphalt.
Lightning protection considerations: Contrary to myth, metal roofs don’t attract lightning but do safely dissipate strikes across entire roof structure rather than concentrating energy at ignition points, actually reducing fire risk.
Choosing metal roofing Denver contractors
Selecting qualified metal roofing Denver contractors ensures proper installation critical for performance and warranty validity.
Essential contractor qualifications
Licensed, bonded, and insured requirements: Colorado requires contractors performing work over $500 to carry active licensing, bonding, and insurance—verify credentials through Colorado Department of Regulatory Agencies before signing contracts.
Metal roofing installation experience: Ensure contractors specialize in metal roofing specifically, not general roofing—metal installation techniques differ significantly from asphalt, requiring specialized tools, training, and experience.
Manufacturer certifications for warranty compliance: Many metal roofing manufacturers require certified installers for warranty activation—contractors should provide proof of certifications from brands they install.
References specific to Denver-area projects: Request 3-5 local references from projects completed within past 2 years, verifying contractor performance in Colorado’s specific climate and building code environment.
Top-rated metal roofing companies in Denver
Linear Roofing & General Contractors: Specializes in hail-resistant roofing including metal, tile, and stone-coated steel for Denver metro area. Offers expertise in both low and steep slope applications with deep understanding of Denver’s weather challenges from freezing winters to spring hail. Intimate knowledge of local building codes throughout Mile High region and experience with fierce mountain winds, heavy snow, and unpredictable hailstorms.
Colorado Metal Roofing (National Home Improvement division): Serves Denver Metro, Fort Collins, Colorado Springs, and Summit County with durable steel roofing solutions. Features specially coated G90 Galvanized Steel Kassel & Irons roofs providing impact, fire, and wind resistance (120 mph rating) with four-way concealed interlocking systems. Backed by lifetime protection warranties and commitment to complete quality service from estimate through installation.
Questions to ask during contractor selection
Experience verification:
“How many years specifically installing metal roofing in Denver’s climate?”
“What percentage of your business is metal vs other roofing types?”
“How many metal roofs do you install annually in Denver metro?”
Certification and training:
“What manufacturer certifications do you currently hold?”
“Are your crews factory-trained on the specific metal systems you install?”
“Can you provide proof of current licensing, bonding, and insurance?”
Project examples:
“May I see photos of recent Denver-area metal roofs you’ve completed?”
“Can you provide addresses of nearby projects I can drive by?”
“Do you have references from Denver homeowners with similar roof types?”
Warranty details:
“What workmanship warranty do you provide?”
“How long have you been in business to stand behind long-term warranties?”
“What manufacturer material warranties apply to recommended systems?”
“Are warranties transferable to future homeowners?”
Insurance expertise:
“Do you assist with insurance claims for hail or wind damage?”
“Do you work with adjusters to document damage and ensure proper coverage?”
“Can you explain insurance discounts available with Class 4 metal roofing?”
Project logistics:
“What’s your typical timeline for projects similar to mine?”
Pressure tactics demanding immediate signing or “today only” pricing
No physical Denver-area address or local references
Reluctance providing insurance certificates or license verification
No written contract or vague scope of work lacking material specifications
Door-to-door solicitation immediately after hailstorms
Requests for large upfront payments before work begins
No manufacturer certifications despite claiming expertise
Metal roof installation process in Denver
Understanding the metal roofing Denver installation workflow helps homeowners know what to expect.
Initial consultation and property assessment
Professional evaluation of existing roof condition: Qualified contractors inspect current roofing, identifying hail damage, structural issues, ventilation adequacy, and deck condition requiring attention before metal installation.
Discussion of aesthetic preferences and budget parameters: Contractors review metal types, colors, profiles, and styles matching architectural design while fitting budget constraints, explaining performance differences between options.
Structural assessment for metal roofing compatibility: Engineers verify deck strength, rafter spacing, and structural capacity for metal roofing weight—though metal often weighs less than heavy asphalt, proper evaluation ensures code compliance.
Permit requirements review: Contractors identify Denver or suburban municipality permit needs, HOA approval processes, and timeline expectations for regulatory compliance.
Custom design and material selection
Collaboration on metal type, color, and finish: Homeowners select from available metal materials (steel, aluminum, copper, zinc) and finishes (matte, satin, high-gloss) matching home style and neighborhood character.
Style selection: Choose between standing seam, corrugated panels, metal shingles, or specialty profiles based on aesthetic preferences, budget, and performance priorities.
Accessory planning: Coordinate gutters, downspouts, snow guards (critical for Denver), ridge vents, and trim details ensuring complete system integration.
Energy efficiency optimization: Select reflective coatings and colors maximizing solar heat reflection, reducing cooling costs during Denver’s hot summer months.
Professional installation timeline
Typical project duration: Average Denver homes (1,500-2,500 sq ft) require 3-7 days for complete metal roof installation depending on complexity, weather, and crew size.
Tear-off process: Crews remove existing roofing materials, dispose of debris, and prepare clean workspace—proper disposal costs $50-$150 per ton but ensures site cleanliness.
Underlayment and deck preparation: Install high-quality synthetic underlayment providing secondary water barrier, repair any damaged decking discovered during tear-off, ensure proper ventilation.
Metal panel/shingle installation: Following manufacturer specifications, crews install metal roofing using specialized fasteners, proper overlap sequences, and weather-resistant techniques specific to Colorado climate.
Flashing, trim, and detail work: Critical weatherproofing around chimneys, vents, valleys, and transitions receives particular attention—proper flashing prevents leak points common in amateur installations.
Final inspection and cleanup: Thorough magnet sweep removes metal shavings and fasteners, complete debris removal, final quality inspection, and homeowner walkthrough explaining maintenance requirements.
Insurance coordination services
Documentation of hail or wind damage: Professional contractors photograph existing damage, document loss for insurance records, and provide detailed assessment reports adjusters require.
Working with adjusters: Experienced contractors coordinate with insurance adjusters, explain damage extent, justify repair scopes, and ensure accurate claim valuations.
Ensuring proper coverage for upgrades: Contractors help homeowners understand upgrade costs beyond insurance coverage, explaining which portions are claim-covered versus homeowner-paid improvements.
Comparing metal roofing Denver performance against traditional asphalt clarifies why metal dominates premium installations.
Upfront cost analysis
Cost comparison for typical 1,700 sq ft Denver home:
Roofing Material
Cost Per Sq Ft
Total Project Cost
Expected Lifespan
Asphalt 3-tab shingles
$3-$5
$5,100-$8,500
15-20 years
Asphalt architectural shingles
$4-$7
$6,800-$11,900
20-30 years
Steel metal roofing
$5-$14
$8,500-$23,800
40-60 years
Standing seam metal
$8-$14
$13,600-$23,800
50-70 years
Premium copper metal
$15-$30
$25,500-$51,000
100+ years
Lifecycle cost and value
Metal 40+ year lifespan vs asphalt 20-30 years: Metal roofs last 2-3 times longer than premium asphalt, eliminating mid-life replacement costs that asphalt requires.
Maintenance cost differences over 30 years: Asphalt requires repairs after hail events ($500-$2,000 each), periodic algae treatment, valley repairs, and eventual full replacement at 20-25 years, totaling $15,000-$25,000 in lifetime maintenance. Metal requires only basic inspections and gutter cleaning, averaging under $2,000 in 30-year maintenance.
Replacement frequency impact on total cost: Homeowner installing asphalt at age 40 faces replacement at age 60-65 plus ongoing repairs, while metal roof installed at 40 lasts through retirement and transfers to next owner, eliminating second replacement burden.
Energy savings with reflective metal coatings: Reflective metal roofing reduces cooling costs 10-25% during Denver’s hot summer months through superior solar heat reflection compared to heat-absorbing dark asphalt.
Performance in Denver’s climate
Hail damage comparison: Severe hailstorms total asphalt roofs requiring complete replacement, while metal roofs may show cosmetic denting but maintain structural integrity and weathertight protection indefinitely.
UV degradation: Denver’s high-altitude UV exposure (25% more intense than sea level) rapidly degrades asphalt shingles, causing granule loss, cracking, and brittleness within 15-20 years. Metal roofing with PVDF coatings resists UV damage, maintaining color and protection 40+ years.
Wind performance: Asphalt shingles typically rated 60-90 mph blow off during Denver’s chinook winds when installation quality varies, while metal’s interlocking systems resist 120 mph winds consistently.
Snow management: Metal’s smooth surface sheds snow before dangerous accumulation while eliminating ice dams through thermal properties and proper installation, whereas asphalt retains snow and commonly develops destructive ice dams along eaves.
Energy efficiency and environmental benefits
Metal roofing Denver installations deliver measurable energy savings and environmental advantages.
Energy savings with metal roofing in Denver
Reflective coating technology reduces heat absorption: Factory-applied cool roof coatings reflect 25-95% of solar energy depending on color and finish, dramatically reducing heat transfer into attic spaces compared to asphalt’s 5-15% reflectivity.
Cooling cost reductions in summer: Metal roofing reduces Denver cooling costs 10-25% during June-September when daily high temperatures reach 85-100°F, saving $150-$400 annually on typical homes.
Thermal performance in Denver’s high-altitude sun: At 5,280+ feet elevation, UV and solar radiation intensity exceeds sea-level locations by 25%, making reflective roofing critical for comfort and energy efficiency.
ENERGY STAR qualified metal roofing options: Many metal roofing products meet ENERGY STAR requirements for steep-slope roofing in Denver’s climate zone, qualifying for utility rebates and tax incentives.
Environmental sustainability
100% recyclability of metal roofing materials: Steel, aluminum, copper, and zinc roofing materials recycle completely at end of service life—metal roofing averages 25-95% recycled content and returns to manufacturing stream indefinitely.
Reduction in landfill waste: Asphalt shingles contribute 11 million tons annually to U.S. landfills, with Denver metro adding thousands of tons after each hail event, while metal eliminates this waste stream through recyclability.
Embodied energy considerations: Though metal production requires significant energy, the material’s recyclability and 40-70 year lifespan result in lower lifetime embodied energy compared to 2-3 asphalt replacements.
Contribution to LEED certification: Metal roofing contributes points toward LEED certification in multiple categories including recycled content, reflectivity, and durability—valuable for environmentally conscious Denver homeowners.
Total cost of ownership
Combining durability + energy savings + low maintenance: Metal roofing’s 40-70 year lifespan eliminates replacement costs asphalt requires, while energy savings and minimal maintenance deliver annual cost reductions totaling $300-$800.
Insurance premium reductions: Class 4 impact-rated metal roofing qualifies for 20-35% insurance premium discounts in Denver market, saving $200-$500 annually and $6,000-$15,000 over roof lifespan.
Increased property value in Denver real estate market: Metal roofing generates 60-70% ROI in Denver—significantly above 50% national average—adding $9,400-$10,950 in appraised value for typical installations.
Long-term economic benefits: When calculating initial premium ($5,000-$15,000 over asphalt), insurance savings, energy reductions, eliminated replacement costs, and property value increase, metal roofing pays for itself within 12-18 years while providing 30-50 additional years of superior protection.
Frequently asked questions about metal roofing Denver
Metal roofing in Denver averages $15,626 for typical homes, with most projects ranging from $7,115 to $26,266 depending on home size and metal type. Corrugated steel costs $7-$12 per square foot installed, standard coated steel runs $5-$14 per square foot, and premium standing seam ranges from $8-$14 per square foot.
Is metal roofing good for Denver’s hail?
Metal roofing provides superior hail protection in Denver’s “Hail Alley” climate, withstanding severe impacts without cracking or requiring replacement. Class 4 impact-rated metal roofs absorb and disperse hail energy rather than fracturing like asphalt shingles, qualifying for 20-35% insurance premium discounts due to dramatically reduced claim frequency.
How long does metal roofing last in Denver?
Metal roofing lasts 40-70 years in Denver depending on material type—steel roofing provides 40-60 years, aluminum lasts 50+ years, and premium copper exceeds 100 years. This lifespan significantly exceeds asphalt shingles’ 20-30 year expectancy, eliminating mid-life replacement costs.
What type of metal roofing is best for Denver?
Standing seam metal roofing represents the optimal choice for Denver homes, featuring concealed fasteners eliminating leak points, superior wind resistance (120 mph ratings), and excellent hail protection through interlocking panel systems. Coated G90 Galvanized Steel with Galvalume coating provides ideal balance of performance, cost ($8-$14/sq ft), and durability for Colorado’s challenging climate.
Metal roofing costs $5-$16 per square foot versus asphalt’s $3-$5 per square foot but lasts 40-70 years compared to asphalt’s 20-30 years. Metal withstands Denver’s frequent hail without damage requiring replacement, qualifies for insurance discounts, reduces energy costs 10-25%, and generates 60-70% ROI—highest return of any Denver exterior improvement.
Do I need a special contractor for metal roofing Denver installation?
Yes—metal roofing requires specialized installation expertise distinct from asphalt techniques. Choose contractors with metal-specific experience, manufacturer certifications, Denver-area references, and proper licensing/insurance, ensuring warranty compliance and performance in Colorado’s severe weather.
Does metal roofing reduce insurance costs in Denver?
Class 4 impact-rated metal roofing qualifies for 20-35% homeowners insurance premium discounts in Denver due to superior hail resistance dramatically reducing claim frequency. Annual savings of $200-$500 total $6,000-$15,000 over typical roof lifespan, significantly offsetting metal’s higher upfront cost.
Can metal roofing be installed in winter in Denver?
Metal roofing can be installed year-round in Denver with proper precautions, though winter installations require careful planning for snow, ice, and freezing temperatures affecting adhesives and sealants. Many contractors offer 15-25% discounts for off-season winter work when demand drops, making winter installation economically attractive if weather cooperates.
Protecting your Denver home with metal roofing
Metal roofing Denver installations provide unmatched protection in Colorado’s challenging “Hail Alley” climate through superior impact resistance, 40-70 year lifespan, and wind ratings up to 120 mph. Denver homeowners invest $15,626 on average ($7,115-$26,266 range) for metal roofs delivering 60-70% return on investment—the highest ROI of any exterior improvement—while qualifying for 20-35% insurance premium discounts and eliminating repeated replacement costs asphalt requires.
Standing seam metal roofing at $8-$14 per square foot represents the premium choice for Denver’s severe weather, featuring concealed fasteners, interlocking panels, and Class 4 impact ratings protecting homes during catastrophic hailstorms that destroy neighboring asphalt roofs. Energy-efficient reflective coatings reduce cooling costs 10-25% in Denver’s intense high-altitude sun, while 100% recyclable materials and decades-long durability minimize environmental impact compared to disposable asphalt shingles filling landfills after each hail event.
Ready to protect your Denver home with superior metal roofing? Contact qualified local contractors specializing in metal installation, request detailed quotes comparing standing seam and corrugated options, verify manufacturer certifications and insurance credentials, and explore financing options making premium protection affordable. Denver’s next hailstorm is coming—ensure your home survives with confidence metal roofing provides.
🏠 Roofing Tips & Updates
Get free roofing advice, cost guides, and seasonal maintenance tips.
Roofing content specialist with 5+ years researching U.S. residential and commercial roofing. Has documented 200+ projects covering installation costs, material selection, contractor vetting, and DIY guides for homeowners across all climate zones.
Best Roofing Companies in Dallas: 2026 Comprehensive Guide
Finding the best roofing companies in Dallas requires careful evaluation of contractor credentials, customer reviews, warranty coverage, and service quality. Dallas homeowners face unique roofing challenges including severe hail storms, extreme summer heat, and occasional winter ice that demand experienced, reliable contractors who understand North Texas weather patterns.
The best roofing companies in Dallas distinguish themselves through A+ Better Business Bureau ratings, manufacturer certifications from brands like GAF and Owens Corning, comprehensive warranty coverage, transparent pricing, and proven track records serving the Dallas-Fort Worth metroplex. With nearly 60 roofing contractors operating in the DFW area, selecting the right company involves comparing multiple factors beyond just price quotes.
This guide profiles the best roofing companies in Dallas for 2025, covering established family-owned businesses and highly-rated contractors who specialize in residential roof replacement, storm damage repair, insurance claims assistance, and emergency roofing services. Whether you’re planning a complete roof replacement, need emergency leak repair, or want a professional inspection after hail damage, these vetted Dallas roofing companies deliver quality workmanship backed by solid warranties and customer satisfaction guarantees.
Table of Contents
Top-Rated Dallas Roofing Companies
photograph of a professional roofing crew installing premium shingles on a modern residential home in Dallas
These best roofing companies in Dallas have earned exceptional reputations through decades of quality service, customer satisfaction, and professional excellence in the competitive North Texas roofing market.
Bert Roofing, Inc.
Bert Roofing stands among the best roofing companies in Dallas with over 37 years of family-owned operation since becoming a Texas Corporation in 1988. They have completed over 40,000 roofing jobs across the Dallas-Fort Worth region, establishing an impressive track record of residential and commercial success.
Why Bert Roofing ranks among the best:
A+ rating with Better Business Bureau with zero customer complaints
Family-owned and operated business model ensures personalized service
Extensive experience with Dallas-area weather challenges
Comprehensive roof replacement and repair services
Contact: 214-321-9341
Bert Roofing’s spotless BBB record and decades of satisfied customers make them a top choice for homeowners seeking reliable, trustworthy roofing contractors in Dallas.
Lon Smith Roofing
Lon Smith Roofing has grown from a small operation founded in 1974 into one of the largest and most successful roofing contractors in the United States. Having served more than 14 cities across seven states and replaced over 100,000 roofs, Lon Smith Roofing is the largest residential roofing company in Texas.
Why Lon Smith Roofing is among the best:
More than 40 years of industry leadership and experience
Largest residential roofing company in Texas
Consistently ranks among America’s Top 25 roofing contractors
Trusted name with proven quality across multiple states
Extensive manufacturer certifications and warranties
The scale and longevity of Lon Smith Roofing demonstrates their position as one of the best roofing companies in Dallas for homeowners wanting a proven, established contractor.
Firehouse Roofing
Firehouse Roofing, founded in 1997 by a firefighter-turned-entrepreneur, brings community focus and exceptional quality standards to every Dallas roofing project. As one of the only contractors in Texas holding the Owens Corning Platinum Preferred designation, Firehouse Roofing delivers premium materials and rigorous installation standards.
Services include attic insulation, ventilation upgrades, and gutters
“Our Roofs Save Lives” mission-driven community campaign
Firehouse Roofing’s elite manufacturer certification and lifetime warranty place them among the best roofing companies in Dallas for homeowners prioritizing quality and reliability.
T Rock Roofing
T Rock Roofing has served the Dallas-Fort Worth metroplex for over 65 years with strong business ethics and professional dependability. They emphasize face-to-face client meetings and personalized service that addresses homeowner concerns directly.
Why T Rock Roofing is a top choice:
Over 65 years serving DFW area
Multiple office locations across North Texas
Professional, customer-focused approach
Services designed specifically for customer needs
Offices in Arlington, Dallas, Denton, Flower Mound, Fort Worth, Keller, Lewisville, and McKinney
Contact: (469) 931-9867
T Rock Roofing’s longevity and extensive service area make them one of the best roofing companies in Dallas for homeowners throughout the metroplex.
Wortham Bros Inc.
Wortham Bros Inc. was founded in 1986 by brothers David and Stephen Wortham and has installed over 75,000 roofs across North Texas. Their commitment to continuing education for salespeople, staff, and installers has earned them the highest levels of recognition and certification from material manufacturers.
Why Wortham Bros stands out:
Nearly 40 years of family business operation
Over 75,000 roofs installed
Highest manufacturer certifications through ongoing education
Best service standards in the Dallas-Fort Worth area
Wortham Bros’ massive installation volume and manufacturer certifications establish them as one of the best roofing companies in Dallas for quality-focused homeowners.
Arrington Roofing
Arrington Roofing brings more than 40 years of experience serving the Dallas-Fort Worth metroplex as a family-owned and operated business built on trust, integrity, and expert craftsmanship. They serve prestigious neighborhoods including Highland Park, Lakeside, Plano, and Frisco.
On-site project representative assigned to every job
Full-service offerings: replacement, new construction, emergency repair, ventilation
Contact: (214) 698-8443
Arrington Roofing’s decade-long labor warranty and dedicated on-site project management make them one of the best roofing companies in Dallas for homeowners wanting accountability and quality assurance.
Bold Roofing
Bold Roofing has served Dallas for over two decades, earning a reputation for professional workmanship and fair pricing across residential and commercial projects. They specialize in storm-prone area needs with impact-resistant materials for Dallas’s frequent hail events.
Why Bold Roofing is a top contractor:
Over 20 years serving Dallas homeowners
Specialization in impact-resistant materials for hail protection
Professional workmanship with fair, transparent pricing
Services include installations, emergency repairs, insurance restoration
Financing assistance available
Strong commitment to safety, timeliness, and customer satisfaction
Bold Roofing’s focus on hail-resistant materials positions them among the best roofing companies in Dallas for homeowners in storm-prone neighborhoods.
Home Quality Solutions Roofing
Home Quality Solutions Roofing offers comprehensive roofing services for Dallas homeowners including inspections, repairs, replacements, insurance restoration, and full exterior remodeling. They serve both residential and commercial clients with top-tier materials from leading manufacturers.
Why HQS Roofing excels:
Complete range of roofing and exterior services
Top-tier materials from leading manufacturers
Personal service with hands-on project management
Efficient insurance claim handling expertise
Transparent pricing structure
Strong warranty coverage
HQS Roofing’s comprehensive service offerings and insurance expertise make them one of the best roofing companies in Dallas for storm damage restoration projects.
New View Roofing
New View Roofing is a veteran-owned, locally operated business delivering high-quality roofing solutions throughout Dallas with decades of combined industry experience. They emphasize honesty, professionalism, and transparent communication throughout every project.
Why New View Roofing stands out:
Veteran-owned business with community commitment
Decades of roofing industry experience
Certified by top roofing manufacturers
Extensive warranty options
Services include replacements, repairs, storm restoration, inspections
Transparent, honest communication standards
New View Roofing’s veteran ownership and manufacturer certifications establish them among the best roofing companies in Dallas for homeowners valuing integrity and expertise.
White Rock Roofing
White Rock Roofing is a family-run, Dallas-based contractor known for straightforward service and strong customer reputation serving Dallas, Garland, Lake Highlands, Mesquite, Rowlett, and nearby communities.
Why White Rock Roofing ranks highly:
Family-run local business with community ties
Straightforward, no-pressure service approach
Strong customer reputation and reviews
Full service: inspections, repairs, replacements, storm restoration
Gutter installation and insurance assistance
Contact: (972) 777-4299
White Rock Roofing’s local focus and family business model make them one of the best roofing companies in Dallas for homeowners preferring personal, community-oriented service.
What Makes the Best Roofing Companies Stand Out
a professional roofing crew installing premium shingles on a residential home in Dallas
The best roofing companies in Dallas share common characteristics that separate them from less qualified contractors in the competitive North Texas market.
Better Business Bureau A+ Ratings
Top Dallas roofing contractors consistently maintain A+ ratings with the Better Business Bureau, demonstrating complaint-free service and ethical business practices. Companies like Bert Roofing have achieved zero customer complaints while serving tens of thousands of clients—a remarkable achievement indicating commitment to customer satisfaction.
When evaluating the best roofing companies in Dallas, always verify current BBB ratings and read any complaint history to understand how companies handle customer issues.
Manufacturer Certifications
The best roofing companies in Dallas earn elite certifications from major roofing manufacturers like GAF, Owens Corning, CertainTeed, and IKO. These certifications require:
Ongoing training for installers and sales staff
Proven track record of quality installations
Financial stability and proper licensing
Commitment to manufacturer installation specifications
Companies like Firehouse Roofing hold the exclusive Owens Corning Platinum Preferred designation, one of the highest certifications available in Texas. Wortham Bros achieves top manufacturer recognition through continuous education programs.
Manufacturer certifications allow the best roofing companies in Dallas to offer enhanced warranty coverage beyond standard material warranties.
Extensive Local Experience
The best roofing companies in Dallas have decades of experience specifically in North Texas, understanding unique challenges including:
Severe hail storms that damage roofs regularly
Extreme summer heat exceeding 100°F that tests roofing materials
Insurance claim processes specific to Texas storm damage
Companies like T Rock Roofing (65+ years), Lon Smith Roofing (40+ years), and Arrington Roofing (40+ years) have weathered multiple economic cycles and gained invaluable expertise serving Dallas homeowners through changing conditions.
Material warranties: Standard manufacturer coverage for 20-50 years depending on shingle quality
Workmanship warranties: Separate coverage for installation errors, typically 5-10 years from standard contractors, but lifetime from elite companies like Firehouse Roofing
Enhanced system warranties: Available through certified contractors that extend coverage to 50 years for entire roofing system
The best roofing companies in Dallas clearly explain all warranty coverage in writing before project start, ensuring homeowners understand what’s protected and for how long.
Transparent Communication
Elite Dallas roofing contractors maintain clear communication throughout projects:
Written estimates detailing all costs without hidden fees
Dedicated project managers or on-site representatives
Regular updates on project timeline and any issues discovered
Clear explanation of material options and trade-offs
Documented insurance claim support
Companies like Arrington Roofing assign an on-site representative to every project ensuring consistent oversight and accessible communication.
Services Offered by Leading Dallas Roofers
The best roofing companies in Dallas provide comprehensive services addressing all residential roofing needs, from routine maintenance to emergency storm repairs.
Roof Replacement and Installation
https://roof-installation.com/roof-installation-guide-2025/Complete roof replacement represents the core service of the best roofing companies in Dallas, involving full tear-off of existing materials and installation of new roofing systems. Top contractors offer multiple material options including:
The replacement process includes underlayment installation, proper ventilation setup, flashing around penetrations, and disposal of old materials.
Storm Damage Repair and Restoration
Storm Damage Roof costs and DIY guide 2025
Dallas’s severe weather makes storm damage repair a critical service from the best roofing companies in Dallas. After hail, wind, or tornado events, top contractors provide:
Free storm damage inspections
Comprehensive damage documentation for insurance claims
Emergency temporary repairs to prevent further damage
Complete restoration to pre-storm condition
Direct insurance company coordination
Companies like Bold Roofing and Home Quality Solutions specialize in insurance restoration, understanding claim processes and adjuster requirements.
Roof Inspections
Regular professional inspections from the best roofing companies in Dallas identify minor issues before they become expensive repairs. Comprehensive inspections include:
Complete examination of roofing materials for wear or damage
Flashing inspection around chimneys, vents, and valleys
Gutter and drainage system evaluation
Attic ventilation assessment
Detailed written report with photographic documentation
Firehouse Roofing offers a thorough 28-point inspection process covering all critical roof components. Many top Dallas roofers provide free inspections, especially after severe weather events.
Emergency Roof Repair
The best roofing companies in Dallas offer 24/7 emergency services for urgent situations including active leaks, wind damage, or fallen tree impacts. Emergency services typically include:
Immediate response within hours of contact
Temporary tarping or sealing to prevent interior damage
Rapid damage assessment
Coordination with insurance for emergency coverage
Scheduling of permanent repairs as soon as possible
Firehouse Roofing specifically advertises 24/7 emergency response as a core service offering.
Attic Ventilation and Insulation
Proper attic systems extend roof life and reduce energy costs, making ventilation and insulation services important offerings from the best roofing companies in Dallas. Services include:
Ventilation system evaluation and upgrades
Ridge vent installation for continuous airflow
Soffit and gable vent installation
Attic insulation installation or replacement
Solar-powered attic fans
These upgrades reduce summer cooling costs significantly in Dallas’s extreme heat while preventing moisture buildup that damages roofs and framing.
Gutter Installation and Repair
Many of the best roofing companies in Dallas also handle gutter systems that protect foundations and landscaping from roof runoff. Services include:
Seamless gutter installation
Gutter guard and leaf protection systems
Repair of damaged or sagging gutters
Downspout extensions
Complete gutter replacement
Bundling gutter work with roof replacement often saves money through combined project pricing.
How to Choose the Best Roofer for Your Project
best roofing companies in Dallas
Selecting from among the best roofing companies in Dallas requires systematic evaluation of multiple factors beyond advertised claims.
Verify Licensing and Insurance
All best roofing companies in Dallas carry proper licensing and comprehensive insurance coverage:
Texas contractor license: Verify current registration with Texas Department of Licensing and Regulation
General liability insurance: Protects your property if damage occurs during work ($1 million minimum recommended)
Workers’ compensation: Covers injuries to roofing crew members (prevents homeowner liability)
Bonding: Provides financial guarantee of contract completion
Request certificates of insurance directly from contractors and verify coverage is current before signing contracts.
Check Reviews and References
The best roofing companies in Dallas have extensive positive reviews across multiple platforms:
Better Business Bureau ratings and complaint history
Google reviews with substantial review counts
Yelp ratings from verified customers
Angie’s List ratings and detailed reviews
Thumbtack pro ratings and hire counts
Look for patterns in reviews rather than focusing on isolated complaints. Companies with hundreds of positive reviews and occasional negative ones are normal; companies with frequent complaints about similar issues raise red flags.
Request references for projects similar to yours—recent roof replacements in your neighborhood, same material you’re considering, or similar home style.
Compare Multiple Written Estimates
Obtain detailed written estimates from at least three of the best roofing companies in Dallas before making decisions:
Estimates should include:
Detailed material specifications (manufacturer, product line, color)
Square footage of roof area
Labor costs broken out separately
Tear-off and disposal fees
Warranty coverage details (materials and workmanship)
Project timeline
Payment schedule
Total project cost
Be suspicious of estimates significantly lower than others—they may indicate inferior materials, uninsured contractors, or incomplete scope that will result in change orders.
The best roofing companies in Dallas provide comprehensive written estimates that allow true apples-to-apples comparisons.
Evaluate Communication and Professionalism
The best roofing companies in Dallas demonstrate professionalism from first contact:
Prompt response to initial inquiries (within 24-48 hours)
Willingness to answer questions thoroughly
Clear explanation of options without pressure tactics
Professional appearance and conduct during inspections
Written documentation of all agreements
Companies using high-pressure sales tactics, requiring large upfront deposits, or unable to provide proper documentation should be avoided regardless of price.
Assess Warranty Coverage
Compare warranty offerings among the best roofing companies in Dallas:
Standard contractors typically offer 1-5 year workmanship warranties, while elite certified contractors offer 10 years to lifetime workmanship coverage. Arrington Roofing provides 10-year labor warranties, while Firehouse Roofing offers lifetime workmanship warranties.
Manufacturer material warranties vary from 20-50+ years depending on shingle quality, but only apply when installed by certified contractors following specifications.
Enhanced system warranties (covering entire roof system) are available only through certified contractors like those holding GAF Master Elite or Owens Corning Platinum Preferred status.
Pricing and Cost Considerations
Understanding typical costs from the best roofing companies in Dallas helps homeowners budget appropriately and recognize unrealistic estimates.
Average Dallas Roof Replacement Costs
Roof replacement costs from the best roofing companies in Dallas typically range:
These ranges reflect typical projects from reputable contractors including proper tear-off, underlayment, ventilation, and disposal.
What Affects Total Project Cost
The best roofing companies in Dallas base pricing on multiple project-specific factors:
Roof size and complexity: Larger roofs cost more; multiple valleys, dormers, and steep pitches increase complexity and labor
Material selection: Premium shingles, specialty products, or metal roofing significantly increase material costs
Roof accessibility: Multi-story homes or properties with limited access require additional equipment and labor
Structural repairs: Damaged decking, trusses, or framing discovered during tear-off adds costs
Permits and inspections: Dallas building permits for roof replacement typically cost $75-$200 depending on project value
Disposal fees: Old roofing material removal and landfill fees, typically $1,000-$2,000 for average homes
Understanding Payment Terms
The best roofing companies in Dallas use fair, transparent payment structures:
Typical payment schedule:
10-25% deposit upon contract signing
25-50% when materials delivered
Final 25-50% upon project completion and inspection
Avoid contractors demanding full payment upfront or large deposits exceeding 25-30% of total cost. Legitimate companies with good credit relationships with suppliers don’t need excessive upfront payments.
Many of the best roofing companies in Dallas offer financing options through third-party lenders, allowing homeowners to spread costs over time.
Insurance Claim Assistance
When storm damage occurs, the best roofing companies in Dallas provide valuable insurance claim support:
Free storm damage inspection and documentation
Detailed damage reports with photographs for adjusters
Meeting with insurance adjusters on-site to explain damage
Helping homeowners understand coverage and deductibles
Working directly with insurance companies on approved amounts
Quality contractors understand that insurance companies pay actual cash value minus deductibles, not full replacement cost upfront. Be wary of contractors offering to “cover your deductible”—this may violate insurance contracts and indicate inflated pricing.
Questions to Ask Before Hiring
Before selecting from the best roofing companies in Dallas, ask these critical questions to evaluate contractor suitability:
About Company Credentials
How long have you been in business? Look for companies with 10+ years serving Dallas specifically.
Are you licensed, bonded, and insured? Request proof of current coverage.
What manufacturer certifications do you hold? Elite certifications indicate quality standards.
What is your BBB rating? A+ ratings demonstrate customer satisfaction.
Can you provide local references? Recent projects in your area show relevant experience.
About the Project
What specific materials do you recommend and why? Quality contractors explain options clearly.
What warranties will I receive? Get details on both material and workmanship coverage.
How long will the project take? Understand timeline and weather contingencies.
Who will be on site managing the work? Know your point of contact.
How do you handle unexpected issues? Understand change order process and pricing.
About Installation Process
Will you tear off existing roofing or install over it? Understand pros and cons of each approach.
How will you protect my property? Ask about landscaping protection and cleanup procedures.
What happens if weather delays the project? Understand how partially completed roofs are protected.
Do you handle permits and inspections? The best companies manage all administrative requirements.
What is included in cleanup? Ensure complete debris removal and property restoration.
Frequently Asked Questions
What are the best roofing companies in Dallas?
The best roofing companies in Dallas for 2025 include Bert Roofing (A+ BBB rating, 40,000+ completed jobs), Lon Smith Roofing (largest residential roofer in Texas, 100,000+ roofs), Firehouse Roofing (Owens Corning Platinum Preferred, lifetime warranty), T Rock Roofing (65+ years serving DFW), Wortham Bros (75,000+ installations), Arrington Roofing (40+ years, 10-year labor warranty), Bold Roofing (20+ years, storm specialist), Home Quality Solutions, New View Roofing (veteran-owned), and White Rock Roofing (family-run local business). These companies demonstrate exceptional credentials through BBB A+ ratings, manufacturer certifications, decades of local experience, comprehensive warranties, and thousands of satisfied customers.
Roof replacement costs from the best roofing companies in Dallas typically range from $7,000 to $12,000 for standard 1,500-2,000 square foot homes with mid-grade architectural shingles. Budget 3-tab shingles cost $5,000-$8,000, while premium designer shingles run $12,000-$18,000 for average homes. Metal roofing increases costs significantly, with painted steel panels costing $12,000-$18,000 and standing seam systems reaching $15,000-$25,000+ for similar-sized homes. Large homes exceeding 3,000 square feet with architectural shingles cost $14,000-$25,000, while premium materials can reach $25,000-$45,000+. Factors affecting cost include roof size, complexity, material selection, accessibility, structural repairs needed, and permit fees.
What should I look for when choosing a Dallas roofer?
When selecting from the best roofing companies in Dallas, verify the contractor holds current Texas licensing, carries general liability and workers’ compensation insurance, and has bonding. Check Better Business Bureau ratings (look for A+ ratings like Bert Roofing), read reviews on Google, Yelp, and Angie’s List, and request local references from recent similar projects. Evaluate manufacturer certifications from GAF, Owens Corning, or CertainTeed that indicate quality standards. Obtain detailed written estimates from at least three contractors comparing materials, labor, warranties, and total costs. Assess professionalism through communication responsiveness, thoroughness of answers, and absence of high-pressure tactics. Compare warranty coverage, with the best companies offering 10-year to lifetime workmanship warranties plus enhanced manufacturer coverage.
Do Dallas roofing companies help with insurance claims?
Yes, the best roofing companies in Dallas provide comprehensive insurance claim assistance for storm damage. Quality contractors offer free storm damage inspections with detailed documentation and photographs for insurance adjusters. They meet with adjusters on-site to explain damage, help homeowners understand coverage and deductibles, and work directly with insurance companies on approved claim amounts. Companies like Bold Roofing and Home Quality Solutions specialize in insurance restoration projects and understand claim processes specific to Texas storm damage. However, be cautious of contractors offering to “cover your deductible” as this may violate insurance contracts and indicate inflated pricing. Legitimate companies help maximize legitimate claims while following proper insurance procedures.
How long does roof replacement take in Dallas?
Most roof replacement projects from the best roofing companies in Dallas take 1-3 days for average-sized residential homes depending on roof size, complexity, and weather conditions. Simple gable roofs on single-story homes often complete in one long day, while larger two-story homes with complex roof designs may require 3-5 days. Timeline factors include tear-off requirements (removing multiple layers takes longer), roof accessibility (multi-story homes need more setup time), weather interruptions (work stops during rain), material delivery schedules, and structural repairs discovered during tear-off that must be addressed before new roofing installation. The best roofing companies in Dallas provide estimated timelines in written contracts and communicate promptly about any delays or issues extending the original schedule.
What roofing materials work best in Dallas?
For Dallas’s climate featuring severe hail storms, extreme summer heat, and occasional ice, the best roofing companies in Dallas typically recommend impact-resistant architectural shingles or metal roofing systems. Impact-resistant Class 4 shingles provide superior hail protection (important for Dallas’s frequent hail events) and may qualify for insurance discounts of 15-35%. Metal roofing offers 40-70 year lifespan, excellent heat reflection reducing cooling costs, and superior wind and hail resistance, though at higher initial cost than asphalt shingles. For budget-conscious homeowners, standard architectural shingles from GAF, Owens Corning, or CertainTeed provide 25-30 year lifespan with good performance when properly installed by certified contractors. The best roofing companies in Dallas explain pros and cons of each material option specific to your home and budget.
How do I know if I need roof replacement or just repairs?
The best roofing companies in Dallas recommend replacement rather than repair when your roof shows extensive damage affecting 25% or more of the surface, approaches 20-25 years old (for asphalt shingles), has multiple layers requiring removal before repairs, exhibits widespread granule loss or curling shingles, or shows structural damage like sagging or soft spots. Isolated damage affecting small areas (under 10% of roof), minor leaks traced to specific locations, damaged flashing around vents or chimneys, or recent roofs (under 10 years) with limited issues typically qualify for cost-effective repairs instead of full replacement. Schedule free inspections from reputable contractors like Bert Roofing, Arrington Roofing, or Firehouse Roofing to get professional assessment of your roof’s condition and recommendations. Quality contractors explain their recommendations transparently without pressure tactics.
The best roofing companies in Dallas combine decades of local experience, elite manufacturer certifications, A+ Better Business Bureau ratings, comprehensive warranty coverage, and proven track records serving thousands of satisfied North Texas homeowners. Companies like Bert Roofing (zero BBB complaints, 40,000+ jobs), Lon Smith Roofing (largest in Texas, 100,000+ roofs), and Firehouse Roofing (Owens Corning Platinum Preferred) demonstrate the quality standards homeowners should expect.
When selecting from the best roofing companies in Dallas, verify licensing and insurance, check multiple review platforms, compare detailed written estimates from at least three contractors, evaluate warranty offerings, and assess professionalism through communication quality. For Dallas’s unique challenges including severe hail storms and extreme heat, choose contractors with extensive North Texas experience who understand local weather patterns and insurance claim processes. By following this guide’s recommendations and asking the right questions, Dallas homeowners can confidently select qualified contractors who deliver quality roofing installations backed by solid warranties and customer satisfaction guarantees.
🏠 Roofing Tips & Updates
Get free roofing advice, cost guides, and seasonal maintenance tips.
Roofing content specialist with 5+ years researching U.S. residential and commercial roofing. Has documented 200+ projects covering installation costs, material selection, contractor vetting, and DIY guides for homeowners across all climate zones.
Mobile Home Roof Replacement Cost: Full Price Guide
The cost of replacing roof on mobile home typically ranges from $3 to $8 per square foot, with most homeowners spending between $1,500 and $16,000 depending on home size and material choice. For a single-wide mobile home, the cost of replacing roof on mobile home averages $1,900 to $5,500, while double-wide units cost $4,000 to $7,000 for standard materials, with premium options reaching $16,300 or more.
Understanding the cost of replacing roof on mobile home helps manufactured homeowners budget accurately for this essential maintenance project. Mobile home roofs face unique challenges including lower pitch angles, thinner structural framing, and specific material requirements that differ from site-built homes. Whether your manufactured home needs asphalt shingles, metal roofing, TPO membrane, or rubber EPDM, knowing what drives the cost of replacing roof on mobile home enables smart material selection and contractor negotiations.
This comprehensive 2025 guide breaks down the cost of replacing roof on mobile home by size, material type, and installation method, explains single-wide versus double-wide pricing differences, compares full replacement versus roof-over options, and provides practical strategies to reduce expenses without sacrificing quality. Whether you’re facing an aging mobile home roof or planning ahead for future replacement, you’ll find detailed pricing data and actionable guidance here.
Understanding mobile home roof replacement cost before calling a contractor is the single most effective way to avoid overpaying — contractors quote 18–35% higher to homeowners who arrive without price benchmarks.
Average Cost of Replacing Roof on Mobile Home
The national average cost of replacing roof on mobile home is approximately $5,000 to $5,500, with typical project ranges between $4,000 and $7,000 for double-wide homes using standard materials. However, the cost of replacing roof on mobile home varies dramatically based on several critical factors including home size, roof pitch, material selection, and whether you choose full tear-off or roof-over installation.
Photorealistic wide-angle shot of a modern manufactured home undergoing a professional roof replacement
National Cost Ranges
Understanding the cost of replacing roof on mobile home starts with knowing typical price brackets for different project scopes:
Budget range: $1,100 to $2,500 for small single-wide homes using liquid coatings or basic rubber membranes
Mid-range: $3,000 to $7,000 for standard single-wide and double-wide homes with asphalt shingles or basic metal roofing
Premium range: $8,000 to $18,000 for large triple-wide homes, standing-seam metal roofing, or projects requiring extensive structural repairs
The wide variation in cost of replacing roof on mobile home reflects differences in labor rates across regions, with projects in high-cost metro areas running 20-40% above national averages.
The cost of replacing roof on mobile home breaks down into three main components when calculated per square foot:
This per-square-foot cost of replacing roof on mobile home helps homeowners estimate total project expenses by multiplying roof square footage by the appropriate rate. A 1,500-square-foot roof at $5 per square foot equals $7,500 total project cost.
Cost Component
Price Range Per Square Foot
Materials
$2.00-$4.50
Labor
$1.00-$3.50
Tear-off & disposal
$1.00-$2.00
Total installed cost
$3.50-$8.00
OSB vs. Plywood Roof Decking: Which Should You Choose?
When your contractor exposes damaged decking during a full replacement, the choice between OSB (oriented strand board) and plywood determines your material cost, long-term performance, and moisture resilience. OSB costs 10–15% less per sheet but absorbs moisture more readily — a critical consideration in mobile homes where roof decking is closer to interior humidity sources than in site-built construction.
Factor
OSB Decking
Plywood Decking
Cost per sheet (4×8)
$37–$40
$40–$50
Cost for 1,600 sf roof
$1,850–$2,000
$2,000–$2,500
Moisture resistance
⚠️ Swells at edges when wet
✅ Better; resists delamination
Structural strength
✅ Comparable for roofing
✅ Slightly higher strength-to-weight
Weight
Heavier per sheet
Lighter — better for mobile home framing
Nail holding ability
✅ Strong when dry
✅ Strong; more consistent
Best application
Dry climates; budget repairs
Humid climates; long-term performance
Lifespan (protected)
25–30 years
30–40 years
Verdict
Good for dry-region mobile homes on a budget
Recommended for most mobile home re-decking projects
💡 Pro Tip: For mobile homes in Florida, Gulf Coast states, or the Pacific Northwest — high-humidity environments — always specify plywood over OSB for re-decking. OSB edge-swelling under mobile home roof conditions creates a visible wave pattern that shortens shingle life by 4–7 years and is costly to remediate after the new roof is installed.
What Influences Total Cost
Several variables significantly impact the cost of replacing roof on mobile home beyond just square footage:
Roof pitch and shape: Flat or low-slope roofs (most common on mobile homes) cost less per square foot because they’re safer and faster to work on, while steeper bow-style roofs increase labor costs by 15-30%.
Structural condition: If roof trusses, decking, or framing shows rot or damage from leaks, repair costs add $500-$3,000 to the cost of replacing roof on mobile home before new materials can be installed.
Access and location: Mobile homes in parks with restricted access, tight spacing between units, or limited staging areas increase labor time and equipment costs.
Permit and inspection fees: Some jurisdictions require building permits for mobile home roof replacement, adding $100-$500 to the cost of replacing roof on mobile home.
Cost by Mobile Home Size
The cost of replacing roof on mobile home scales directly with the size of your manufactured home, as larger units require more materials and labor hours. Mobile homes are categorized by width, with each size presenting different cost profiles.
Single-Wide Mobile Home Roof Costs
Single-wide mobile homes typically measure 14 to 18 feet wide by 56 to 80 feet long, with roof areas ranging from approximately 500 to 1,200 square feet. The cost of replacing roof on mobile home for single-wide units averages:
Standard single-wide (14×56 to 16×70):
Roof area: 780-1,120 square feet
Cost of replacing roof on mobile home: $1,900-$5,500
Asphalt shingles: $1,500-$4,000
Metal roofing: $2,500-$6,000
TPO/rubber membrane: $2,000-$4,500
Large single-wide (16×80 to 18×80):
Roof area: 1,280-1,440 square feet
Cost of replacing roof on mobile home: $3,800-$6,300
Premium materials can push costs to $9,600 for high-end metal or specialized membranes
The lower cost of replacing roof on mobile home for single-wide units makes them more budget-friendly for roof replacement, though material quality and lifespan should still guide decisions rather than just initial cost.
Double-Wide Mobile Home Roof Costs
Double-wide mobile homes consist of two single-wide sections joined together, typically measuring 20 to 32 feet wide by 50 to 76 feet long, with roof areas from approximately 1,000 to 2,700 square feet. The cost of replacing roof on mobile home for double-wide units averages:
Standard double-wide (24×52 to 28×60):
Roof area: 1,400-1,900 square feet
Cost of replacing roof on mobile home: $4,000-$7,000
Asphalt shingles: $3,000-$6,000
Metal roofing: $5,000-$10,000
TPO/rubber membrane: $4,000-$7,500
Large double-wide (32×70 to 36×76):
Roof area: 2,200-2,736 square feet
Cost of replacing roof on mobile home: $8,200-$11,200
Premium materials: $10,000-$16,000
The higher cost of replacing roof on mobile home for double-wide units reflects not just increased square footage but also the complexity of working across the center seam where the two sections join.
Triple-Wide and Large Mobile Homes
Triple-wide and extra-large manufactured homes (40+ feet wide) feature roof areas exceeding 3,000 square feet, driving the cost of replacing roof on mobile home significantly higher:
Roof area: 3,000-4,000+ square feet
Cost of replacing roof on mobile home: $9,500-$18,000
High-end materials with insulation: $15,000-$25,000+
These premium manufactured homes often justify higher-quality roofing materials given their overall value, making metal or premium TPO systems more economically sensible despite elevated cost of replacing roof on mobile home.
Roof Size vs Living Space
An important note about the cost of replacing roof on mobile home: roof square footage typically exceeds living space square footage due to overhangs and pitch. A 1,500-square-foot double-wide may have a 1,650-1,750 square foot roof depending on overhang width and roof style. Always calculate costs based on actual roof area, not floor plan dimensions.
Cost by Roofing Material
Material selection significantly impacts the cost of replacing roof on mobile home, with choices ranging from economical asphalt shingles to premium metal roofing systems. Each material offers different cost profiles, lifespans, and performance characteristics.
Asphalt Shingles: Most Economical Choice
Asphalt shingles represent the most budget-friendly cost of replacing roof on mobile home option, making them popular for homeowners prioritizing initial affordability:
Cost for asphalt shingle mobile home roof:
Single-wide: $1,500-$6,000
Double-wide: $3,000-$10,000
Per square foot: $2-$4 installed
Advantages of asphalt shingles:
Lowest upfront cost of replacing roof on mobile home
Wide variety of colors and styles to match home aesthetics
Familiar installation process for most roofing contractors
Readily available at building supply stores
Adequate performance in most climates with proper installation
Lifespan considerations:
3-tab shingles: 15-20 years
Architectural/dimensional shingles: 25-30 years
Premium shingles: 30+ years with proper maintenance
While asphalt shingles offer the lowest cost of replacing roof on mobile home, their shorter lifespan compared to metal or membrane systems means more frequent replacements over the home’s lifetime.
Metal Roofing: Premium Durability
Metal roofing delivers superior longevity and performance, though at a higher initial cost of replacing roof on mobile home:
Cost for metal mobile home roof:
Single-wide: $2,500-$19,200 (wide range reflects material grades)
Double-wide: $5,000-$32,000 (premium standing-seam systems at high end)
Per square foot: $5.50-$10.00 for painted steel; $8-$15 for standing-seam
Advantages of metal roofing:
Exceptional lifespan of 40-70 years reduces long-term cost of replacing roof on mobile home
Superior weather resistance against wind, hail, snow, and rain
Reflective surfaces reduce cooling costs by 10-25% in hot climates
Low maintenance requirements save money over decades
Higher resale value offsets premium installation costs
Types of metal roofing:
Painted steel panels: Most economical metal option at $5.50+ per square foot
Standing-seam metal: Premium choice with hidden fasteners at $8-$15 per square foot
Galvalume: Steel coated with aluminum-zinc alloy for superior corrosion resistance
The higher cost of replacing roof on mobile home with metal is offset by avoiding 2-3 asphalt shingle replacements over 50 years, making metal economically competitive long-term.
photorealistic side-by-side comparison of three specific roofing materials designed for mobile homes
TPO (Thermoplastic Polyolefin) single-ply membranes work well on flat and low-slope mobile home roofs common in many manufactured homes:
Cost for TPO mobile home roof:
Single-wide: $2,000-$12,000
Double-wide: $4,000-$20,000
Per square foot: $4-$10 installed, plus $1.50-$3.50 for rigid insulation
Advantages of TPO roofing:
Excellent for flat and low-slope roofs where shingles don’t perform well
White reflective surface reduces heat absorption and cooling costs
Seams are heat-welded for superior waterproofing
Lifespan of 15-25 years with proper maintenance
Can be installed as roof-over without full tear-off in many cases
The cost of replacing roof on mobile home with TPO sits between asphalt shingles and metal roofing, offering good value for flat-roof mobile homes.
Rubber (EPDM) Roofing: Proven Performance
EPDM (Ethylene Propylene Diene Monomer) rubber roofing is another popular low-slope option with moderate cost of replacing roof on mobile home:
Cost for rubber mobile home roof:
Single-wide: $2,000-$12,000
Double-wide: $4,000-$22,000
Materials only: $1,175-$2,295 for single-wide; $1,595-$3,610 for double-wide
Per square foot: $4-$10 installed
Advantages of rubber roofing:
Made from recyclable materials, environmentally friendly option
Fire, water, and UV resistant for long-term durability
Flexible membrane accommodates mobile home movement and settling
Lifespan of 15-25 years
Can be installed over existing roofs as roof-over system
Rubber roofing offers similar cost of replacing roof on mobile home as TPO with proven track record on manufactured homes.
Roof Coatings: Budget Maintenance
For mobile homes with structurally sound roofs showing minor wear, liquid roof coatings offer the lowest cost of replacing roof on mobile home:
Cost for roof coating:
Single-wide: $250-$5,400
Double-wide: $500-$9,000
Per square foot: $0.50-$2.50 applied
Roof coatings seal minor leaks and extend existing roof life by 5-10 years, but aren’t suitable for roofs with structural damage or extensive deterioration. They represent a temporary solution rather than full replacement.
Roof Replacement vs Roof-Over
When calculating the cost of replacing roof on mobile home, homeowners must choose between complete tear-off replacement and “roof-over” installation, which significantly affects project costs.
Full Roof Replacement: Complete Tear-Off
Traditional full replacement involves removing all existing roofing materials down to the deck, inspecting and repairing structure, then installing new roofing:
Cost for full mobile home roof replacement:
Includes tear-off costs of $1-$2 per square foot
Total cost of replacing roof on mobile home: $4-$10 per square foot
Single-wide: $2,000-$9,600
Double-wide: $4,000-$16,000
Advantages of full replacement:
Allows inspection and repair of underlying decking and trusses
Addresses hidden rot, water damage, or structural issues
Ensures clean installation surface for maximum roof lifespan
Required when existing roof is severely deteriorated
Meets building code requirements in all jurisdictions
When full replacement makes sense:
Existing roof has multiple layers that must be removed
Structural damage or rot is suspected from leaks
Roof deck is soft, spongy, or shows sagging
Building codes prohibit additional roof layers
You want maximum lifespan from new roofing investment
Full tear-off delivers the most comprehensive solution but increases the cost of replacing roof on mobile home compared to roof-over methods.
Roof-Over: Installing Over Existing Roof
A roof-over (also called “recover” or “overlay”) installs new roofing materials directly over the existing roof without removal:
Cost for mobile home roof-over:
Eliminates tear-off costs, saving $1-$2 per square foot
Total cost of replacing roof on mobile home: $3-$6 per square foot
Single-wide: $1,000-$4,500
Double-wide: $2,000-$7,000[estimate based on industry standards]
Roof-over installation process:
Install 1×4 wood battens over existing shingles or metal
Add rigid foam insulation panels between battens for energy efficiency
Install new metal panels, TPO, or other roofing material over the frame
Flash and seal all penetrations and edges
Advantages of roof-over:
Lower cost of replacing roof on mobile home by eliminating tear-off and disposal
Faster installation, often completed in 1-2 days
Added insulation improves energy efficiency significantly
Minimal disruption to home interior during installation
Creates air gap that enhances ventilation and thermal performance
When roof-over works well:
Existing roof is structurally sound without rot or damage
Only one existing roof layer present (codes limit total layers)
Roof deck and trusses are solid with no sagging or softness
Goal is maximum cost savings while maintaining quality
Climate benefits from added insulation and reflective surfaces
Limitations of roof-over:
Cannot inspect or repair hidden structural problems
Adds weight to roof structure (though usually within limits for manufactured homes)
May not be allowed by local building codes in some jurisdictions
Existing roof must be relatively sound, not deteriorated
Some warranty coverage may be reduced compared to full replacement
Metal roof-overs with insulation are increasingly popular on mobile homes because they reduce the cost of replacing roof on mobile home while delivering superior energy performance and 40+ year lifespan.
Cost Comparison: Tear-Off vs Roof-Over
For a typical 1,500 square foot double-wide mobile home:
Installation Method
Materials
Labor
Tear-Off
Total Cost
Full replacement with asphalt shingles
$3,000-$4,500
$2,250-$3,750
$1,500-$3,000
$6,750-$11,250
Roof-over with metal panels
$4,500-$6,750
$1,500-$2,250
$0
$6,000-$9,000
The roof-over typically saves $750-$2,250 on a double-wide mobile home, making it attractive for budget-conscious homeowners with structurally sound existing roofs.
Factors That Affect Mobile Home Roofing Cost
Beyond basic size and material selection, several variables significantly influence the cost of replacing roof on mobile home:
Roof Pitch and Style
Mobile home roof styles affect both material requirements and labor costs:
Flat roofs: Most economical cost of replacing roof on mobile home at $3-$6 per square foot; require membrane systems rather than shingles
Low-slope gable roofs: Standard mobile home style with slight pitch; moderately priced at $3.50-$7 per square foot
Bow/arched roofs: Curved profile adds complexity and increases cost of replacing roof on mobile home by 20-30% due to custom material cutting and slower installation
Hip roofs: Multiple planes require more material waste and flashing, adding 15-25% to project costs
Steep-pitch manufactured homes approaching residential-style roofs cost more per square foot for both materials and labor due to safety equipment requirements.
Geographic Location and Labor Rates
Regional differences dramatically impact the cost of replacing roof on mobile home:
High-cost regions (California, Northeast, Pacific Northwest): Labor rates of $3-$5 per square foot push total costs 30-50% above national averages
Moderate-cost regions (Midwest, Southeast, most of South): Labor aligns with national averages of $1.50-$3.50 per square foot
Lower-cost areas (rural markets, economically depressed regions): Labor may run $1-$2 per square foot, reducing total cost of replacing roof on mobile home by 20-30%
Material costs also vary regionally based on transportation and local market conditions.
Structural Repairs and Damage
Hidden problems discovered during roofing can significantly increase the cost of replacing roof on mobile home:
Minor repairs: Replacing a few damaged boards or trusses adds $200-$800
Moderate damage: Extensive deck replacement or truss repairs add $800-$2,500
Major structural issues: Pervasive rot requiring substantial framing replacement can add $2,500-$5,000+ to the cost of replacing roof on mobile home
Mobile homes with chronic leak history are more likely to need structural repairs, making thorough pre-project inspection critical for accurate budgeting.
Permits and Mobile Home Park Rules
Administrative costs affect the total cost of replacing roof on mobile home:
Building permits: Required in many jurisdictions; cost $100-$500 depending on project value and local fees
Mobile home park restrictions: Some parks require specific roofing materials, colors, or contractor approval, potentially limiting cost-saving options
HOA requirements: Manufactured home communities may mandate aesthetic standards affecting material choices and costs
Always verify permit requirements and park rules before starting work to avoid costly corrections or fines.
Insulation and Energy Upgrades
Adding insulation during roof replacement increases the cost of replacing roof on mobile home but delivers substantial long-term savings:
Rigid foam insulation: Adds $1.50-$3.50 per square foot to project cost
Spray foam insulation: Premium option adding $3-$5 per square foot[estimate based on industry standards]
Reflective barriers: Radiant barriers add $0.50-$1.50 per square foot[estimate based on industry standards]
Energy upgrades can reduce heating and cooling costs by 15-30%, recovering the additional cost of replacing roof on mobile home in 3-7 years through lower utility bills.
Signs Your Mobile Home Roof Needs Replacement
Recognizing when to replace your mobile home roof helps you budget for the cost of replacing roof on mobile home and prevents minor issues from escalating into major structural damage.
Interior Water Damage Signs
Water stains and moisture problems inside your mobile home clearly indicate roofing failure:
Brown spots or stains on ceilings: Discoloration, especially near seams or around vents and penetrations, shows water infiltration through the roof
Mold growth or musty odors: Biological growth and stale smells signal persistent moisture from roof leaks
Soft or sagging ceiling panels: Ceiling materials weakened by water absorption indicate severe leak damage requiring immediate action to prevent collapse
Any interior water damage warrants immediate roof inspection to assess the cost of replacing roof on mobile home and prevent further deterioration.
Exterior Roof Problems
Visual inspection of your mobile home roof reveals condition issues:
Membrane bowing, warping, or distortion: Top layer swelling or sagging indicates heat-weakened support structure
Alligatoring: Surface developing a pattern of interconnected cracks resembling reptile skin signals advanced deterioration
Soft or spongy areas: Roof surface feeling cushioned or springy when walked on (if safely accessible) indicates failing deck or trusses
Missing or damaged shingles/panels: Gaps in roofing material expose underlying layers to weather and accelerate failure
Daylight visible from attic: Light penetrating through roof deck from inside shows holes or severe deterioration
These exterior problems require professional evaluation to determine whether repair is feasible or if full replacement is necessary to address the cost of replacing roof on mobile home.
Age-Related Replacement
Even without obvious damage, roof age provides guidance on replacement planning:
Asphalt shingle roofs over 20 years: Approaching end of typical 20-30 year lifespan; budget for replacement within 2-5 years
Metal roofs over 30 years: Mid-life for quality metal; inspect for rust, fastener problems, or coating failure
TPO/EPDM membrane roofs over 15 years: Nearing typical lifespan; monitor for brittleness or seam failures
Roof coating systems over 10 years: Coatings degrade faster than structural roofing; recoating or replacement needed
If your mobile home roof approaches these age thresholds, start researching the cost of replacing roof on mobile home and obtaining contractor quotes even before problems appear.
When to Act Quickly
Certain conditions demand immediate action to minimize damage and control eventual cost of replacing roof on mobile home:
Active leaks during rain that penetrate interior spaces
Large sections of missing roofing material exposing deck to weather
Evidence of extensive rot visible from attic or exterior inspection
Severe storm damage with multiple areas compromised
Delaying replacement when these severe conditions exist often escalates repair needs and increases the total cost of replacing roof on mobile home by allowing water damage to spread to framing, insulation, and interior finishes.
Photorealistic close-up of a deteriorating mobile home roof
Ready to replace your mobile home roof? Get a free, no-obligation quote from certified contractors in your area.
Frequently Asked Questions: Mobile Home Roof Replacement Cost
How much does it cost to replace a mobile home roof?
Mobile home roof replacement costs $1,500–$16,000 in 2026. A roof-over runs $1,500–$6,000. A full replacement is $4,500–$8,500 for single-wide and $8,000–$14,000 for double-wide homes. The national average for a double-wide asphalt replacement is $5,500. [web:725][web:727]
Is OSB or plywood better for mobile home roof decking?
Plywood is recommended for most mobile home re-decking projects. It resists moisture better, weighs less (better for light mobile home framing), and lasts 30–40 years vs. 25–30 for OSB. OSB costs $37–$40/sheet vs. $40–$50 for plywood — a $250–$500 total difference on a full deck replacement. [web:730][web:736]
How long does a mobile home roof last?
Asphalt shingles: 20–30 years. Rubber/EPDM: 20–30 years. Metal: 40–60 years. Regular inspection every 3–5 years extends lifespan regardless of material by catching flashing failures and sealant deterioration early.
Can I put a new roof over an existing mobile home roof?
Yes — a roof-over saves $1,500–$4,000 and is viable when the existing deck is structurally sound and only one layer exists. Not permitted over two existing layers or damaged decking. Most contractors recommend metal panels for roof-over applications due to the lightweight profile.
How do I know if my mobile home roof decking needs replacing?
Key signs: soft or spongy spots underfoot, visible sagging or wave patterns, dark staining/mold after tear-off, crumbling OSB surface, and interior water stains directly below the deck. Each damaged sheet costs $75–$150 to replace — a full deck replacement adds $1,800–$4,000 to the project.
Roofing content specialist with 5+ years researching U.S. residential and commercial roofing. Has documented 200+ projects covering installation costs, material selection, contractor vetting, and DIY guides for homeowners across all climate zones.
Affordable Roofing Near Me: 2026 Local Roofers Guide
Finding quality affordable roofing near me without getting scammed remains one of homeowners’ biggest challenges when facing roof replacement or repairs. The national average for asphalt shingle roof replacement ranges from $3.50 to $6.00 per square foot, translating to $6,000-$14,500 for typical homes, with significant variation based on location, materials, and contractor selection. Many homeowners struggle with price transparency, contractor trustworthiness, hidden fees, and distinguishing between genuinely affordable service and dangerously cheap work that cuts critical corners.
This comprehensive guide shows how to find affordable roofing companies near me that deliver quality workmanship at fair prices, compare estimates effectively, verify contractor credentials, negotiate better pricing, and avoid the most common roofing scams. Hiring local roofers provides distinct advantages including lower overhead costs, intimate knowledge of regional building codes and climate conditions, better accountability through community reputation, and faster response times for warranty issues.
Understanding what “affordable” actually means versus “cheap,” knowing where to search for qualified contractors, recognizing essential credentials, and asking the right questions before signing contracts protects your investment while ensuring your roof performs reliably for decades.
Table of Contents
What “affordable roofing near me” really means
Affordable roofing near me refers to finding quality roof installation or repair services at fair market prices with transparent estimates, proper licensing, and solid warranties—not simply choosing the lowest bid.
Defining affordable versus cheap roofing
Affordable roofing provides quality materials and professional installation
Affordable roofing provides quality materials and professional installation at competitive prices without inflating costs through excessive overhead, while cheap roofing cuts corners on materials, labor quality, or licensing to offer unrealistically low bids that often result in premature failure. Affordable contractors maintain lower overhead costs by operating lean businesses and pass savings directly to customers, whereas cheap contractors sacrifice critical elements like proper underlayment, adequate ventilation, or manufacturer-approved installation techniques.
The distinction matters significantly because the lowest bid frequently indicates substandard materials, unlicensed workers, skipped building permits, or contractors planning to disappear after collecting deposits. True affordability balances upfront investment with long-term value, ensuring your roof lasts its expected lifespan without unexpected repairs or premature replacement.
2025 pricing expectations for roof replacement
Understanding typical costs helps identify fair pricing when comparing affordable roofing companies near me:
Roof Size (sq ft)
Material Cost Range
Labor Cost Range
Total Installed Cost
Typical Home Type
1,300
$1,300-$2,600
$2,000-$3,900
$5,800-$7,800
Small ranch, 2-bedroom
1,700
$1,700-$3,400
$2,600-$5,100
$7,600-$10,300
Standard 3-bedroom
2,000
$2,000-$4,000
$3,000-$6,000
$8,900-$12,100
Larger single-family
2,500
$2,500-$5,000
$3,800-$7,500
$11,100-$15,100
Complex or steep pitch
Asphalt shingles represent the most affordable roofing material at $3.40-$5.95 per square foot installed, with architectural shingles costing $1.50-$4 per square foot for materials and budget 3-tab shingles running $1-$2 per square foot. Labor rates typically range from $1.50-$3.00 per square foot depending on regional market conditions, roof complexity, pitch steepness, and accessibility challenges.
Factors affecting affordable pricing
Factors affecting affordable pricing
Several elements influence final costs when searching for affordable roofing near me:
Regional variations:
Urban areas command premium labor rates compared to rural markets
Coastal regions with strict building codes require additional materials
Markets with high contractor demand see elevated pricing
Local competition level directly impacts price competitiveness
Roof characteristics:
Steeper pitches require specialized safety equipment and slower installation
Complex designs with multiple valleys, dormers, or penetrations increase labor hours
Accessibility challenges (tight spaces, no driveway access) raise costs
Height and number of stories affect safety requirements and scaffolding needs
Material selection:
Budget 3-tab shingles offer lowest upfront cost but shorter 15-20 year lifespan
Standard architectural shingles provide better long-term value at moderate pricing
Premium shingles with enhanced warranties add 30-50% to material costs
Specialty colors or designer lines may carry additional charges
Timing and seasonality:
Off-season installation (late fall through early spring) often yields 10-20% discounts
Peak summer demand drives prices higher
Emergency repairs after storms command premium rates
Scheduled replacements allow time for competitive bidding
How to find affordable roofing companies near you
find affordable roofing companies near you
Locating trustworthy affordable roofing companies near me requires systematic research using multiple verification methods.
Online search strategies
Start with targeted Google searches using location-specific terms like “affordable roofing companies near me” plus your city or neighborhood name. Google Business Profiles display local results with customer ratings, photos, business hours, and direct contact information—filter results to show only contractors with 4.0+ star ratings and substantial review volume indicating established track record.
Google Maps provides geographic visualization showing contractor proximity to your home, helping identify truly local businesses versus regional companies claiming local status. Check each contractor’s website for physical business address (not just P.O. box), years in operation, licensing information, and project portfolio demonstrating experience with roofs similar to yours.
Local business directories and referral services
Better Business Bureau (BBB) ratings and accreditation status reveal complaint history, resolution practices, and overall business integrity—prioritize contractors with A+ or A ratings and review any complaints to assess how professionally issues were resolved. Online platforms like Thumbtack, HomeAdvisor, and Angie’s List pre-screen contractors for basic licensing and insurance requirements while aggregating customer reviews and enabling direct quote requests from multiple contractors simultaneously.
Local Chamber of Commerce membership directories identify established community businesses with vested interest in maintaining regional reputation. Building supply companies often maintain referral lists of contractors who regularly purchase quality materials and maintain good standing with suppliers.
Manufacturer contractor networks
Major shingle manufacturers operate certification programs identifying contractors meeting strict quality and training standards:
GAF Master Elite contractors represent the top 3% of roofing contractors nationwide, offering enhanced warranty coverage, factory training, and proven track record meeting GAF’s rigorous financial, licensing, and customer satisfaction requirements. CertainTeed Select ShingleMaster and Five Star Contractor programs similarly certify contractors demonstrating superior installation expertise and business practices.
Owens Corning Platinum Preferred Contractors receive ongoing technical training, can offer extended warranty coverage, and maintain minimum insurance and licensing standards exceeding typical market requirements. These manufacturer certifications indicate contractors invest in continuous education and maintain accountability to national brands, though certified contractors may charge slightly more due to enhanced warranty offerings.
Word-of-mouth referrals
Personal recommendations from neighbors, friends, and family who recently completed roofing projects provide invaluable first-hand insights into contractor communication, workmanship quality, timeline reliability, and final cost compared to initial estimates. When requesting referrals, ask specific questions about project duration, unexpected issues, how well the contractor protected landscaping and property, cleanup thoroughness, and whether they would hire the same company again.
Local Facebook community groups and Nextdoor platforms facilitate neighborhood discussions where residents freely share contractor experiences and warn about problematic companies. Real estate agents frequently maintain lists of trusted contractors they confidently recommend to buyers and sellers preparing homes for market.
No physical local address listed (only P.O. box or out-of-area location)
Exclusively toll-free 800 numbers without local contact numbers
Companies operating less than 2 years without verifiable track record
Door-to-door solicitation after storms claiming “limited-time discounts”
Pressure tactics demanding immediate signing to secure quoted pricing
Requests for 100% payment upfront before starting work
Unusually low bids 30%+ below other estimates without clear explanation
Reluctance to provide insurance certificates or license verification
No online presence, reviews, or verifiable customer references
Top qualities of affordable roofing companies
Distinguishing quality affordable roofing near me from risky cheap contractors requires verifying essential credentials and business practices.
Licensing, bonding, and insurance requirements
Valid state contractor licensing ensures contractors meet minimum competency standards, maintain required insurance, and face accountability through state licensing boards for violations. Verify license numbers directly through your state’s contractor licensing website rather than accepting contractor-provided documentation that could be falsified.
General liability insurance with minimum $1 million coverage protects your property if contractors damage your home, landscaping, vehicles, or neighboring properties during installation. Workers’ compensation insurance protects you from liability if crew members suffer injuries on your property—without this coverage, injured workers could potentially sue homeowners directly.
Surety bonding provides financial recourse if contractors abandon projects, fail to pay subcontractors or suppliers, or don’t complete work according to contract specifications. Request certificates of insurance directly from contractors’ insurance companies rather than accepting photocopies that may be expired or altered.
Local presence and established reputation
Physical local offices or warehouses indicate genuine community investment versus fly-by-night operations using virtual addresses. Companies operating 5-10+ years in your market demonstrate stability, satisfied customer base, and vested interest in maintaining long-term regional reputation.
Local contractors possess intimate knowledge of regional climate challenges, common roofing issues specific to your area, local building code requirements, and which materials perform best in your environmental conditions. Community-based businesses depend heavily on word-of-mouth referrals and local reputation, incentivizing superior customer service and quality workmanship compared to regional companies rotating through different markets.
Transparent pricing and detailed estimates
Quality affordable roofing companies near me provide comprehensive written estimates itemizing all project costs including materials with specific brand/model specifications, labor broken down by task (tear-off, installation, cleanup), disposal fees, permit costs, and any optional upgrades or accessories. Transparent contractors explain pricing clearly, answer questions patiently, and welcome estimate comparisons rather than pressuring immediate signing.
Detailed contracts specify complete scope of work, exact materials by manufacturer and product line, project timeline with start and completion dates, payment schedule (typically 50% down, 50% on satisfactory completion), warranty terms for both workmanship and materials, and procedures for handling unexpected discoveries or change orders. Avoid contractors providing vague estimates, verbal-only quotes, or contracts with blank sections to be “filled in later”.
Robust warranty offerings
Minimum 10-year workmanship warranties demonstrate contractor confidence in installation quality and commitment to standing behind their work long-term. Manufacturer material warranties typically range from 25-50 years depending on shingle quality, with some premium products offering limited lifetime coverage.
Warranty transferability adds home resale value by allowing coverage to transfer to subsequent owners, though transferred warranties often carry reduced terms (lifetime becomes 20-30 years). Written warranty documentation with clear coverage details, exclusions, claim procedures, and contact information proves essential—verbal warranty promises hold no legal weight.
Examples of affordable roofing companies
Regional examples demonstrate characteristics of quality affordable contractors:
How to compare roofing estimates and find the best value
Effective estimate comparison identifies affordable roofing near me offering superior value rather than simply lowest price.
Getting quality estimates
Request written quotes from 3-5 local contractors minimum to establish realistic price ranges and identify outliers suggesting either premium services or cut corners. Schedule on-site roof inspections with each contractor—avoid companies providing estimates without physically examining your roof, as accurate pricing requires assessing actual conditions, measurements, and complexity.
Provide identical specifications to all contractors (same shingle quality tier, similar warranty expectations, comparable project scope) enabling true apples-to-apples comparison. Request contractors bid the same shingle brand and product line when possible, or specify equivalent quality levels (all architectural shingles, all 30-year warranties) to isolate price differences from quality variations.
Essential estimate components
Comprehensive estimates should detail:
Materials specification:
Exact shingle manufacturer, product line, color, and quantity
Underlayment type and coverage area (standard felt vs. synthetic)
Ice and water shield placement (valleys only vs. full roof deck)
Drip edge, starter strips, ridge caps with specific products
Flashing materials for chimneys, skylights, pipes, walls
Labor breakdown:
Tear-off and disposal of existing roofing (number of layers)
Deck inspection and repair allowance
Installation labor with estimated crew size and timeline
Cleanup procedures including magnetic nail sweeps
Additional costs:
Building permit fees and inspection charges
Dumpster rental or disposal fees
Temporary roof protection if needed
Parking considerations or street permits
Project details:
Estimated start and completion dates
Weather contingency procedures
Daily work hours and weekend scheduling
Communication protocols and project manager contact
Evaluating price differences
When estimates vary significantly, investigate underlying reasons rather than assuming higher prices indicate overcharging or lower prices signal great deals:
If estimates range from $8,000 to $11,000 for identical roof:
Questions to clarify:
Does higher bid include superior shingle warranty (30-year vs. lifetime)?
Are workmanship warranty terms different (5-year vs. 10-year coverage)?
Does one estimate include ventilation upgrades others omit?
What ice and water shield coverage differences exist?
Do contractor certifications differ (Master Elite vs. standard installer)?
Have licensing, insurance, and bonding been verified for all contractors?
Extremely low bids—30% or more below other estimates—typically indicate cut corners, inferior materials, unlicensed labor, or contractors planning to add unexpected charges during installation. Mid-range bids generally offer best value, balancing quality materials, professional installation, proper licensing, and fair profit margins.
Negotiation strategies
Secure better pricing without sacrificing quality:
Schedule projects during off-season (late fall through winter) when contractor demand drops and companies offer 10-20% discounts to maintain steady work
Inquire about package pricing if multiple services needed (roof plus gutter replacement)
Ask about available financing programs—many contractors offer 0% interest for 12-24 months
Explore referral programs offering $100-$500 discounts for recommending neighbors
Consider mid-grade architectural shingles instead of premium lines, saving 25-35% while maintaining quality construction
Bundle multiple homes if neighbors also need roofing, negotiating volume pricing
Questions to ask affordable roofing companies before hiring
Comprehensive vetting protects against hiring unqualified contractors claiming to offer affordable roofing near me.
Credentials and business verification
1. What’s your state contractor license number, and can I verify it online? Legitimate contractors readily provide license numbers and direct you to state licensing board websites for independent verification.
2. Can you provide current certificates of insurance for liability and workers’ compensation? Request contractors have insurance companies send certificates directly to you, ensuring policies are active and coverage amounts adequate.
3. How long have you operated under your current business name in this area? Established local presence (5-10+ years) indicates stability and satisfied customer base.
4. Do you maintain a physical local office I can visit? Physical addresses demonstrate genuine community investment versus P.O. boxes suggesting transient operations.
5. What manufacturer certifications do you hold? GAF Master Elite, CertainTeed Select ShingleMaster, or Owens Corning Platinum Preferred status indicates advanced training and enhanced warranty offerings.
Experience and expertise
6. How many roofs similar to mine have you completed in the past year? Contractors should demonstrate substantial experience with your roof type, pitch, and material selection.
7. Do you use in-house crews or subcontractors? In-house employees typically receive better training, supervision, and quality control compared to subcontracted labor.
8. Are your installers background-checked and drug-tested? Quality companies screen employees for homeowner safety and security.
9. Can you provide 3-5 local references from projects completed in the last six months? Recent references with contact information allow you to verify quality, communication, and professionalism directly.
10. What roofing materials do you recommend for my specific roof and climate? Knowledgeable contractors explain material options based on your roof characteristics, budget, and regional climate conditions.
Pricing and payment
11. Can you provide a detailed written estimate itemizing all costs? Professional contractors supply comprehensive written estimates breaking down materials, labor, permits, and disposal fees.
12. What exactly is included in your quoted price? Clarify whether estimates include tear-off, disposal, all materials, labor, permits, cleanup, and magnetic nail sweeps.
13. What’s your payment schedule? Standard payment terms require 50% down and 50% upon satisfactory completion—avoid contractors demanding 100% upfront.
14. Are there potential additional costs I should anticipate? Transparent contractors disclose contingencies for rotted decking, unexpected structural issues, or material price fluctuations.
15. Do you offer financing options or payment plans? Many reputable contractors partner with financing companies offering 0% interest for qualified homeowners.
Warranties and guarantees
16. What workmanship warranty do you provide? Look for minimum 10-year workmanship warranties covering installation defects and labor issues.
17. What manufacturer warranty comes with the specified shingles? Confirm warranty length, coverage details, and whether enhanced warranties require certified installation.
18. Are warranties transferable to future homeowners? Transferable warranties add resale value and demonstrate contractor confidence in long-term performance.
19. How do I file warranty claims if issues arise? Understand claim procedures, required documentation, and expected response timeframes.
Project details
20. What’s the estimated timeline from start to completion? Realistic timelines for average homes range from 1-3 days for installation plus preparation and cleanup.
21. How will you protect my property, landscaping, and vehicles? Quality contractors use tarps, plywood walkways, and careful debris management protecting your property.
22. What happens if weather delays the project? Clarify rain delay procedures, temporary weatherproofing, and timeline adjustments.
23. Who serves as my primary contact during the project? Dedicated project managers or foremen provide consistent communication and accountability.
24. What cleanup procedures do you follow? Magnetic sweeps for nails, complete debris removal, and dumpster hauling should be standard.
Affordable roofing materials that don’t compromise quality
Choosing cost-effective materials significantly impacts total project costs when searching for affordable roofing near me.
Asphalt shingles: Most popular affordable option
Asphalt shingles dominate approximately 80% of the residential roofing market due to their affordability, availability, installation ease, and satisfactory performance. Material costs range from $1-$4 per square foot with installed pricing typically $3.40-$5.95 per square foot including labor, making asphalt the most budget-friendly quality roofing option.
Expected lifespan varies from 15-30 years depending on shingle quality, climate conditions, ventilation adequacy, and maintenance. Asphalt shingles offer extensive color selections, reasonable wind resistance (60-130 mph depending on type), Class A fire ratings, and straightforward repair procedures.
3-tab versus architectural shingles comparison
Feature
3-Tab Shingles
Architectural Shingles
Material cost per sq ft
$1-$2
$1.50-$4
Installed cost per sq ft
$3.40-$4.50
$4.50-$5.95
Expected lifespan
15-20 years
25-30 years
Appearance
Flat, uniform pattern
Dimensional, textured depth
Wind resistance
60-70 mph
110-130 mph
Warranty coverage
20-25 years limited
30-50 years limited lifetime
Best application
Rental properties, tight budgets
Primary residences, long-term value
Weight per square
200-250 lbs
300-400 lbs
Architectural shingles provide superior long-term value despite higher upfront costs, lasting 50-100% longer while offering enhanced curb appeal and wind resistance. For affordable roofing near me balancing cost and performance, standard architectural shingles represent the optimal sweet spot for most homeowners.
Alternative budget options
Roll roofing costs just $0.50-$1.50 per square foot installed but carries extremely limited 5-10 year lifespan, making it suitable only for sheds, garages, or temporary structures rather than primary homes. Metal roofing requires higher initial investment but provides 40-70 year lifespan and superior energy efficiency through reflectivity, offering excellent long-term value for homeowners planning extended ownership.
Cost-saving strategies maintaining quality
Maximize affordability without sacrificing performance:
Select standard architectural shingles over premium designer lines, saving 30-40% while maintaining durability
Choose popular neutral colors (weathered wood, charcoal, pewter gray) often priced lower than specialty hues
Schedule installation during off-season (late fall through winter) capturing 10-20% contractor discounts
Handle preparatory work yourself including moving attic belongings, protecting interior spaces, and clearing work areas
Bundle services if replacing gutters or siding simultaneously, negotiating package pricing
Materials to avoid
Protect your investment by avoiding:
Unknown or off-brand shingles without manufacturer warranties
“Contractor grade” or “economy” shingles without specifications
Used or salvaged roofing materials
Products from unauthorized dealers potentially voiding manufacturer warranties
Extremely discounted materials claimed as “overstock” or “surplus”
Avoiding roofing scams and low-quality work
Protecting yourself from fraudulent contractors claiming to offer affordable roofing companies near me requires vigilance and verification.
Common roofing scams
Storm chasers arrive in neighborhoods after severe weather, going door-to-door claiming they’re “working nearby” and can offer special pricing if you sign immediately. These transient contractors often lack proper licensing, collect deposits, and leave town without completing work or performing substandard installation.
Lowball bid schemes offer prices 30-50% below legitimate estimates, planning to use inferior materials, skip critical installation steps like proper underlayment or ventilation, employ unlicensed labor, or disappear after receiving deposits. Some claim to have “leftover materials from another job” available at steep discounts, then substitute mismatched or defective products.
Advance payment fraud involves demanding 100% payment upfront, claiming they need funds to “order your specific materials” or “schedule your project,” then either disappearing with money or performing rushed, inadequate work before becoming unreachable.
Unlicensed contractor operations work “under the table” for cash discounts, avoiding licensing fees, insurance costs, taxes, and regulatory oversight—when work fails or property damage occurs, homeowners have no recourse and may face liability for worker injuries.
Bait-and-switch tactics provide low estimates specifying quality materials, then substitute inferior products during installation claiming they’re “equivalent” while adding unexpected charges for “unforeseen issues” discovered after starting work.
Protection strategies before signing
Verify contractor legitimacy thoroughly:
Confirm contractor license status directly through state licensing board websites, checking for active status and complaint history
Request certificates of insurance from contractors’ insurance companies (not photocopies), verifying current coverage and adequate limits
Check Better Business Bureau ratings, accreditation status, and complaint resolution patterns
Read recent online reviews across multiple platforms (Google, Yelp, Facebook) looking for patterns in complaints
Visit physical business locations when possible, confirming legitimate operations versus virtual offices
Contact provided references asking specific questions about timeline adherence, communication quality, final cost versus estimate, and whether they’d hire the contractor again
Contract safeguards
Protect yourself through documentation:
Demand everything in writing—never accept verbal promises or handshake agreements
Read entire contract thoroughly before signing, including fine print and attached terms
Verify payment schedule is reasonable (50% down, 50% on completion maximum)
Confirm materials are specified by exact manufacturer, product line, model, and color
Ensure timeline, warranty terms, and change order procedures are documented
Never sign blank contracts or agreements with sections to be “filled in later”
During installation vigilance
Monitor project appropriately:
Verify delivered materials match contract specifications before installation begins
Photograph project stages documenting work quality if disputes arise later
Don’t release final payment until work is completely finished and inspected
Request copies of building permits and final inspection approvals
Address concerns immediately rather than waiting until project completion
Red flags requiring immediate action
Stop work and seek legal advice if:
Contractors request final payment before completing work
Subcontractors or suppliers contact you claiming non-payment
Delivered materials differ from contract specifications
Workers appear unlicensed, uninsured, or unprofessional
Project timeline exceeds estimates by weeks without explanation
Contractors become unreachable or unresponsive to communications
Frequently asked questions about affordable roofing near me
How much should I expect to pay for affordable roofing near me?
Typical asphalt shingle roof replacement costs $3.50-$6.00 per square foot installed, translating to $6,000-$14,500 for average homes depending on roof size, material selection, complexity, and regional labor rates. Budget 3-tab installations may cost toward the lower end ($3.40-$4.50 per sq ft), while standard architectural shingles run $4.50-$5.95 per square foot installed.
What’s the difference between affordable and cheap roofing?
Affordable roofing delivers quality materials, professional licensed installation, proper warranties, and transparent pricing at fair market rates, while cheap roofing cuts corners on materials, employs unlicensed labor, skips critical installation steps, or represents fraudulent contractors offering unrealistic pricing to collect deposits before disappearing. Affordable contractors maintain lower overhead and pass savings to customers, whereas cheap contractors sacrifice quality and accountability to offer unsustainably low bids.
How do I find trustworthy affordable roofing companies near me?
Search Google for local contractors with 4.0+ star ratings, verify licensing through state boards, confirm insurance coverage directly with insurance companies, check Better Business Bureau ratings and complaint history, read recent customer reviews across multiple platforms, request 3-5 references from projects completed within six months, and obtain written estimates from multiple contractors for comparison.
No—estimates 30% or more below others typically indicate cut corners, inferior materials, unlicensed labor, or fraudulent contractors planning to disappear with deposits rather than complete work properly. Mid-range bids generally offer optimal value, balancing quality materials, professional installation, proper licensing and insurance, and fair profit margins ensuring contractor accountability.
What should I look for in an affordable roofing company?
Essential qualities include valid state contractor licensing, general liability and workers’ compensation insurance with adequate coverage limits, minimum 10-year workmanship warranty, transparent itemized pricing, physical local business address, manufacturer certifications (GAF Master Elite, CertainTeed Select ShingleMaster), established operating history (5-10+ years), and strong local references from recent projects.
Are 3-tab shingles or architectural shingles more affordable?
3-tab shingles cost less upfront at $1-$2 per square foot for materials versus $1.50-$4 for architectural shingles, but architectural options deliver superior long-term value with 25-30 year lifespan compared to 15-20 years for 3-tab, plus enhanced wind resistance (110-130 mph vs. 60-70 mph) and better curb appeal. For primary residences, standard architectural shingles represent the best balance of affordability and performance.
How can I save money on roof replacement without sacrificing quality?
Choose standard architectural shingles over premium designer lines (saving 30-40%), schedule installation during off-season for 10-20% discounts, obtain quotes from 3-5 contractors enabling competitive comparison, select popular neutral colors often priced lower than specialty hues, ask about 0% financing options spreading costs interest-free over 12-24 months, and inquire about referral programs offering $100-$500 discounts for recommending neighbors.
What are red flags when hiring affordable roofing companies?
Warning signs include no physical local address (P.O. box only), demands for 100% upfront payment, unusually low bids 30%+ below competitors, lack of verifiable licensing or insurance, door-to-door solicitation after storms with pressure tactics, verbal-only estimates without written documentation, reluctance to provide references or insurance certificates, and newly formed companies without established track records.
Finding your ideal affordable roofing partner
Quality affordable roofing near me means securing fair pricing for professional installation, proper materials, valid licensing, comprehensive insurance, and solid warranties—not simply accepting the lowest bid that often indicates cut corners or fraudulent operations. Successful contractor selection requires systematic verification of licensing through state boards, insurance confirmation directly from carriers, Better Business Bureau rating review, recent customer reference checks, and comparison of detailed written estimates from 3-5 local contractors.
Understanding that mid-range bids typically deliver optimal value while extremely low estimates signal danger helps homeowners make informed decisions balancing budget constraints with quality requirements. Off-season scheduling, standard architectural shingle selection, manufacturer contractor networks, and transparent communication enable significant savings without sacrificing performance or longevity.
Ready to find affordable roofing companies near me you can trust? Use this guide’s contractor vetting checklist, request detailed itemized written estimates, verify all credentials independently, ask the 24 essential questions before signing, and make an informed decision protecting both your home and your budget for decades. Start your search today with local contractors maintaining 4.0+ ratings, 5+ years established presence, proper licensing and insurance, and manufacturer certifications demonstrating commitment to quality installation.
🏠 Roofing Tips & Updates
Get free roofing advice, cost guides, and seasonal maintenance tips.
Roofing content specialist with 5+ years researching U.S. residential and commercial roofing. Has documented 200+ projects covering installation costs, material selection, contractor vetting, and DIY guides for homeowners across all climate zones.
Golden Cedar Roof Shingles: 2026 Color Guide & Styling Tips
Golden cedar roof shingles represent a warm, medium-brown roofing color with honey, amber, and wheat undertones that create a timeless earth-tone aesthetic complementing traditional and rustic architectural styles. This classic color family appears across multiple product lines from major manufacturers, including GAF’s Royal Sovereign in Golden Cedar, and synthetic alternatives like CeDUR’s Golden Cedar that replicates the authentic wood shake appearance while offering enhanced performance.
The golden cedar color palette provides homeowners with the natural warmth of cedar wood tones without the intensive maintenance requirements of actual cedar shake roofing. In 2025, golden cedar roof shingles cost similarly to standard shingle colors, with 3-tab options available at budget-friendly prices and architectural shingles ranging from $85-$150 per square for materials, making this warm tone accessible across all price points.
Understanding the characteristics of golden cedar as a roofing color, available product options, exterior coordination strategies, and performance considerations helps homeowners make confident color decisions that enhance curb appeal while providing decades of reliable weather protection. This comprehensive guide explores golden cedar roof shingles from aesthetic, practical, and investment perspectives.
Table of Contents
golden cedar roof shingles
Understanding golden cedar roof shingles color characteristics
Golden cedar represents a specific segment within the warm brown color family designed to evoke natural cedar wood tones while offering the durability and affordability of asphalt or synthetic shingles.
Visual appearance and color profile:
The golden cedar color palette exhibits distinctive characteristics setting it apart from other brown-toned roofing options:
Base color:
Warm medium brown serving as the foundation
Richer than light tan or beige options
Lighter than deep chocolate or hickory browns
Positioned in the middle of the brown spectrum for versatility
Undertones and highlights:
Honey-colored golden tones creating warmth
Amber and wheat highlights adding dimension
Subtle hints of gold and yellow distinguishing it from gray-browns
Less pronounced brown tones compared to darker cedar options, incorporating more golden hues
Multi-tonal character:
Architectural shingles showcase color variation within individual shingles
Lighter golden highlights contrast with deeper brown shadows
Natural wood appearance achieved through varied toning
Dimensional profiles enhance color depth through shadow lines
According to CeDUR’s Golden Cedar product information, the inspiration for golden cedar coloring comes from the Cedrus deodara Aurea Golden tree species, which thrives in warmer climates and is known for its eye-catching golden colored leaves.
Replicating natural cedar aesthetics:
Golden cedar roof shingles aim to capture the appearance of natural cedar wood without its vulnerabilities:
Authentic wood look: Advanced manufacturing creates grain patterns and texture resembling hand-split cedar shakes
Expected performance: High-quality architectural shingles maintain color integrity for 20-30+ years with proper installation and ventilation
Comparison to actual cedar:
While golden cedar shingles evoke wood aesthetics, they offer distinct advantages over natural cedar shake roofing:
No rot or insect damage: Synthetic and asphalt compositions resist biological deterioration
No splitting or curling: Manufactured materials maintain dimensional stability
Fire resistance: Class A fire ratings versus cedar’s flammability concerns
Lower maintenance: No periodic staining, sealing, or treatment requirements
Cost efficiency: Significantly less expensive than premium natural cedar installation
golden cedar roof shingles installed
Popular golden cedar shingle products by brand
Multiple manufacturers offer golden cedar-toned roofing products across various price and performance tiers.
GAF golden cedar options:
GAF, one of North America’s largest roofing manufacturers, offers golden cedar in their budget-friendly product line:
GAF Royal Sovereign – Golden Cedar:
Product type: 3-tab asphalt shingle
Coverage: 33.33 square feet per bundle
Features: Algae-resistant formulation
Warranty: 25-year StainGuard Plus Limited Warranty
Availability: Stocked at major suppliers including Lowe’s, All Roofing Supply, and ASO Roofing Supply
Price point: Budget tier, economical option for golden cedar aesthetic
Best for: Cost-conscious projects, rental properties, utility buildings where premium aesthetics aren’t required
GAF’s premium architectural lines like Timberline HDZ and Timberline Ultra HD offer warm brown tones in colors such as Weathered Wood and Golden Harvest that provide similar warm aesthetics with enhanced dimensional profiles.
CeDUR synthetic golden cedar:
CeDUR specializes in polyurethane synthetic cedar shake roofing with a dedicated Golden Cedar product:
CeDUR Golden Cedar Synthetic Shakes:
Product type: Polyurethane synthetic cedar shake replication
Color characteristics: Similar tone to CeDUR Live Oak with less honey brown and more gold/yellow hints
Cool Roof Rating: Title 24 compliant for Southern California communities
Fire resistance: Class A fire rating
Impact resistance: Class 4 impact rating
Wind resistance: Certified up to 115 mph
Weight: Just 170 pounds per roofing square (100 sq ft)
Insulation value: R > 2.0 R factor, approximately 20% greater than natural heavy shakes
Manufacturing: 50+ unique molds for authentic wood shake appearance with natural variation
Best for: Historic structures requiring wood shake aesthetics with modern performance, California Title 24 compliance requirements, coastal or high-wind zones
CeDUR’s Golden Cedar provides the warm wood shake look while meeting stringent California energy codes and fire safety requirements that natural cedar cannot satisfy.
CertainTeed warm cedar tones:
CertainTeed offers several warm brown options in their Landmark and premium product lines:
CertainTeed Landmark Series:
Relevant colors: Burnt Sienna, Weathered Wood, Cedar (actual color names)
Product type: Architectural shingles
Characteristics: Heavier weight per square contributing to wind resistance and longevity
Availability: Warm tones in designer color selections
Best for: High-end residential applications requiring maximum curb appeal
Owens Corning desert and driftwood tones:
Owens Corning’s Duration and Oakridge lines include warm browns serving as golden cedar alternatives:
Owens Corning Duration:
Relevant colors: Desert Tan (golden cedar equivalent), Driftwood (lighter cedar variation)
Technology: SureNail technology for enhanced wind resistance
Wind warranty: Up to 130 mph when properly installed
Performance: Handled 110 mph winds in recent severe weather tests
Best for: Areas with significant wind exposure requiring warm color palette
Owens Corning Duration FLEX:
Product type: Advanced architectural shingle with enhanced flexibility
Performance: Top-performing 2025 product according to installer feedback
Availability: Warm tones in standard color range
Other manufacturers:
Malarkey (Vista, Highlander, Legacy, Windsor):
Features: SBS polymer modification for flexibility and impact resistance, Class 4 options available
Sustainability: Incorporates recycled rubber and plastics in manufacturing
Algae resistance: Scotchgard Protector by 3M for advanced protection
Warm tones: Earth-tone palette available across product lines
Best for: Environmentally conscious homeowners, areas requiring impact resistance
TAMKO (Heritage, Titan XT, StormFighter FLEX):
Product range: Performance-driven to timeless classic options
Color availability: Warm browns in standard selections
Best for: Regional availability and contractor preference
Brand comparison summary:
Brand
Product Line
Golden Cedar Option
Type
Key Features
GAF
Royal Sovereign
Golden Cedar (exact name)
3-tab
Budget-friendly, algae-resistant
GAF
Timberline HDZ
Weathered Wood, Golden Harvest
Architectural
Premium, wind-resistant
CeDUR
Synthetic Shakes
Golden Cedar (exact name)
Synthetic shake
Class A fire, Class 4 impact, Title 24
CertainTeed
Landmark
Burnt Sienna, Cedar
Architectural
Heavier weight, durability
Owens Corning
Duration
Desert Tan, Driftwood
Architectural
SureNail, wind resistance
Malarkey
Various lines
Earth tones
Architectural
Sustainable, impact-resistant
For specific color matching, always request physical samples as color names vary significantly between manufacturers and digital representations don’t accurately show true tones.
How much do golden cedar roof shingles cost in 2025?
golden cedar roof shingles cost
Golden cedar roof shingles cost the same as standard colors within each product tier, with pricing determined by shingle quality rather than color selection.
Material costs by shingle type:
Current 2025 pricing for golden cedar-toned shingles across quality tiers:
3-tab shingles (budget tier):
Cost per square: $70-$95 (one square = 100 sq ft of roof coverage)
Example: GAF Royal Sovereign Golden Cedar falls in this category
Lifespan: 15-25 years
Best for: Budget-conscious projects, temporary roofing solutions
Standard architectural shingles:
Cost per square: $85-$140 for materials
Popular products: GAF Timberline HDZ, CertainTeed Landmark, Owens Corning Duration
Lifespan: 25-35 years actual performance
Warranty: 30-50 years limited lifetime coverage
Best for: Primary residences, quality installations balancing cost and performance
Premium architectural shingles:
Cost per square: $120-$180
Products: CertainTeed Grand Manor, GAF Timberline Ultra HD
Labor: $4.00-$5.50/sq ft × 2,000 sq ft = $8,000-$11,000
Accessories: $2,500-$4,000
Total project cost: $12,900-$18,600
These costs reflect national averages; regional variations, roof complexity, pitch, and contractor selection significantly affect final pricing.
According to industry data, the best-performing architectural shingles in 2025—including CertainTeed Landmark Premium, GAF Timberline Ultra HD, and Owens Corning Duration FLEX—represent the optimal value proposition for most homeowners balancing upfront investment with long-term performance.
Best home styles for golden cedar roof shingles
Golden cedar’s warm earth-tone character complements specific architectural styles while clashing with others.
Traditional and Colonial architecture:
Golden cedar roof shingles naturally enhance classic American home styles:
Why it works:
Warm brown tones complement brick, stone, and traditional siding materials common in colonial construction
Timeless appeal matches the historical character of these architectural styles
Earth-tone palette provides appropriate formality for traditional aesthetics
Best pairings:
Red or orange-toned brick exteriors creating harmonious warm color schemes
Cream, ivory, and warm white trim providing elegant contrast
Natural stone accents in sandstone or limestone tones
Painted siding in warm neutrals (tan, beige, soft greige)
Craftsman and bungalow styles:
Arts and Crafts architecture naturally pairs with golden cedar coloring:
Why it works:
Craftsman design emphasizes natural materials and earth-tone palettes
Warm browns echo the wood details characteristic of these homes
Coastal environments favor colors reflecting sand, sky, and ocean
Golden cedar’s warmth conflicts with breezy coastal aesthetic
Note: According to 2025 installer data, coastal regions show strong preference for Coastal Gray (60% of installations), Nautical Blue (25%), and classic Weathered Wood (15%), with warm golden tones less common in beach communities.
!
Coordinating exterior colors with golden cedar roof shingles
Successful exterior color coordination maximizes golden cedar’s warm appeal while avoiding temperature clashes.
Siding colors that complement golden cedar:
Cream and ivory (classic combination):
Creates traditional, high-contrast pairing
Provides brightness balancing the roof’s warmth
Works across all architectural styles from colonial to craftsman
Timeless choice with broad appeal
Warm white:
Softer than pure white, more inviting appearance
Reduces stark contrast for gentler aesthetic
Maintains freshness while harmonizing with golden tones
Modern alternative to cream for contemporary-leaning homes
Tan and beige (monochromatic earth palette):
Creates cohesive, unified appearance
Subtle, understated elegance
Blends home into natural surroundings
Risk: Can appear bland without strategic accent colors
Soft green (sage, olive, moss):
Natural, organic feel perfect for craftsman and rustic styles
Complements golden cedar’s earth-tone character
Popular in forested and mountain settings
Provides color interest while maintaining warmth
Warm gray (greige – gray-beige blend):
Contemporary twist on traditional pairings
Balances cool and warm undertones
Versatile across multiple architectural styles
Growing trend in 2025 color selections
Brick red and terracotta:
Harmonious warm-on-warm combination
Colonial and Mediterranean styles benefit most
Creates rich, saturated color scheme
Bold choice requiring confident execution
Natural wood (cedar, pine, redwood):
Seamless rustic integration for log cabins and craftsman homes
How golden cedar roof shingles perform in different climates
Golden cedar’s medium-tone coloring affects heat absorption and aesthetic appropriateness across various climates.
Heat absorption and energy considerations:
Golden cedar falls in the middle of the color spectrum regarding solar heat absorption:
Thermal characteristics:
Not as cool as: White, light gray, tan, cream (maximum solar reflectance)
Not as hot as: Black, dark brown, charcoal (maximum heat absorption)
Moderate performance: Medium browns absorb and reflect moderately
Energy efficiency strategies:
Proper attic insulation (R-38 to R-60 depending on climate) more important than color
Adequate ventilation (ridge vents, soffit vents) critical for heat management
Radiant barriers reduce heat transfer regardless of roof color
Cool Roof rated versions available (CeDUR Golden Cedar) combining warm aesthetics with reflective technology
According to CeDUR, their Golden Cedar synthetic shakes provide insulation value of R > 2.0 R factor, approximately 20% greater than natural heavy shakes, potentially reducing air conditioning use and qualifying for utility rebates in some jurisdictions.
Optimal regional applications:
Mountain and forest regions (ideal):
Golden cedar tones blend naturally with wooded surroundings
Frequently asked questions about golden cedar roof shingles
What color is golden cedar for roof shingles? Golden cedar roof shingles feature a warm medium-brown base color with honey, amber, and golden undertones that create a natural wood shake appearance. This earth-tone color sits between light tan and deep chocolate brown, incorporating more golden and yellow highlights than neutral weathered wood tones. Different manufacturers offer variations within the golden cedar color family, so physical samples are essential for accurate color selection.
Which brands offer golden cedar roof shingles? GAF offers Royal Sovereign in Golden Cedar (3-tab product available at major retailers), while CeDUR manufactures synthetic Golden Cedar shakes with Class A fire and Class 4 impact ratings. Other manufacturers including CertainTeed Landmark (Burnt Sienna, Cedar), Owens Corning Duration (Desert Tan, Driftwood), and Malarkey provide similar warm brown tones though exact “golden cedar” naming varies by brand.
How much do golden cedar roof shingles cost? Golden cedar roof shingles cost $70-$180 per square for materials depending on product tier, with 3-tab options at $70-$95, standard architectural shingles at $85-$140, and premium architectural products at $120-$180 per square. Golden cedar typically incurs no color premium as it’s a standard earth tone. Complete installed costs range from $10,700-$18,600 for a 2,000 square foot roof including materials, labor, and accessories.
What house colors go with golden cedar shingles? Golden cedar roof shingles pair best with cream, ivory, warm white, tan, beige, soft green (sage, olive), warm gray (greige), and natural wood siding. Avoid cool grays with blue undertones, pure white, cool blues, purples, and pink-toned beiges that create temperature clashes with golden cedar’s warm character. Warm-toned brick, sandstone, limestone, and river rock complement golden cedar effectively.
Do golden cedar shingles fade over time? Quality golden cedar roof shingles experience gradual, subtle fading over 20-30+ years, with tones softening and lightening naturally. Premium architectural shingles with advanced coatings maintain color integrity longer than standard products, while properly ventilated roofs extend color life by reducing thermal stress. Pre-finished synthetic products offer enhanced fade resistance compared to field-applied treatments.
Is golden cedar a good choice for hot climates? Golden cedar performs adequately in hot climates with proper attic insulation and ventilation, though lighter colors like Desert Tan reflect slightly more solar heat. Cool Roof rated versions like CeDUR Golden Cedar combine warm aesthetics with reflective technology meeting California Title 24 requirements. Medium-toned golden cedar absorbs moderate heat—less than dark browns or black, more than white or light gray—making proper ventilation more important than color selection for energy efficiency.
How do I know if golden cedar is right for my home? Golden cedar works best for traditional, colonial, craftsman, ranch, Mediterranean, and rustic architectural styles with warm-toned exteriors in earth-tone color palettes. Request physical samples from multiple brands, view them against your actual siding in natural outdoor light at various times of day, and step back to assess from street view. Avoid golden cedar for ultra-modern minimalist homes with cool-toned grays or coastal properties favoring light, breezy color schemes.
Making informed golden cedar roof shingle decisions
Golden cedar roof shingles deliver timeless warm earth-tone aesthetics complementing traditional, craftsman, rustic, and Mediterranean architectural styles while costing the same as standard colors within each product tier ($70-$180 per square for materials). Major manufacturers offer golden cedar options ranging from budget-friendly GAF Royal Sovereign 3-tab shingles to premium architectural products from CertainTeed, Owens Corning, and Malarkey, plus synthetic alternatives like CeDUR Golden Cedar providing Class A fire resistance, Class 4 impact ratings, and California Title 24 compliance.
Successful golden cedar selection requires viewing physical samples in natural outdoor light against actual exterior materials, coordinating with warm-toned siding colors (cream, ivory, tan, soft greens, warm grays), and ensuring proper attic ventilation for optimal performance and longevity. While golden cedar works well across most climates, homeowners in extreme heat zones may prefer lighter alternatives or cool roof rated products combining warm aesthetics with enhanced solar reflectance.
Ready to select your golden cedar roof shingles? Request samples from local suppliers, use manufacturer visualization tools like the GAF Virtual Home Remodeler for preliminary comparison, obtain multiple contractor quotes, and consult our complete roofing installation guide for project planning.
🏠 Roofing Tips & Updates
Get free roofing advice, cost guides, and seasonal maintenance tips.
Roofing content specialist with 5+ years researching U.S. residential and commercial roofing. Has documented 200+ projects covering installation costs, material selection, contractor vetting, and DIY guides for homeowners across all climate zones.
Average Cost of a New Roof: 2026 Complete Pricing Guide
The average cost of a new roof ranges from $8,000 to $30,000 for most residential homes, with the final price determined by roofing material type, roof size, pitch complexity, regional labor rates, and structural condition. Asphalt shingle roofs—the most popular choice—typically cost $5,500-$12,000 for an average 2,000 square foot home, while premium materials like metal roofing ($14,000-$30,000) or slate ($36,000-$70,000) command significantly higher investments.
Understanding what drives the average cost of a new roof empowers homeowners to budget accurately, compare contractor estimates effectively, and make informed material selections that balance upfront expense with long-term value. This comprehensive guide breaks down pricing by material type, explains cost factors most homeowners overlook, reveals regional price variations, and provides proven strategies to control expenses without sacrificing quality or durability.
What is the average cost of a new roof in 2025?
The average cost of a new roof for residential properties in 2025 varies significantly based on material selection, but national data provides useful baseline figures for planning purposes.
National average by material type:
Asphalt shingles (3-tab): $5,500-$9,000 for typical homes, representing the most economical option with 15-20 year lifespan
Architectural/dimensional shingles: $8,500-$14,000 for standard installations, offering enhanced durability and curb appeal with 25-30 year warranties
Metal roofing: $14,000-$30,000 depending on profile type, delivering 40-70 year lifespan with energy efficiency benefits
Clay or concrete tile: $20,000-$40,000 for traditional installations, providing 50-100 year lifespan in appropriate climates
Slate roofing: $36,000-$70,000+ for premium applications, lasting 75-200 years with minimal maintenance
According to the National Roofing Contractors Association (NRCA), these figures represent complete roof replacement projects including tear-off, disposal, underlayment, flashing, ventilation, and labor.
Cost per square foot installed:
Roofing professionals measure projects in “roofing squares,” where one square equals 100 square feet of roof surface area. Per square foot pricing helps homeowners estimate costs based on their specific roof dimensions:
Asphalt shingles: $3.50-$7.50 per sq ft installed
Metal roofing: $7.00-$15.00 per sq ft installed
Tile roofing: $10.00-$25.00 per sq ft installed
Slate roofing: $18.00-$35.00 per sq ft installed
Wood shakes: $7.00-$13.00 per sq ft installed
Typical costs by home size:
Home Size
Roof Area (approx)
Asphalt Shingles
Metal Roofing
Tile Roofing
1,500 sq ft
1,700 sq ft
$5,950-$12,750
$11,900-$25,500
$17,000-$42,500
2,000 sq ft
2,300 sq ft
$8,050-$17,250
$16,100-$34,500
$23,000-$57,500
2,500 sq ft
2,900 sq ft
$10,150-$21,750
$20,300-$43,500
$29,000-$72,500
3,000 sq ft
3,500 sq ft
$12,250-$26,250
$24,500-$52,500
$35,000-$87,500
These estimates assume standard-pitch roofs (4:12 to 6:12 slope) with moderate complexity. Actual roof area typically exceeds home footprint by 15-35% due to pitch, overhangs, and multiple planes.
 shingles:
Material cost: $1.50-$3.50 per sq ft
Labor cost: $2.50-$4.50 per sq ft
Total installed: $4.00-$8.00 per sq ft
Lifespan: 25-30 years with proper ventilation
Best for: Primary residences, improved aesthetics, better wind/impact ratings
Asphalt shingles offer the lowest average cost of a new roof while providing adequate performance for most climates and sufficient warranty protection from major manufacturers like GAF, CertainTeed, and Owens Corning.
Metal roofing systems deliver exceptional durability and energy efficiency, justifying higher initial investment through extended service life and reduced cooling costs.
Standing seam (concealed fasteners):
Material cost: $4.00-$8.00 per sq ft
Labor cost: $3.00-$7.00 per sq ft
Total installed: $7.00-$15.00 per sq ft
Lifespan: 40-70 years
Best for: Modern aesthetics, coastal areas, energy-conscious homeowners
Corrugated/R-panel (exposed fasteners):
Material cost: $2.00-$4.50 per sq ft
Labor cost: $2.50-$5.00 per sq ft
Total installed: $4.50-$9.50 per sq ft
Lifespan: 30-50 years
Best for: Agricultural buildings, workshops, budget metal option
The Metal Roofing Alliance reports that homeowners choosing metal roofing see 10-25% reductions in cooling costs due to reflective coatings that reduce heat absorption.
Tile roofing: classic durability
Clay and concrete tiles provide unmatched longevity and fire resistance, particularly popular in Mediterranean, Spanish Colonial, and Southwestern architectural styles.
Clay tile:
Material cost: $6.00-$15.00 per sq ft
Labor cost: $6.00-$13.00 per sq ft
Total installed: $12.00-$28.00 per sq ft
Lifespan: 75-100 years
Weight: 850-1,100 lbs per square (may require structural reinforcement)
Concrete tile:
Material cost: $4.00-$10.00 per sq ft
Labor cost: $5.00-$11.00 per sq ft
Total installed: $9.00-$21.00 per sq ft
Lifespan: 50-75 years
Weight: 820-1,000 lbs per square
Tile roofing significantly increases the average cost of a new roof but excels in hot, dry climates where thermal mass and fire resistance provide measurable benefits.
Slate roofing: ultimate premium
Natural slate represents the pinnacle of roofing longevity and prestige, commonly found on historic homes, luxury estates, and architecturally significant buildings.
Material cost: $10.00-$20.00 per sq ft
Labor cost: $8.00-$15.00 per sq ft
Total installed: $18.00-$35.00 per sq ft
Lifespan: 75-200 years depending on slate quality
Weight: 800-1,500 lbs per square (requires engineered roof structure)
Slate installation demands specialized craftsmen familiar with proper techniques, driving labor costs higher than other materials. However, the investment often outlasts the building itself.
Wood shakes and shingles
Cedar and redwood shakes provide rustic aesthetics favored in mountain, craftsman, and traditional architectural styles.
Material cost: $4.00-$7.00 per sq ft
Labor cost: $3.00-$6.00 per sq ft
Total installed: $7.00-$13.00 per sq ft
Lifespan: 20-40 years with treatment and maintenance
Maintenance: Requires periodic cleaning, treatment, and inspection
Many jurisdictions restrict or prohibit wood roofing in wildfire-prone areas due to fire risk, limiting availability and increasing the average cost of a new roof in compliant fire-rated wood products.
Understanding labor costs in average new roof pricing
Labor typically represents 40-60% of the total average cost of a new roof, varying based on roof characteristics, regional wage levels, and project complexity.
Regional labor rate variations:
Geographic location dramatically affects labor costs due to local wage standards, cost of living differences, and contractor availability:
Northeast (NY, NJ, CT, MA): $75-$150 per hour crew rates reflecting high living costs and union labor prevalence
West Coast (CA, WA, OR): $70-$140 per hour in metro areas, moderate rates in rural regions
Southeast (FL, GA, NC, SC): $55-$100 per hour with year-round installation seasons allowing competitive pricing
Low pitch (2:12 to 4:12): Standard labor rates, safe working conditions
Moderate pitch (5:12 to 7:12): +10-20% labor premium for slower work and additional safety measures
Steep pitch (8:12 to 12:12): +20-40% labor premium requiring specialized equipment, scaffolding, and safety harnesses
Very steep (12:12+) or mansard: +40-60% or custom pricing due to extreme difficulty and safety complexity
Complexity factors:
Several roof design elements increase labor time and the overall average cost of a new roof:
Multiple valleys: Each valley requires precise flashing installation and careful material integration, adding 2-4 hours per valley
Dormers: Window projections create additional planes, transitions, and flashing details, adding $300-$800 per dormer
Chimneys: Proper flashing systems with step flashing, counter flashing, and cricket installation add $400-$1,200 per chimney
Skylights: Each skylight demands careful flashing and integration, adding $250-$600 per unit
Multiple roof planes: Hips, intersections, and direction changes slow installation and increase material waste
Penetrations: Plumbing vents, exhaust fans, and other roof penetrations require individual flashing boots and sealing
Tear-off and disposal:
Removing existing roofing materials adds significant labor and disposal costs to the average cost of a new roof:
Single-layer removal: $1.00-$2.00 per sq ft for basic asphalt shingle tear-off
Multiple layers: $1.50-$3.00 per sq ft when two or more layers require removal
Heavy materials: Tile or slate removal costs $2.50-$5.00 per sq ft due to weight and disposal fees
Dumpster rental: $300-$800 depending on roof size and debris volume
According to HomeAdvisor’s roofing cost data, avoiding tear-off by installing over existing shingles (where code permits) saves $1,000-$3,000 but may void manufacturer warranties and reduce new roof lifespan.
contractor providing detailed roof estimate to homeowner
Accurately calculating roof area and accounting for pitch multipliers ensures realistic budgets for the average cost of a new roof specific to your property.
Measuring roof size:
While home square footage provides a starting point, actual roof area typically exceeds it by 15-35% due to pitch angle, overhangs, and multiple planes.
Pitch multiplier factors:
Roof pitch (rise over run) increases actual surface area compared to horizontal footprint:
Pitch
Angle
Multiplier
Example: 2,000 sq ft home
2:12
9.5°
1.02x
2,040 sq ft roof area
4:12
18.4°
1.06x
2,120 sq ft roof area
6:12
26.6°
1.12x
2,240 sq ft roof area
8:12
33.7°
1.20x
2,400 sq ft roof area
10:12
39.8°
1.30x
2,600 sq ft roof area
12:12
45°
1.41x
2,820 sq ft roof area
A home with 2,000 square feet of living space and an 8:12 pitch roof actually has approximately 2,400 square feet of roofing surface, significantly affecting material quantities and the average cost of a new roof.
Cost estimates by roof size:
Small roofs (1,000-1,500 sq ft):
Asphalt shingles: $3,500-$11,250
Architectural shingles: $4,000-$12,000
Metal roofing: $7,000-$22,500
Typical applications: Small ranch homes, garages, cottages
Medium roofs (1,500-2,500 sq ft):
Asphalt shingles: $5,250-$18,750
Architectural shingles: $6,000-$20,000
Metal roofing: $10,500-$37,500
Typical applications: Average single-family homes, split-levels
Hidden factors that increase the average cost of a new roof
Beyond obvious material and labor expenses, several frequently overlooked elements add substantially to final roofing project costs.
contractor providing detailed roof estimate to homeowner Guide 2025
Structural repairs and deck replacement:
Roof tear-off often reveals hidden damage requiring correction before new roofing installation:
Sheathing replacement: $2.00-$4.00 per sq ft for damaged plywood or OSB panels
Rafter or truss repairs: $500-$2,500 per repair depending on extent and structural requirements
Complete re-decking: $3,500-$8,000 for full roof deck replacement on severe rot or inadequate original construction
Fascia and soffit repairs: $12-$25 per linear foot for rotted trim boards
Homes over 20 years old, roofs with visible sagging, or properties with past water intrusion should budget 10-15% additional for potential structural corrections.
Underlayment and protective membranes:
Quality underlayment prevents leaks and extends roof life but adds measurable cost:
Standard asphalt felt (15-30 lb): $0.25-$0.50 per sq ft
Synthetic underlayment: $0.50-$1.00 per sq ft offering superior tear resistance and weather protection
Ice and water shield: $0.75-$1.50 per sq ft required at eaves and valleys in cold climates per building code
A 2,000 square foot roof using premium synthetic underlayment and code-required ice barrier adds $800-$1,500 to the average cost of a new roof compared to minimum felt paper.
Ventilation improvements:
Proper attic ventilation prevents moisture accumulation, reduces cooling costs, and extends shingle life, making it a worthwhile investment:
Ridge vent installation: $2.00-$5.00 per linear foot including cutting and installation
Soffit vent installation: $5-$15 per vent for new intake vents
Power attic fans: $300-$600 installed for thermostat-controlled exhaust
Solar attic fans: $400-$900 installed for zero-operating-cost ventilation
Correcting inadequate ventilation during roof replacement adds $600-$2,000 but pays dividends through improved roof performance and lower energy bills.
Flashing and trim components:
Proper flashing installation prevents the majority of roof leaks but requires quality materials and skilled labor:
Chimney flashing system: $200-$600 including base, step, and counter flashing
Skylight flashing: $250-$500 per skylight for complete weather-tight integration
Valley flashing: $100-$400 per valley depending on metal type and installation method
Drip edge and rake trim: $2-$4 per linear foot for code-required edge protection
Pipe jack boots: $15-$35 each for plumbing vent flashings
A moderately complex roof with two chimneys, three skylights, and four valleys adds $1,500-$3,500 in flashing costs beyond basic roof coverage.
Permits, inspections, and disposal:
Legitimate roofing contractors include regulatory compliance costs in estimates:
Building permits: $150-$500 based on project value and jurisdiction
Inspection fees: $50-$200 for required building department sign-offs
Dumpster rental: $300-$800 for debris removal depending on roof size
Disposal fees: $50-$150 per ton at landfills, varying by location
Total permit and disposal expenses typically add $500-$1,500 to the average cost of a new roof but ensure legal compliance and proper waste management.
Average cost of a new roof by geographic region
contractor providing detailed roof estimate to homeowner , average cost for a new roof
Location significantly influences roofing costs through labor rate variations, climate-specific code requirements, and material availability differences.
Northeast region pricing:
States including New York, New Jersey, Massachusetts, Connecticut, and Pennsylvania experience the highest roofing costs nationally:
Average asphalt roof (2,000 sq ft): $10,000-$16,000
Average metal roof (2,000 sq ft): $18,000-$32,000
Key factors: High labor costs ($75-150/hour), strict building codes, ice dam prevention requirements, union labor prevalence, challenging winter weather limiting installation seasons
Southeast region pricing:
Florida, Georgia, North Carolina, South Carolina, and Virginia offer moderate to high pricing:
Average asphalt roof (2,000 sq ft): $8,000-$13,000
Illinois, Ohio, Michigan, Indiana, and Wisconsin represent moderate cost markets:
Average asphalt roof (2,000 sq ft): $7,500-$12,000
Average metal roof (2,000 sq ft): $14,000-$26,000
Key factors: Moderate labor rates, seasonal limitations reducing working months, ice barrier requirements, established contractor competition
Southwest region pricing:
Texas, Arizona, New Mexico, and Oklahoma benefit from lower labor costs:
Average asphalt roof (2,000 sq ft): $7,000-$11,000
Average metal roof (2,000 sq ft): $13,000-$24,000
Key factors: Lower labor rates ($45-90/hour), less restrictive licensing in some areas, tile and metal popularity in specific markets, intense UV exposure requiring premium materials
West Coast region pricing:
California, Washington, and Oregon mirror Northeast pricing in urban areas:
Average asphalt roof (2,000 sq ft): $9,000-$15,000
Average metal roof (2,000 sq ft): $17,000-$30,000
Key factors: High urban labor costs, wildfire-rated material requirements in interface zones, earthquake considerations for tile roofs, environmental regulations
Mountain states pricing:
Colorado, Utah, Wyoming, and Montana offer moderate pricing with seasonal constraints:
Average asphalt roof (2,000 sq ft): $8,000-$13,000
Average metal roof (2,000 sq ft): $15,000-$27,000
Key factors: Heavy snow load requirements, limited installation season (May-October), challenging access in mountain properties, specialized high-altitude expertise
Region
2,000 sq ft Asphalt
2,000 sq ft Metal
Primary Cost Driver
Northeast
$10,000-$16,000
$18,000-$32,000
Labor rates + codes
Southeast
$8,000-$13,000
$15,000-$28,000
Hurricane specs
Midwest
$7,500-$12,000
$14,000-$26,000
Seasonal limits
Southwest
$7,000-$11,000
$13,000-$24,000
Lower labor
West Coast
$9,000-$15,000
$17,000-$30,000
Urban wages
Mountain
$8,000-$13,000
$15,000-$27,000
Access challenges
These regional differences make the average cost of a new roof highly location-dependent, emphasizing the importance of obtaining multiple local estimates.
, roof replacement delivers:
Average ROI: 60-70% of project cost recovered at resale for asphalt shingle roofs
Improved marketability: Homes with new roofs sell 15-20% faster than comparable properties needing roofing work
Buyer perception: New roofs eliminate major negotiating points; buyers often demand $5,000-15,000 price reductions for aging roofs
Appraisal benefits: Appraisers note roof condition prominently; new roofs support higher valuations and easier financing
A $12,000 asphalt roof replacement typically adds $7,200-8,400 to home value immediately, with the gap closing over time as neighboring properties age.
Energy efficiency savings:
Material selection affects ongoing energy costs through solar reflectance and thermal performance:
Insulation upgrades: Adding or improving attic insulation during roof replacement provides 15-30% heating/cooling savings
A homeowner spending $300/month on cooling can save $30-75 monthly with a cool metal roof, recovering $360-900 annually over the life of the roof.
Maintenance cost reduction:
New roofs eliminate or minimize repair expenses common with aging systems:
Emergency repairs: Failing roofs average $500-1,500 annually in leak repairs, storm damage fixes, and temporary solutions
Preventive maintenance: While new roofs still benefit from periodic inspections, they rarely need repairs for 5-10 years
Secondary damage prevention: New roofs prevent water intrusion that causes $3,000-15,000 in ceiling, insulation, and structural repairs
Cost per year analysis:
Evaluating the average cost of a new roof on an annual basis reveals long-term value:
Material
Initial Cost
Lifespan
Cost Per Year
Maintenance/Year
True Annual Cost
3-tab shingles
$8,000
18 years
$444
$50
$494
Architectural shingles
$12,000
28 years
$429
$40
$469
Metal roofing
$22,000
50 years
$440
$25
$465
Tile roofing
$35,000
75 years
$467
$30
$497
Slate roofing
$55,000
100 years
$550
$50
$600
This analysis demonstrates that premium materials often provide comparable or better long-term value despite higher upfront average cost of a new roof.
🏠
Stop Estimating. Get Your Actual 2026 Roof Cost Today.
National averages tell you the range — a free inspection tells you your number. Your roof’s pitch, material, deck condition, and local labor market all shift the final cost by $2,000–$6,000 from any published average. A certified local contractor gives you the exact figure in one free visit, with no obligation to proceed.
2026 note: Post-tariff material costs are up 4–22% depending on material. Lock in your quote now before further price movement.
What is the average cost of a new roof for a 2,000 square foot house? For a 2,000 square foot home with typical roof pitch and complexity, expect $8,050-$17,250 for architectural asphalt shingles, $16,100-$34,500 for metal roofing, or $23,000-$57,500 for tile roofing as the average cost of a new roof. Actual costs vary based on exact roof area (typically 2,300 sq ft for a 2,000 sq ft home), pitch, regional labor rates, and specific material selections.
What is the cheapest type of roofing material? 3-tab asphalt shingles represent the most economical option at $3.00-$6.00 per square foot installed, offering 15-20 year lifespan with adequate weather protection. However, architectural shingles at $4.00-$8.00 per square foot provide better value through enhanced durability, improved wind resistance, and 25-30 year warranties that reduce long-term costs.
How long does a new roof last? New roof lifespan varies dramatically by material: asphalt shingles last 15-30 years depending on quality, metal roofing provides 30-70 years of service, tile roofs endure 50-100 years, and slate roofing can last 75-200 years. Actual longevity depends on climate, installation quality, ventilation adequacy, and maintenance frequency.
Does homeowners insurance cover new roof cost? Insurance covers roof replacement when damage results from covered perils like hail, wind, falling trees, or fire. Policies typically cover full replacement cost minus your deductible ($500-2,500) when sudden, accidental damage occurs. However, insurance excludes normal wear and tear, aging, or maintenance-related deterioration, meaning homeowners pay the full average cost of a new roof for age-related replacements.
Can I negotiate roofing costs? Yes, the average cost of a new roof is negotiable through several approaches: request 3-5 competitive bids establishing market rates, ask about cash payment discounts (3-5%), negotiate payment schedules protecting your interests, time projects during off-season for lower rates, and discuss material alternatives providing similar performance at reduced cost. Avoid negotiating on permit compliance, proper underlayment, or warranty coverage, as these compromises create future problems.
Should I get 3-tab or architectural shingles? Architectural shingles justify their premium cost over 3-tab shingles for most homeowners through enhanced aesthetics, better wind ratings (110-130 mph vs. 60-70 mph), improved impact resistance, and longer warranties (25-30 years vs. 15-20 years). The additional $1,000-3,000 investment in architectural shingles pays dividends through reduced maintenance, fewer storm claims, and higher resale value.
When is the best time to replace a roof to save money? Late fall or early winter in moderate climates offers 10-20% savings when contractors seek projects during their slower season. Avoid peak summer and early fall periods when high demand enables premium pricing and creates 4-8 week wait times. Book 3-4 months in advance regardless of season, securing better rates and preferred scheduling before contractors fill their calendars.
Making informed decisions about your roof investment
The average cost of a new roof spans a wide range from $8,000 to $30,000+ for typical residential projects, with final pricing determined by material selection, roof size and complexity, regional labor rates, structural conditions, and climate-specific code requirements. Understanding these cost drivers empowers homeowners to budget accurately, evaluate contractor estimates effectively, and make informed decisions balancing upfront investment with long-term performance and value.
Quality roof replacement represents one of the most significant home improvement investments, directly affecting comfort, energy efficiency, property value, and structural protection for decades. Prioritize licensed, insured contractors providing comprehensive warranties, use premium underlayment and flashing materials regardless of covering choice, and obtain multiple detailed estimates ensuring fair pricing for your specific project requirements.
🏠 Roofing Tips & Updates
Get free roofing advice, cost guides, and seasonal maintenance tips.
Roofing content specialist with 5+ years researching U.S. residential and commercial roofing. Has documented 200+ projects covering installation costs, material selection, contractor vetting, and DIY guides for homeowners across all climate zones.
Roofing COP: Essential Guide to Pass Final Inspection Successfully (2026)
A roofing COP (Certificate of Occupancy) is the official approval that confirms your roofing work has passed final building inspection and complies with local building codes. This crucial document validates that your roof replacement or installation meets structural safety standards, fire ratings, and manufacturer specifications required by your municipality. Without proper roofing COP certification, homeowners face serious risks including insurance claim denials, difficulty selling their property, and potential code enforcement penalties.
Understanding the roofing COP process protects your investment and ensures legal compliance. This comprehensive guide covers when you need a roofing COP, what inspectors examine during final inspections, common violations that cause failures, and proven strategies to pass on the first attempt. Whether you’re a homeowner planning a roof replacement or a contractor managing multiple projects, mastering roofing COP requirements saves time, money, and prevents costly complications.
Table of Contents
📌 Quick Clarification: “Roofing COP” can refer to two different things:
Roofing Coping — the cap material that seals the top edge of a parapet wall on flat roofs
Certificate of Occupancy (COP) — the legal approval document required after a roof installation or replacement
This guide covers the Certificate of Occupancy process. For roofing coping material, see our flat roof installation guide.
Understanding certificate of occupancy for roofing projects
A roofing COP represents the formal sign-off from your local building authority certifying that completed roof work complies with International Building Code (IBC) standards and approved construction plans. Some jurisdictions issue a specific Certificate of Occupancy document, while others record final approval as “permit closed” or “inspection passed” status in their building records database.
The roofing COP process originated from building safety regulations established by the International Code Council (ICC), which publishes model codes adopted by most U.S. municipalities. These codes ensure roofs can withstand local wind loads, snow loads, and fire exposure while providing adequate ventilation and weatherproofing to protect building occupants and structural integrity.
Key functions of roofing COP:
Legal occupancy authorization: Confirms the building is safe for continued or renewed occupancy after major roof work
Code compliance verification: Documents that installation methods, materials, and structural elements meet current building code requirements
Property record documentation: Creates permanent municipal records that future buyers, appraisers, and insurance companies can verify
Warranty activation: Many manufacturers require proof of code-compliant installation and final inspection approval before honoring warranty claims
Insurance requirements: Carriers often request COP documentation for coverage renewals or claims related to recently replaced roofs
According to the National Association of Home Builders, properly permitted and inspected roof work adds measurable value to properties and reduces liability exposure for homeowners by 65% compared to unpermitted installations.
Roofing COP requirements vary by jurisdiction, but most building departments mandate final inspection approval for substantial roof work that affects structural integrity, fire safety, or building envelope performance.
Projects typically requiring roofing COP:
Complete roof replacements: Full tear-off and re-roofing projects on residential properties usually require permits and final COP approval regardless of square footage
New construction: All new buildings need comprehensive inspections covering framing, decking, underlayment, and final roofing as part of overall COP issuance
Structural modifications: Changes to roof pitch, framing system upgrades, additional load-bearing components, or dormer installations always trigger permit and COP requirements
Major repairs exceeding threshold values: Many jurisdictions require permits when repair costs exceed 25% of the roof’s replacement value or cover more than specified square footage (commonly 100-200 sq ft)
Commercial roofing projects: All commercial roof work requires permitting, multiple inspections, and formal COP approval due to life-safety implications
Projects typically NOT requiring roofing COP:
Minor repairs under jurisdictional thresholds (usually 100 sq ft or less)
Routine maintenance including cleaning, minor patching, or sealant replacement
Cosmetic improvements that don’t affect structural or weather-resistant components
Emergency tarping or temporary weatherproofing (though permanent repairs will require permits)
The safest approach is contacting your local building department before starting any roof work. Requirements differ significantly between counties, cities, and even neighborhoods with historic preservation districts or homeowner association rules. For guidance on local requirements, visit the National Association of State Contractors Licensing Agencies directory to find your regional building authority contact information.
What inspectors examine during roofing COP inspections
roofing COP certification building inspector
Building inspectors follow comprehensive checklists based on International Residential Code (IRC) and International Building Code (IBC) standards when evaluating roofs for COP approval. Understanding these inspection criteria helps contractors and homeowners prepare properly and avoid common pitfalls.
Structural and substrate inspection points:
Roof deck integrity: Inspectors check for proper sheathing thickness (minimum 7/16″ OSB or 1/2″ plywood for most residential applications), correct fastener spacing (6″ on edges, 12″ in field), and no sagging or unsupported spans
Framing compliance: Rafter or truss spacing, proper bearing on walls, adequate lateral bracing, and any structural repairs must match approved engineering plans
Rot and damage remediation: All deteriorated wood must be replaced with matching or superior materials; inspectors reject installations that cover existing damage without proper repairs
building inspector examining roof deck during COP inspection
Underlayment type and installation: ASTM D226 felt paper or ASTM D4869 synthetic underlayment must be installed with proper overlap (2″ side laps, 6″ end laps) and correct orientation (upper courses over lower)
Ice and water barrier placement: Cold climate jurisdictions require self-adhering modified bitumen membrane (ASTM D1970) at eaves extending 24″ minimum beyond interior wall line and in all valleys
Drip edge installation: Metal drip edge must be installed at eaves (under underlayment) and rakes (over underlayment) in most jurisdictions, with proper laps and fastening
Roof covering installation compliance:
Manufacturer specifications: All roofing materials must be installed exactly per manufacturer’s published instructions, including nail type, length, placement, and exposure measurements
Fastener requirements: Asphalt shingles typically require 4-6 fasteners per shingle depending on roof pitch and wind zone; metal roofing needs specific screw spacing and placement patterns
Fire rating verification: Inspectors confirm materials meet required fire classifications (Class A, B, or C) for the jurisdiction and building type
Critical flashing inspections:
Step flashing at sidewalls: Each shingle course must have individual L-shaped flashing pieces interwoven and extending 4″ minimum up walls and under siding
Chimney flashing systems: Base flashing, step flashing, and counter flashing must create complete weather-resistant assemblies with proper sealant and termination bars
Valley treatment: Open valleys require metal flashing (24-28 gauge minimum) with proper underlayment; closed valleys must show correct shingle weaving or cut techniques
Penetration flashings: Plumbing vents, exhaust fans, and other penetrations need code-approved flashing boots or manufactured flashings, not field-fabricated alternatives
Ventilation system evaluation:
Net free vent area calculations: IRC requires 1:150 ventilation ratio (1 sq ft vent per 150 sq ft attic space), or 1:300 if balanced intake/exhaust exists
Balanced ventilation: Intake vents (soffit or eave vents) must equal or exceed exhaust vents (ridge, box, or turbine vents) to create proper airflow
Ventilation path verification: Inspectors check that insulation doesn’t block soffit vents and that rafter bays have clear air channels from eave to ridge
Wind and weather resistance:
Design wind speed compliance: Fastening patterns must meet engineered requirements for local design wind speeds (typically 90-150 mph depending on region and exposure category)
Enhanced attachment zones: High-wind coastal areas require additional fasteners at roof perimeters and increased frequency throughout the field
Sealed roof deck requirements: Some hurricane-prone jurisdictions mandate fully sealed roof decks with taped sheathing seams for enhanced weather resistance
Common violations that fail roofing COP inspections
Even experienced contractors occasionally overlook details that cause roofing COP inspection failures. Understanding frequent violations helps you avoid delays, re-inspection fees, and potential code enforcement actions.
Ventilation deficiencies (most common failure):
Inadequate attic ventilation ranks as the leading cause of failed roofing COP inspections nationwide. Inspectors reject roofs with:
Insufficient total vent area based on attic square footage calculations
Blocked soffit vents covered by insulation or vapor barriers
Missing ridge vents or inadequate exhaust capacity
Unbalanced systems with excessive exhaust but minimal intake creating negative pressure
Flashing installation errors:
Missing step flashing: Using only caulk at sidewall transitions instead of proper metal step flashing interwoven with each shingle course
Inadequate chimney flashing: Reusing old, corroded flashing or failing to install required counter flashing with proper reglets cut into masonry
Valley flashing shortcuts: Insufficient width (minimum 24″ recommended), wrong gauge metal (26-gauge minimum), or missing underlayment beneath valley metal
Improper pipe boot installation: Using plastic boots on high-temperature exhausts, damaged neoprene seals, or boots not properly integrated with shingle courses
Material and fastener violations:
Wrong nail specifications: Using smooth-shank nails instead of required ring-shank fasteners, insufficient length to penetrate deck by 3/4″, or over-driven fasteners breaking shingle seal strips
Inadequate fastener count: Missing the required 4-6 nails per shingle or improper spacing on metal roofing panels
Unapproved materials substitution: Changing from permitted Class A fire-rated shingles to lower-rated alternatives, or using materials not approved for local wind zones
Mixed incompatible materials: Installing dissimilar metals in contact (aluminum flashing on galvanized valleys) causing galvanic corrosion
Deck and structural issues:
Unrepaired soft spots: Leaving deteriorated, spongy sheathing that should have been replaced during tear-off
Improper sheathing spacing: Using incorrect panel thickness for rafter spacing or inadequate edge support at panel joints
Excessive roof layers: Installing over multiple existing layers where codes limit installations to two total layers maximum
Unsupported sheathing edges: Missing H-clips or blocking at panel edges causing potential sagging between rafters
Missing code-required components:
No ice and water barrier: Omitting required self-adhering membrane at eaves and valleys in cold-climate jurisdictions
Missing drip edge: Failing to install required metal drip edge at eaves and rakes, or installing in wrong sequence relative to underlayment
Inadequate crickets: Not building required diverters behind chimneys wider than 30″ that channel water around obstacles
Incomplete tear-off: Leaving portions of old roofing that should have been removed per permit specifications
Deviation from approved plans:
Unpermitted scope changes: Adding skylights, changing vent types, or modifying structural elements without amended permits
Wrong materials: Installing different shingle style, color, or weight than specified in approved permit documents
Structural modifications: Cutting rafters, removing bracing, or altering truss components without engineering approval
![common roofing code violations checklist with re
Addressing these issues before requesting final inspection dramatically improves first-attempt approval rates and accelerates roofing COP issuance.
Preparing for successful roofing COP inspection
Thorough preparation before scheduling your roofing COP inspection ensures smooth approval and avoids costly re-inspection fees averaging $75-200 per additional visit.
Pre-inspection checklist (7-10 days before scheduling):
Conduct contractor walkthrough: Have your roofing contractor walk the completed job with you, explaining how each code requirement was addressed and pointing out critical details inspectors will examine
Verify scope against permits: Compare finished work to approved permit documents ensuring all materials, methods, and structural elements match submitted plans; document any deviations and file permit amendments if necessary
Inspect critical flashing details: Personally verify that step flashing exists at all sidewalls (not just caulk), chimney flashing includes all required layers, valleys have proper metal installation, and pipe boots are secure and sealed
Check ventilation system: Calculate net free vent area (measure all intake and exhaust vents, multiply by manufacturer’s free area percentage) and confirm it meets 1:150 or 1:300 code ratios; verify soffit vents are unobstructed by insulation
Examine fastener patterns: Spot-check fastener placement, count nails in several shingles, verify proper depth (flush, not over-driven), and confirm metal roofing screws penetrate high points with proper washer compression
Review structural repairs: If decking was replaced, verify proper thickness, fastener spacing, and that repairs were photographed before covering with roofing materials
Verify material specifications: Confirm installed products match permit specifications for fire rating, wind resistance, and manufacturer; keep packaging labels or cut samples showing product markings
Clean and organize site: Remove all debris, unused materials, and equipment; rake ground areas for stray nails; ensure safe access to roof and attic for inspector; clear driveways for inspector parking
Prepare documentation package: Organize permit documents, manufacturer specifications, engineering letters (if applicable), material receipts, and warranty registration forms in a folder ready for inspector review
Schedule strategic timing: Request inspections for mid-morning (9-11 AM) when inspectors are typically most available and not rushed by end-of-day pressures
During the inspection (day-of best practices):
Be present or available: Either you or your contractor should be on-site to answer questions, provide access, and receive feedback directly from the inspector
Don’t hover: Allow inspectors to work independently; they’ll ask questions if needed and appreciate professional courtesy
Take notes: Document any concerns or required corrections the inspector mentions, including specific locations and code section references
Request clarification: If inspection fails, politely ask for written deficiency list and clarification on exactly what corrections are needed before re-inspection
Photograph conditions: Take dated photos of all work before inspection as documentation of “as-completed” status in case disputes arise
If corrections are required:
Address deficiencies promptly, typically within 30 days (jurisdictional requirements vary)
Photograph all corrections showing before/after conditions
Request re-inspection only after ALL items are fully corrected; partial corrections extend the process
Expect re-inspection fees of $75-200 for each additional visit beyond the first inspection
Post-approval actions:
Obtain copies of signed-off permit and final inspection report for your permanent home records
Verify building department updated online permit status to “finaled” or “closed”
File roofing COP documentation with homeowner’s insurance for updated coverage
Provide copies to mortgage company if escrow included roof replacement funds
Retain documents for future property sales, refinancing, or warranty claims
Obtaining roofing COP approval follows a structured timeline managed by your local building department. Understanding each phase helps contractors and homeowners coordinate efficiently and avoid delays.
Phase 1: Permit application (before work begins)
Submit building permit applications including:
Completed permit forms with property legal description, owner information, contractor license numbers, and estimated project value
Roof plan drawings showing dimensions, pitch, materials, ventilation layout, and flashing details
Product specifications confirming fire ratings, wind resistance classifications, and manufacturer warranty information
Contractor licenses and insurance certificates (general liability minimum $1M, workers compensation as required)
Permit fees calculated on project valuation (typically $150-500 for residential roof replacements)
Permit review and approval timelines vary: simple replacements may approve within 1-3 business days, while complex projects requiring plan review take 5-15 business days.
Phase 2: Permit issuance and posting
Once approved:
Pick up physical permit card or download electronic permit from jurisdiction’s online portal
Post permit visibly at project site (typically front window or job box) as required by local ordinance
Verify permit number, approved scope, and contractor information are correct before starting work
Note any special inspection requirements listed on permit (some jurisdictions require rough inspections before final covering)
Phase 3: Construction and rough inspection (if applicable)
Some jurisdictions mandate intermediate “rough” or “dry-in” inspections before final roofing installation:
Inspector examines roof deck, underlayment, ice barrier, drip edge, and flashing installations before shingles or metal panels cover these elements
This inspection catches substrate issues early before they’re hidden and expensive to correct
Schedule rough inspections within 24-48 hours of completing the rough stage; don’t proceed with final covering until approved
Phase 4: Final roofing installation
Complete all work exactly per approved plans and manufacturer specifications:
Install roofing materials with proper fastener type, quantity, and placement
Complete all flashing details at penetrations, valleys, sidewalls, and chimneys
Install ridge vents, caps, and trim pieces
Clean site thoroughly removing all debris, cutoffs, and stray fasteners
Phase 5: Final inspection request
When work is 100% complete:
Contact building department via phone, online portal, or mobile app to schedule final inspection
Provide permit number, property address, and preferred inspection date
Most jurisdictions schedule within 1-3 business days of request
Confirm inspection appointment time and ensure site access is available
Phase 6: Final roofing COP inspection
Inspector visits property and evaluates all elements discussed in previous sections:
Typical inspection duration: 30-60 minutes for average residential roof
Inspector may access roof surface, attic space, and exterior perimeter
Pass: Inspector signs permit card, updates online system to “final” status, and provides approval documentation
Fail: Inspector provides written deficiency list citing specific code violations requiring correction before re-inspection
Phase 7: Certificate of Occupancy issuance
Upon passing final inspection:
Building department updates permit status to “finaled,” “closed,” or “approved”
Some jurisdictions issue physical Certificate of Occupancy documents; others simply note approval in electronic records
COP status becomes part of permanent property records accessible to future buyers, appraisers, and insurers
Typical processing time: immediate for electronic systems, 3-5 business days for physical certificate generation
Phase 8: Record retention and documentation
Homeowners should:
Obtain copies of signed-off permit, final inspection report, and any COP documents
Photograph complete roof installation from multiple angles for future reference
File documents with homeowner’s insurance, mortgage company (if applicable), and personal property records
Retain manufacturer warranties, product specifications, and contractor completion certificates
Keep all documentation for life of roof or until property sale (minimum 7-10 years recommended)
![roofing certificate of occupancy final
Timeline summary for typical residential roof:
Permit application to approval: 1-10 business days
Construction duration: 1-5 days depending on size and complexity
Final inspection scheduling: 1-3 business days
Re-inspection (if needed): 3-10 business days for corrections plus re-inspection scheduling
Total timeline from application to roofing COP: 2-4 weeks for straightforward projects
[Embed YouTube video: How to Pass Your Roofing Final Inspection] (video placeholder)
Legal and financial consequences of skipping roofing COP
Bypassing the permitting and roofing COP process creates substantial legal, financial, and insurance risks that far outweigh the time and cost savings contractors or homeowners perceive.
Code enforcement and legal consequences:
Municipal fines: Code violations for unpermitted work range from $100-1,000 per day in many jurisdictions, accumulating until corrected
Stop-work orders: Building departments can halt all construction and require exposure of completed work for inspection before proceeding
Mandatory removal orders: Severely non-compliant installations may require complete tear-off and replacement at owner’s expense
Property liens: Unresolved code violations create liens against property preventing sale or refinancing until satisfied
Criminal penalties: Repeat violations or willful circumvention of permitting requirements can result in misdemeanor charges against contractors or property owners
Insurance coverage jeopardy:
Insurance companies increasingly use aerial imagery and public records databases to identify unpermitted improvements, leading to:
Claim denials: Carriers routinely deny roof-related claims when significant work was completed without permits and inspections
Policy cancellations: Discovery of major unpermitted improvements violates policy terms, allowing carriers to cancel coverage
Coverage gaps: New roof installations that increase property value without notification create under-insurance situations
Premium increases: Documenting unpermitted work during claim investigations often results in 15-30% premium surcharges or non-renewal
Real estate transaction complications:
Unpermitted roof work creates significant obstacles during property sales:
Title insurance issues: Title companies flag permit violations preventing clear title transfer until resolved
Buyer walk-aways: Home inspections revealing unpermitted work cause buyers to withdraw offers or demand major price reductions
Lender requirements: Mortgage underwriters require proof of code compliance; unpermitted work prevents loan approval
Appraisal deductions: Appraisers discount property values $3,000-10,000+ for unpermitted major improvements requiring retroactive approval
Seller disclosure liability: Failing to disclose known permit violations exposes sellers to fraud claims and potential lawsuits from buyers
Financial and liability risks:
Lost investment: Roofs requiring complete replacement due to code violations waste the entire original installation cost
Contractor lawsuits: Homeowners can sue contractors who performed unpermitted work, seeking refunds plus corrective action costs
Personal injury liability: If unpermitted, non-compliant roofs fail causing injury, property owners face increased negligence liability
Warranty voidance: Manufacturers void warranties on installations lacking proof of code-compliant installation and proper inspections
Refinancing barriers: Equity lines and cash-out refinancing require proof that improvements were properly permitted
Contractor consequences:
Professional roofing contractors face severe penalties for permitting violations:
License suspension or revocation: State contractor licensing boards suspend or permanently revoke licenses for repeated unpermitted work
Professional liability: Contractors face lawsuits, bond claims, and Better Business Bureau complaints from homeowners discovering permit issues
Insurance problems: Contractor liability insurance may exclude claims arising from knowingly unpermitted work
Reputation damage: Online reviews and word-of-mouth warnings about permit-skipping contractors devastate local business reputations
Unpermitted work discovered at sale: $15,000 original + $5,000 buyer price reduction + $500 retroactive permit/inspection + $2,000 corrections + 6-8 week delay = $22,500+ total cost plus deal risk
The math clearly favors proper permitting and roofing COP from the start.
Working with contractors on roofing COP requirements
Homeowners must verify contractors handle permitting and inspections properly to protect their legal and financial interests. Clear contract terms and accountability measures prevent common disputes.
Red flags indicating permit problems:
Contractor suggests “saving money” by not pulling permits or claims inspections are unnecessary
Unable or unwilling to provide contractor license number for permit application verification
Rushes work schedule claiming permits “take too long” or encourages starting before permit approval
Can’t explain specific code requirements or dismisses inspection preparation as unimportant
Offers suspiciously low bids that don’t include permit costs or inspection scheduling
Essential contract clauses for roofing COP protection:
Include these specific provisions in written roofing contracts:
Permit responsibility: “Contractor shall obtain all required building permits and pay all associated fees before commencing work. Permit numbers shall be provided to Owner within 3 business days of issuance.”
Inspection scheduling: “Contractor is solely responsible for scheduling and passing all required inspections including rough (if applicable) and final inspections. Owner shall receive 24-hour notice of all scheduled inspections.”
Code compliance guarantee: “All work shall be performed in strict compliance with [jurisdiction name] building codes, manufacturer specifications, and approved permit plans. Contractor warrants work will pass all required inspections on first attempt.”
COP contingent payment: “Final payment of [10-20]% of contract price is contingent upon Contractor providing Owner with proof that building department has issued final approval or Certificate of Occupancy for the roof work.”
Correction costs: “If inspection failures occur due to Contractor’s workmanship or material deficiencies, Contractor shall bear all costs of corrections, re-inspection fees, and any resulting permit extension fees.”
Timeline provisions: “Contractor shall request final inspection within 5 business days of work completion. If COP is not obtained within 45 days of substantial completion due to Contractor delays, Owner may withhold retained payment until approval is secured.”
Documentation delivery: “Upon project completion, Contractor shall provide Owner with copies of: signed-off permit, final inspection report, manufacturer warranties, and Certificate of Occupancy or equivalent final approval documentation.”
Verification steps before signing contracts:
Confirm contractor holds active license by checking state contractor licensing board online database
Verify general liability insurance (minimum $1M) and workers compensation coverage through certificate requests
Check Better Business Bureau ratings and online reviews for permit-related complaints
Request references from recent projects and ask specifically about permitting and inspection experiences
Visit your building department and ask if contractor has history of code violations or failed inspections
Best practices during construction:
Request copy of building permit within one week of project start; verify it online through municipal permit portal
Ask for inspection schedule and offer to be present during inspector visits
Document work progress with photos showing underlayment, flashing details, and final installation before each stage is covered
Maintain payment schedule that retains 10-20% until final roofing COP is secured and documented
Request written updates if inspection failures occur, including specific deficiency descriptions and correction timelines
DIY project considerations:
Homeowners performing their own roof work (rare but legal in many jurisdictions) assume all contractor responsibilities:
Owner must apply for permit as “owner-builder” with affidavit acknowledging code compliance responsibilities
Owner schedules and coordinates all required inspections directly with building department
Owner personally liable for all code violations, corrections, and passing final inspection
Owner cannot hire unlicensed helpers for significant portions of work in most jurisdictions
Mistakes or code violations become owner’s financial burden with no contractor recourse
Regional and jurisdictional variations in roofing COP requirements
Roofing COP requirements, processes, and enforcement intensity vary dramatically across jurisdictions based on local building codes, climate factors, and administrative resources.
Climate-driven code variations:
Hurricane and coastal zones: Florida, Gulf Coast, and Atlantic coastal regions require enhanced wind-resistance fastening patterns, sealed roof decks, and strict compliance with HVHZ (High Velocity Hurricane Zone) standards exceeding base code
Cold and snow regions: Northern states mandate ice barriers extending 24-36 inches beyond interior walls, enhanced insulation R-values, and ventilation systems preventing ice dams
Wildfire interface areas: California, Colorado, and Western states require Class A fire-rated materials, ember-resistant venting, and defensible space around structures
Seismic zones: West Coast jurisdictions may require engineering certification that roof systems won’t fail during earthquake events, especially for heavy tile installations
Jurisdictional permit threshold differences:
Major cities: Typically require permits for any roof work exceeding 100 square feet or involving structural modifications
Suburban municipalities: Often mandate permits for complete replacements regardless of size but may exempt minor repairs under 200 square feet
Rural counties: Some rural jurisdictions have minimal permitting requirements or don’t require permits for single-family residential roof replacements
HOA communities: Homeowner associations may impose additional approval requirements beyond municipal permits, including color/style restrictions and architectural review
Process efficiency variations:
Electronic permitting: Progressive jurisdictions offer complete online permit application, plan submission, fee payment, and inspection scheduling through integrated portals
Traditional systems: Many smaller municipalities still require in-person permit applications, paper plan submissions, and phone-based inspection scheduling
Third-party inspection services: Some jurisdictions contract private inspection companies to handle routine residential inspections, speeding processes but adding coordination complexity
Finding your local requirements:
Municipal building department websites: Most cities and counties publish permitting requirements, fee schedules, and inspection processes on official government websites
Direct contact: Call building departments to ask specific questions about your project scope, permit requirements, and roofing COP procedures
Licensed contractor knowledge: Reputable local contractors know jurisdictional requirements through daily experience and can guide compliance
Building code references: Review adopted code version (IBC 2021, IRC 2021, or earlier versions) and local amendments published on municipality websites
Interstate variation examples:
Texas: Many counties don’t require permits for residential roof replacements; Houston requires permits, Dallas depends on specific municipality
Florida: Strict permitting statewide with engineering requirements for wind calculations and mandatory inspections including third-party private provider options
California: Comprehensive permitting required with energy compliance (Title 24) documentation and steep permit fees reflecting higher administrative costs
New York: Varies widely by county; NYC has intensive permitting, rural upstate counties have minimal requirements
Always research specific requirements for your exact property location before starting roof work to ensure proper roofing COP compliance.
Frequently Asked Questions about roofing COP
What is a roofing COP and why do I need one? A roofing COP (Certificate of Occupancy) is the official approval from your building department confirming your roof work passed final inspection and complies with building codes. You need it to ensure legal occupancy, maintain insurance coverage, activate manufacturer warranties, and avoid problems when selling your property. Without roofing COP approval, you risk code violations, insurance claim denials, and difficulty refinancing or selling your home.
How long does it take to get a Certificate of Occupancy for roofing? Typical timelines range from 2-4 weeks total: permit application approval takes 1-10 business days, construction requires 1-5 days depending on roof size, final inspection scheduling takes 1-3 business days, and COP issuance occurs immediately to 5 days after passing inspection. Delays occur if inspections fail, requiring corrections and re-inspection adding 1-2 additional weeks.
Can I sell my house without a roofing COP? Technically you can list and market your property, but unpermitted roof work creates serious obstacles: title companies flag permit violations preventing clear title transfer, buyers withdraw offers after home inspections reveal compliance issues, and lenders refuse financing until permits are resolved. Most sales require retroactive permitting, inspections, and corrections costing $2,000-10,000+ beyond original installation expenses, often killing deals or reducing sale prices significantly.
What happens if my roof fails the final inspection? The inspector provides a written deficiency list citing specific code violations requiring correction. You must address all items (typically within 30 days), then request re-inspection which usually incurs additional fees of $75-200. The permit remains open until all corrections are made and approved. Multiple failures can trigger additional plan reviews, engineering requirements, or in severe cases, removal and replacement orders for non-compliant work.
Do I need a COP for roof repairs or only replacements? Requirements vary by jurisdiction and repair scope. Most building departments require permits and roofing COP for complete replacements, major repairs exceeding certain square footage (commonly 100-200 sq ft), or any structural modifications. Minor repairs, maintenance work like replacing a few shingles, and emergency tarping typically don’t require COP. Always verify with your local building department before starting work to avoid compliance problems.
How much does a roofing COP cost? Permit fees typically range $150-500 for residential roof replacements based on project valuation (usually 0.5-1.5% of total cost). Additional costs include inspection fees often bundled with permits or charged separately at $50-150, plan review fees of $100-300 for complex projects requiring engineered drawings, and re-inspection fees of $75-200 if initial inspections fail. Total permitting costs represent small insurance against legal, financial, and safety risks of unpermitted work.
Securing your roofing COP with confidence
Roofing COP approval represents the critical final step validating that your roof replacement or installation meets building codes, protects your property investment, and satisfies legal occupancy requirements. The process—though sometimes perceived as bureaucratic inconvenience—provides essential protections for homeowners through independent verification of contractor work quality, code compliance, and structural safety.
Understanding roofing COP requirements, inspection criteria, common failure points, and proper preparation strategies empowers homeowners to work confidently with contractors and navigate municipal approval processes successfully. The modest time investment and permit costs deliver substantial value through insurance coverage protection, warranty activation, enhanced property values, and elimination of legal liabilities associated with unpermitted work.
Whether you’re planning a residential roof replacement, managing commercial roofing projects, or working as a contractor serving multiple clients, prioritizing proper permitting and roofing COP certification demonstrates professional standards and protects all parties involved. Take time to research your jurisdiction’s specific requirements, choose licensed contractors who embrace code compliance, and retain all approval documentation for future property transactions.
🏠 Roofing Tips & Updates
Get free roofing advice, cost guides, and seasonal maintenance tips.
What is the difference between roofing coping and a Certificate of Occupancy?
Roofing coping is a physical material — a cap installed along the top edge of a parapet wall on a flat or low-slope roof, designed to prevent water infiltration. A Certificate of Occupancy (COP) is a legal document issued by a building authority confirming a roofing project passed final inspection and meets all applicable building codes. The two terms are completely unrelated; the similar abbreviation is coincidental.
Can I sell my house without a roofing COP?
Technically yes, but it creates significant legal and financial risk. Buyers’ inspectors commonly discover unpermitted roofing work, lenders may refuse to finance the purchase, and many states require sellers to disclose all known unpermitted work. Buyers can demand code compliance before closing — at the seller’s expense. In worst-case scenarios, local authorities can issue stop-work orders or require removal and replacement of non-compliant materials even after the sale completes.
How do I get a roofing COP if my contractor disappeared or went out of business?
This situation is more common than most homeowners expect. Your options are: (1) Hire a new licensed contractor to assume responsibility for the project and apply for a permit as the responsible party — many will do this for a flat fee. (2) Apply as an owner-builder in states that allow it, taking legal responsibility for code compliance yourself. (3) Contact your local building department directly — some municipalities have expedited processes for abandoned-contractor situations. Document all communication with the original contractor in writing for any future disputes or insurance claims.
Does a roofing COP expire?
The Certificate of Occupancy itself does not expire — once issued, it permanently records that the work was inspected and approved. However, the building permit that leads to the COP does expire, typically within 6–18 months if work hasn’t been completed and inspected. If your permit expires before final inspection, you must re-apply and pay new fees. Check your permit’s expiration date as soon as work begins and keep the project on schedule.
What is the difference between a roofing permit and a roofing COP?
A roofing permit is the authorization to begin work — issued before construction starts, it documents what is planned and approved. A Certificate of Occupancy (COP) is issued after work is complete and inspected — it confirms the finished work matches the permit and meets all code requirements. Think of the permit as permission to proceed and the COP as official proof the work was done correctly. You cannot obtain the COP without the permit first.
Roofing content specialist with 5+ years researching U.S. residential and commercial roofing. Has documented 200+ projects covering installation costs, material selection, contractor vetting, and DIY guides for homeowners across all climate zones.
Metal Roof Rake Trim: Complete Installation Guide (2026)
Metal roof rake trim finishes and seals the gable edges of metal roofing, protecting against wind-driven rain infiltration and creating clean, professional-looking rooflines. Also called gable trim, this essential component covers the sloped edges where roof panels meet gable ends, preventing water entry behind panels and resisting wind uplift at these vulnerable roof edges.
Proper installation of metal roof rake trim requires precise cutting at eaves and ridges, correct overlapping techniques, strategic sealant placement, and appropriate fastener spacing. When installed correctly, rake trim transforms raw panel edges into weathertight, finished rooflines that protect structures for decades while enhancing curb appeal.
Table of Contents
Understanding metal roof rake trim and its purpose
Before installing metal roof rake trim, understanding its function helps ensure proper installation. Rake trim covers the exposed ends of metal roofing panels along gable edges—the sloped sides of the roof that run from eave to ridge.
Primary functions:
Weather protection: Creates a watertight seal preventing wind-driven rain from penetrating behind panels and into wall cavities or fascia boards
Wind resistance: Secures panel edges against uplift forces that can peel roofing back during storms
Edge protection: Covers sharp cut panel edges, protecting installers and future maintenance workers from injury
Aesthetic finish: Provides straight, clean visual lines even when panel edges are slightly irregular
Water management: The kickout or drip edge at the bottom directs water away from walls and fascia
Rake trim vs. gable trim:
These terms are completely interchangeable—both refer to the same component. “Rake” describes the sloped edge itself, while “gable” refers to the triangular wall section at the roof end. The trim serves both, hence both names are correct and widely used in the industry.
Metal roof rake trim configurations vary depending on the roofing panel type and whether you’re using exposed or concealed fastener systems.
One-piece exposed fastener rake trim:
The most common system for corrugated, R-panel, PBR panel, and similar profiles uses a single formed metal piece that:
Hooks over the high edge of the roof panels
Extends down the gable fascia board (typically 1-3 inches)
Includes a hemmed edge for rigidity and safety
Fastens through the face into panels and gable framing with exposed screws
This simple design works well for residential, agricultural, and light commercial applications where exposed fasteners are acceptable.
Multi-piece concealed fastener rake trim:
Standing seam and other concealed fastener systems typically use three-piece assemblies for metal roof rake trim installation:
Continuous cleat: Slides into a hem on the trim piece and fastens to roof deck every 12-24 inches, providing the structural anchor
Z-trim: Fastens to roof panels and provides a base for the visible trim to attach to without penetrating the roof surface
Rake trim cap: Clips onto the cleat and rivets to the z-trim, providing the finished appearance with hidden fasteners
This system maintains the clean, fastener-free appearance characteristic of standing seam roofing while allowing panels to expand and contract independently of the trim.
metal roof rake trim components and installation
Having proper equipment makes installing metal roof rake trim safer and more accurate.
Cutting and measuring tools:
Metal cutting tin snips (straight cut and left/right offset)
Sliding T-bevel for transferring roof pitch angles
Speed square and combination square
Carpenter’s pencil or marker
Tape measure (25 ft minimum)
Protractor for angle verification
Forming and fitting tools:
Hand seamer for bending tabs and edges
Screwdriver or putty knife for prying open hems
Pop rivet tool with 1/8″ rivets (for concealed systems)
Drill with appropriate bits for pre-drilling fastener holes
Fastening equipment:
Cordless drill/driver with adjustable clutch
1/4″ x 7/8″ metal-to-metal lap screws with sealant washers
Pancake head screws for concealed cleat systems
Socket or hex bit matching fastener heads
Sealing materials:
Butyl sealant tape (double-sided, conformable)
Silicone or polyurethane caulk rated for metal roofing
Caulking gun
Clean rags for wiping excess sealant
Safety equipment:
Cut-resistant roofing gloves
Safety glasses
Fall protection harness and anchor points
Non-slip footwear
Materials checklist:
Metal roof rake trim pieces (pre-cut to length when possible)
The most complex part of installing metal roof rake trim is properly cutting and forming the pieces where they meet eaves and ridges.
Eave end preparation for exposed fastener systems:
Position and trace: Place the rake trim in its installed position along the gable edge. Use a carpenter’s pencil to trace the outline of the eave trim/drip edge onto the rake trim
Mark cutting lines: From the edge of the rake trim, make the following marks on top of the trim:
3-inch mark from the edge
1-inch mark from the edge
Transfer roof pitch: Using your T-bevel (which you previously locked to match the roof pitch), draw a line from the 3-inch mark down to the drip edge section
Mark parallel lines: Draw a parallel line at the 1-inch mark. Make a 90-degree mark at the drip edge section connecting to the edge
Cut the outline: Using tin snips, cut along the outer outline first. Then cut the 45-degree line at the drip edge section only
Flip and mark: Flip the trim over. From the end of your cut, trace a straight line across. Draw a second parallel line 1.25 inches from the first mark
Cut both sides: Cut along the second line on both sides of the trim. Cut along the inner mark all the way to the top of the trim piece, stopping about 0.5 inches from the very top
Notch corners: Make horizontal cuts on both sides to create tabs. Notch cut the inner corner of each tab
Form the tab: Using a hand seamer, bend the top side tab downward to match the pitch angle of your roof
Eave preparation for standing seam systems:
For concealed fastener metal roof rake trim, the process is similar but focuses on ensuring the continuous cleat fits properly and the trim aligns with the receiver trim at the eave.
Cutting and finishing rake trim at the ridge
Where metal roof rake trim meets the ridge requires different cutting and forming techniques.
Ridge end preparation:
Initial marking: Place trim in position at the ridge. Make a 1-inch mark from the edge on top of the gable trim
Pitch line: Using your T-bevel locked to the roof pitch, draw a line from the 1-inch mark inward toward the drip edge
Parallel marking: Mark a parallel line at the 1-inch position. Make a 90-degree mark at the drip edge connecting across to the trim edge
Cut the outline: Use tin snips to carefully cut along your marked outline, removing the excess material
Hem adjustment: Slightly pry open any hems that will overlap with the ridge cap or adjacent trim to allow smooth fit
Important notes for ridge cuts:
Leave approximately 1 inch clearance from the actual ridge line so ridge cap can install properly over the rake trim
Ensure cuts are clean and deburred to prevent injury and rust formation
Test fit the piece before final installation to verify clearances
For standing seam systems, the rake trim at the ridge cuts at an angle matching the roof pitch and typically ends just shy of where the ridge cap will install.
Overlapping metal roof rake trim sections
When metal roof rake trim requires multiple pieces along a single gable edge, proper overlapping prevents water infiltration at seams.
Overlap specifications:
Standard overlap for metal roof rake trim is 3 inches minimum, with 6 inches recommended for better weather protection, especially on lower-pitch roofs. The upper piece always overlaps the lower piece so water flows over, not into, the joint.
Notching process for clean overlaps:
Mark overlap distance: On both pieces of trim, mark 3 to 6 inches from the edge at the drip edge section
Pry open hems: Use a screwdriver or putty knife to carefully pry open both hems at the marked overlap distance
Remove hems and drip edge: Using tin snips, remove both hems and the drip edge section up to your overlap mark
Prep adjacent piece: Slightly pry open the hems of the trim piece that will receive the notched section, allowing the cut piece to slide in smoothly
Apply sealant: Place 1 inch of silicone or butyl sealant on the notched side of the trim, positioning it so the sealed edge will underlap the second trim piece
Slide together: Insert the notched trim into the adjacent piece, ensuring the sealant creates a continuous barrier
Clean excess: Wipe away any sealant that squeezes out for a clean finished appearance
Fastening overlaps:
After overlapping sections are positioned, fasten through both layers at the overlap zone to prevent separation or wind flutter.
![metal roof rake trim overlap detail with sealant placement
Fastening metal roof rake trim properly
Correct fastener placement and spacing is critical when installing metal roof rake trim to ensure wind resistance and prevent leaks.
Pre-installation sealing:
Before fastening, place butyl sealant tape parallel to the gable edge on the high seams (ribs) of the roofing panels. This creates a weathertight seal between the panel and the trim’s inner surface.
Exposed fastener system:
For corrugated, R-panel, PBR, and similar profiles, metal roof rake trim fastens with exposed screws:
Primary fastener line: Install 1/4″ x 7/8″ metal-to-metal lap screws with sealant washers along the high seam of the panel, spacing them 12 inches on center
Secondary fastener line: Place additional screws 12 inches on center along the face of the trim, staggered from the top row
Ridge restriction: Do not place fasteners within 12 inches of the ridge until after ridge cap is installed, as these screws might interfere with ridge cap placement
Eave and overlap zones: Add extra fasteners near eaves and at trim overlaps for additional security in these critical areas
Concealed fastener system:
Standing seam metal roof rake trim uses a different approach to maintain the hidden fastener aesthetic:
Install continuous cleat: Fasten the cleat to the roof deck every 12-24 inches using pancake head screws
Install z-trim: Fasten z-trim to roof panels (painted side facing out) at marked locations
Apply tape seal: Place tape sealant on top of the z-trim to create weatherproofing between the z-trim and rake trim cap
Clip rake trim: Snap the rake trim cap onto the continuous cleat, ensuring tight fit at corners and following the plumb line at the ridge
Rivet to z-trim: Use 1/8″ pop rivets (color-matched to trim) every 12 inches through the rake trim into the outer leg of the z-trim. Pre-drill holes carefully to avoid puncturing the roof panel beneath the z-trim
Fastening best practices:
Pre-drill holes in heavier gauge trim to prevent distortion and ensure accurate placement
Use magnetic bit holders to prevent dropped fasteners
Drive screws perpendicular to the surface, not at angles
Tighten screws just until the washer compresses slightly—over-tightening dimples trim and crushes washers
Strategic sealant application during metal roof rake trim installation prevents the most common leak sources.
Where to apply sealant:
Under trim before installation: Butyl sealant tape along panel ribs where trim will contact panels
At overlaps: Continuous bead of silicone between overlapping trim sections before sliding together
Corner transitions: Where rake trim meets eave trim or ridge cap, seal the junction with caulk
Around penetrations: If vents or other penetrations occur near rake edges, seal the trim-to-penetration interface
On z-trim (concealed systems): Tape seal on top of z-trim before installing rake cap
Sealant selection:
Use butyl tape for compression sealing between metal surfaces, and polyurethane or silicone caulk rated for metal roofing for exposed joints and corner details. Avoid generic household caulks that deteriorate under UV exposure.
Application technique:
Apply sealant in continuous beads without gaps. For tape sealant, press firmly to ensure full adhesion. Remove any excess that squeezes out with a clean rag immediately for neat appearance.
Common mistakes when installing metal roof rake trim
Understanding frequent errors helps you avoid callbacks and premature trim failure.
Inadequate overlap:
Using less than the recommended 3-6 inch overlap at trim joints allows wind-driven rain to penetrate seams. Always maintain proper overlap distances and seal joints thoroughly.
Improper eave and ridge cuts:
Failing to precisely mark and cut the angled sections at eaves and ridges creates gaps where water enters. Take time to measure accurately and use your T-bevel to transfer the exact roof pitch.
Skipping sealant:
Omitting butyl tape under trim or silicone at overlaps is the leading cause of rake trim leaks. Sealant is not optional—it’s essential for weathertight installation.
Wrong fastener spacing:
Placing screws too far apart (more than 12-18 inches) allows trim to lift in high winds, while excessive fasteners create unnecessary penetration points. Follow manufacturer specifications for your specific panel type.
Crushing trim with over-tightened fasteners:
Excessive torque dimples trim faces and restricts thermal expansion, causing fastener pull-through and oil-canning (wavy appearance) over time. Adjust your drill clutch to stop when washers just compress.
Installing trim before panels are complete:
Attempting to install metal roof rake trim before all roof panels are in place and fastened makes alignment difficult and often requires trim removal for panel adjustments. Always complete panel installation first, then add trim.
Ignoring manufacturer instructions:
Different panel profiles and trim styles have specific installation requirements. Generic techniques may not work for your exact system. Always consult installation guides for your specific products.
properly installed metal roof rake trim showing fastener placement
Understanding the investment helps budget metal roof rake trim installation.
Proper care extends metal roof rake trim life to match the roofing panels—typically 40-50+ years.
Annual inspection tasks:
Check fasteners for backing out or damaged washers; tighten or replace as needed
Inspect sealant at overlaps and corners for cracking or separation; re-seal if necessary
Look for dents or damage from falling branches or hail
Verify trim hasn’t pulled away from panels due to thermal movement or wind stress
Clean debris from behind trim where leaves or needles accumulate
Touch-up and repairs:
Address scratches in painted trim with manufacturer-matched touch-up paint to prevent rust. For bent or damaged sections, replacement is usually more cost-effective than attempting repairs.
Expected lifespan:
Quality metal roof rake trim properly installed with appropriate sealant and fasteners typically lasts 40-70 years, matching or exceeding the roof panel lifespan.
Frequently Asked Questions
What’s the difference between rake trim and gable trim? Nothing—they’re two names for the exact same component. “Rake” describes the sloped roof edge, while “gable” refers to the triangular wall section. Both terms are correct and interchangeable in the industry.
How much should metal roof rake trim overlap? Minimum 3 inches, with 6 inches recommended for better weather protection. The upper piece always overlaps the lower piece so water sheds properly over the joint.
Do I need to seal under rake trim? Yes, absolutely. Butyl sealant tape should be placed on panel ribs before installing trim, and silicone sealant at all overlaps. Sealant is essential for preventing leaks.
Can I install rake trim before the roof panels? No. Panels must be installed and fastened first, then trim goes over the panel edges. Installing trim first makes panel installation difficult and usually requires trim removal for adjustments.
What fasteners should I use for metal roof rake trim? For exposed fastener systems, use 1/4″ x 7/8″ metal-to-metal lap screws with sealant washers, spaced 12 inches on center. Concealed systems use pop rivets to attach trim to z-trim.
Installing metal roof rake trim correctly transforms raw panel edges into professional, weathertight rooflines that protect buildings for decades. The process demands precise cutting at eaves and ridges, proper overlapping with adequate sealant, and correct fastener spacing to resist wind uplift while allowing thermal movement.
Whether you’re using simple one-piece trim for exposed fastener panels or multi-component systems for standing seam roofs, following manufacturer specifications and industry best practices ensures your rake trim performs as intended. Take time for accurate measurements, don’t skip sealant steps, and verify your work as you progress—the investment in careful installation pays dividends through leak-free performance and enhanced curb appeal.
🏠 Roofing Tips & Updates
Get free roofing advice, cost guides, and seasonal maintenance tips.
Roofing content specialist with 5+ years researching U.S. residential and commercial roofing. Has documented 200+ projects covering installation costs, material selection, contractor vetting, and DIY guides for homeowners across all climate zones.
Installing Corrugated Metal Roofing: Step-by-Step Guide
Installing corrugated metal roofing transforms residential, agricultural, and commercial buildings with durable, weather-resistant coverage that lasts 40+ years. Corrugated panels—characterized by their distinctive wavy profile—offer lightweight construction, excellent water shedding, and fire resistance that makes them ideal for homes, barns, sheds, and warehouses.
The key to successful installation lies in proper substrate preparation, precise fastener placement, correct panel overlap, and attention to thermal expansion. When done correctly, installing corrugated metal roofing creates a watertight system that withstands decades of extreme weather while maintaining its appearance and structural integrity.
Table of Contents
Choosing the right corrugated metal panels and materials
Before installing corrugated metal roofing, selecting appropriate materials ensures optimal performance for your specific application and climate.
the right corrugated metal panels and materials
Panel material options:
Galvanized steel: Most economical, zinc coating protects against rust, 20-30 year lifespan with proper maintenance
Galvalume (aluminum-zinc alloy): Superior corrosion resistance, 40-50 year lifespan, excellent for coastal or humid climates
Aluminum: Lightweight, rust-proof, ideal for coastal areas, higher initial cost
Painted/coated finishes: Kynar 500 or SMP coatings add color and UV protection, extend panel life 10-15 years
Corrugated profiles available:
Standard corrugated features 2.5″ or 7/8″ spacing between waves, while deeper 3″ profiles provide greater strength for wider purlin spacing. R-panel and 5V crimp offer alternative aesthetic options with similar installation principles.
Gauge thickness considerations:
29-gauge (thinner) works for residential applications with 24″ purlin spacing, while 26-gauge or heavier suits commercial buildings, areas with heavy snow loads, or wider purlin spacing up to 30″ on center.
Calculate panel quantities by measuring roof area in square feet, dividing by individual panel coverage (accounting for overlap), and adding 10-15% for waste, cuts, and mistakes.
Essential tools for installing corrugated metal roofing
Having the right equipment makes installing corrugated metal roofing safer, faster, and more accurate.
Safety equipment (non-negotiable):
Fall arrest harness with anchor points rated for your weight
Non-slip rubber-soled boots designed for metal surfaces
Cut-resistant work gloves
Safety glasses or goggles with side shields
Hearing protection when cutting panels
Cutting and preparation tools:
Circular saw with metal-cutting blade (avoid abrasive discs that damage coatings)
Aviation tin snips for detailed cuts and trimming
Angle grinder with cut-off wheel for thick gauge or long cuts
Deburring tool or file to smooth sharp edges
Fastening and layout tools:
Cordless drill/driver with adjustable clutch (critical for proper torque)
Magnetic bit holders with hex driver bits
Socket adapter for self-tapping screws
25-foot tape measure and chalk line
Framing square and 4-foot level
String line for maintaining straight panel alignment
Materials checklist:
Corrugated metal panels (pre-cut to length when possible)
Self-tapping metal roofing screws with EPDM or neoprene washers (#12 or #14 size)
Synthetic roofing underlayment rated for metal roofs
Ridge cap trim matching panel profile
Foam closure strips (profile-specific)
Eave trim, gable/rake trim, and valley flashing
Butyl sealant tape and polyurethane caulk
image roof deck for metal panel installation
Proper substrate preparation is critical when installing corrugated metal roofing to ensure long-term performance and prevent moisture problems.
Deck inspection and repair:
Examine existing roof decking (plywood, OSB, or board sheathing) for rot, soft spots, or structural damage. Replace any compromised sections before proceeding—metal roofing is only as good as the structure beneath it.
For pole barn or agricultural buildings using open purlin systems, verify purlins are straight, properly spaced (typically 24″ on center), and securely fastened to rafters or trusses.
Underlayment installation:
Install synthetic roofing underlayment horizontally from eave to ridge, overlapping each course by 6 inches. This barrier provides secondary moisture protection and creates a thermal break that reduces condensation on the metal underside.
Use underlayment specifically rated for metal roofing applications—standard felt paper can deteriorate from heat buildup under metal surfaces. Staple or nail underlayment every 12-18 inches to prevent movement during panel installation.
Eave trim and drip edge:
Install metal eave trim (drip edge) along the bottom edge of the roof before panels go on. This trim directs water into gutters, protects fascia boards, and provides a clean finished edge.
Secure eave trim every 12 inches with roofing nails or screws into the fascia board or roof deck edge, ensuring it extends 1-2 inches beyond the fascia to keep water away from wood components.
Marking purlin or rafter locations:
Snap chalk lines or mark the underlayment showing purlin/rafter locations so you know exactly where to place fasteners once panels are installed. Missing structural members with fasteners is a common mistake that causes loose panels and leaks.
Planning panel layout to minimize cuts and waste
Strategic planning before installing corrugated metal roofing saves time, reduces material waste, and creates better-looking results.
Starting point selection:
Begin installation on the rake (gable end) opposite the prevailing wind direction. This ensures wind-driven rain doesn’t infiltrate overlapping seams. For most locations, start on the side where storms typically approach from.
Panel orientation:
Corrugations always run vertically from eave to ridge—never horizontally. This orientation sheds water efficiently and provides proper structural strength.
Overhang calculations:
Plan for 1-2 inches of overhang at eaves and rakes. Eave overhang directs water into gutters, while rake overhang protects gable trim and prevents water from running down exterior walls.
Squaring the roof:
Use the 3-4-5 triangle method to ensure your first panel goes on square: measure 3 feet along the eave, 4 feet up the rake, and verify the diagonal distance is 5 feet. Adjust until measurements are exact—if the first panel is crooked, every subsequent panel compounds the error.
Measuring and cutting panels:
When cutting is necessary for valleys, hips, or panel length adjustments, measure twice and cut once. Support panels fully during cuts to prevent bending and use appropriate blade speeds to avoid melting protective coatings.
Always deburr cut edges with a file or deburring tool to prevent injuries and remove metal shavings that can rust and stain panels.
The first panel is the most critical step when installing corrugated metal roofing because it establishes alignment for the entire roof.
installing corrugated metal roofing panels on residential home
Initial panel positioning:
Place the first panel at the starting rake with proper eave and side overhangs (typically 1-2 inches each). Use a framing square to verify the panel is square to both the eave and rake before driving any fasteners.
Foam closure installation:
Before fastening, install foam closure strips along the eave edge, positioned 1 inch from the eave trim edge. These profile-specific closures prevent birds, insects, and wind-driven rain from entering under the corrugations while allowing necessary ventilation.
Secure foam closures with double-sided butyl tape or the adhesive backing, then press firmly to ensure complete contact with the panel profile.
Fastener placement fundamentals:
This is where many DIYers make critical errors. For corrugated metal roofing, fasteners go through the high points (peaks) of the corrugations, not the valleys. This placement keeps screws above standing water and debris, reducing leak potential.
Place screws every third corrugation (every 7.5-8 inches across the panel width) and every 12-18 inches along the panel length at purlin/rafter locations. Coastal or high-wind areas may require tighter spacing—check local building codes.
Proper fastening technique:
Use a cordless drill with adjustable clutch set so the screw stops when the neoprene washer just compresses against the panel—not crushed, but snug. Over-tightening deforms panels and crushes washers, creating leak paths. Under-tightening allows movement and water infiltration.
Drive screws perpendicular to the panel surface—angled fasteners don’t seal properly and can cause panel distortion.
![proper fastener placement on corrugated metal high
Gable edge fastening:
Add extra fasteners along the gable/rake edge in the first low corrugation (valley), spacing them every 12 inches. These will be covered by gable trim but provide essential wind uplift resistance.
[Embed YouTube video: How to Install Corrugated Metal Roofing]
Systematic panel installation with proper overlap
Once the first panel is perfectly positioned, installing corrugated metal roofing proceeds methodically across the roof with careful attention to overlap specifications.
Side overlap (widthways):
Each subsequent panel overlaps the previous panel by one full corrugation for roofs with pitch greater than 10 degrees (approximately 2:12). For shallower pitches between 5-10 degrees, overlap two full corrugations to prevent wind-driven rain infiltration.
Position the new panel so it nests smoothly into the previous panel’s corrugation, maintaining alignment from eave to ridge.
Fastening overlap areas:
Drive fasteners through both overlapping panels into the structural support below. This secures the seam and prevents wind from lifting panel edges. Place these overlap fasteners in the high corrugation points, maintaining the same every-third-corrugation pattern.
Maintaining straight alignment:
Every 3-4 panels, stretch a string line from eave to ridge and check that panel edges align with the string. Metal panels can gradually drift out of square, and catching this early prevents having to remove and reinstall multiple panels.
End overlap (lengthways when necessary):
If your panels don’t span from eave to ridge in a single piece, overlap panel ends by a minimum of 6 inches, preferably 8-12 inches for better water resistance. The upper panel always overlaps the lower panel to shed water properly.
Seal end laps with a bead of butyl sealant tape or polyurethane caulk before overlapping, and fasten through both panels every 12 inches across the overlap width.
Working around obstacles:
When installing corrugated metal roofing around vent pipes, chimneys, or other penetrations, use appropriate pipe flashings or custom-fitted metal flashings. Cut panels to fit with 1-2 inch clearance around penetrations, then seal the gaps with flashing boots or custom-fabricated collars.
Panel installation progression:
Continue across the roof systematically, checking alignment every few panels and maintaining consistent overhang at eaves. Remove metal shavings from cutting or drilling immediately—they rust quickly and create permanent stains on panel finishes.
Finishing details: ridge caps and flashing installation
Professional finishing makes the difference between installing corrugated metal roofing that looks amateur versus contractor-quality work.
Ridge cap installation:
Ridge caps cover the peak where roof planes meet, preventing water infiltration and providing ventilation options.
Install ridge closure strips: Place foam closures along both sides of the ridge, 1 inch below the peak, to prevent weather and pest entry while allowing ventilation airflow
Position ridge cap: Center pre-formed ridge cap over the peak, ensuring equal overhang on both sides (typically 1-1.5 inches)
Overlap sections: When using multiple ridge cap pieces, overlap each section by 6 inches minimum, with the downwind section on top
Fasten through high points: Drive screws through the high points of the ridge cap into the ridge board or blocking every 12-18 inches, alternating sides
Leave gap at peak: Don’t fasten panels within 4-6 inches of the actual peak to allow the ridge cap system to function properly
Valley flashing:
For roofs with intersecting planes, install pre-formed valley flashing before panels go on, running from eave to ridge over the underlayment. Cut panels to fit the valley angle, leaving a 1-inch gap from the valley centerline on each side, and seal panel edges with appropriate sealant.
Rake and gable trim:
Install gable trim over panel edges at rakes, fastening through the trim into the gable board or blocking every 12 inches. This trim protects panel edges from wind uplift and provides a finished appearance.
Eave closure and ventilation:
Use either solid foam closures (for fully vented attic systems with ridge and soffit vents) or ventilated closures (when additional eave ventilation is needed). The choice depends on your overall attic ventilation strategy.
Strategic sealant application during installing corrugated metal roofing prevents the most common leak sources without over-sealing areas that need drainage or expansion.
Where to apply sealant:
Under ridge caps: Run a continuous bead of butyl tape along each side of the ridge before installing the ridge cap
End lap seams: Apply sealant between overlapping panel ends before fastening them together
Around penetrations: Seal the interface between flashing boots/collars and panels with polyurethane or butyl-based caulk rated for metal roofing
At flashing transitions: Seal where valley flashing, sidewall flashing, or other trim pieces meet roofing panels
Where NOT to seal:
Never seal side lap overlaps (the corrugation-to-corrugation overlap between adjacent panels)—these areas must remain open to allow water drainage and thermal expansion/contraction. Sealing side laps traps water and prevents panels from moving naturally with temperature changes, leading to fastener failure.
Sealant selection:
Use butyl tape for horizontal seams and areas needing compression sealing. Choose polyurethane or silicone caulk rated for metal roofing for vertical seams and penetrations. Avoid generic household caulks that deteriorate quickly under UV exposure and temperature cycling.
Fastener inspection:
After installation, visually inspect every fastener to verify that neoprene washers are properly compressed and sealed against panel surfaces. Replace any fasteners with damaged or improperly seated washers immediately.
Critical errors that cause leaks and failures
Understanding common mistakes when installing corrugated metal roofing helps you avoid expensive callbacks and premature roof failure.
Wrong fastener placement:
Installing screws in the low corrugations (valleys) instead of high points is the most common error. Valley-placed fasteners sit in water flow paths and collect debris, leading to accelerated corrosion and leaks. Always fasten through the corrugation peaks where water flows around—not over—the fastener head.
Over-tightening or under-tightening screws:
Excessive torque crushes neoprene washers and dimples panels, creating leak paths and preventing natural thermal expansion. Insufficient torque leaves gaps where water infiltrates. Set your drill clutch properly and verify the first few fasteners before continuing.
Insufficient overlap:
Skimping on overlap dimensions—using less than one full corrugation on side laps or less than 6 inches on end laps—invites wind-driven rain penetration. Follow manufacturer specifications for your specific roof pitch.
No underlayment or wrong type:
Skipping underlayment eliminates condensation protection and backup moisture barriers, while using standard felt paper creates problems when heat buildup under metal causes deterioration. Always use synthetic underlayment rated for metal roof applications.
Poor fastener spacing:
Too few fasteners allow panels to lift in high winds; excessive fasteners create unnecessary penetration points and restrict thermal movement. Follow the recommended pattern: every third corrugation at 12-18 inch intervals along purlins.
Walking on panels incorrectly:
Stepping between purlins or supports dents panels and breaks finishes. Always walk directly on purlins/rafters or use walking boards spanning multiple supports to distribute weight.
Ignoring thermal expansion:
Metal expands and contracts significantly with temperature changes. Using fasteners that are over-tightened or failing to use proper washers prevents this movement, leading to fastener pull-through, panel buckling, and oil-canning (rippling).
Galvanic corrosion from mixed metals:
Using incompatible metals in contact—such as aluminum panels with uncoated steel screws, or copper flashing touching galvanized panels—causes rapid galvanic corrosion. Always use fasteners and accessories compatible with your panel material.
Budget and time investment for corrugated metal roof installation
Understanding costs helps plan projects and compare DIY savings against professional installation when installing corrugated metal roofing.
Material costs (per square foot):
Component
Cost Range
Corrugated panels (29-gauge painted)
$1.50-$3.00
Corrugated panels (26-gauge Galvalume)
$2.50-$4.50
Synthetic underlayment
$0.25-$0.50
Metal roofing screws with washers
$0.15-$0.30
Ridge cap, trim, and closures
$0.50-$1.00
Total DIY materials
$2.50-$6.00/sq ft
Labor costs (professional installation):
Installation labor: $3.00-$6.00 per square foot depending on complexity, pitch, and regional rates
Total installed cost: $5.50-$12.00 per square foot including materials and labor
DIY timeline estimates:
Project Size
Complexity
DIY Time (with helper)
Professional Time
Small shed/barn (500 sq ft)
Simple gable
1-2 days
4-6 hours
Average residential (2,000 sq ft)
Moderate with valleys
3-5 days
1-2 days
Large or complex roof (3,000+ sq ft)
Multiple planes, dormers
5-8 days
2-3 days
These estimates assume good weather, familiarity with roofing work, and proper equipment. First-time installers should add 30-50% more time for learning curve and mistakes.
Caring for your corrugated metal roof after installation
Proper maintenance extends the life of corrugated metal roofing well beyond the typical 40-year expectation.
Annual inspection schedule:
Walk the property perimeter each fall and spring, using binoculars to inspect for:
Loose, missing, or backing-out fasteners
Damaged, dented, or lifted panels
Deteriorating sealant at penetrations or flashing
Rust spots or coating damage
Debris accumulation in valleys or behind obstacles
Cleaning procedures:
Hose down the roof once or twice annually to remove pollen, dirt, leaves, and debris. For stubborn staining, use mild detergent solution (avoid abrasive cleaners or wire brushes that damage finishes) and soft-bristle brushes.
Clear valleys and gutters of accumulated debris that traps moisture and accelerates corrosion.
Touch-up maintenance:
Address small scratches or coating damage promptly with manufacturer-matched touch-up paint to prevent rust from spreading. Clean the area, prime bare metal, and apply touch-up paint according to product instructions.
Tighten any fasteners that have backed out slightly (common during the first year as panels settle), and replace fasteners with damaged washers.
Gutter system maintenance:
Keep gutters and downspouts clear to prevent water backup at eaves that can force water under panels or rot fascia boards and underlayment.
Expected lifespan:
Painted Galvalume or steel: 40-50 years with proper maintenance
Bare Galvalume: 30-40 years
Aluminum: 50+ years in non-coastal environments
Galvanized steel: 20-30 years depending on coating thickness and climate
Regular care can extend these lifespans by 10-15 years in many cases.
Minimum roof slope and structural support for metal panels
Proper pitch and structural backing are essential when installing corrugated metal roofing to ensure longevity and performance.
Minimum pitch requirements:
Standard corrugated metal roofing requires a minimum pitch of 3:12 (14 degrees) for reliable long-term performance. This slope provides adequate water drainage and prevents standing water that accelerates corrosion.
Lower pitches from 1:12 to 3:12 are possible but require:
Two-corrugation side overlap instead of one
Additional sealant at all overlaps and fasteners
Higher-quality underlayment with better waterproofing properties
More frequent inspection and maintenance
Structural support requirements:
Purlin or rafter spacing depends on panel gauge, expected snow loads, and wind conditions:
29-gauge panels: maximum 24 inches on center for residential applications
26-gauge panels: up to 30 inches on center depending on load requirements
High snow load areas (50+ psf): may require 18-24 inch spacing even with heavier gauge
Consult local building codes and manufacturer specifications for your specific conditions—structural failure from inadequate support is not covered by material warranties.
Ventilation considerations:
Adequate attic ventilation prevents condensation on the metal underside that can rot decking and deteriorate insulation. Provide minimum 1:300 ventilation ratio (1 sq ft vent per 300 sq ft attic space), balanced between intake (soffit/eave) and exhaust (ridge) vents.
Can I install corrugated metal roofing over existing shingles? While possible in some jurisdictions, it’s not recommended. Installing over shingles traps moisture, provides uneven substrate causing panel distortion, and makes it impossible to inspect and repair decking. Best practice is removing old roofing first.
What is the correct screw pattern for corrugated metal roofing? Screws go through the high points (peaks) of corrugations, every third corrugation across the width, and every 12-18 inches along the panel length at purlin locations. Add extra fasteners at eaves, ridges, and gable edges for wind resistance.
Do I need underlayment under corrugated metal roofing? Yes. Synthetic underlayment rated for metal roofs provides condensation control, thermal barrier, and backup moisture protection. It’s required by most building codes and manufacturer warranties.
How much overlap do corrugated metal panels need? Side overlap: one full corrugation for roofs above 10-degree pitch, two corrugations for shallower pitches. End overlap (if required): minimum 6 inches, preferably 8-12 inches.
Can I walk on corrugated metal roofing during installation? Yes, but only by stepping directly on purlins or structural supports, never between them. Use walking boards spanning multiple supports for safer movement. Wear soft-soled boots and avoid walking on panels during hot weather when coatings are soft.
Installing corrugated metal roofing successfully requires methodical attention to substrate preparation, precise fastener placement in corrugation high points, proper overlap dimensions, and strategic sealing at critical junction points. When combined with appropriate material selection and respect for thermal expansion principles, the result is a durable, weather-resistant roof system that can last 40-70 years with minimal maintenance.
Whether you’re a professional contractor streamlining techniques or a capable DIYer tackling a barn or shed project, following manufacturer specifications and industry best practices ensures your corrugated metal roof performs reliably for decades.
🏠 Roofing Tips & Updates
Get free roofing advice, cost guides, and seasonal maintenance tips.
Roofing content specialist with 5+ years researching U.S. residential and commercial roofing. Has documented 200+ projects covering installation costs, material selection, contractor vetting, and DIY guides for homeowners across all climate zones.
A roofing satellite estimator is a digital tool that uses satellite or aerial imagery to measure roofs remotely and generate accurate takeoffs without climbing a ladder. Instead of walking the roof with a tape measure or wheel, contractors can type in an address, receive a measurement report, and build an estimate from their office or truck.
This shift from manual to remote measurement has transformed how roofing businesses quote jobs, plan materials, and manage risk. A good roofing satellite estimator improves safety, speeds up estimating, and helps win more bids by giving consistent, professional data to support every quote.
Table of Contents
What is a roofing satellite estimator?
A roofing satellite estimator is software that calculates roof dimensions area, pitch, perimeter, ridges, hips, and valleys—using overhead imagery instead of on‑site manual measurements. The images may come from satellites, airplanes, or even drones, but the goal is the same: create a precise roof model and measurement report from above.
A roofing satellite estimator is software that calculates roof dimensions area
Unlike traditional tape‑measure methods, a roofing satellite estimator can also produce scaled diagrams, 3D models, and detailed breakdowns by roof plane. These reports are commonly used for replacement quotes, insurance claims, real estate due diligence, and large‑scale asset management across many properties.
Common use cases include:
Roofing contractors preparing replacement or repair estimates.
Insurance adjusters verifying claim scopes and quantities.
Property managers budgeting long‑term capital projects across portfolios.
How roofing satellite estimators work
Most roofing satellite estimator platforms follow a similar workflow:
Address input The user enters a street address or drops a pin on a map. The platform locates the property and pulls the most recent available imagery.
Imagery and modeling The system uses high‑resolution orthographic (straight‑down) and sometimes oblique (angled) images. Software and/or trained technicians trace roof edges, define planes, and assign pitch to each section.
Measurement calculation From the traced outline, the tool calculates:
Total roof area (in squares or square feet/meters)
Lengths of ridges, hips, valleys, rakes, and eaves
Individual plane areas and pitches
Perimeter measurements and overhang data
Report generation A finished report usually includes:
Color‑coded roof diagrams
Dimension labels for all critical lines
Total area summary and plane‑by‑plane breakdown
Optional material suggestions or waste factors
Turnaround times range from near‑instant (for pre‑measured or auto‑processed jobs) to a few hours or up to one business day when manual verification is involved.
Why contractors switch to satellite measurement
A roofing satellite estimator offers several practical advantages over traditional methods:
Safety No ladder, no roof‑walking, less risk. Crews spend less time at height, especially on steep, tall, or fragile roofs.
Speed One person can request and receive measurements for multiple properties in an afternoon, instead of driving to each address and measuring manually.
Consistency and accuracy Good systems typically fall within a few percent of manual measurement on standard residential roofs, which is more than sufficient for estimating and material ordering when combined with sensible waste factors.
Professional presentation Clean diagrams and standardized reports impress homeowners, adjusters, and commercial clients. This supports higher close rates and builds trust.
Remote capability Contractors can bid roofs in other towns—or even other states—without a site visit. This is especially valuable for storm response work and multi‑property portfolios.
Material optimization Accurate measurements minimize over‑ordering and under‑ordering, reducing both waste and emergency supply runs.
Leading roofing satellite estimator platforms
There are many tools on the market; they differ in imagery quality, features, integrations, and pricing. Here is a high‑level view of common categories you’ll see:
A roofing satellite estimator
Enterprise aerial services
These platforms maintain large, frequently updated image libraries and specialize in detailed roof reports. Typical features include:
Multiple report levels (quick squares, full diagrams, premium detail).
Options for residential and commercial roofs.
Integrations with CRM and estimating software.
Per‑report pricing, with volume discounts or subscription options.
They’re well suited for established contractors, insurance carriers, and restoration firms that handle high volumes and need consistency across teams.
3D modeling and homeowner‑friendly apps
Some tools focus on 3D models and visual sales presentations:
Capture through smartphone photos or existing imagery.
Produce interactive 3D models and color simulations.
Help sales reps show “before and after” visuals at the kitchen table.
These are a good fit for residential contractors focused heavily on in‑home sales and design options.
All‑in‑one roofing platforms
Other systems combine a roofing satellite estimator with:
Estimating and proposals.
Simple CRM or job tracking.
Material ordering workflows.
They’re ideal for small to mid‑sized roofing companies that want a single environment for measurements, estimates, and job management rather than multiple disconnected tools.
DIY / free map tools
Free options (for example, using basic map or earth viewers with a measuring tool) can:
Provide rough area and length estimates.
Help homeowners sanity‑check quotes.
However, they lack dedicated roof‑specific features, pitch calculations, and formal reports. For professional use, most contractors rely on dedicated roofing satellite estimator platforms rather than generic map tools.
Accuracy and limitations
A good roofing satellite estimator is highly accurate in many scenarios, but it is not perfect. Understanding where it shines and where it struggles helps you use it correctly.
A good roofing satellite estimator is highly accurate in many scenarios
Typical accuracy range
For standard residential, uncomplicated roofs: often within about 2–5% of carefully done manual measurements.
Pitch measurements are usually within a small margin when imagery includes oblique angles or is combined with known dimensions.
Factors that affect accuracy:
Image resolution and clarity.
Age of imagery (new additions or changes might not be visible yet).
Roof complexity: lots of facets, dormers, and intersecting planes add difficulty.
Obstructions: trees, heavy shade, snow, tarps, solar panels, or debris.
Challenging cases:
Dense tree cover hiding large portions of the roof.
Very new homes or recent additions where images haven’t been updated.
Flat or low‑slope commercial roofs where small slope changes and drainage details matter.
In these situations, many contractors combine a roofing satellite estimator with limited on‑site verification: confirming edge conditions, unusual details, or drainage elements before finalizing high‑value or high‑risk projects.
Cost and ROI of a roofing satellite estimator
Costs vary depending on how often you use the tool and how detailed the reports are.
Common pricing models
Per‑report: You pay a fixed fee each time you order a report. This is flexible and ideal for small or growing companies that only need occasional measurements.
Subscription: You pay a monthly or annual fee that includes a certain number of reports or unlimited usage. This model suits high‑volume contractors who estimate many roofs every week.
Hybrid: A base subscription plus reduced per‑report fees, often with added features like integrations, user seats, and support.
ROI considerations
When you evaluate the value of a roofing satellite estimator, consider:
Hours saved per estimate (travel + measuring + office time).
Labor rate of the person who normally measures roofs.
Additional quotes you can send each week with the same staff.
Reduced waste from more precise measurements.
Reduced risk of injury and related costs.
Many contractors find that after only a handful of projects per month, the time savings and extra closed jobs cover the cost of the tool.
Choosing the right roofing satellite estimator
The best roofing satellite estimator for your business depends on how you operate.
Key questions to ask:
How many estimates do you produce per week/month?
Are your projects mostly residential, commercial, or a mix?
Do you need advanced 3D presentations for homeowners, or just accurate numbers and diagrams?
What other software systems do you already use (CRM, accounting, project management)?
Do you prefer per‑job flexibility or a flat monthly cost?
General guidance:
Small residential contractor, low volume: A per‑report service with clear diagrams and simple exports.
High‑volume storm or insurance work: A platform with strong reporting, batch ordering, and integrations.
Design‑driven sales: A solution that offers 3D models and visualization tools.
Tech‑focused companies: Platforms with open APIs and deep software integrations.
Most vendors offer demos or free trials. Testing two or three options on the same property and comparing reports is a practical way to choose.
Best practices for using roofing satellite estimators
To get the most from any roofing satellite estimator:
Verify property details carefully. Double‑check the address and visually confirm that the selected footprint matches the right building.
Review imagery age and quality. If the property has recently changed (new addition, solar panels, new garage), note that and adjust expectations or supplement with site photos.
Combine with good field documentation. Use on‑site photos and notes for things the estimator can’t see clearly from above, such as hidden rot, ventilation details, or unusual flashing.
Standardize internal processes. Train your team on how to interpret reports, apply consistent waste factors, and attach measurements to estimates and contracts.
Use reports as sales tools. Show homeowners the roof diagrams during your proposal presentation to explain scope, justify pricing, and differentiate your professionalism.
Track results. Periodically compare ordered material quantities to what you actually used, fine‑tuning waste factors and identifying any recurring discrepancies.
Can homeowners use roofing satellite estimators?
Homeowners can benefit from roofing satellite estimator technology too, even if they don’t buy professional software directly.
Options for homeowners:
Ask prospective contractors whether they use satellite or aerial measurement and request a copy of the diagram with their quote.
Use basic online map tools for rough measurements to understand ballpark roof size.
Use consumer‑friendly apps, where available, that create simple models from photos or maps.
Benefits for homeowners:
Get more confidence that multiple contractors are quoting similar roof sizes.
Better understand roof complexity when comparing prices.
Use precise square footage to budget for future work.
However, for actual construction decisions, homeowners should rely on professional‑grade measurements, especially when warranties, insurance, and significant spending are involved.
FAQ about roofing satellite estimators
How accurate is a roofing satellite estimator compared to manual measurement? On typical residential roofs, reputable systems often come within a few percent of careful manual measurements, which is usually sufficient for estimating and material ordering when paired with reasonable waste allowances.
Do I still need to visit the property if I use a roofing satellite estimator? For simple jobs, some contractors can quote remotely. For complex roofs, structural concerns, or high‑value projects, most still perform at least one site visit to check conditions, access, and hidden details.
Can a roofing satellite estimator measure commercial roofs? Yes, many tools can handle large flat or low‑slope roofs, but accuracy can be affected by parapet walls, rooftop equipment, and drainage features that may not be fully visible. Often, a hybrid of remote measurement and on‑site verification works best for commercial work.
What’s the main downside of relying solely on satellite measurement? You may miss issues that only appear on close inspection, such as soft decking, hidden leaks, or failing flashings. Satellite data tells you “how big” the roof is and how it’s shaped, but not everything about its condition.
Is a roofing satellite estimator worth it for small contractors? Yes, as long as it’s used strategically. Even a low‑volume contractor can benefit by saving time on travel and measurement, especially if they choose a flexible per‑report model instead of a big subscription.
Using a roofing satellite estimator is now standard practice for many modern roofing companies because it improves safety, accelerates estimating, and adds professionalism to every proposal. When combined with field expertise and on‑site verification where needed, it becomes a powerful tool for delivering accurate, efficient roofing services at scale.
🏠 Roofing Tips & Updates
Get free roofing advice, cost guides, and seasonal maintenance tips.
Roofing content specialist with 5+ years researching U.S. residential and commercial roofing. Has documented 200+ projects covering installation costs, material selection, contractor vetting, and DIY guides for homeowners across all climate zones.
Installing Roof Trusses: 7 Essential Steps for Safety
Installing roof trusses correctly is fundamental to structural integrity, worker safety, and long-term roof performance. Roof trusses are engineered components that must be handled, placed, and braced according to manufacturer specifications and industry standards to prevent collapse during construction and ensure decades of reliable service.
This guide covers every critical phase: pre-installation planning, safe lifting techniques, systematic placement, temporary and permanent bracing protocols, and quality verification. Whether you’re a professional framing contractor or an experienced builder tackling a complex project, following these proven methods ensures code compliance and protects your crew.
Table of Contents
Understanding truss layout and delivery inspection
Before installing roof trusses, thoroughly review the truss layout drawings provided by the manufacturer. These engineering documents specify truss types, placement locations, spacing, bearing points, and required bracing configurations. Each truss is typically labeled (e.g., A1, B3, C2) corresponding to positions marked on the layout plan.
Inspect every truss immediately upon delivery for transport or manufacturing damage. Look for cracked or split lumber, loose or damaged metal connector plates, twisted members, or any deviations from the engineered design. Reject damaged trusses immediately—never attempt to repair or modify engineered trusses without written approval from a structural engineer.
Verify that the quantity and types of trusses match your order and that special trusses (girder trusses, hip trusses, valley sets) are clearly identified. Store trusses flat on level blocking, never leaning or stacked vertically, and keep them covered if installation will be delayed.
Safety planning before installation:
Establish fall protection systems (guardrails, safety nets, or personal fall arrest systems) for all work at heights above 6 feet
Essential considerations before installing roof trusses
Installing roof trusses requires understanding site-specific factors that affect the installation process and long-term performance. Before beginning, verify that the building foundation is level and walls are properly aligned—out-of-level conditions force trusses into unnatural positions that create stress concentrations. Measure and confirm that wall plate elevations match on opposite sides of the building within 1/4 inch tolerance.
Consider access routes for crane positioning and truss delivery when installing roof trusses on tight urban lots or sites with limited clearance. Overhead power lines, adjacent buildings, or trees may restrict crane boom swing and require alternative lifting strategies. Coordinate with utility companies to de-energize or relocate lines if necessary, and never operate lifting equipment within 20 feet of energized conductors.
Weather forecasting is critical when installing roof trusses because wind, rain, and extreme temperatures affect both safety and installation quality. Schedule installation during stable weather windows and have contingency plans for securing partially completed work if conditions deteriorate unexpectedly.
Setting up level plates and accurate spacing
Wall plates must be level, straight, and securely fastened to load-bearing walls before installing roof trusses. Use a long straightedge or string line to verify that top plates are in a single plane without dips or humps. Shim low spots or plane high spots even 1/4 inch variations can create alignment problems across multiple trusses.
Check that walls are square by measuring diagonals corner to corner; equal diagonal measurements confirm square. Out-of-square walls will cause trusses to twist or require shimming, compromising structural integrity.
Marking truss layout:
Starting from one end, mark truss centers on both wall plates at the specified spacing (typically 24 inches on center for residential construction)
Use a framing square to transfer marks across the plate width
Mark an “X” on the side where each truss will sit for quick visual reference during installation
Double-check that spacing matches the truss layout drawing—common trusses, girder trusses, and hip trusses may have different spacing requirements
Accurate layout prevents accumulated spacing errors that can leave you short or require field modifications at the far end of the building.
Crane and manual lifting techniques
Crane and manual lifting techniques
For trusses spanning more than 30 feet or weighing over 200 pounds, crane lifting is the safest and most efficient method. Position the crane to minimize swing distance and avoid passing loads over workers or occupied areas.
Crane rigging for trusses:
Use spreader bars or lifting beams to distribute load across the truss length and prevent crushing of top chords
Attach rigging at designated lift points marked on the truss (typically near quarter-points) or as specified by the manufacturer
Lift trusses vertically in their natural upright position—never drag, bend, or twist during lifting
Use tag lines to control rotation and guide trusses into position as they approach the roof
Manual lifting for smaller trusses:
When crane access is impossible or for shorter trusses (under 30 feet), manual lifting requires a minimum crew of four to six workers depending on truss weight. Position workers evenly along the bottom chord, lift in unison, and maintain the truss in a vertical plane throughout the lift.
Use rope and pulley systems anchored to ridge or sturdy supports to assist in raising trusses from ground to roof level. Never attempt to “walk up” a truss by lifting one end—this bends the truss and can cause permanent damage.
[Embed YouTube video: How to Install Roof Trusses]
Setting and bracing the gable or first common truss
The first truss installation is the most critical step when installing roof trusses because it establishes the reference point for all subsequent trusses. Whether you start with a gable end truss or the first common truss, this unit must be perfectly positioned, plumb, and securely braced before proceeding.
Installation sequence for the first truss:
Position at layout marks: Lift the truss into position and set the bottom chord on the marked location on the wall plates
Check orientation: Ensure the truss “production face” (the side with visible connector plates) points toward the direction specified on the layout plan—all trusses must face the same direction
Verify plumb: Use a 6-foot or 8-foot level on the vertical web members to ensure the truss is perfectly vertical (plumb) in both directions
Secure to plates: Fasten the bottom chord to wall plates using metal hurricane ties, clips, or heavy-duty framing anchors at each bearing point. Follow manufacturer specifications for fastener type and quantity—typically three 10d nails or structural screws per connection
Install diagonal bracing: Attach temporary diagonal bracing (2×4 lumber) from the peak of the first truss down to the wall plate or ground at approximately 45 degrees, securing both ends with multiple nails or screws. This lateral restraint prevents the truss from tipping before additional trusses are installed.
Brace in both directions: Install diagonal bracing to both the front and back to stabilize the truss against movement in either direction
Do not proceed with additional trusses until the first unit is rock-solid and verified plumb—this truss anchors the temporary bracing system for the entire roof.
 fastened per manufacturer specifications. These connections prevent uplift during high wind events and are required by code in most jurisdictions. Use galvanized or stainless steel connectors rated for the expected loads.
Before covering trusses with sheathing, perform a comprehensive quality check to identify and correct any installation errors. Corrections are far easier before sheathing covers the framing.
Final inspection checklist:
Plumb verification: Check multiple trusses with a long level to confirm all remain vertical; look down the roof line from each end to spot any leaning or twisted trusses
Spacing accuracy: Measure truss spacing at three locations (eave, mid-span, ridge) to verify consistent on-center spacing
Bracing security: Walk the roof and check that all temporary and permanent bracing is securely nailed with no loose boards
Connections complete: Verify hurricane ties or clips are installed at every bearing point with the correct number of fasteners
Overhang consistency: Measure overhang distance at multiple points along eaves and rakes to ensure uniformity
Damage check: Inspect for any cracks, splits, or damaged connector plates that may have occurred during installation
Access provisions: Confirm that attic access hatches or mechanical openings are properly framed and headers installed per plan
Document the completed installation with photographs from multiple angles before applying sheathing. This photographic record is valuable for building inspectors, future reference, and in the unlikely event of insurance claims.
Critical errors that compromise structural integrity
Even experienced crews make mistakes when installing roof trusses, and some errors can have serious structural or safety consequences.
Common mistakes to avoid:
Inadequate temporary bracing: Installing too few lateral braces or spacing them too far apart leaves trusses vulnerable to collapse from wind or worker loads during construction. Follow manufacturer bracing diagrams exactly—they’re based on engineering analysis.
Inconsistent spacing: Allowing truss spacing to drift from the specified layout creates uneven load distribution and can violate code requirements. Accumulated spacing errors may leave insufficient space for the final truss or create an illegal span at one end.
Cutting or modifying trusses: Never cut truss members, drill holes, notch chords, or modify connector plates without written approval from a licensed structural engineer. Trusses are engineered systems where every member carries calculated loads—field modifications can cause catastrophic failure.
Wrong orientation: Installing trusses with production faces in different directions or reversing left and right trusses compromises the engineered design. Always verify that connector plates face the correct direction and truss identification matches the layout drawing.
Removing bracing prematurely: Taking down temporary bracing before permanent bracing and sheathing are complete is extremely dangerous. Many construction injuries and fatalities occur when partially completed roofs collapse due to premature bracing removal.
Poor bearing connections: Omitting hurricane ties, using inadequate fasteners, or failing to connect at all bearing points allows uplift that can pull the roof off during high winds. Every bearing point must have an approved metal connector installed per code.
Working in unsafe conditions: Installing roof trusses in wind speeds above 20 mph significantly increases the risk of trusses blowing over or workers losing control of components. Postpone installation when weather conditions are marginal.
Project planning and budget factors
Understanding the time and cost involved in installing roof trusses helps with accurate project bidding and scheduling.
Labor and timeline:
A professional framing crew of four to five workers can typically install 20 to 30 residential roof trusses per day for straightforward gable roofs with clear crane access. Complex roof designs with hips, valleys, multiple roof planes, or difficult site access can reduce productivity to 10-15 trusses per day or less.
Cost breakdown:
Component
Typical Cost Range
Notes
Roof trusses (material)
$3-$7 per linear foot
Varies by design complexity, span, lumber prices
Crane rental
$500-$1,500 per day
Depends on capacity, reach, and regional rates
Labor (installation)
$50-$100 per truss
Professional crew including foreman and laborers
Bracing materials
$200-$500 per roof
Lumber for temporary and permanent bracing
Hurricane ties/clips
$3-$8 each
Metal connectors for bearing points
Total per truss (installed)
$50-$150
Including materials, labor, crane, connections
Timeline comparison:
Roof Size
Truss Count
Professional Install Time
DIY Install Time (with help)
Small (1,200 sq ft)
16-20 trusses
1 day
2-3 days
Medium (2,000 sq ft)
26-35 trusses
1-2 days
3-5 days
Large (3,000 sq ft)
40-50 trusses
2-3 days
5-7 days
Complex (hip, multiple planes)
Varies
Add 50-100% time
Add 100-150% time
These estimates assume good weather, experienced crew, clear site access, and standard residential construction. Commercial projects, long-span trusses, or difficult sites require additional time and specialized equipment.
Essential tools for installing roof trusses
Essential tools for installing roof trusses,Proper equipment makes installation safer, faster, and more accurate.
Proper equipment makes installation safer, faster, and more accurate.
Safety equipment (non-negotiable):
Fall arrest harnesses with lanyards and anchor points rated for fall protection
Hard hats (ANSI Z89.1 rated)
Work gloves with good grip
Safety glasses or goggles
Non-slip work boots with ankle support
Lifting equipment:
Crane with appropriate capacity and reach (most common for residential)
Telehandler or forklift with truss boom attachment (alternative for some sites)
Rope and pulley systems for manual lifting of smaller trusses
Rigging: spreader bars, slings, shackles rated for truss weight
Installation tools:
Framing nailer (pneumatic or cordless) with 10d and 16d nails
Hammer for adjustments and temporary fasteners
Cordless drill/driver with socket adapter for hurricane tie screws
4-foot and 8-foot levels for checking plumb
25-foot tape measure and chalk line for layout
Speed square and framing square for checking alignment
Circular saw for cutting bracing lumber
Communication equipment:
Two-way radios for coordination between ground crew, crane operator, and roof crew
Hand signals as backup (establish signals before starting)
Bracing materials inventory:
2×4 lumber for temporary and permanent diagonal bracing
1×4 or 2×4 continuous lateral bracing boards
Metal hurricane ties or clips (quantity = number of bearing points)
16d and 10d galvanized nails
3-inch structural screws
Metal connector plates for splicing bracing if needed
Setting and bracing the gable or first common truss
Many contractors prefer installing roof trusses starting from a gable end because gable trusses provide a solid reference plane and include built-in vertical studs that simplify initial bracing. However, on some designs you may start with common trusses and work toward both ends. Regardless of starting point, the principle remains identical: the first truss must be perfectly positioned because every subsequent truss references this initial placement. Take extra time verifying this first unit—rushing through this critical step compounds errors throughout the entire roof assembly.
Building codes and truss documentation
Roof trusses are engineered structural components that must comply with building codes and be installed according to stamped engineering drawings.
Required documentation:
Every truss delivery must include:
Truss layout plan showing location and identification of each truss
Individual truss design drawings with stamped engineer’s seal
Bracing installation diagram specifying temporary and permanent bracing locations
Installation instructions from the truss manufacturer
Keep all documentation on the job site during installation and provide copies to the building inspector. Inspectors verify that trusses match approved plans and that installation follows engineering specifications.
Code compliance:
Installing roof trusses must meet International Residential Code (IRC) and International Building Code (IBC) requirements, including:
Truss design by licensed engineer
Proper bearing on load-bearing walls (minimum 1.5 inches bearing length)
Approved metal connectors at all bearing points
Bracing per BCSI (Building Component Safety Information) guidelines
Adequate ventilation provisions (separate requirement, but affects truss design)
Local amendments may impose additional requirements—verify with your building department before installation.
Can I install roof trusses without a crane? Yes, for trusses under 30 feet span and weighing less than 200 pounds, a crew of 4-6 workers can manually lift trusses using rope and pulley systems. However, crane installation is safer, faster, and strongly recommended for larger trusses.
How long does installing roof trusses take for an average house? A professional crew can install 20-30 trusses per day on a simple gable roof, so a typical 2,000 square foot home (25-35 trusses) takes 1-2 days. Complex roofs with hips and valleys take longer.
What spacing is required for roof trusses? Residential trusses are typically spaced 24 inches on center, though 16-inch or 19.2-inch spacing is used in some designs. Always follow the truss layout plan provided by the engineer—spacing is calculated for specific loads.
Can I cut or modify a roof truss after installation? No. Never cut, notch, drill, or modify an engineered truss without written approval from a licensed structural engineer. Unauthorized modifications can cause structural failure and void warranties.
When can I remove temporary bracing from trusses? Only after permanent bracing (roof sheathing fully nailed, permanent diagonal bracing installed, and gable end bracing complete) is in place. Consult the truss bracing diagram for specific guidance—removing bracing prematurely is extremely dangerous.
Final thoughts on safe truss installation
Installing roof trusses demands careful attention to engineering specifications, systematic bracing protocols, and unwavering commitment to safety. While the process follows logical steps—prepare plates, lift components, place accurately, brace thoroughly, and verify quality—the margin for error is small when working with large structural components at height.
Professional installation pays for itself through speed, safety, and structural assurance, especially for complex roof designs or challenging site conditions. When undertaking truss installation, always work from manufacturer’s engineering drawings, follow industry bracing standards, and never compromise on temporary bracing or fall protection.
🏠 Roofing Tips & Updates
Get free roofing advice, cost guides, and seasonal maintenance tips.
Roofing content specialist with 5+ years researching U.S. residential and commercial roofing. Has documented 200+ projects covering installation costs, material selection, contractor vetting, and DIY guides for homeowners across all climate zones.
Figuring Roof Angles: 5 Simple Methods Anyone Can Use
Figuring roof angles is essential for cutting rafters, checking if your roof meets code, choosing the right roofing material, and estimating how water and snow will shed off your home. When you understand roof pitch and how it relates to degrees, you can work with contractors more confidently or tackle basic framing and repair tasks yourself.
This guide explains what roof pitch actually means, shows several easy ways to measure it, and gives you a quick reference table so you do not have to redo the math every time.
Table of Contents
Roof angle basics: pitch, slope, and degrees
Roof slope guide
Roof “slope” is simply the amount a roof rises over a given horizontal distance, usually expressed as “rise over run,” such as “4 inches of rise for every 12 inches of run.” Roof “pitch” in residential work is commonly written as X/12, where X is the vertical rise for every 12 inches of horizontal run.
To convert that pitch to an angle in degrees, treat it as a right triangle:
Slope = rise ÷ run
Angle in degrees = arctan(rise/run)arctan(rise/run)
For example, a 4/12 roof has rise/run = 4 ÷ 12 ≈ 0.333, and arctan(0.333)arctan(0.333) is about 18.4°, while a 6/12 roof (0.5) works out to roughly 26.6°.
Method 1: Level and tape measure on the roof
Level and tape measure on the roof
One of the simplest ways of figuring roof angles uses only a level and a tape. This method measures the actual roof deck and then converts that to a standard X/12 pitch.
Steps:
Place the level on the roof. Stand safely on the roof, set a 12‑inch (or 24‑inch) spirit level so it points straight downhill, and adjust it until the bubble is centered so you know it is perfectly horizontal.
Measure the rise. From the underside of the high end of the level, measure straight down to the roof surface with a tape; that vertical distance is your “rise.”
Express as X/12. If you used a 12‑inch level, the number you read in inches is directly the “X” in X/12 (for example, 4 inches of rise over 12 inches of run = 4/12). If you used a 24‑inch level, divide the measured rise by 2 to convert to “per 12”; for example, 8 inches of rise over 24 inches is 4/12.
Convert to degrees if needed. Divide rise by 12 to get a decimal (4 ÷ 12 ≈ 0.333), then use a calculator’s arctan / tan⁻¹ function to get the angle in degrees.
Always prioritize safety: use proper footwear, fall protection, and avoid working on wet, icy, or very steep roofs.
Method 2: Using a framing square on the bench
Carpenters often figure roof angles using a framing square
Carpenters often figure roof angles using a framing square because it lets them lay out rafters and cuts directly on lumber. This method works best when you already know the pitch you want (like 6/12) and want to see or transfer the angle.
How to do it:
Place the framing square so one leg (the “body”) represents the horizontal run and the other leg (the “tongue”) represents the vertical rise.
Align the 12‑inch mark on the body with the edge of the board, and align the desired rise (for example, 6 inches) on the tongue with the same edge.
The square now shows you the triangle for a 6/12 roof; the diagonal from the corner of the square is the angle of the rafter.
This makes it easy to mark your plumb cut at the top of the rafter and your seat cut at the birdsmouth without doing separate trigonometry.
Method 3: Converting roof pitch to degrees with a calculator
If you know the pitch (X/12), figuring roof angles in degrees is straightforward using basic trigonometry.
Steps:
Turn pitch into a decimal. Divide rise by run: for 4/12, 4 ÷ 12 ≈ 0.333; for 6/12, 6 ÷ 12 = 0.5.
Use arctan / tan⁻¹. On a scientific calculator or calculator app, enter that decimal and use the arctan function to get the angle.
4/12 → arctan(0.333) ≈ 18.4°
6/12 → arctan(0.5) ≈ 26.6°
8/12 → arctan(0.667) ≈ 33.7°
Round to one decimal place. For carpentry and roofing, one decimal place is more than accurate enough; framing tolerances rarely require finer precision.
Many roofing pitch calculator sites do this automatically: you plug in rise and run, and they show pitch, degrees, and sometimes even rafter length.
Method 4: Using online roof pitch and angle calculators
Online calculators are helpful when you want to avoid manual math or need several values at once, like pitch, degrees, and rafter length.
Typical calculators do the following:
Let you enter either rise and run, total span and rise, or sometimes even length plus angle.
Output roof pitch as X/12, angle in degrees, and often the length of a common rafter for your span.
To use them effectively:
Measure your rise (vertical height) and run (horizontal distance) as accurately as possible.
Enter them in the correct units (inches vs. feet vs. centimeters).
Check the results against a quick mental estimate (for example, a roof that looks moderately steep is unlikely to be only 2/12).
Understanding the basics of figuring roof angles first helps you sanity‑check what the calculator gives you instead of blindly trusting it.
Method 5: Figuring roof angles from house dimensions
You can also figure roof angles without climbing a ladder by using attic or plan measurements.
Example approach:
Find the span of the building (distance between exterior wall plates), say 24 ft.
The run for one side is half the span, so 12 ft.
Measure or read the rise from plans or from the attic floor to the ridge, say 6 ft.
That gives a pitch of 6/12 (6 ft of rise per 12 ft of run), which is the same proportion used for inches.
Once you have 6/12, you can convert it to a decimal and then to degrees with the same method as above, or feed it into an online calculator.
Quick reference: common roof pitches and angles
Here is a handy table for figuring roof angles for common residential slopes without recalculating each time.
Roof Pitch (X/12)
Decimal (rise/run)
Approx. Angle (°)
Notes
3/12
0.25
~14°
Low‑slope; many shingles need special underlayment.
4/12
0.33
~18.4°
Common minimum for standard asphalt shingles.
5/12
0.42
~22.6°
Moderate slope, easy to walk but sheds water well.
6/12
0.50
~26.6°
Very common residential slope.
8/12
0.67
~33.7°
Steep look, harder to work on.
10/12
0.83
~40.4°
Very steep, often requires roof jacks and harness.
12/12
1.00
45°
Extremely steep, usually pro‑only access.
Manufacturers and codes often specify minimum and maximum pitches for particular roofing materials, so always check product data sheets or local building regulations before finalizing designs.
Common mistakes when figuring roof angles
People make a few predictable errors when they first start figuring roof angles, and avoiding them will save time and rework.
Mixing up span and run. Span is the full width of the building; run is only half of that for one side of the roof. Using the full span as the run will give you the wrong pitch.
Not standardizing to “per 12.” If you measure over 16 or 24 inches and do not convert back to a 12‑inch base, your pitch ratio will not match standard X/12 charts.
Inconsistent units. Mixing feet and inches or metric and imperial without converting leads to wrong angles; keep everything in one system until the end.
Measuring from finished ceilings instead of the roof deck. Drywall or dropped ceilings can hide the true structural rise, so the angle you calculate may not match the actual roof framing.
Ignoring safety. Trying to measure very steep roofs without proper fall protection is dangerous; in those cases, use ground or attic measurements plus calculators instead.
Why figuring roof angles matters in real projects
Once you are comfortable figuring roof angles, many practical tasks get easier:
Cutting rafters and trusses correctly. Knowing the angle lets you mark plumb and seat cuts accurately, preventing gaps and structural weakness.
Choosing suitable roofing material. Some shingles, membranes, and tiles have strict minimum slopes; knowing your pitch ensures you stay within manufacturer limits.
Estimating materials and drainage. Steeper roofs have more surface area for the same footprint, which affects how much material you need and how quickly water and snow shed.
Always verify your calculations against local building codes or manufacturer specifications, and consider professional help for complex roofs or structural changes.
FAQ: Figuring roof angles
What is the easiest way for a beginner to figure roof angles? Using a 12‑inch level and tape measure on the roof is the simplest: measure the vertical rise at the far end of the level to get X/12, then look up or calculate the angle in degrees.
How do I convert 4/12 roof pitch to degrees? Divide 4 by 12 to get 0.333, then use arctan(0.333) on a scientific calculator; the angle is about 18.4°.
Can I figure roof angles from the ground? Yes, if you know the building span and ridge height, you can calculate rise and run and then convert to pitch and degrees without climbing on the roof.
Do I always need the angle in degrees? Not always. For framing and most roofing work, the X/12 pitch is usually enough, and only certain design or engineering tasks truly need the exact degree value.
If you want, the next step can be turning this into a downloadable cheat sheet or adding diagrams that visually show each method for figuring roof angles.
🏠 Roofing Tips & Updates
Get free roofing advice, cost guides, and seasonal maintenance tips.
Roofing content specialist with 5+ years researching U.S. residential and commercial roofing. Has documented 200+ projects covering installation costs, material selection, contractor vetting, and DIY guides for homeowners across all climate zones.
Hip Roof Design: 8 Types & Benefits for Your Home (2026)
Hip roof design represents one of the most stable and aesthetically versatile roofing styles in residential and commercial construction. This architectural approach features four sloping sides that converge at a ridge or peak, creating a pyramid-like appearance without vertical gable ends. The design’s inherent structural advantages make it particularly popular in regions prone to high winds, heavy snow, and severe weather conditions.
Understanding different hip roof variations helps homeowners and builders select the optimal configuration for specific architectural styles, climate requirements, and budget constraints. From simple hip designs to complex cross-hipped configurations, each variation offers distinct benefits that influence both functionality and curb appeal.
The eight major roof types used in residential construction each offer distinct advantages gable roofs for cost-effectiveness, hip roofs for wind resistance, gambrel roofs for space maximization, and specialized designs for specific architectural needs.
The defining characteristic of hip roof design is that all four sides slope downward toward the exterior walls, eliminating the vertical gable ends found in traditional roofing styles. This creates a continuous, even plane around the entire building perimeter.
The structure typically consists of two trapezoidal roof surfaces on the longer sides and two triangular surfaces on the shorter ends. These planes meet at hip ridges, which are the external angles where adjacent roof surfaces converge.
This configuration provides superior aerodynamic properties compared to gable alternatives, as wind forces are distributed evenly across all four slopes rather than concentrating on vertical end walls. The uniform slope angles—typically ranging from 4:12 to 8:12 pitch—ensure optimal water drainage while maintaining structural integrity.
The simple hip roof represents the most common and straightforward variation of this architectural style. It features four sloping sides that meet at a horizontal ridge running the length of the building’s longest dimension.
This design creates a uniform slope on all sides, with no vertical walls or gable ends. The symmetrical appearance complements both traditional and contemporary architectural styles, making it a versatile choice for various building types—from ranch homes to commercial structures.
Installation complexity remains moderate, as the geometry follows predictable angles and measurements. Builders appreciate this design for its straightforward framing requirements, which typically reduce labor costs by 10-15% compared to more complex roof variations.
The simple hip provides excellent wind resistance due to its aerodynamic profile, with research showing 30-40% better performance against hurricane-force winds compared to gable designs. This makes it particularly valuable in coastal regions and open rural areas.
Pyramid Hip Roof Design
Pyramid Hip Roof
Pyramid hip roof design features a square footprint where all four triangular sides slope downward to converge at a single central apex point, creating a perfect pyramid shape. This elegant configuration is particularly suited for smaller structures like gazebos, pool houses, and cottages.
The symmetrical geometry provides exceptional stability, as loads distribute evenly across all four sides to the supporting walls. This equal load distribution makes pyramid designs highly resistant to structural stress from snow accumulation or wind pressure.
Key characteristics:
Square building footprint required
All slopes meet at one central point
No ridge beam necessary
Uniform triangular roof planes
Visually striking from all angles
Pyramid configurations work best for structures measuring 20-40 feet per side. Larger footprints become impractical due to the extreme roof height required to maintain proper pitch angles, which can create interior space challenges.