Slant Roof Shed: Build Guide & Roof Types
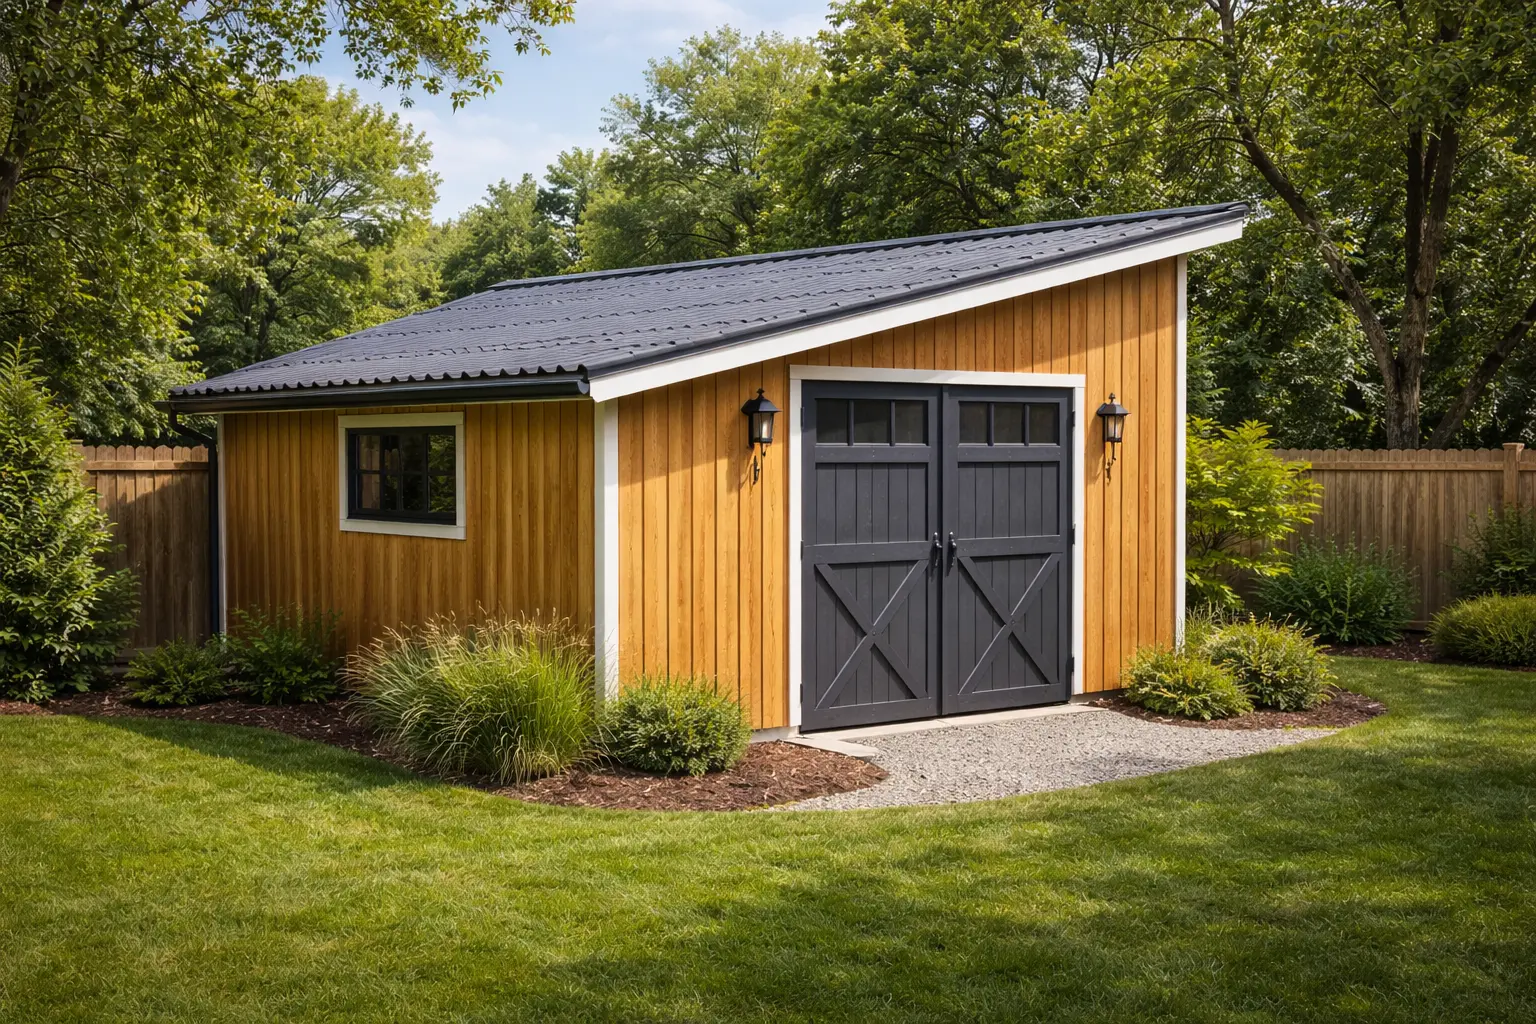
A slant roof shed, also known as a lean-to shed, skillion shed, or mono-pitch shed, has a single roof plane that slopes in one direction. This makes it the easiest and cheapest type of shed roof to build, with DIY material costs of $500 to $1,500 and total professional build costs of $1,500 to $3,500 for a standard 8×12 structure. There is no ridge beam, no complicated rafter cuts except for one birdsmouth notch, and the roof can be sloped anywhere from 1:12 (low slope) to 4:12 (standard) to 6:12+ (steep), depending on the weather, drainage needs, and personal taste.
Table of Contents
Slant roof sheds have become very popular in North America, Australia, and the UK. Homeowners love their clean, modern look, quick construction time, and much lower material and labor costs compared to gable, gambrel, or hip-roof sheds. A slant roof shed doesn’t need mirrored rafter pairs, ridge beams, or complicated compound cuts like a traditional gable shed does. Instead, it has a single plane of parallel rafters that run from a taller front wall to a shorter back wall. This design is easy enough for even first-time DIY builders to finish in one weekend.
This comprehensive 2026 guide covers slant roof shed design principles, slope calculations, rafter sizing, step-by-step framing and installation, roofing material options, cost breakdown, comparisons against other shed roof types, and a complete FAQ section for homeowners planning their build.
What Is a Slant Roof Shed?
A slant roof shed is an outbuilding with a single-pitch roof that slopes down from the highest point, which is usually the front wall, to the lowest point, which is usually the back wall or supporting structure. In professional terms, this single-plane design is called a monopitch or skillion roof. When built as an attached addition against an existing wall, it is called a lean-to.
A slant roof is different from other types of shed roofs because it doesn’t have a ridge. This means that there is no central peak where two roof planes meet. Instead, all rain, snow, and debris flow in one direction, making it easier to plan for drainage and getting rid of the need for a ridge beam assembly.
Slant Roof Shed vs Lean-To Shed
These two terms are often used interchangeably but have a technical distinction:
- Slant roof shed (freestanding): A standalone structure with four walls of varying heights typically taller at the front and shorter at the back creating the roof slope independently.
- Lean-to shed (attached): A structure where one wall is shared with or supported by an existing building (house, garage, barn), using the existing wall’s height as the high point and the lean-to’s outer wall as the low point.
Both share identical roof framing principles parallel rafters, single slope, birdsmouth cuts but lean-to sheds use the existing structure for one wall, reducing material costs by 20–30%.
Slant Roof Types: Slanted Roof Styles Explained
Understanding the full spectrum of slanted roof configurations helps you select the best design for your specific property, climate, and use case.
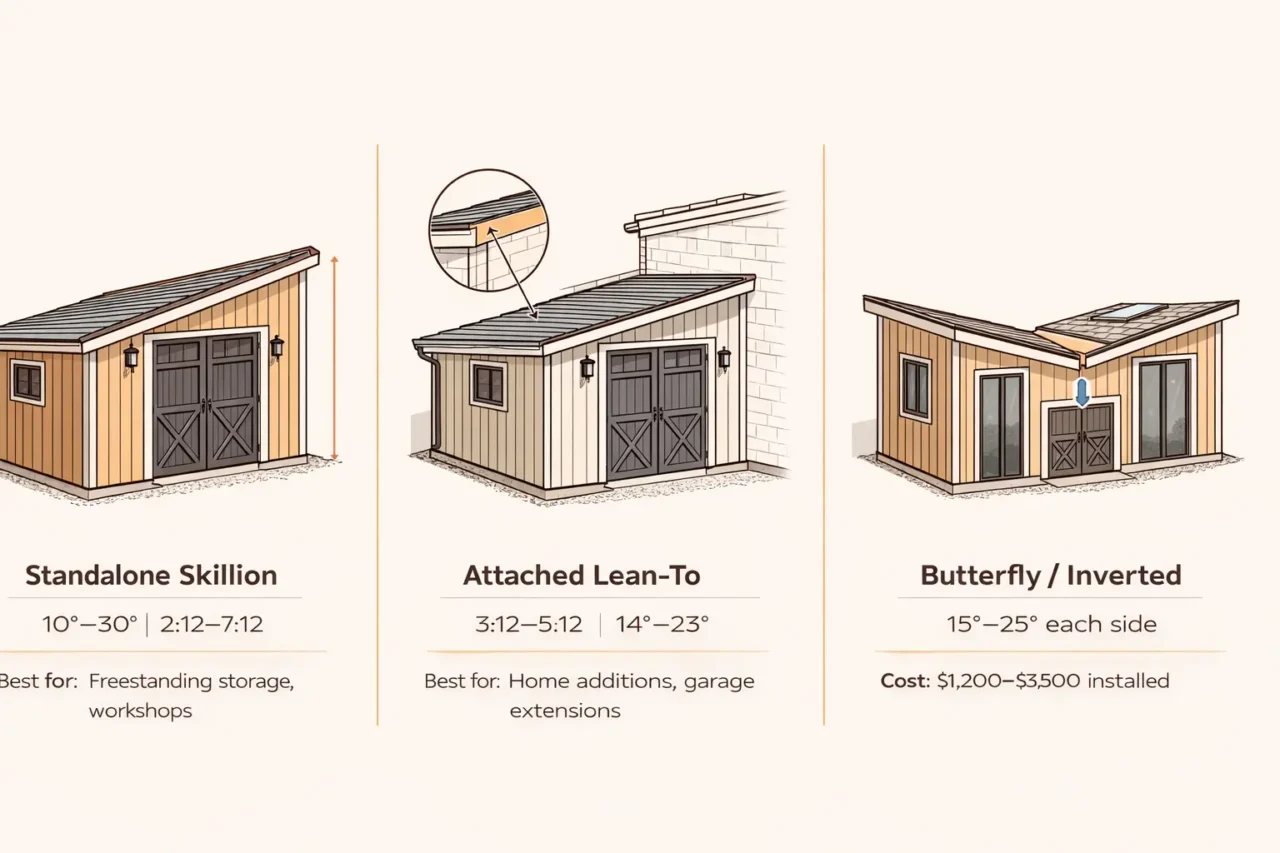
1. Single-Pitch Slant Roof (Classic Skillion)
The most common slant roof shed configuration: perfectly flat single plane running from tall front wall to short back wall. Clean, modern aesthetic. Excellent drainage. Ideal for contemporary homes, urban properties, and minimalist designs.
Best for: Tool sheds, bike storage, garden sheds, home office pods
Typical slope: 2:12–4:12
Construction difficulty: ★☆☆☆☆ (easiest)
2. Low-Slope Slant Roof (Nearly Flat)
Slope of 1:12–2:12, creating a near-flat appearance from ground level. Modern, architectural aesthetic that blends with contemporary home styles. Requires careful material selection low slopes need metal, TPO, or EPDM roofing rather than asphalt shingles (which require minimum 2:12).
Best for: Modern home additions, contemporary architecture, urban settings
Typical slope: 1:12–2:12
Construction difficulty: ★★☆☆☆
3. Steep Slant Roof (High-Pitch Skillion)
Slope of 5:12–8:12 or steeper, creating dramatic visual interest and maximizing overhead interior space at the tall wall. Excellent snow shedding in northern climates. Provides head clearance for loft storage or workshop use.
Best for: Workshop sheds, storage buildings in snow climates, architectural statement buildings
Typical slope: 5:12–8:12
Construction difficulty: ★★☆☆☆
4. Lean-To Attached Slant Roof
Attached to an existing structure at the high end, using the parent building’s wall as one side. Reduces wall framing by 25%, shares structural load with existing building, and creates covered transition spaces between buildings.
Best for: Garage additions, house storage extensions, covered walkways, firewood storage
Typical slope: 3:12–6:12 (must clear adjacent roof drainage)
Construction difficulty: ★★☆☆☆
5. Butterfly Slant Roof (Inverted Pitch)
Two opposing slant planes pitched inward toward a central valley rather than outward creates a distinctive V-shape that channels rainwater to a central collection point. Used in contemporary and sustainable architecture for rainwater harvesting.
Best for: Rainwater collection, contemporary design statement, hot-climate sheds
Typical slope: 2:12–4:12 per plane
Construction difficulty: ★★★☆☆
Slant Roof Shed Cost Breakdown (2026)
DIY Material Cost by Shed Size
| Shed Size | Floor Area | Lumber (framing) | Roofing Material | Hardware/Fasteners | Total DIY Materials |
|---|---|---|---|---|---|
| 6×8 ft | 48 sf | $180–$280 | $120–$250 | $60–$100 | $360–$630 |
| 8×10 ft | 80 sf | $250–$380 | $180–$320 | $80–$130 | $510–$830 |
| 8×12 ft | 96 sf | $300–$450 | $220–$380 | $90–$150 | $610–$980 |
| 10×12 ft | 120 sf | $370–$560 | $280–$460 | $110–$180 | $760–$1,200 |
| 12×16 ft | 192 sf | $520–$780 | $420–$680 | $150–$240 | $1,090–$1,700 |
| 16×20 ft | 320 sf | $780–$1,150 | $650–$1,050 | $200–$320 | $1,630–$2,520 |
Professional Build Cost by Shed Size
| Shed Size | Foundation | Framing + Roof | Roofing Material | Total Professional |
|---|---|---|---|---|
| 8×10 ft | $200–$400 | $600–$1,000 | $180–$320 | $980–$1,720 |
| 8×12 ft | $250–$500 | $700–$1,200 | $220–$380 | $1,170–$2,080 |
| 10×12 ft | $300–$600 | $900–$1,500 | $280–$460 | $1,480–$2,560 |
| 12×16 ft | $400–$800 | $1,200–$2,000 | $420–$680 | $2,020–$3,480 |
| 16×20 ft | $600–$1,200 | $1,800–$3,000 | $650–$1,050 | $3,050–$5,250 |
Roofing Material Cost Comparison for Slant Roof Shed
| Material | Minimum Slope | Material Cost (per sf) | DIY Difficulty | Lifespan |
|---|---|---|---|---|
| Asphalt shingles | 2:12 | $0.80–$1.80/sf | Easy | 15–25 years |
| Corrugated metal | 1:12 | $1.20–$2.50/sf | Moderate | 30–50 years |
| Standing seam metal | 0.5:12 | $3.00–$6.00/sf | Hard | 40–70 years |
| EPDM rubber | 0.25:12 | $1.50–$3.00/sf | Moderate | 20–30 years |
| TPO/PVC membrane | 0.25:12 | $2.00–$4.00/sf | Moderate | 20–30 years |
| Polycarbonate panels | 1:12 | $2.00–$5.00/sf | Easy | 10–20 years |
| Cedar shingles | 3:12 | $2.50–$5.00/sf | Hard | 20–30 years |
Slant Roof Shed Design: Slope and Pitch Calculations
Understanding Roof Pitch in a Slanted Roof
Roof pitch is expressed as the rise over run ratio the number of inches the roof rises vertically for every 12 inches of horizontal span. A 3:12 pitch rises 3 inches for every 12 inches of horizontal distance.
Why pitch matters for slant roof sheds:
- Too low (under 1:12): Water pools, debris accumulates, leaks develop requires fully waterproof membrane roofing
- 2:12–3:12: Minimum for asphalt shingles; adequate drainage for most climates
- 4:12–6:12: Optimal for most applications good drainage, weather resistance, adequate headroom variation
- 6:12+: Excellent snow shedding; dramatic visual impact; increases structural loads
Calculating Wall Height Difference for Your Desired Pitch
The wall height difference between your front (tall) and back (short) walls determines the roof slope:
Formula:
Wall height difference (inches) = (Shed depth in feet × desired rise) ÷ 1
Example: 10 ft deep shed at 3:12 pitch:
- Wall height difference = 10 × 3 = 30 inches (2.5 feet)
- If back wall is 7 ft tall, front wall = 7 ft + 2.5 ft = 9.5 ft tall
Example: 12 ft deep shed at 4:12 pitch:
- Wall height difference = 12 × 4 = 48 inches (4 feet)
- If back wall is 7 ft, front wall = 11 ft tall
Common Pitch Recommendations by Climate
| Climate Zone | Recommended Minimum Pitch | Reasoning |
|---|---|---|
| Desert/Southwest (low rainfall) | 1:12–2:12 | Minimal drainage demand |
| Moderate climate (Southeast/Midwest) | 3:12–4:12 | Standard drainage, asphalt shingles compatible |
| High rainfall (Pacific Northwest) | 4:12–6:12 | Fast drainage prevents water infiltration |
| Heavy snow (Northeast/Midwest/Mountain) | 5:12–8:12 | Active snow shedding prevents structural overload |
| Coastal/High wind | 3:12–4:12 | Lower profile reduces wind uplift exposure |
Materials and Tools for Building a Slant Roof Shed
Lumber Requirements (Standard 8×12 Slant Roof Shed at 3:12 Pitch)
Wall Framing:
- Bottom plates: 2×4 PT lumber (pressure-treated for ground contact), 8 ft and 12 ft lengths
- Top plates: 2×4 standard lumber (doubled top plate)
- Wall studs: 2×4 at 16 inches on center
- Front wall studs: Taller than back wall by the calculated height difference
- Side wall studs: Graduated heights from front to back (cut at rafter angle)
Roof Framing:
- Rafters: 2×6 (for spans up to 12 ft) or 2×8 (for spans 12–16 ft) at 16 or 24 inches on center
- Roof sheathing: 15/32″ plywood or 7/16″ OSB
Quantity estimate for 8×12 shed:
- 2×4 studs (8 ft): 30–40 pieces
- 2×4 plates: 8 pieces (8 ft lengths)
- 2×6 rafters (14 ft): 8–9 pieces
- Plywood/OSB (4×8 sheets): 5–6 sheets
- Fascia boards (1×6): 4 pieces
Essential Tools
- Circular saw or miter saw
- Speed square and framing square
- Chalk line
- Cordless drill/driver
- Tape measure (25 ft)
- Level (4 ft and torpedo)
- Rafter square (for birdsmouth cuts)
- Hammer and nail gun (or pneumatic nailer)
- Safety equipment: hard hat, gloves, safety glasses, fall protection
Step-by-Step: How to Build a Slant Roof Shed
Step 1: Planning, Permits, and Foundation
Permitting:
Most jurisdictions require building permits for sheds over 100–200 square feet or structures over a certain height. Check with your local building department before starting fines for unpermitted structures can exceed $1,000–$5,000, and unpermitted sheds may require demolition.
Foundation options for slant roof shed:
- Concrete blocks on compacted gravel: Most common, easy, adjustable best for most DIY applications
- Poured concrete slab: Permanent, maximum stability, required for heavy storage or workshop use
- Deck blocks on treated lumber skids: Fast, budget-friendly, moveable if needed
- Helical piers: Best for sloped sites or areas with poor drainage
Ensure the foundation is:
- Level in all directions (critical an unlevel foundation transfers stress throughout the entire structure)
- Elevated minimum 6 inches above grade to prevent moisture wicking into floor framing
- Sized precisely to your shed’s floor plan dimensions
Step 2: Build and Square the Floor Frame
- Cut floor joists from 2×6 or 2×8 PT lumber to match shed width (8 ft, 10 ft, or 12 ft)
- Assemble rim joists and interior joists at 16-inch on-center spacing
- Verify square by measuring diagonally both diagonal measurements must be equal
- Install blocking between joists at the center span for additional rigidity
- Fasten ¾-inch tongue-and-groove plywood floor decking with construction adhesive and 2½-inch screws
- Re-verify level this is your last chance to adjust before walls go up
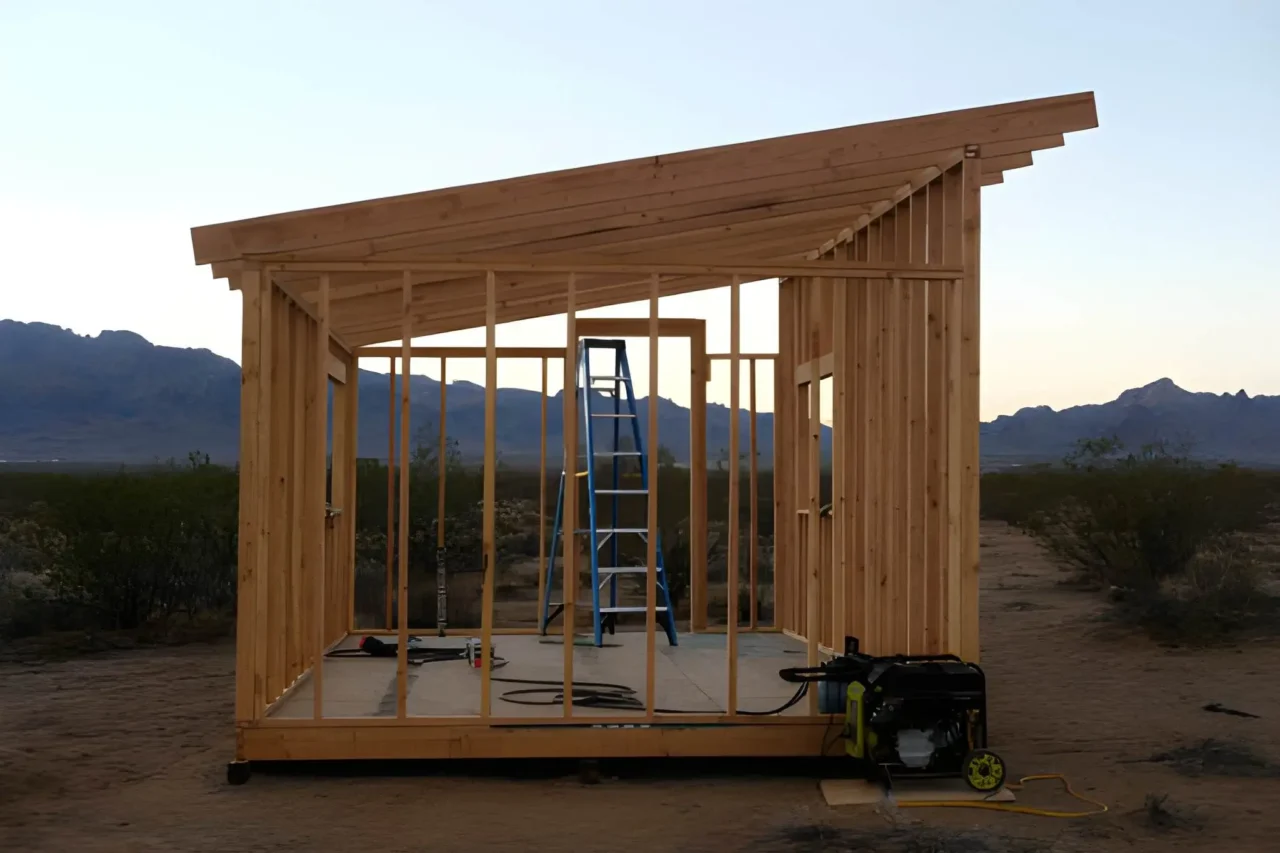
Step 3: Frame the Walls
Wall framing for a slant roof shed requires four walls of different heights:
- Back wall (low side): Standard height typically 7 ft (84 inches) for comfortable interior clearance
- Front wall (high side): Back wall height + calculated pitch difference
- Example: 8 ft deep shed at 3:12 = back wall 84″ + 24″ = 108 inches (9 ft)
- Side walls: Graduated height from front to back, with top plates cut at the rafter angle
Wall framing process:
- Cut all studs to correct height based on wall position (front, back, or graduated side)
- Assemble each wall flat on the floor: bottom plate + studs + single top plate
- Mark and cut door and window rough openings per your design
- Stand walls, brace temporarily, and connect corners with structural screws
- Add doubled top plates, lapping corners for structural continuity
- Verify all walls plumb (vertical) and brace until roof is complete
“For slant roof sheds, the side walls are the most complex framing challenge the top of each side wall stud must be cut at the rafter angle so the roof deck lies flat. Cut a test rafter first, determine the exact angle, then use that angle on your side wall top plate cut.” ATI Improvements Lean-To Shed Guide, 2022
Step 4: Calculate and Cut Roof Rafters
This is the most technically demanding step in slant roof shed construction but significantly simpler than gable rafter cuts.
Rafter length calculation:
For a slant roof shed, rafters run from the front wall top plate to the back wall top plate plus desired overhangs.
Formula:
Rafter length = √(shed depth² + height difference²) + front overhang + back overhang
Example: 10 ft deep shed, 30-inch height difference (3:12 pitch), 12-inch front overhang, 6-inch back overhang:
- Roof span = √(120² + 30²) = √(14,400 + 900) = √15,300 = 123.7 inches (10.3 ft)
- Add overhangs: 10.3 ft + 1 ft + 0.5 ft = 11.8 ft → cut to 12 ft
Birdsmouth cut:
The birdsmouth is a notch cut into the rafter bottom that allows the rafter to sit flat on the wall’s top plate:
- Vertical cut (plumb cut): perpendicular to the rafter’s top surface
- Horizontal cut (seat cut): parallel to the wall top plate, typically 1.5 inches deep
- Use a speed square set to your roof pitch angle to mark both cuts
- Cut the first rafter, test fit on both walls, verify it sits flat and aligns with your chalk line before cutting all remaining rafters from this template
Rafter spacing:
- 16 inches on center: Maximum structural performance, required for heavy snow loads or spans over 12 ft
- 24 inches on center: Adequate for light to moderate loads, reduces lumber cost by 25–30%
Step 5: Install the Roof Rafters
- Mark rafter layout on both front and back wall top plates at your chosen spacing (16″ or 24″ OC)
- Position first rafter at one end, verify it’s plumb and level side-to-side
- Fasten birdsmouth seat to top plate using hurricane ties or rafter ties (never toenail only inadequate uplift resistance)
- Install remaining rafters per your layout marks
- Add a fascia board (1×6 or 2×6) across the rafter tails at front and back overhangs this provides a finished edge and supports gutters
- Install blocking between the outermost rafters at overhang locations for additional support
- Double-check all rafters are parallel and evenly spaced before proceeding to sheathing
Step 6: Install Roof Sheathing
- Start at the low (back) end of the roof, positioning first sheet perpendicular to rafters
- First sheet should overhang the fascia by ¼–½ inch
- Fasten plywood/OSB with 8d nails or 2-inch screws at 6 inches on center along edges and 12 inches in the field
- Stagger sheet joints end joints of adjacent rows must not align (offset by minimum 4 ft / half sheet)
- Use H-clips (panel clips) between sheets at unsupported mid-span edges
- Continue from low end to high end, trimming final sheet to fit flush at ridge
- Mark rafter locations on sheathing surface with chalk line before fasteners to ensure all nails hit solid framing
Step 7: Install Underlayment
For slopes 2:12 and above:
- Install synthetic roofing underlayment (30+ perms) horizontally from low edge to high edge
- 6-inch side laps, 6-inch end laps
- Fasten with cap nails 12 inches on center at overlaps
- In cold climates: apply ice and water shield at eave (low end) extending minimum 24 inches inside exterior wall line
For slopes under 2:12:
- Use EPDM, TPO, or PVC fully adhered membrane asphalt underlayment is insufficient
- Seams must be heat-welded or chemically bonded per membrane manufacturer specs
Step 8: Install Roofing Material
Asphalt shingles (most common, minimum 2:12 slope):
- Install metal drip edge at low eave edge under underlayment
- Install drip edge at rake (side) edges over underlayment
- Install starter strip along eave edge
- Begin shingle installation at eave, working toward the high end
- Offset each course by half-shingle width to prevent aligned vertical joints
- Secure each shingle with 4–6 roofing nails (not staples) in the manufacturer’s nailing zone
- At the high (ridge) end, trim final course flush or install a ridge cap for a finished appearance
Corrugated metal (minimum 1:12 slope):
- Start at the low end and work upward
- Overlap adjacent panels 1.5 corrugations side-to-side
- Overlap end laps minimum 6 inches (12 inches for slopes under 2:12)
- Fasten with hex-head metal roofing screws with rubber washers, driven into panel crests
- Install foam closure strips at eave and ridge to seal corrugation voids
Step 9: Install Siding, Doors, and Finishing Touches
- Siding: Install vinyl lap siding, T1-11 plywood siding, or board-and-batten from bottom to top, overlapping each course
- Corner trim: Install before siding for clean, finished corners
- Door installation: Pre-hung doors are easiest; double doors recommended for equipment storage
- Ventilation: Install soffit vents at eave and ridge vent or gable vents to prevent moisture buildup
- Gutters: Attach seamless aluminum gutter to fascia at low (back) edge, directing water away from foundation
- Paint or stain: Apply two coats of exterior paint or stain to all wood surfaces
Slant Roof Shed vs Other Shed Roof Types
Choosing the right roof style is one of the most important early decisions in shed design. Here’s how the slant roof compares to every other major shed roof type:
Full Comparison Table
| Factor | Slant Roof (Skillion) | Gable Roof | Gambrel Roof | Hip Roof | Flat Roof |
|---|---|---|---|---|---|
| Construction complexity | ★☆☆☆☆ Easiest | ★★☆☆☆ Moderate | ★★★★☆ Hard | ★★★★☆ Hard | ★☆☆☆☆ Easy |
| Material cost | Lowest | Low-Moderate | Moderate | Moderate-High | Low |
| Interior headroom | Moderate (one side high) | High (central peak) | Maximum (loft potential) | Moderate | Low |
| Drainage | Excellent | Excellent | Good | Good | Poor |
| Snow shedding | Excellent (one direction) | Excellent | Good | Good | Poor |
| Wind resistance | Good | Moderate (vulnerable end gables) | Good | Excellent (no gable ends) | Good |
| Aesthetic | Modern/Contemporary | Traditional | Barn/rustic | Classic | Industrial/Modern |
| DIY friendly | ✅ Highly | ✅ Yes | ⚠️ Challenging | ❌ Difficult | ✅ Yes |
| Typical cost premium vs slant | Baseline | +10–15% | +25–40% | +35–50% | -5–10% |
| Best use case | Tool/garden shed | General purpose | Large storage/workshop | Premium builds | Commercial only |
When to Choose Slant Roof Over Gable
Choose a slant roof shed when:
- Budget is the primary concern single-slope framing uses fewer materials and fewer complex cuts
- Attached lean-to design against existing building is the goal
- Modern or contemporary architectural style of your home demands a compatible shed aesthetic
- Small to medium shed size (under 12×16 ft) where gable’s central headroom advantage is less significant
- First-time DIY builder who wants the simplest possible roof framing challenge
Choose a gable roof shed when:
- Maximum interior headroom throughout the full floor area is required
- Traditional aesthetic matching your home’s architecture is important
- Larger structures (12×16 ft and above) where central headroom matters
- Loft storage is planned above the main floor
Slant Roof Shed: Pros and Cons
Advantages
- Simplest roof framing: Single-slope design requires no ridge beam, no complex compound cuts, and no mirror-image rafter pairs reducing both material cost and framing time significantly
- Superior drainage: Single-direction water flow with no valleys, no ridges, and no areas where debris can accumulate making slanted roofs among the most leak-resistant shed designs
- Modern, contemporary aesthetic: Clean lines and simple geometry suit modern architecture, urban properties, and contemporary shed designs that complement updated home exteriors
- Ideal for lean-to applications: Perfect for attaching to existing buildings uses existing wall as high-point support, reducing wall framing by up to 25%
- Excellent snow shedding: Single slope efficiently sheds snow in one direction particularly valuable for high-pitch slant roofs (5:12+) in northern climates
- Lower wall material costs: While the front wall is taller, the overall framing lumber quantities are typically lower than gable or gambrel designs of equivalent footprint
Disadvantages
- Uneven interior headroom: The sloped ceiling means maximum headroom only at the tall wall the short wall may have restricted clearance for tall users or large equipment
- Insulation challenges: The sloped ceiling with no attic space makes insulation difficult spray foam is the most effective but expensive option; batt insulation is hard to install properly on angled surfaces
- Limited headroom at low wall: In sheds with significant pitch difference, the back wall area may be useful only for ground-level storage
- Appearance from certain angles: The asymmetric profile may look less balanced than a gable roof from certain viewpoints particularly for larger sheds where pitch difference creates a dramatic wall height variation
- Drainage direction planning required: All water discharges in one direction foundation drainage and gutter placement must account for concentrated water flow at the low edge
Common Slant Roof Shed Mistakes to Avoid
Mistake 1: Insufficient Roof Pitch
Problem: Building with 1:12 or less pitch using asphalt shingles leads to water infiltration, shingle deterioration, and voided material warranties.
Solution: Use minimum 2:12 pitch for asphalt shingles; 3:12–4:12 is optimal for most climates. For slopes under 2:12, upgrade to metal roofing or fully adhered membrane.
Mistake 2: Skipping Hurricane Ties
Problem: Toenailing rafters to top plates provides insufficient resistance to wind uplift in severe weather, roofs lift off walls.
Solution: Install Simpson Strong-Tie H2.5A or equivalent hurricane ties at every rafter-to-wall-plate connection. Cost: $0.50–$1.00 per rafter connection the cheapest insurance available.
Mistake 3: Incorrect Birdsmouth Cut Depth
Problem: Cutting the birdsmouth seat more than ⅓ of the rafter depth weakens the rafter structurally at the point of maximum stress.
Solution: Keep birdsmouth seat cut to maximum 1.5 inches deep (or ⅓ rafter depth, whichever is less). Mark carefully with a speed square set to your exact pitch before cutting.
Mistake 4: Not Accounting for Rafter Angle on Side Walls
Problem: Side wall studs cut square (90 degrees) leave a gap between wall top and rafter bottom, preventing proper fastening and creating air infiltration paths.
Solution: Calculate your exact rafter angle (arctangent of rise/run) and cut all side wall top plate studs at that angle. Cut a test piece and verify fit against a positioned rafter before cutting all studs.
Mistake 5: Forgetting Ventilation
Problem: A sealed slant roof shed with no vents traps moisture, promotes mold growth, and degrades wood framing and stored contents.
Solution: Install at least one soffit vent at the low eave and a gable vent or ridge vent at the high end even a small 8×16 inch vent at each location dramatically improves air circulation. Net free vent area should be at least 1 sq ft per 150 sq ft of floor area.
Slant Roof Shed Maintenance Schedule
Every 6 Months
- Clear debris from roof surface
- Inspect and clean gutter at low eave edge
- Check fascia boards for paint peeling or moisture damage
Annually
- Full visual inspection of roofing material for cracks, lifted edges, or missing fasteners
- Inspect all flashing around vents and penetrations
- Verify rafter ties/hurricane ties still secure no rust or looseness
- Touch up exterior paint or stain where needed
- Check foundation level settle or shift is common in the first 2–3 years
Every 3–5 Years
- Professional inspection if you notice any roof leaks, sagging, or unusual deflection
- Re-caulk any exposed fastener heads on metal roofing
- Consider re-staining cedar or wood siding if moisture absorption increases
- Evaluate underlayment condition if roofing material is replaced

Frequently Asked Questions
What is a slant roof shed?
A slant roof shed is an outbuilding with a single-pitched roof sloping in one direction, from a taller front wall to a shorter back wall. Also called a lean-to shed, skillion shed, or mono-pitch shed, this design is the simplest and most affordable shed roof type to build requiring no ridge beam, no complex rafter pairs, and only basic birdsmouth cuts to complete.
How much does it cost to build a slant roof shed?
A slant roof shed costs $500–$1,500 in DIY materials for a standard 8×12 ft build, or $1,500–$3,500 professionally built depending on size, materials, and region. Larger structures (12×16 ft and above) cost $2,000–$5,000+ professionally. The slant roof design is 10–25% cheaper to build than an equivalent gable-roof shed due to simpler framing and fewer materials.
What is the best pitch for a slant roof shed?
The best pitch for most slant roof sheds is 3:12 to 4:12 providing reliable drainage for all climates, compatibility with standard asphalt shingles, adequate snow shedding, and a visually balanced wall height difference. In heavy-snow regions, 5:12–6:12 is preferred for active snow shedding. Low rainfall, mild climates can use 2:12 successfully.
What roofing material is best for a slanted roof?
Asphalt shingles are the most popular and affordable option for slant roof sheds with 2:12+ slope, offering easy installation and 15–25 year lifespan at $0.80–$1.80/sf. Corrugated metal is preferred for slopes under 2:12 or in climates with heavy snowfall ($1.20–$2.50/sf, 30–50 year lifespan). Metal roofing and EPDM rubber membrane are best for very low slopes under 1:12.
How do I calculate rafter length for a slant roof shed?
Use the Pythagorean theorem: rafter length = √(shed depth² + height difference²), then add your desired front and back overhangs. For a 10 ft deep shed with a 30-inch height difference (3:12 pitch), the structural span = √(120² + 30²) ≈ 123.7 inches. Add a 12-inch front overhang and 6-inch back overhang for a total rafter length of approximately 141.7 inches (11.8 ft) cut from 12 ft stock.
Can I attach a slant roof shed to my house?
Yes a slant roof shed attached to a house is called a lean-to shed. The house wall serves as the high point, eliminating one wall of framing. You must attach the ledger board (the beam the rafters rest against) securely to the house’s structural framing (not just siding), flash the connection properly to prevent water infiltration, and verify the attachment doesn’t conflict with house windows, doors, or electrical service. Most jurisdictions require permits for attached structures.
How far apart should rafters be on a slant roof shed?
Slant roof shed rafters should be spaced 16 inches on center for maximum structural performance, especially with plywood sheathing and in climates with snow loads. 24-inch on-center spacing is acceptable for lighter loads and smaller sheds (under 10 ft wide) with OSB sheathing rated for 24-inch spans. Always match sheathing thickness to rafter spacing 7/16-inch OSB minimum for 16 OC; 15/32-inch plywood recommended for 24 OC.
Do I need a permit to build a slant roof shed?
Most municipalities require building permits for sheds exceeding 100–200 square feet in floor area or structures taller than 10–12 feet. Requirements vary significantly by jurisdiction some cities exempt all sheds under 200 sf while others require permits for anything over 64 sf. Always check with your local building department before starting construction. Unpermitted structures may require demolition and can complicate property sales.
What is the difference between a slant roof and a gable roof shed?
A slant roof has one single sloped plane running in one direction, while a gable roof has two symmetric planes meeting at a central ridge peak. Slant roofs are simpler and cheaper to build, drain in one direction, and suit modern aesthetics. Gable roofs provide more uniform interior headroom, a traditional appearance, and better performance on very large sheds (12×16 ft and above) where central headroom becomes important.
How do I insulate a slant roof shed?
Insulating a slant roof shed is challenging because the roof is the ceiling there is no separate attic space. The most effective options are: closed-cell spray foam applied directly to the underside of roof sheathing between rafters (R-6.5 per inch, $1.00–$2.00/sf); rigid foam board (EPS or polyiso) installed between rafters then covered with a vapor barrier; or a parallel chord truss design that creates a small attic cavity for batt insulation. Spray foam is recommended as the most effective and air-tight option for small sheds.
Get free roofing advice, cost guides, and seasonal maintenance tips.

Roofing content specialist with 5+ years researching U.S. residential and commercial roofing. Has documented 200+ projects covering installation costs, material selection, contractor vetting, and DIY guides for homeowners across all climate zones.
Leave A Comment