Asphalt Roofing Nails: Sizes, Types & Where to Buy
Asphalt nails more commonly called roofing nails are one of the most important “small parts” in an asphalt shingle roof because correct nail type, size, and placement directly control wind resistance, leak risk, and warranty compliance. If you’re looking up where to nail shingles, the short answer is: follow the manufacturer’s printed nail line (or designated nailing zone), keep nails at least 1 inch from the shingle ends, and use the correct number of nails (typically 4, or 6 in high-wind/steep-slope conditions).
This guide explains everything a homeowner, DIYer, or new roofer needs to know about asphalt nails: nail types and materials, required diameters and head sizes, nail length and deck penetration rules, nail placement on 3-tab vs laminated (architectural) shingles, 4‑nail vs 6‑nail patterns, what “high nailing” is, how pneumatic nailers should be set, and the most common mistakes that cause blow-offs and leaks.
Table of Contents
Asphalt nails are not just “fasteners”—they’re part of the roof’s wind‑resistance system. When asphalt nails are placed in the correct nailing zone, the nail head clamps the shingle without tearing the mat, and the fastener penetrates the roof deck enough to resist uplift forces during gusts. That’s why learning where to nail shingles correctly matters as much as choosing a premium shingle brand.
In many real-world blow‑off cases, the shingle itself isn’t defective—the asphalt nails were installed too high (missing the intended layers), too low (visible exposure), overdriven (cutting into the mat), or underdriven (holding the shingle up and preventing sealing). ARMA notes that improperly located and/or driven nails can lead to sealing failures, blow-offs, raised tabs, and buckling.
What are asphalt nails?
“Asphalt nails” usually refers to roofing nails used to fasten asphalt shingles to roof decking. These nails are designed with a wide head for holding power and a corrosion-resistant finish for long-term exposure to moisture and temperature swings.
In practice, selecting asphalt nails is not just about “any nail that fits” industry guidance specifies minimum shank diameter, minimum head diameter, corrosion resistance, and sufficient length to properly penetrate the roof deck.
Why asphalt nails matter more than people think

Shingles are a system: the sealant strip, shingle overlap, starter strip, underlayment, and asphalt nails all work together to resist wind uplift and keep water moving down the roof surface. If nails are placed too high, too low, crooked, overdriven, or underdriven, the shingle may not be fastened through the proper layers or may not seal correctly reducing wind performance and increasing leak risk.
ARMA (Asphalt Roofing Manufacturers Association) highlights that nail placement guidance is usually provided in the manufacturer installation instructions, including the recommendation that no nail head should be less than 1 inch from either end of the shingle. Owens Corning similarly stresses that shingle nailing patterns and nail counts relate to wind warranty and code requirements.
Asphalt nails vs roofing staples
Some older roofs were installed with staples, and homeowners sometimes ask if staples are “fine” for repairs. ARMA’s guidance emphasizes nails as the required fastening method under model codes and focuses its recommendations on roofing nails rather than staples. If you’re patching or re-roofing, matching the intended fastening system with proper asphalt nails (correct gauge, head size, and penetration) is the safer approach for performance and compliance.
Minimum nail penetration
Choosing asphalt nails by length only works if the nail actually penetrates the deck correctly after passing through shingles, underlayment, and any flashing layers. ARMA says to select nails long enough to penetrate at least ¾ inch into the roof deck, and if the deck is less than ¾ inch thick, the nail should penetrate through the sheathing at least 1/8 inch. That deck penetration rule is one of the most important “invisible” factors in where to nail shingles because perfect placement still fails if the nail doesn’t bite solid wood.
This is also why roof-overs (installing new shingles over existing shingles) can change asphalt nail selection. ARMA says nail length should account for the number of shingle layers, shingle thickness(es), underlayment, and flashing. If your roof has extra layers, longer asphalt nails may be required to maintain the minimum penetration rule.
Where to nail shingles on sealant-strip shingles
A quick way to understand where to nail shingles is to identify whether the sealant is on the top surface or the back surface of the shingle. ARMA explains that for most shingles with sealant on the top surface, nails should be placed below the sealant strip but above the area that will be visible after the roof is complete. For shingles with sealant on the back surface, manufacturers often print a line (or lines) indicating where asphalt nails should be placed.
This matters because the correct nailing zone is designed to both fasten the shingle and properly secure the overlapping course. ARMA also notes that for multi-layer laminated shingles, manufacturers may require nails be positioned so they penetrate both/all shingle layers, so the “where to nail shingles” answer is sometimes different for architectural shingles than for three-tab shingles.
End distance rule
Even if you follow the nail line perfectly, asphalt nails placed too close to the edges increase the risk of tearing and wind damage. ARMA states no nail head should be less than 1 inch from either end of the shingle. That rule is easy to miss when you’re rushing, but it’s a major part of correct where to nail shingles layout and consistent wind performance.
ARMA also recommends that, whenever possible, no cutout or end joint should be less than 2 inches from a nail in an underlying course. This helps prevent weak points from stacking on top of each other and reduces the chance of localized buckling or blow‑offs.
Roofing nail requirements (minimum specs)
When shopping for asphalt nails, you’re typically choosing among multiple materials and sizes, but there are widely cited minimums.
Minimum shank diameter and head diameter
ARMA states that nails are required to have a minimum nominal shank diameter of 12 gauge (0.105″) and a minimum head diameter of 3/8″ (0.375″). Atlas also states nails should have a minimum nominal shank diameter of 11- or 12-gauge and a minimum head diameter of 3/8″.
Corrosion-resistant material
ARMA specifies corrosion-resistant roofing nails such as galvanized steel, stainless steel, aluminum, or copper, and notes galvanizing is a typical method of achieving corrosion resistance. The reason this matters is simple: rusted nails can lose holding power and stain roofing materials over time.
Penetration into roof deck
A common requirement for roofing nails is to penetrate the roof deck adequately; Construction Mentor notes roof decking penetration should be at least 3/4″ (or 1/8″ past the underside of the deck), which is why 1″ or 1-1/4″ nails are commonly used for asphalt/fiberglass shingles depending on assembly thickness.
Asphalt nail sizes (how long should roofing nails be?)
Correct nail length is one of the most searched questions related to asphalt nails, because “too short” is a hidden failure.
Common nail length for asphalt shingles
FastenerUSA states the most commonly recommended nail size for asphalt shingles is 1-1/4 inch. This length is commonly sufficient for a standard single-layer shingle installation over typical underlayment and sheathing, assuming it achieves proper penetration.
When you need longer nails
If you’re installing over thicker assemblies (for example, roof-overs or additional layers), Atlas notes nails must be a minimum of 1-1/4″ long and Atlas recommends a 2″ nail for a roof-over. The key principle is that nail length must still achieve adequate penetration into the deck after going through shingles and underlayment layers.
Nail head size matters too
Even if the nail is long enough, too small a head can pull through shingles under wind uplift; minimum head diameter guidance (3/8″) is intended to reduce pull-through risk.
Where to nail shingles (the core rule)
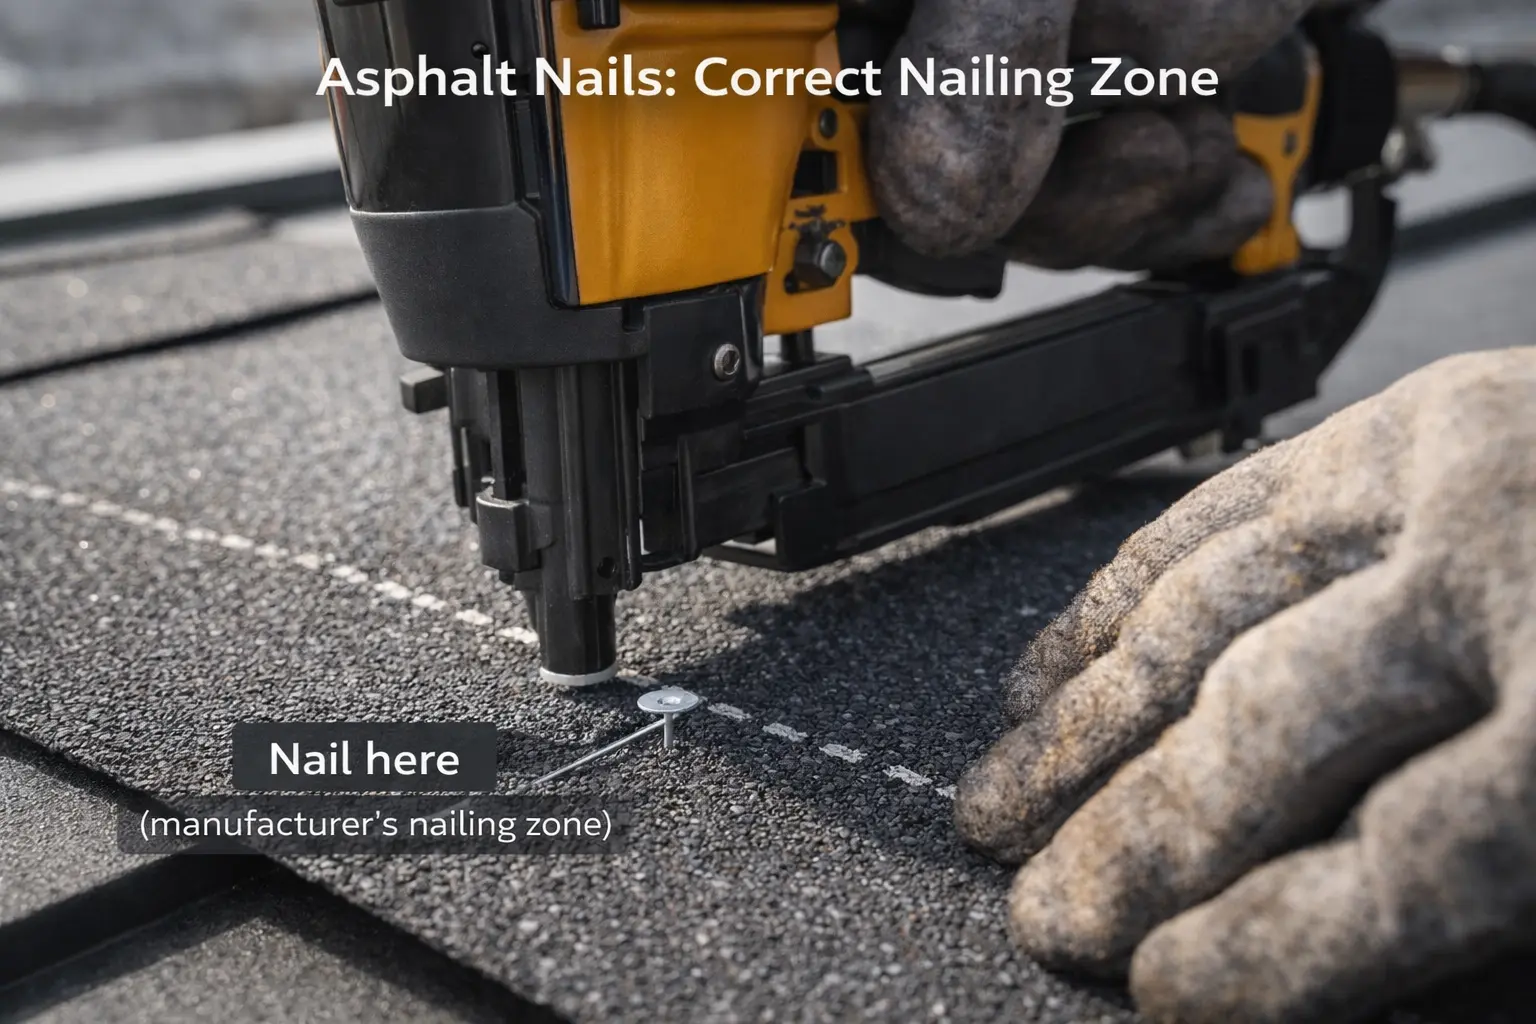
If you only remember one thing about where to nail shingles, it’s this: nails must go in the manufacturer’s designated nailing zone so they fasten the shingle properly and secure the layer below.
Nail line / nailing zone
Most modern shingles include a nail line or “StrikeZone-style” reinforced zone, and manufacturers specify where nails should be placed to penetrate through required layers especially for laminated shingles. ARMA explicitly notes that for multi-layer laminated shingles, manufacturers may require nails be positioned so they penetrate all shingle layers, and you should consult manufacturer instructions for placement and pattern.
Distance from shingle ends
ARMA states no nail head should be less than 1 inch (25 mm) from either end of the shingle. This reduces edge tearing and helps prevent wind from catching and ripping the shingle at its weakest points.
Avoid nailing too close to joints below
ARMA notes that whenever possible you should ensure no cutout or end joint is less than 2″ from a nail in an underlying course. This reduces the chance of concentrating stress at joint lines.
Asphalt nails and nailing patterns (4 nails vs 6 nails)
“How many nails per shingle” is tied to wind rating and local code.
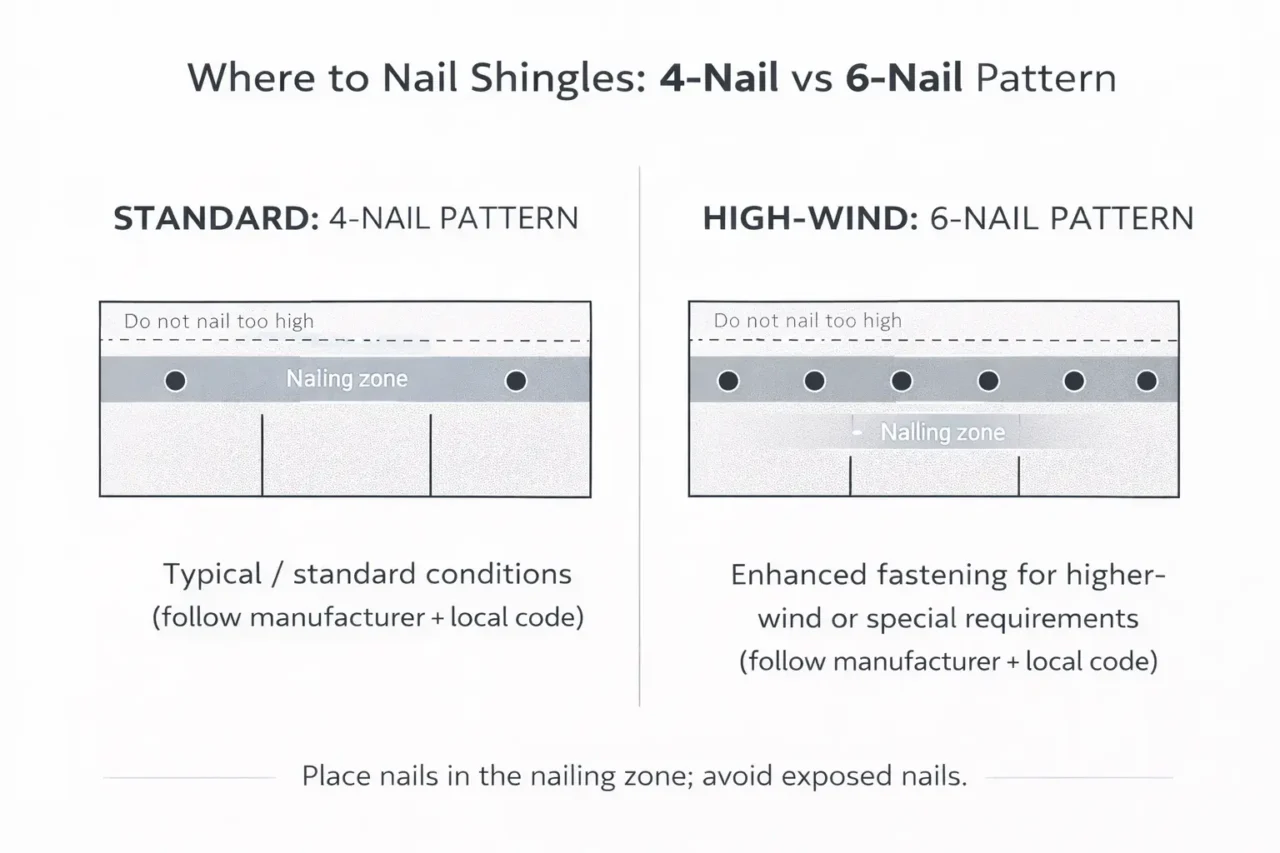
Standard 4-nail pattern
Owens Corning describes a four-nail fastening pattern per shingle (for Duration shingles) as required to take advantage of the maximum wind warranty available for that product. In many standard installations, 4 nails per shingle is typical when manufacturer instructions and local codes allow it.
6-nail pattern (high wind / steep slope / code)
Owens Corning states six nails are required for structures with slopes exceeding 60 degrees (21 inches per foot), and notes local building codes may require six nails as well. ARMA reinforces that nail quantity and placement varies by product and manufacturer instructions.
Why 6 nails often performs better
Pro Tool Reviews recommends a 6-nail pattern regardless of whether you live in a high-wind area, arguing it adds little effort and cost but can help reduce early failure risk. Whether you adopt 6 nails everywhere depends on manufacturer instructions, wind zone requirements, and warranty conditions.
Where to nail shingles: 3-tab vs architectural shingles
Different shingle designs can change the correct nailing zone, even though the concept stays the same.
Three-tab shingles
Three-tab shingles typically have a straightforward nailing zone designed so nails secure the shingle and catch the top edge of the course below. Manufacturer instructions will show the exact line and spacing.
Laminated (architectural) shingles
Laminated shingles can require nails to penetrate through multiple layers; ARMA notes manufacturers may require nails positioned to penetrate both/all shingle layers. This is why “high nailing” (nails too high) is especially risky on laminated shingles: the nail may miss critical layers and reduce wind resistance.
High-wind areas in the U.S. (what changes)
High-wind zones in the United States (coastal regions, tornado-prone areas, hurricane corridors) often trigger code requirements and manufacturer instructions that push installers toward 6 nails and stricter placement discipline. Owens Corning explicitly notes building codes may require 6 nails in some areas, and nail counts can vary by product line.
For homeowners, the best practice is to ask your roofer which fastening pattern they are using and to confirm it matches both code and the shingle manufacturer’s instructions for your local wind region.
Asphalt nails: common installation mistakes (and what they cause)
Many roof failures blamed on “bad shingles” are actually fastening problems.
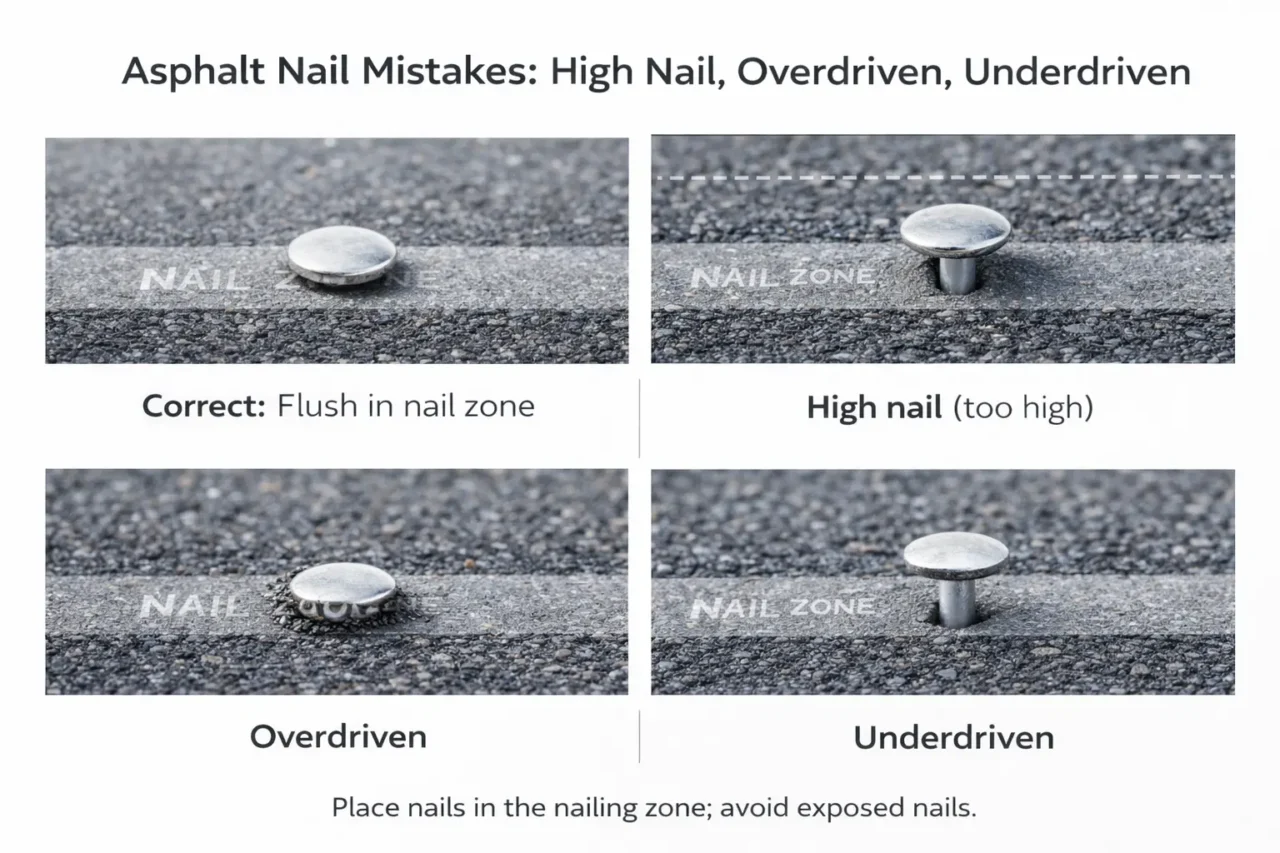
High nailing (nails too high)
A “high nail” means the nail is driven above the correct nail line so it doesn’t properly secure the intended layers; guides emphasize this is especially critical with laminate shingles. High nailing reduces wind resistance and can lead to blow-offs because the shingle isn’t fastened where it’s designed to resist uplift.
Overdriven nails (too deep)
Overdriven nails cut into the shingle mat, reducing holding power and increasing the chance of tear-through in high winds. ARMA’s general guidance implies nails must be properly driven and aligned; if nails distort the shingle or mat, the fastening system is compromised.
Underdriven nails (not flush)
Underdriven nails can hold shingle edges up, interfere with sealing, and create bumps that telegraph through the roof surface. They can also puncture the shingle above as courses overlap.
Crooked nails
Crooked nails reduce contact area and can cut into shingles unevenly, especially if the head edge bites into the mat. Proper nailer technique (or hammer control) matters for consistent fastening.
Pneumatic nailers vs hand nailing (setting matters)
Many roofs are installed with pneumatic nailers, which makes asphalt nails selection and nailer settings critical. If air pressure is too high, nails can be overdriven; if too low, nails may sit proud.
A practical best practice is to do a test strip and inspect nails before continuing across the roof. This helps ensure nails are flush, straight, and placed correctly in the nail zone.
How many asphalt nails do you need? (Quick estimating)
Estimating nail quantity helps DIYers and homeowners validate material lists.
ARMA provides a reference that nails required vary, and provides examples such as about 256 nails per square for certain metric shingle formats and 312 nails per square for some English formats, depending on product and nailing pattern. Because nail count changes with 4-nail vs 6-nail patterns and with shingle dimensions, you should check your shingle wrapper or product instructions for exact counts.
Best practices checklist (quick)
Use this checklist to verify a proper install using asphalt nails:
- Use corrosion-resistant nails that meet minimum shank and head diameter requirements.
- Choose nail length that achieves adequate deck penetration after passing through all roofing layers.
- Place nails in the manufacturer’s nailing zone and at least 1 inch from shingle ends.
- Use 6 nails per shingle when required by slope, code, or manufacturer instructions (and consider it for better wind resistance).
- Avoid high nails, overdriven nails, and underdriven nails each reduces performance.
FAQ: asphalt nails and where to nail shingles
What size nails for asphalt shingles?
A commonly recommended size is 1-1/4 inch roofing nails for standard asphalt shingles, but the correct length depends on your roof assembly thickness and required deck penetration.
What are the minimum specs for roofing nails?
ARMA states roofing nails should have a minimum nominal shank diameter of 12 gauge (0.105″) and a minimum head diameter of 3/8″, and should be corrosion-resistant.
Where exactly do you nail shingles?
You nail shingles in the manufacturer’s specified nail line/nailing zone, keeping nail heads at least 1 inch from the ends of the shingle, and ensuring nails properly fasten required layers (especially for laminated shingles).
Is 4 nails per shingle enough?
Many systems use 4 nails per shingle under standard conditions, but 6 nails may be required in high-wind regions or on steep slopes, and the required pattern depends on manufacturer instructions and code.
Why are high nails bad?
High nails are driven above the nail line and may not properly fasten the shingle layers, reducing wind resistance and increasing the risk of shingle blow-off.
Get free roofing advice, cost guides, and seasonal maintenance tips.

Roofing content specialist with 5+ years researching U.S. residential and commercial roofing. Has documented 200+ projects covering installation costs, material selection, contractor vetting, and DIY guides for homeowners across all climate zones.
Leave A Comment