Shed Roof Shingles: Complete DIY Installation Guide
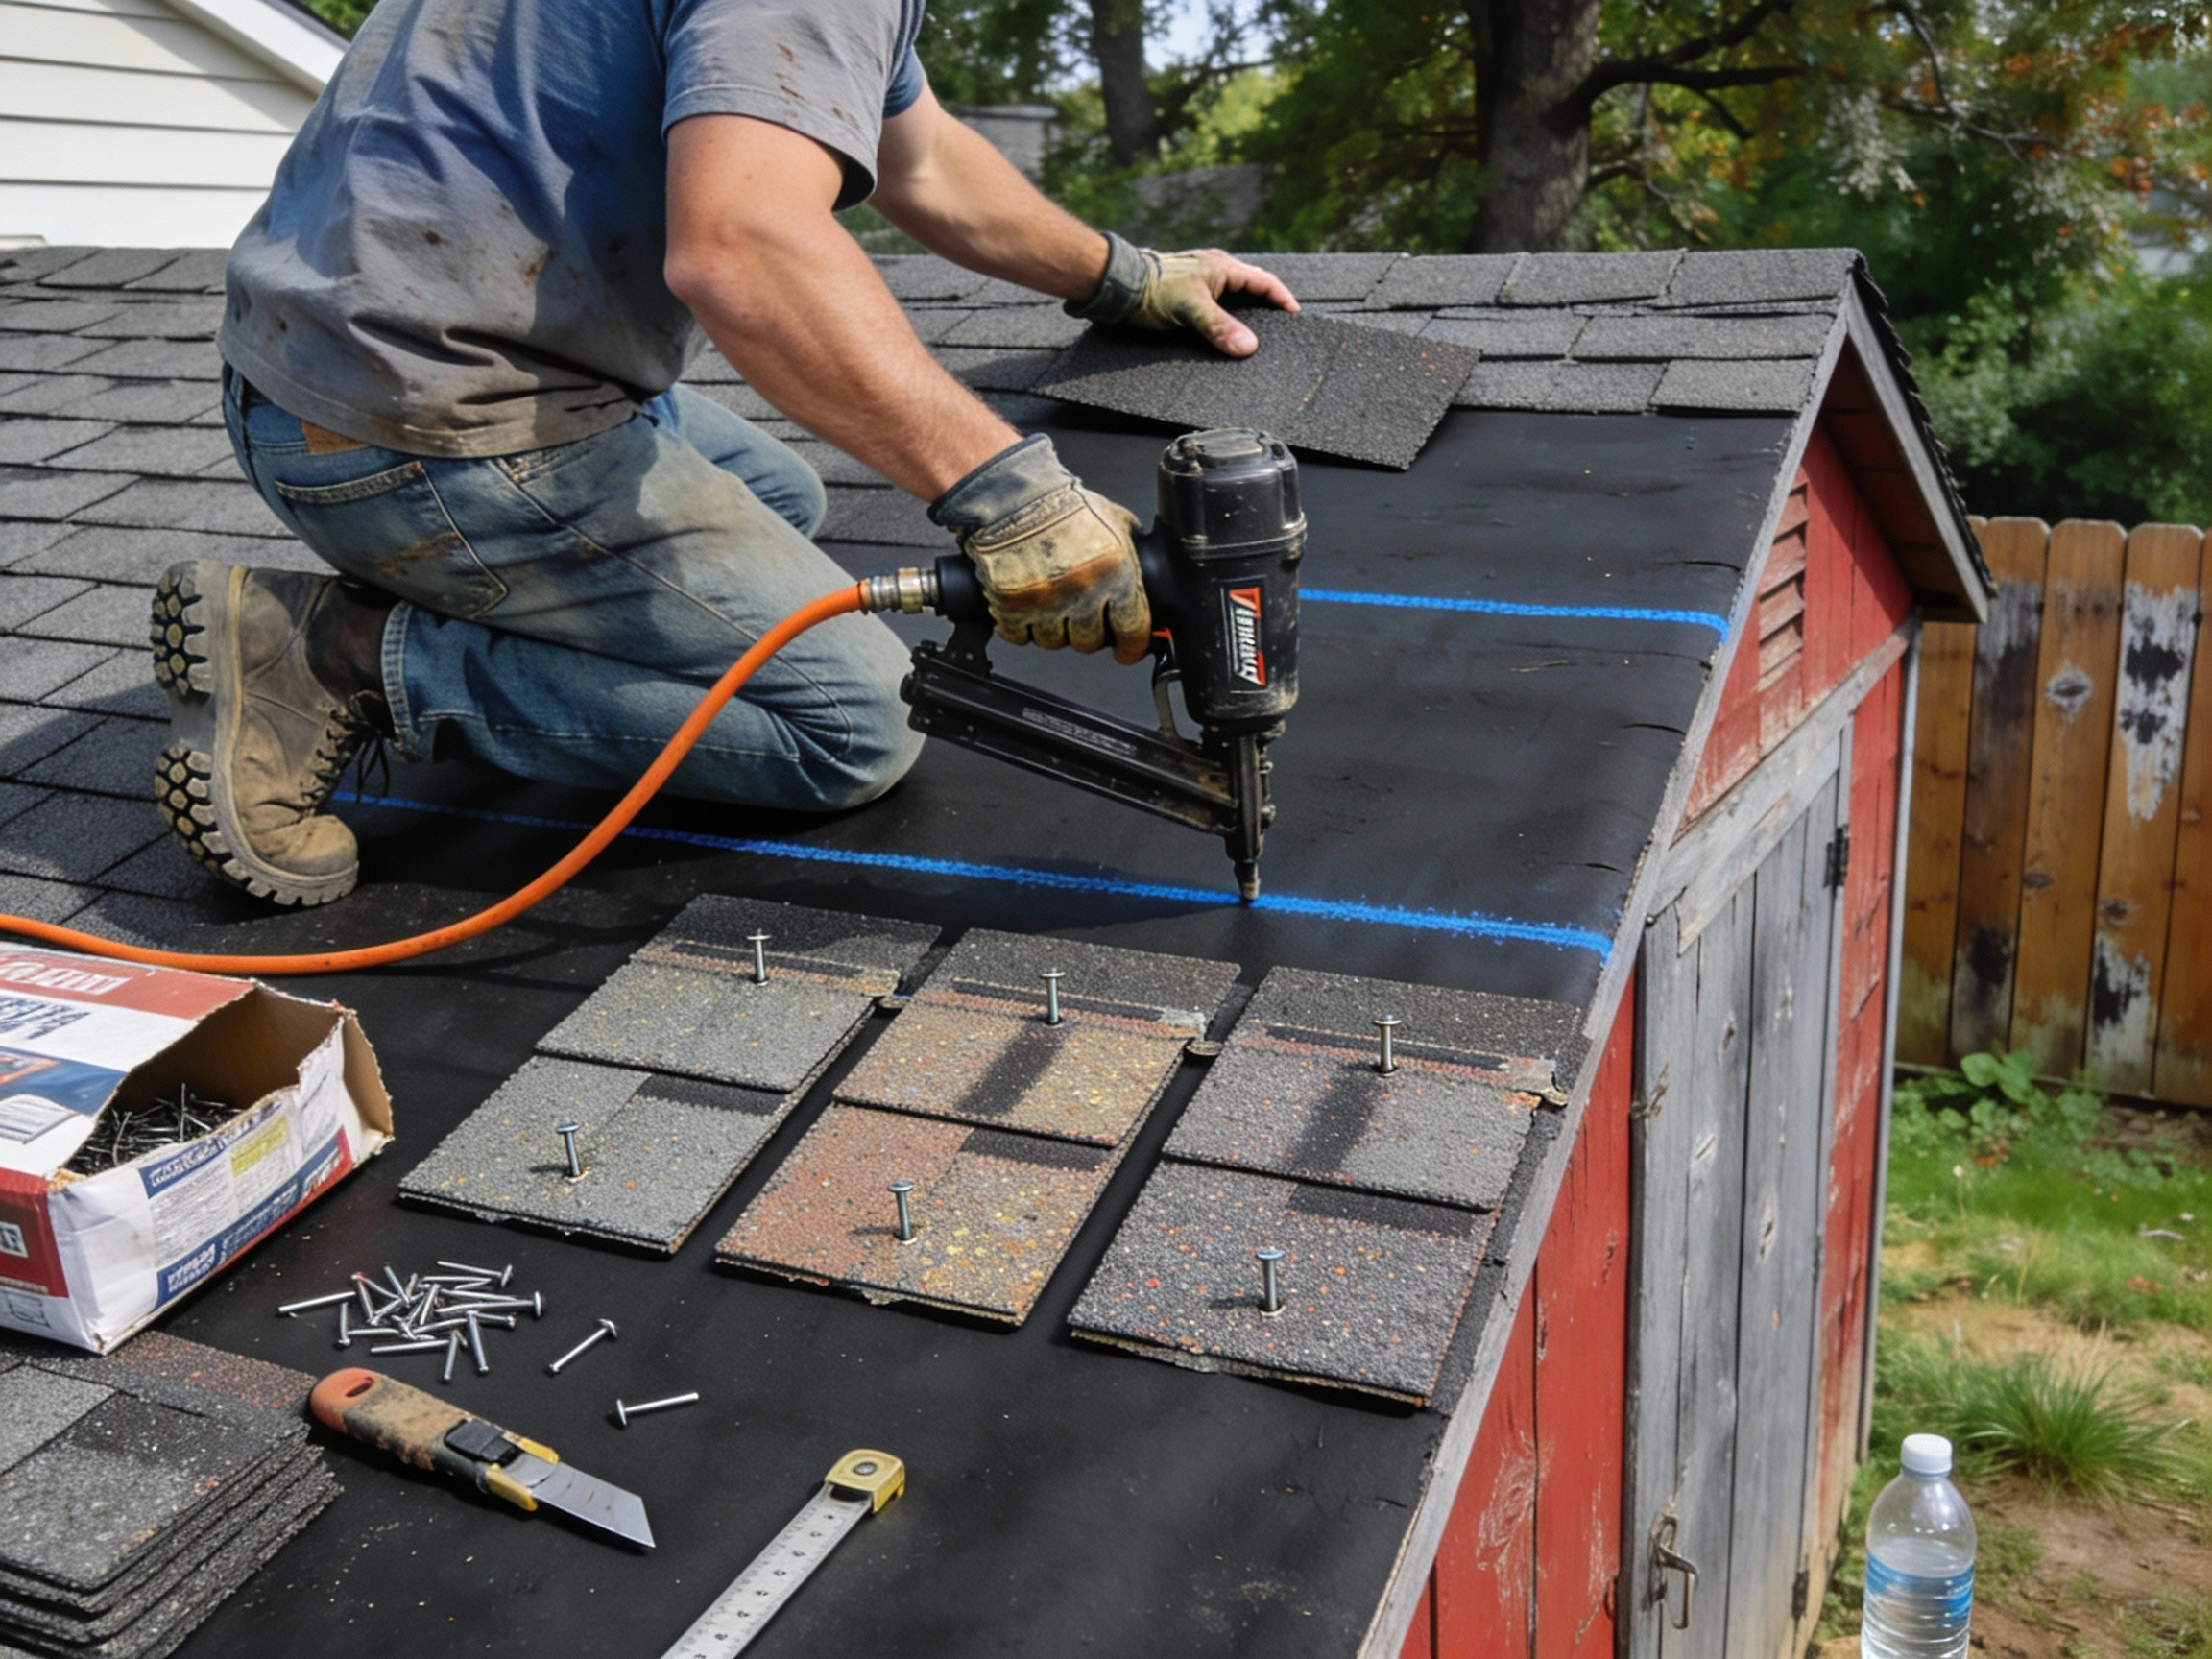
Installing shed roof shingles ranks among the most manageable DIY roofing shingles projects for homeowners with basic construction skills, requiring simple tools, straightforward techniques, and approximately 4-6 hours for typical 8×10 or 10×12 shed roofs. This DIY roof installation transforms bare plywood sheathing into weatherproof protection using asphalt three-tab shingles, drip edge, roofing underlayment, and proper nailing patterns that prevent leaks while lasting 15-25 years with minimal maintenance. Learning correct installation sequences underlayment first, drip edge placement, starter strip creation, proper shingle overlap, and ridge cap finishing ensures professional results without expensive contractor fees averaging $3-$5 per square foot.
Shed roof shingles installation succeeds when DIYers master five critical techniques: installing drip edge below underlayment on eaves but above underlayment on rakes, creating starter strips by cutting tabs off full shingles, maintaining 5-inch overlap between courses, using 4-6 roofing nails per shingle positioned in manufacturer nail zones, and capping ridge lines with bent shingle tabs secured in overlapping pattern. These fundamental DIY roofing shingles methods apply universally whether installing on gable sheds, lean-to sheds, gambrel barns, or simple storage structures, making shed roofing an ideal first roofing project before tackling residential applications.
This comprehensive guide walks through complete shed roof shingles installation from preparation through final inspection, including required tools and materials, safety protocols, step-by-step instructions with visual references, common mistakes to avoid, and troubleshooting tips ensuring watertight roofs protecting equipment, tools, and stored belongings for decades.
Table of Contents
Is installing shed roof shingles a realistic DIY project?
Most homeowners with basic tool skills can successfully install shed roof shingles on simple structures, though certain conditions favor DIY approaches while others warrant professional help.
When DIY shed roofing makes sense
Appropriate DIY scenarios:
- Small to medium sheds (8×10, 10×12, 12×16 common sizes) with manageable roof areas under 200 square feet
- Simple gable or lean-to roof designs without complex valleys, dormers, or architectural features
- Low to moderate roof pitch (4:12 to 6:12 slopes) allowing comfortable standing and working
- Sound existing roof sheathing requiring only shingle replacement, not structural repairs
- Homeowners with previous construction experience (framing, basic carpentry, or home improvement projects)
- Projects where building codes don’t require licensed contractors for accessory structures
Skills assessment:
DIY shed roof shingles installation requires ability to safely work at heights using ladders, measure and cut materials accurately, use hammer or pneumatic nailer consistently, follow sequential steps methodically, and maintain quality control throughout project.
Cost comparison: DIY vs professional
DIY material costs for typical 10×12 shed:
- Asphalt three-tab shingles: 3 bundles at $30-$35 each = $90-$105
- Roofing underlayment (felt paper): 1 roll = $25-$40
- Drip edge (aluminum): 40 linear feet = $40-$60
- Roofing nails: 1 box = $25-$35
- Ridge cap shingles: $15-$25
- Total DIY materials: $195-$265
Professional installation costs:
- Labor and materials: $3-$5 per square foot installed = $360-$600 for 120 square foot shed roof
- Additional charges for tear-off, disposal, complex features
- Total professional cost: $400-$700+
DIY savings: $200-$450 on typical small shed, though investing 4-6 hours labor.
Safety considerations for shed roofing
Essential safety equipment:
- Sturdy extension ladder rated for your weight plus materials (minimum Type I, 250-pound capacity)
- Non-slip rubber-soled work boots with ankle support preventing slips on shingles
- Work gloves protecting hands from sharp shingle edges and nail punctures
- Safety glasses preventing debris and nail fragments from entering eyes
- Fall protection harness and rope for pitches exceeding 6:12 or roof heights over 10 feet
Safe working practices:
- Never work alone—have someone nearby for emergencies and tool/material passing
- Avoid wet, windy, or icy conditions—shingles become slippery when damp
- Install roof jacks and planks on steep pitches creating stable work platforms
- Keep work area organized preventing trip hazards from scattered tools and materials
- Use proper ladder setup—maintain 3-point contact, extend 3 feet above roof edge, secure at top
Tools and materials needed for shed roof shingles
Gathering all required tools and materials before starting prevents frustrating mid-project delays and ensures proper installation.
Essential tools for DIY roofing shingles
Measuring and marking tools:
- Tape measure (25-foot minimum for accurate roof measurements)
- Chalk line for snapping straight horizontal reference lines across roof
- Speed square or framing square for marking cut lines and checking angles
- Pencil or marker for marking measurements and cuts
Cutting tools:
- Utility knife with hooked roofing blades (straight blades slip)
- Tin snips for cutting metal drip edge and flashing
- Circular saw (optional, for cutting plywood sheathing repairs)
Fastening tools:
- Hammer (16-ounce roofing hammer with hatchet blade if hand-nailing)
- Pneumatic roofing nailer (dramatically speeds installation, highly recommended)
- Air compressor (if using pneumatic tools—requires 2.5+ CFM at 90 PSI)
- Staple gun for securing underlayment felt paper
Additional helpful tools:
- Pitchfork or shingle removal tool (if tearing off old shingles)
- Straight edge (4-6 feet) for guiding utility knife cuts
- Ladder stabilizer preventing gutter damage and improving safety
Required materials for complete installation
Roofing shingles:
Calculate coverage by dividing roof square footage by bundle coverage (typically 33 square feet per three-tab bundle). Add 10% waste factor for cuts and mistakes. Standard color choices include charcoal gray, weathered wood, and black providing universal aesthetic compatibility.
Roofing underlayment (felt paper):
#15 felt paper suffices for most shed applications, though #30 offers superior tear resistance and waterproofing. Synthetic underlayment provides premium alternative with better durability and slip resistance during installation.
Drip edge:
Purchase aluminum or galvanized steel drip edge measuring 1.5×1.5 inches or 2×2 inches, covering all eave and rake edges. Calculate linear feet needed by measuring roof perimeter plus 10% for overlaps and cuts.
Fasteners:
- Roofing nails: 1¼-inch galvanized roofing nails with large heads (approximately 320-400 nails per square)
- Staples: ½-inch galvanized staples for securing underlayment
- Calculate 4-6 nails per shingle depending on wind exposure
Additional materials:
- Ridge cap shingles (pre-cut or created from full shingles)
- Roofing cement/mastic for sealing flashing and exposed nail heads
- Caulk for sealing drip edge joints
Material shopping list for 10×12 shed (120 sq ft roof):
- 4 bundles three-tab shingles (allowing for waste)
- 1 roll 15-pound felt (covers 400 square feet)
- 40 linear feet drip edge
- 5 pounds roofing nails
- 1 tube roofing cement
- Ridge cap shingles (typically 1 bundle covers 20 linear feet)

Step-by-step shed roof shingles installation
Following proper sequence ensures watertight DIY roofing shingles installation that protects shed contents for 15-25 years.
Step 1: Prepare roof deck and install underlayment
Deck inspection and preparation:
- Remove old shingles if replacing existing roof using pitchfork or shingle removal tool
- Inspect plywood or OSB sheathing for soft spots, rot, water damage, or loose panels
- Replace any damaged sheathing sections with new 7/16-inch OSB or ½-inch plywood
- Remove all protruding nails and ensure clean, dry surface before proceeding
- Sweep deck clear of debris that could create bumps under shingles
Installing roofing underlayment:
- Start at bottom eave edge, unroll felt paper horizontally across roof width
- Allow ¼-inch overhang beyond roof edge
- Secure felt with staples every 12-16 inches along top edge and center
- Overlap horizontal seams 6 inches ensuring upper felt covers lower felt
- Overlap vertical seams 4 inches preventing water infiltration
- Continue rolling felt paper up roof until reaching ridge, extending 4-6 inches over peak
- On opposite roof slope, repeat process overlapping ridge by 6 inches creating weather seal
Step 2: Install drip edge on eaves and rakes
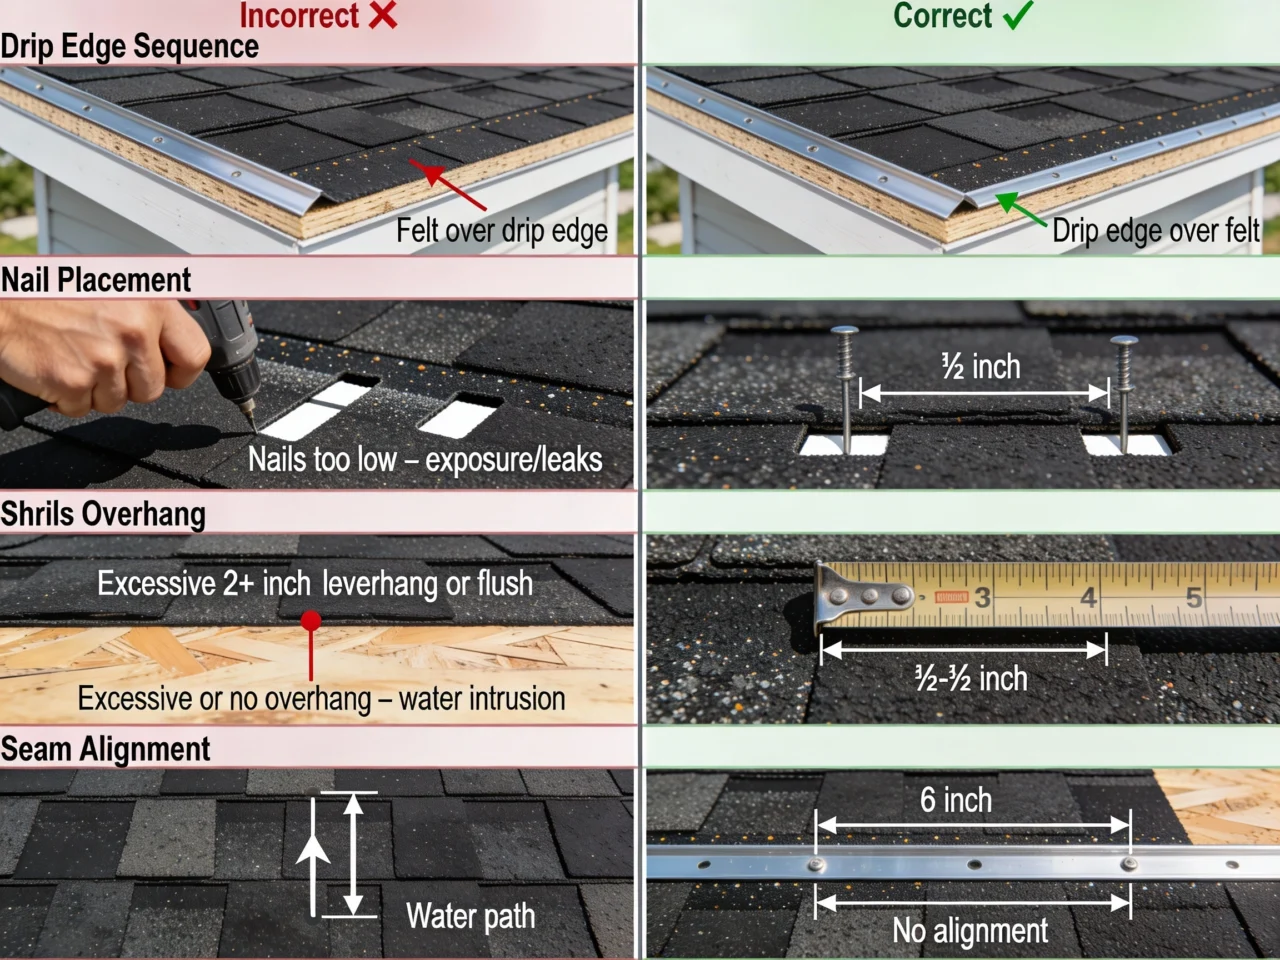
Critical installation sequence:
Drip edge installs UNDER felt paper on eaves (bottom edge) but OVER felt paper on rakes (side edges)—this directs water away from fascia while preventing wind-driven rain from penetrating under felt.
Eave drip edge installation (bottom):
- Position drip edge flush with eave edge before installing felt paper
- Nail drip edge every 8-12 inches through pre-drilled holes using roofing nails
- Overlap drip edge sections 2 inches at joints
- Cut 45-degree miters at corners using tin snips creating clean transitions
Rake drip edge installation (sides):
- Install rake drip edge OVER felt paper after underlayment in place
- Extend drip edge from eave corner up to ridge
- Overlap eave drip edge by 1 inch at bottom corner
- Nail every 8-12 inches securing to roof deck
- Trim drip edge flush with ridge using tin snips
Purpose of drip edge:
Metal drip edge protects fascia boards from water damage by directing runoff into gutters while preventing water from wicking back under shingles through capillary action.
Step 3: Create and install starter strip
Why starter strips matter:
Starter strips fill gaps between three-tab shingle cutouts preventing wind-driven rain from penetrating at vulnerable eave edge while providing adhesive surface for first full shingle course.
Creating starter strips:
- Take full three-tab shingles and flip upside down
- Using utility knife and straight edge, cut off all three tabs leaving only top portion (approximately 7 inches tall)
- Alternative method: Cut shingles in half lengthwise
- Create enough starter strips to cover entire eave length plus 10% waste
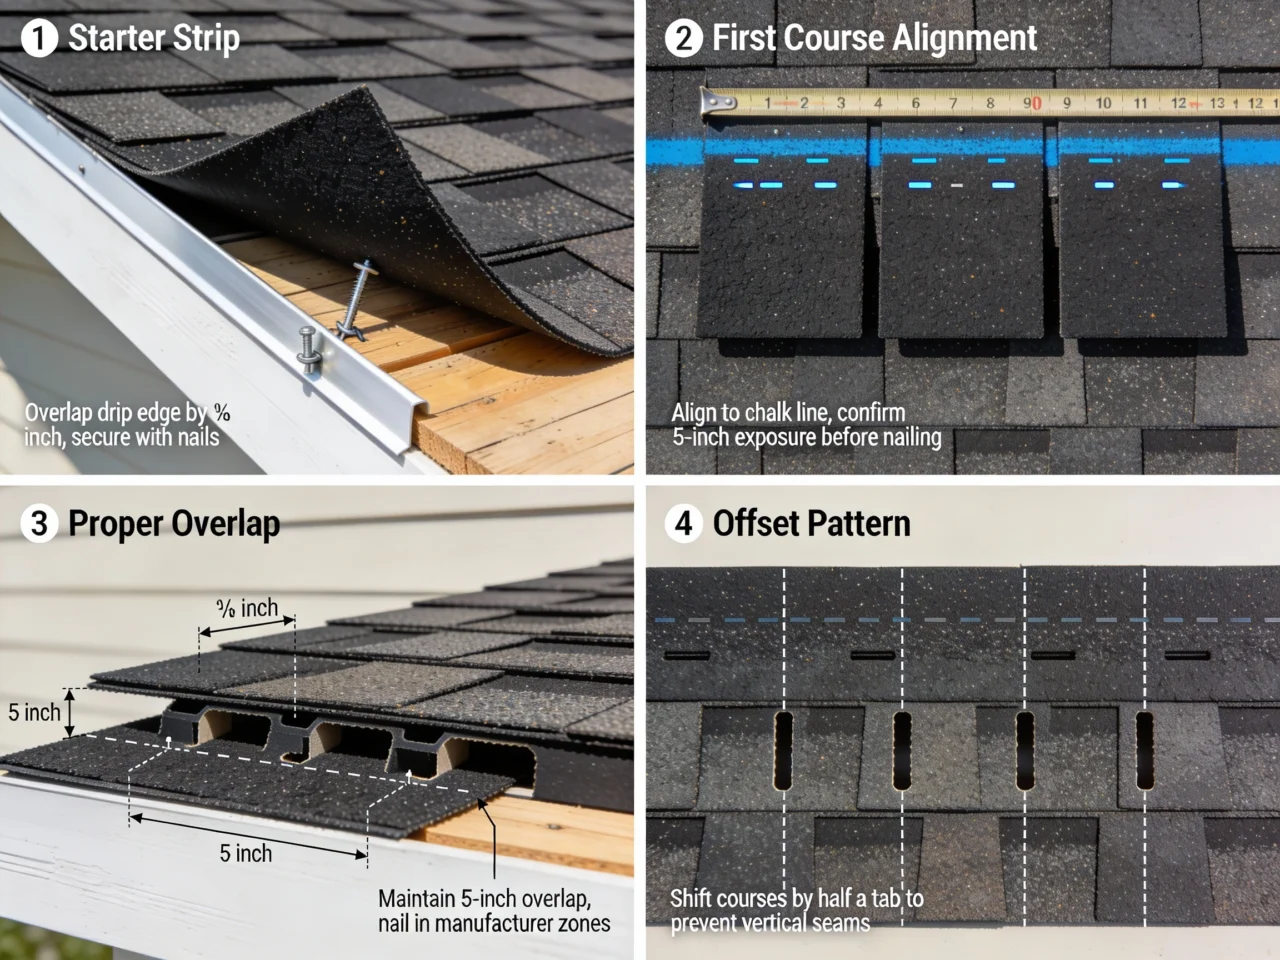
Installing starter course:
- Position first starter strip at rake edge with adhesive strip facing DOWN toward eave
- Overhang drip edge by ¼ to ½ inch on both eave and rake edges
- Nail starter strip approximately 2.5-3 inches above bottom edge (nails will be covered by first full course)
- Use 4 nails per starter strip piece
- Butt adjacent starter strips tightly together with no gaps
- Continue along entire eave until starter strip complete
- Trim final starter piece flush with rake drip edge
Step 4: Install first full shingle course
Establishing reference line:
- Snap chalk line 11¾ inches above starter strip bottom edge (exposes 5 inches of starter)
- This chalk line marks TOP of first full shingle course ensuring straight alignment
- Verify chalk line parallel to eave—measure multiple points confirming consistent distance
First shingle placement:
- Position full three-tab shingle at rake edge with bottom edge aligned on chalk line
- Overhang rake drip edge by ¼ to ½ inch matching starter strip overhang
- Overhang eave by ¼ to ½ inch covering starter strip adhesive
- Ensure shingle lies flat without buckling or gaps
Nailing pattern for shed roof shingles:
- Use 4 nails per shingle for standard applications, 6 nails in high-wind areas
- Position nails ¾ inch above cutouts (top of tab section) in manufacturer nail zone
- Space nails approximately 1 inch from each edge and evenly across width
- Drive nails flush—not overdriven (breaking through) or underdriven (protruding)
- Nail through shingle AND starter strip below securing both layers
Completing first course:
- Install second shingle butted tightly against first shingle with no gaps
- Align top edge on chalk line maintaining straightness
- Nail using same 4-6 nail pattern
- Continue across roof until reaching opposite rake edge
- Trim final shingle flush with rake drip edge using utility knife
Step 5: Continue shingling up roof maintaining proper offset
Calculating shingle offset:
To create proper staggered pattern preventing vertical alignment of seams, offset each course by 6 inches (half a tab width on three-tab shingles).
Second course offset method:
- Cut 6 inches (half tab) off first shingle of second course
- Snap chalk line 5 inches above first course (this creates standard 5-inch exposure)
- Position cut shingle at rake edge aligned on chalk line
- This offset ensures cutout slots don’t align with course below
- Install remaining full shingles across course
Third course offset:
- Cut 12 inches (full tab) off first shingle
- Continue pattern: fourth course starts with full shingle, fifth course cuts 6 inches, sixth course cuts 12 inches
- This 6-inch repeating offset pattern continues up entire roof
Maintaining consistent exposure:
- Snap chalk line every 2-3 courses ensuring parallel alignment
- Standard exposure: 5 inches (showing 5 inches of shingle below)
- Measure periodically from multiple points checking consistency
- Minor adjustments (within ¼ inch) acceptable and visually unnoticeable
Shingling technique:
- Work from bottom to top, one course at a time
- Overlap each course 5 inches covering nails from course below
- Maintain ¼-½ inch overhang on rake edges
- Check alignment every few courses, adjust gradually if drifting
- Keep work area clear, storing materials on ground until needed
Step 6: Install ridge cap shingles
Preparing ridge caps:
Three methods create ridge cap shingles:
- Pre-cut ridge cap shingles: Purchase dedicated ridge cap bundle with pre-cut pieces (easiest method)
- Cut from full shingles: Cut three-tab shingles into individual tabs creating 12×12-inch ridge pieces
- Fold method: Cut shingles into thirds along perforation lines, creating bendable pieces
Installing ridge caps:
- Start at rake end (not prevailing wind direction if known)
- Bend ridge cap piece over ridge peak centering equally on both sides
- Secure with 2 nails per side (4 nails total) positioned to be covered by next cap
- Install second cap piece overlapping first by approximately 5-6 inches
- Continue overlapping pattern along entire ridge
- Final ridge cap should fully cover exposed nails from previous cap
- Nail final cap and cover exposed nail heads with dab of roofing cement
Step 7: Install ridge flashing on lean-to sheds
For lean-to or shed roofs meeting wall:
- Cut angle flashing (L-shaped metal) to roof width
- Apply two beads of roofing mastic on both sides of flashing
- Position flashing covering exposed nail heads at top shingle course
- Extend flashing ¼ inch beyond rake edges
- Nail every 12 inches along flashing securing to wall and roof
- Apply roofing mastic over all exposed nail heads
- If multiple flashing sections needed, overlap 6 inches with mastic between
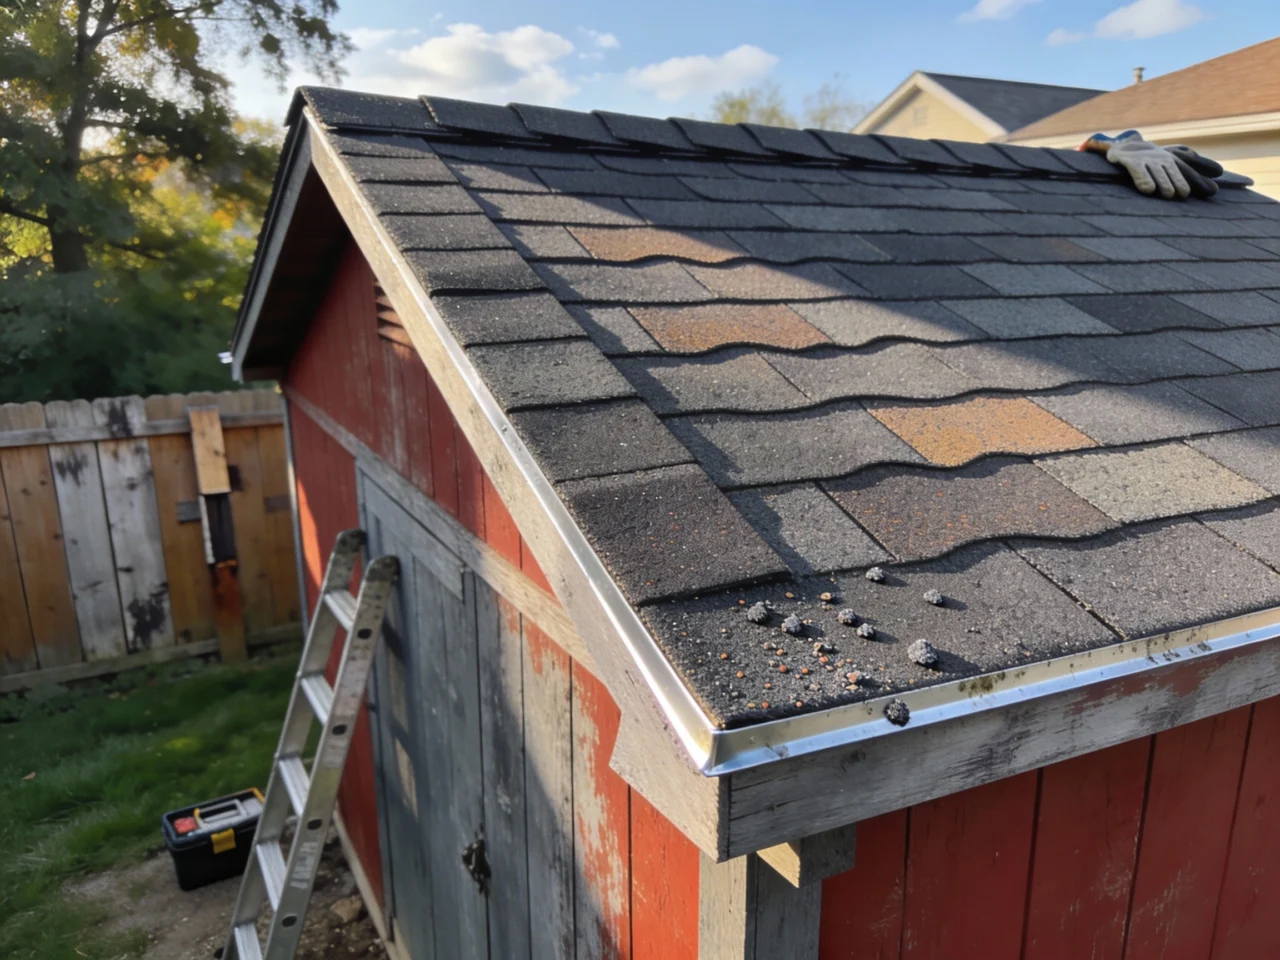
Step 8: Final inspection and cleanup
Quality inspection checklist:
- Walk roof surface checking for missed nails, loose shingles, or gaps
- Verify all rake overhangs consistent
- Confirm ridge caps securely fastened with no exposed nails
- Check drip edge properly secured along entire perimeter
- Ensure no underlayment felt visible between shingles
- Inspect around any roof penetrations for proper sealing
Cleanup procedures:
- Use magnetic sweeper removing all nails and metal debris from roof and ground
- Collect scrap shingle pieces and underlayment scraps for disposal
- Clean gutters of installation debris
- Dispose of materials properly at waste facility accepting construction debris
- Store leftover shingles in dry location for future repairs
Common mistakes when installing shed roof shingles
Avoiding typical errors ensures durable DIY roofing shingles installations lasting full expected lifespan.
Incorrect drip edge installation sequence
The mistake:
Installing drip edge over felt paper on eaves, or under felt on rakes—reversing the correct sequence allows water to penetrate behind drip edge causing fascia rot.
Correct method:
- Eave drip edge: UNDER felt paper (install first, then felt over it)
- Rake drip edge: OVER felt paper (install after felt in place)
Why it matters:
This specific sequence channels water correctly—eave water flows over felt onto drip edge into gutter, while rake water flows over shingles onto drip edge without getting under felt.
Improper nail placement
Nailing too high:
Positioning nails above manufacturer nail zone (more than 1 inch above cutouts) leaves lower shingle portion unfastened—wind catches tabs causing blow-offs.
Nailing too low:
Driving nails below cutout line exposes nail heads to weather causing rust and leak points.
Correct nail placement:
Position nails ¾ inch above cutout slots in designated nail zone where next course covers nails by minimum 2 inches.
Wrong nail quantity:
Using only 2-3 nails per shingle instead of required 4-6 nails reduces holding power—shingles blow off during windstorms.
Insufficient or excessive overhang
No overhang:
Installing shingles flush with roof edge allows water to run behind drip edge and wick back under shingles through capillary action.
Excessive overhang:
Extending shingles more than ¾ inch beyond drip edge creates stress points where wind lifts tabs causing breaks and blow-offs.
Correct overhang:
Maintain ¼ to ½ inch overhang beyond drip edge on both eaves and rakes providing proper water shedding without wind vulnerability.
Vertical seam alignment
The problem:
When cutout slots align vertically through consecutive courses, water channels straight through roof layers bypassing overlaps—major leak potential.
Correct pattern:
Offset each course by 6 inches (half tab width) ensuring three-course vertical spacing between any aligned seams.
Visual check:
Step back periodically viewing roof from distance—vertical alignment appears as obvious “zipper lines” ruining aesthetics and weatherproofing.
Skipping chalk lines
Shortcut temptation:
Experienced DIYers sometimes skip chalk lines after first few courses, eyeballing alignment instead—courses gradually drift creating wavy appearance.
Professional practice:
Snap chalk line every 2-3 courses maintaining perfect horizontal alignment, especially critical as you work higher where minor angle errors compound into obvious visual problems.
Improper ridge cap installation
Common errors:
- Installing ridge caps with prevailing wind exposing seams to weather
- Inadequate overlap (less than 5 inches) exposing nail heads
- Using full shingles instead of bent caps creating rigid peak vulnerable to cracking
Correct technique:
Start opposite prevailing wind direction, maintain 5-6 inch overlap, use flexible ridge cap pieces bent over peak, secure with 4 nails per cap positioned for next cap coverage.
Maintenance and troubleshooting shed roof shingles
Proper maintenance extends shed roof shingles lifespan while addressing minor issues prevents costly repairs.
Expected lifespan and factors affecting longevity
Standard asphalt shingle lifespan:
- Three-tab shingles: 15-20 years typical
- Architectural shingles: 20-30 years (premium option for sheds)
- Factors reducing lifespan: poor ventilation, overhanging tree branches, improper installation, hail damage
Annual maintenance checklist
Spring inspection (after winter):
- Check for blown-off or damaged shingles from winter storms
- Clear debris accumulated in valleys and along eaves
- Inspect flashing around any penetrations
- Look for moss or algae growth requiring treatment
- Verify ridge caps securely fastened
Fall preparation (before winter):
- Clean gutters preventing ice dam formation
- Trim overhanging branches threatening roof during storms
- Replace any damaged shingles before snow season
- Check attic ventilation ensuring proper airflow
Repairing damaged individual shingles
Replacing single shingle:
- Gently lift shingles above damaged shingle
- Remove nails securing damaged shingle using flat pry bar
- Slide damaged shingle out
- Slide new shingle into position matching overlap
- Nail new shingle in proper nail zones
- Apply dab of roofing cement under tabs sealing against wind
Temporary leak repairs:
- Apply roofing cement under lifted tabs
- Use roofing cement to seal small cracks or punctures
- Consider temporary tarp covering if major damage until permanent repair possible
Frequently asked questions about shed roof shingles
How long does it take to install shed roof shingles?
Installing shed roof shingles takes approximately 4-6 hours for an experienced DIYer working on typical 8×10 or 10×12 shed with simple gable roof, though first-time installers should budget 6-8 hours accounting for learning curve and careful attention to proper techniques. Complex gambrel or hip roofs add 2-4 hours due to additional cutting and fitting required.
How many bundles of shingles do I need for a shed roof?
Calculate shingle bundles by dividing total roof square footage by 33 (coverage per three-tab bundle), then adding 10% waste factor—typical 10×12 shed with both roof slopes totals 120 square feet requiring 4 bundles (120÷33=3.6, plus 10% waste). Measure roof length times width for each slope, add together, then divide by coverage per bundle.
Can I install shed roof shingles over existing shingles?
While possible to install new shingles over one existing layer, best practice removes old shingles allowing inspection of roof deck for water damage, rot, or structural issues requiring repair before shingling. Single-layer installations also lie flatter, last longer, and avoid excessive weight on shed framing.
What’s the proper exposure for three-tab shingles?
Standard exposure for three-tab asphalt shingles measures 5 inches, meaning each course overlaps the course below by 5 inches exposing 5 inches of the underlying shingles while covering 7 inches at the overlap. This creates proper double-coverage protection ensuring waterproof installation.
Do I need drip edge on my shed roof?
Yes drip edge is essential for protecting fascia boards from water damage by directing runoff away from wood trim, preventing water from wicking back under shingles through capillary action, and providing clean finished edge preventing shingle deterioration. Installing drip edge adds minimal cost while dramatically extending fascia board lifespan.
How do I install shingles on a lean-to shed roof?
Lean-to shed roof shingles install using same basic process—underlayment, drip edge, starter strip, full courses working up slope—but require angle flashing where roof meets wall instead of ridge caps. Install L-shaped metal flashing over top shingle course, securing to both roof deck and wall with roofing cement sealing all gaps.
Should I use a roofing nailer or hammer for shed shingles?
Pneumatic roofing nailers dramatically speed installation while ensuring consistent nail depth and reducing fatigue, making them worthwhile investment for shed projects and future roofing work, though quality hammers work fine for small sheds if budget constrained. Rental stores offer pneumatic nailer and compressor packages for $40-$60 per day.
What’s the difference between starter strips and regular shingles?
Starter strips are full shingles with tabs cut off (or shingles cut in half lengthwise) installed with adhesive strip facing downward along eave edges, filling gaps between three-tab cutouts to prevent wind-driven rain penetration while providing adhesive surface bonding first full shingle course. Never skip starter strips—they’re critical for proper weatherproofing.
Achieving professional results with DIY shed roofing
Installing shed roof shingles successfully requires mastering fundamental DIY roofing shingles techniques—proper underlayment installation, correct drip edge sequencing (under felt on eaves, over felt on rakes), accurate starter strip creation, systematic chalk line use maintaining straight courses, appropriate 4-6 nail placement in manufacturer zones, 5-inch exposure between courses, six-inch offset pattern preventing seam alignment, and professional ridge cap finishing overlapping 5-6 inches. These proven DIY roof installation methods enable homeowners to complete typical 8×10 or 10×12 shed roofs in 4-6 hours using basic tools and $195-$265 in materials while saving $200-$450 compared to professional installation.
Understanding critical details separates successful from failed installations—installing drip edge in correct sequence prevents fascia rot, maintaining proper ¼-½ inch overhang prevents water wicking, using 4-6 nails per shingle prevents wind blow-off, snapping chalk lines every 2-3 courses ensures straight rows, offsetting each course six inches prevents leak-prone seam alignment, and properly overlapping ridge caps creates weathertight peak protection. Simple shed roofing represents ideal first roofing project teaching fundamental skills applicable to residential applications while protecting valuable equipment and tools stored in backyard structures.
Ready to tackle shed roof shingles installation? Gather quality three-tab shingles, roofing felt underlayment, aluminum drip edge, pneumatic nailer or hammer, and safety equipment, choose mild weather day with low wind, follow systematic step-by-step process from underlayment through ridge caps, maintain consistent quality control checking alignment and nail placement, and complete professional-quality waterproof roof protecting your shed for 15-25 years. Remember—patience and attention to detail matter more than speed when learning DIY roofing techniques that deliver lasting results.
Get free roofing advice, cost guides, and seasonal maintenance tips.

Roofing content specialist with 5+ years researching U.S. residential and commercial roofing. Has documented 200+ projects covering installation costs, material selection, contractor vetting, and DIY guides for homeowners across all climate zones.
Leave A Comment