Your Roof Is Trying to Tell You Something. Listen Up.
Look up. Right now. When did you last actually look at your roof?
If your answer involves a vague memory and a lot of uncertainty, you’re not alone. Most homeowners treat their roof the way they treat their car’s spare tire, they know it exists, they know it’s important, and they’d really rather not think about it until something goes wrong.
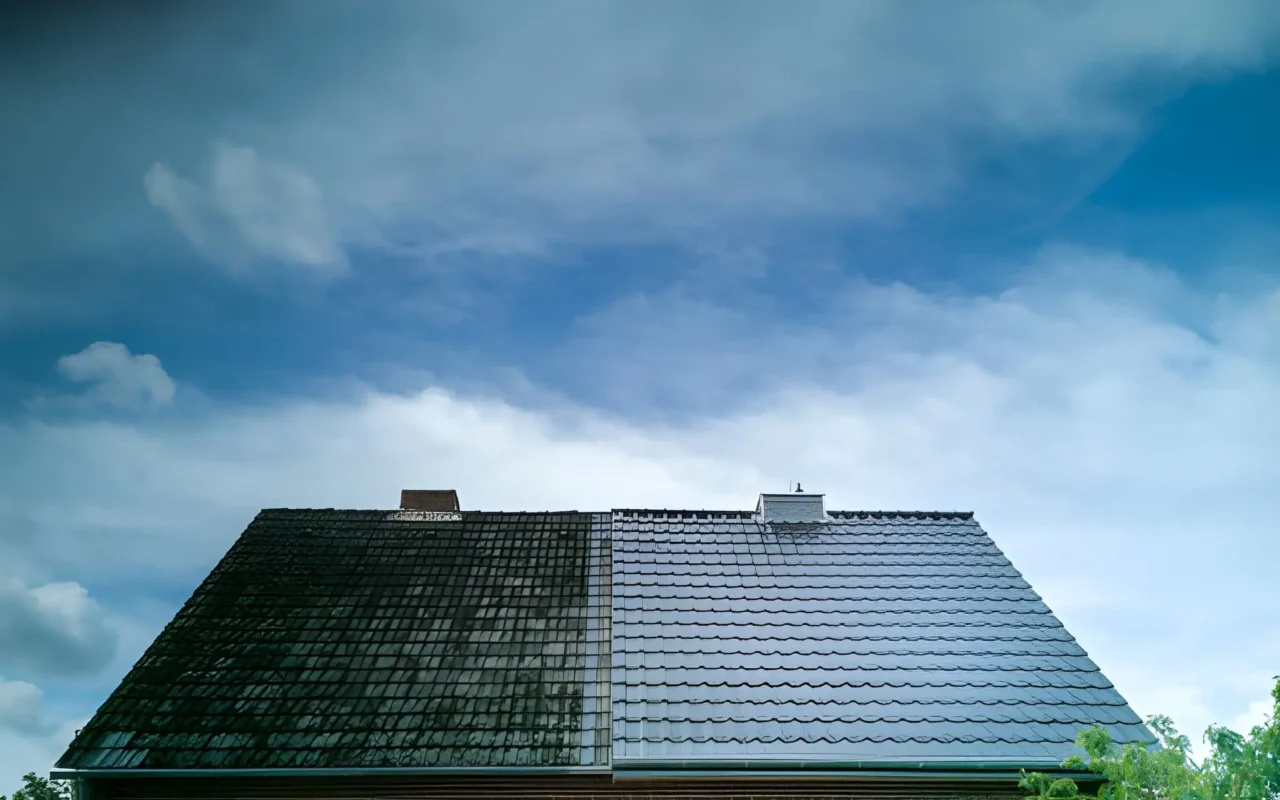
But here’s the thing: your roof is talking to you. Those dark streaks running down the shingles? That fuzzy green carpet of moss creeping across the north-facing slope? The patches of grey-black staining that have been growing quietly since last spring? That’s your roof telling you it needs help and the longer you wait, the more expensive the conversation becomes.
Roof pressure cleaning is one of the simplest, most cost-effective ways to protect the biggest investment above your head. Done correctly, a single cleaning session can add 5–15 years to your roof’s lifespan, remove organisms actively degrading your shingles right now, and restore the kind of curb appeal that reminds you why you loved your home in the first place. Done incorrectly, it can strip your shingles bare and void your manufacturer warranty in a single afternoon.
This guide gives you everything you need to do it right.
Table of Contents
What’s Actually Living on Your Roof (And Why You Should Care)
Before we talk about pressure washers and PSI settings, let’s talk about what you’re actually dealing with, because understanding the enemy changes how you fight it.
That black streaking you’ve been blaming on pollution or tree sap? It’s alive. Gloeocapsa magma is a cyanobacterium, essentially a photosynthetic algae, that feeds on the calcium carbonate limestone filler in your asphalt shingles. It spreads through airborne spores, thrives in humidity, and steadily degrades the granule adhesion that protects your shingles from UV damage. Once it’s established, it doesn’t leave on its own.
Moss is worse. Those green cushions that look almost charming in a cottage-aesthetic kind of way are actually moisture traps, they press damp organic matter directly against your roofing material 24 hours a day. Moss retains water. Water deteriorates shingles. And in advanced cases, moss rhizoids (root structures) actually lift shingle edges, creating pathways for water to infiltrate your roof deck.
Lichen is the final boss of roof contamination. Part algae, part fungi, lichen embeds anchor structures directly into your roofing material. It doesn’t sit on the surface, it grows into it. Removing lichen requires patience, the right chemistry, and the understanding that no amount of pressure washing alone will kill it at the root.
All of this is manageable. None of it is a death sentence for your roof. But ignoring it definitely is.
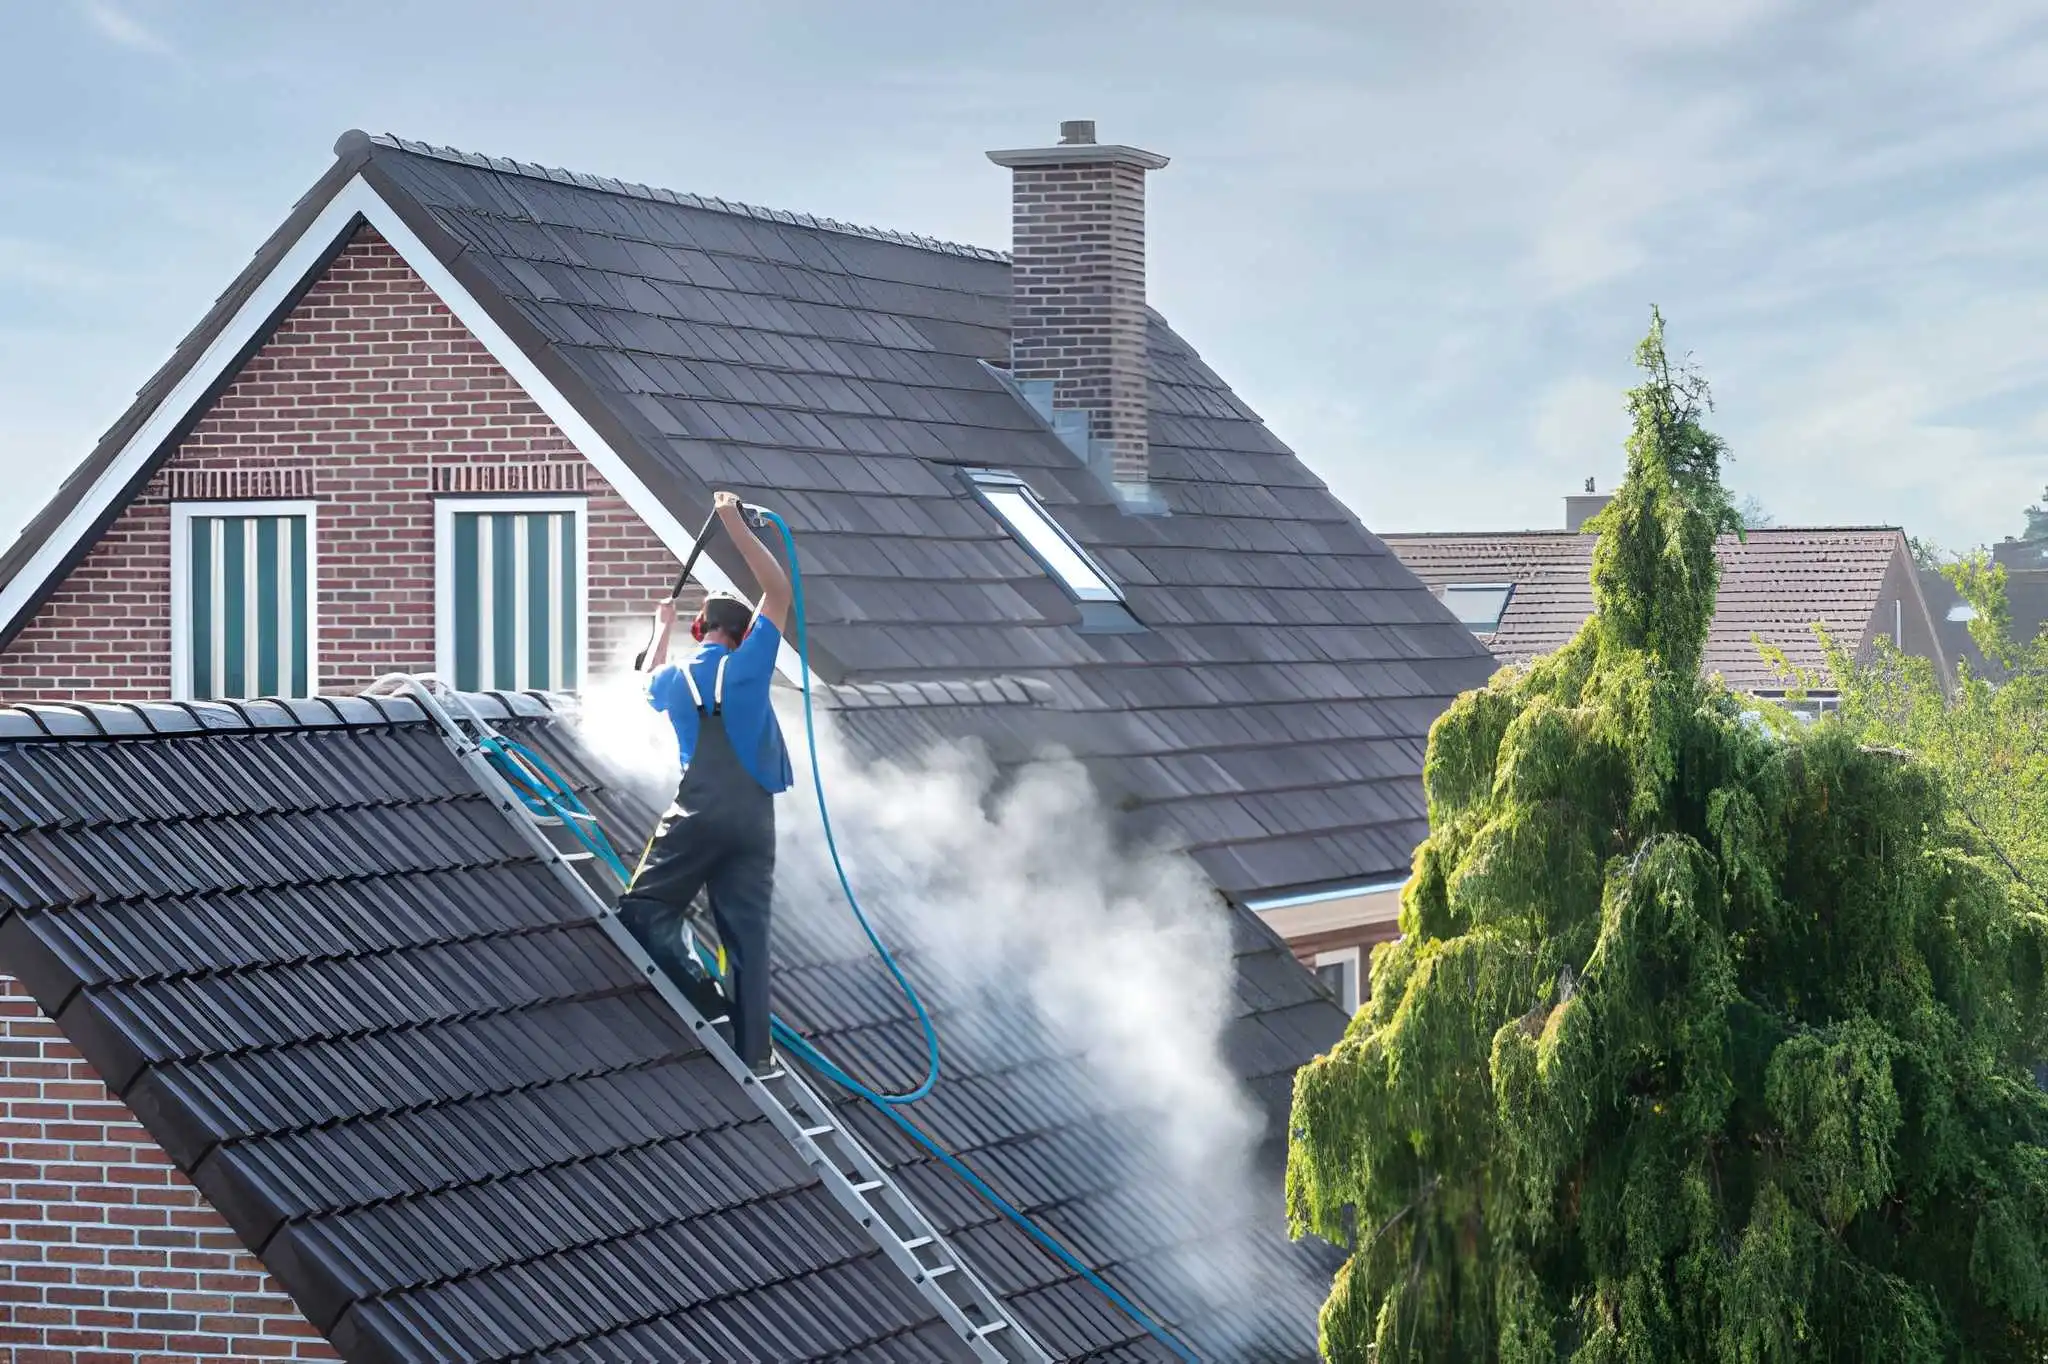
The Big Decision: Pressure Wash or Soft Wash?
Here’s where most homeowners make their first mistake, and it’s usually an expensive one.
The instinct when you see a dirty roof is to blast it. More pressure equals more clean, right? That logic works great on concrete driveways. On asphalt shingles, it’s the roofing equivalent of scrubbing a non-stick pan with steel wool.
Soft washing uses chemistry instead of force. You apply a diluted sodium hypochlorite solution (think carefully managed pool-grade bleach) at extremely low pressure, 50 to 150 PSI, barely more than a garden hose, and let it dwell on the surface for 15 to 30 minutes. The chemistry kills every biological organism on your roof at the cellular level. You’re not scraping off the moss and hoping for the best; you’re killing it at the root. The low-pressure rinse simply removes the dead matter.
Results from a proper soft wash last 2 to 5 years. The Asphalt Roofing Manufacturers Association (ARMA) endorses this as the correct cleaning method for asphalt shingles, not because the industry is being cautious, but because it genuinely works better.
Pressure washing uses mechanical water force,1,000 to 2,000 PSI,to physically blast contamination off the surface. It works well on durable materials like concrete tile and metal roofing. On asphalt shingles, however, anything above 1,500 PSI risks stripping the granules that protect your shingles from the sun. And here’s the kicker: pressure washing doesn’t kill the biology. It removes the visible growth but leaves spores and root structures behind. Expect regrowth within 6 to 18 months.
The choice isn’t really complicated. For asphalt shingles, which cover roughly 80% of American homes, soft wash wins every time. For tile and metal, moderate pressure washing is acceptable with the right nozzle and technique.
Know Your Roof: The PSI Guide That Could Save Your Shingles
Not all roofs are created equal, and the wrong pressure setting doesn’t just clean poorly, it causes the kind of damage that only shows up months later, when your next heavy rain turns into a leak you can’t explain.
Here’s what every homeowner doing roof pressure cleaning needs to know:
Asphalt shingles are the most sensitive material you’ll encounter. New shingles (under 10 years old) can tolerate up to 1,200 PSI with a wide 40-degree nozzle. Mid-age shingles (10 to 20 years) should stay under 800 PSI. Anything older than 20 years? Soft wash only, no exceptions. The granule adhesion on older shingles is too compromised to risk any mechanical pressure.
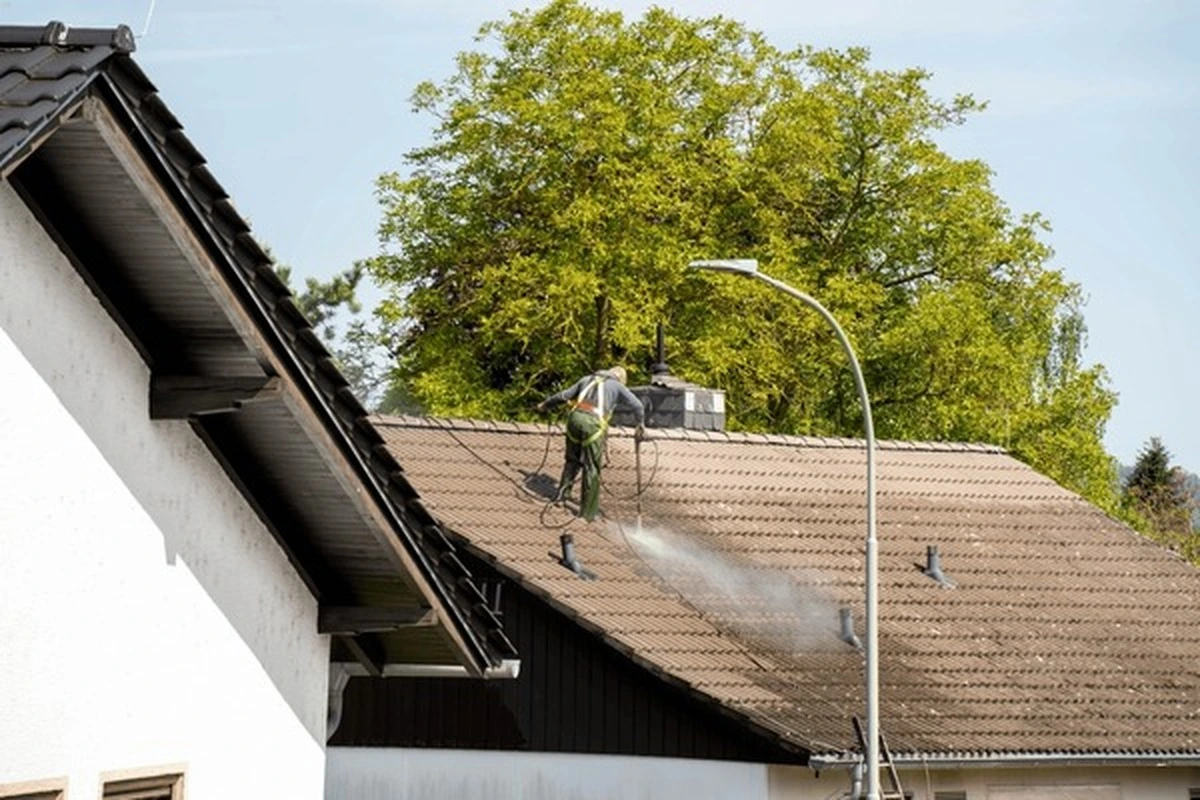
Concrete and clay tiles are significantly more forgiving, you can safely use 1,200 to 2,000 PSI. The critical rule here is direction: always wash downward from ridge to eave. Angle the nozzle upward under tile edges even once and you’ve driven water beneath the tile, exactly where you don’t want it.
Metal roofing handles 1,200 to 1,500 PSI comfortably. Use a wide fan nozzle, avoid direct pressure at seams and fastener points, and reduce to 800 to 1,000 PSI if you’re working on copper or painted finishes you want to preserve.
Cedar shake and wood shingles are nearly as sensitive as old asphalt, maximum 500 to 800 PSI, and soft washing is strongly preferred. High pressure splits grain, raises fibers, and strips the natural oils that give cedar its weather resistance.
Natural slate is durable but brittle at the edges, 800 to 1,200 PSI maximum, and honestly, professional-only territory if you value your roof’s integrity.
Choosing Your Pressure Washer Roof Cleaner: What Actually Matters
The market is flooded with pressure washer options, and the specs can feel overwhelming. Here’s what actually matters for roof pressure cleaning specifically.
For most homeowners, an electric pressure washer rated between 1,800 and 2,200 watts is the sweet spot, enough power to clean effectively, easy enough to control that you won’t accidentally destroy your shingles. The Nilfisk Core 140 with its dedicated roof cleaner accessory was specifically designed for this application, delivering controlled pressure at safe roof-cleaning levels. The Kärcher K5 with an adjustable vario lance is another excellent option.
Gas pressure washers generate more raw power, 2,000 to 4,000 PSI , which makes them better for commercial work and large concrete tile roofs. The problem for DIYers is that extra power combined with less experience creates more opportunities for costly mistakes.
Whatever machine you choose, the nozzle matters more than the machine. A simple rule: never put a red (0-degree) nozzle anywhere near a roof. The concentrated jet that makes it satisfying to blast grime off concrete will destroy roofing material. For most roof applications, start with the white 40-degree nozzle and only step up to the green 25-degree for concrete tile and metal if needed.
One accessory that genuinely changes the safety equation: a telescopic extension wand extending 20 to 38 feet. It lets you clean from ground level or a stable ladder position rather than walking on a wet, sloped roof with a machine creating unpredictable force. For single-story homes especially, it eliminates most of the fall risk that makes DIY roof cleaning genuinely dangerous.
The Chemistry of Clean: What to Put in Your Pressure Washer Roof Cleaner
Here’s something the hardware store won’t always tell you: the chemical you use matters as much as the equipment.
Sodium hypochlorite diluted to 3 to 6% for most residential applications is the gold standard for biological roof contamination. It’s what professional soft wash contractors use, it’s what ARMA recommends, and it’s what genuinely works on the algae, moss, mold, and mildew that accumulate on residential roofs. Mix it with a non-ionic surfactant (about 1 to 2 ounces per gallon) and you have a solution that adheres to the roof surface long enough to do its work before you rinse.
A few things to keep in mind: sodium hypochlorite will damage your plants if it runs off unchecked. Pre-wet your landscaping with plain water before you start, and run a garden hose continuously on surrounding plants during the chemical application phase. It’s not complicated it just requires awareness.
For homeowners who want the lowest-effort option, Wet & Forget Outdoor is a no-rinse formula you apply with a pump sprayer and then let rain do the work over subsequent weeks. Results come slower, but the product is genuinely safe, easy to apply, and effective for light to moderate algae and moss.
What to avoid entirely: muriatic acid (it etches concrete tile and damages metal finishes), undiluted bleach (too concentrated for roof materials), and any product formulated specifically for concrete or decking (the pH and chemical composition are wrong for roofing materials).
Step-by-Step: How to Actually Clean Your Roof Without Ruining It
Before You Touch the Pressure Washer
Safety first and this isn’t boilerplate. Roof pressure cleaning combines working at height with operating pressurized equipment. That’s a combination that demands respect.
Inspect your roof from the ground before climbing anything. Identify damaged shingles, loose tiles, or soft spots that might give way under your weight. Check your ladder it needs to extend at least 3 feet above the roofline, sit on level ground, and be secured at top and bottom. Wear non-slip rubber-soled footwear. Have someone on the ground with you. And if the roof pitch is steeper than 6:12, wear a properly anchored fall protection harness no arguments.
Prepare the Surface
Clear loose debris first leaves, branches, pine needles using a leaf blower or soft brush. If there’s substantial moss buildup, scrape off as much bulk as possible with a plastic scraper before you apply any water or chemical. This reduces the load on your cleaning solution and gets you better results with less product.
Pre-wet all plants, shrubs, and grass below the roofline with plain water. Cover anything particularly sensitive with plastic sheeting during the chemical dwell period.
Apply the Chemical Solution
Switch to your low-pressure soap nozzle (the black one) or your foam cannon attachment. Apply your sodium hypochlorite solution starting at the ridge and working downward never spray upward. Achieve even coverage across all contaminated areas, then step back and wait. Give it 15 to 30 minutes of dwell time. This is the part where the actual cleaning happens. Let the chemistry work.
If it starts drying in hot sun before the dwell time is up, lightly mist with plain water to keep it wet.
Rinse from Top to Bottom
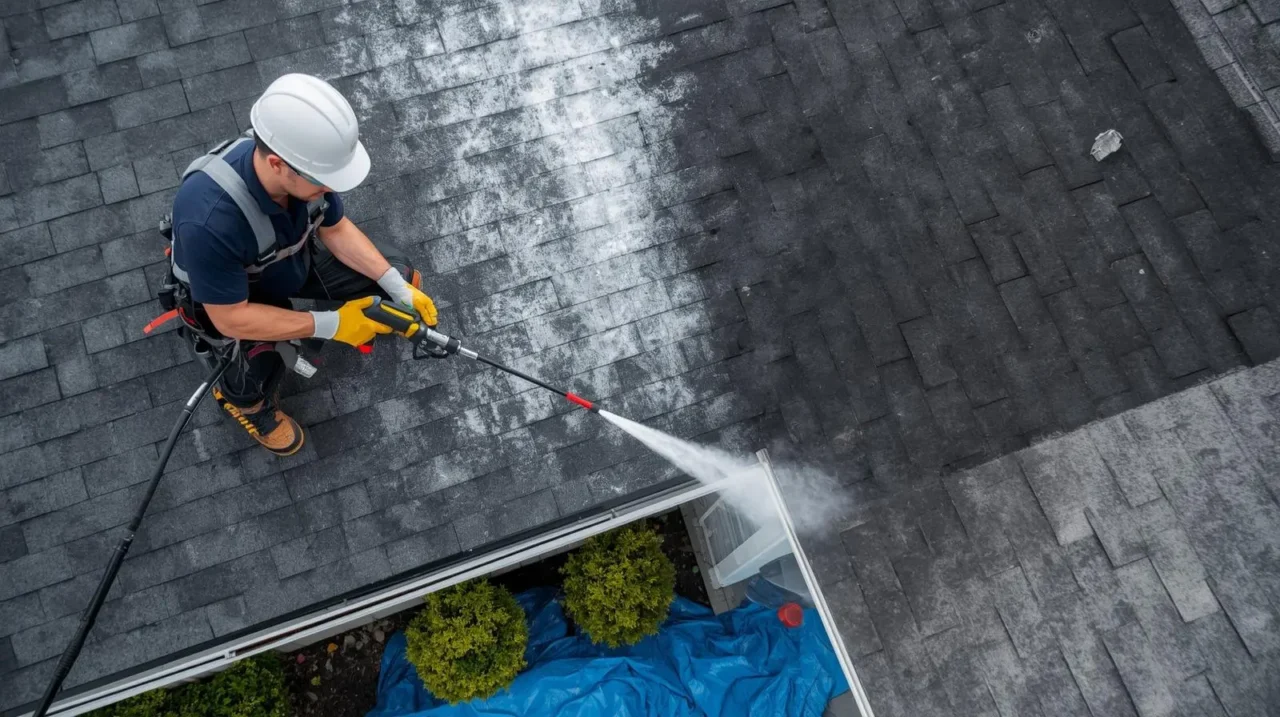
Switch to your appropriate cleaning nozzle 40-degree white for asphalt, 25-degree green for tile and metal. Set your pressure to the correct PSI for your material. Hold the nozzle 12 to 18 inches from the surface closer than that multiplies effective pressure dramatically.
Work systematically from ridge to eave, overlapping each pass slightly, always spraying in the direction the shingles lie. Never angle water upward under shingles or tile edges. This one rule, consistently applied, prevents the majority of water damage caused by amateur roof pressure cleaning.
Treat Valleys and Gutters
Flush valleys from top to bottom to clear anything the cleaning dislodged. Run your pressure washer down each downspout to verify clear flow. Clean your gutters manually to remove the debris that’s accumulated during the washing process.
Apply a Preventive Biocide
This step is optional but genuinely extends the life of your clean by one to two years. Apply a no-rinse biocide treatment Wet & Forget or a professional equivalent using your downstream injector or a separate pump sprayer. Let it dry naturally. Rain will distribute it across the roof surface in subsequent weeks.
Alternatively, install zinc or copper strips along the ridge. Metal ions released by rainfall create a continuous anti-biological treatment across every slope below a passive, maintenance-free solution that works quietly every time it rains.
What It Costs: DIY vs Calling a Pro
Let’s talk numbers honestly.
DIY roof pressure cleaning on a standard 2,000 square foot home costs between $255 and $570 for a one-time clean including rental or purchase of a pressure washer, cleaning chemicals, nozzles, and basic safety equipment. If you’re buying equipment to use repeatedly, budget $375 to $900 for the full setup. The savings versus professional service are real: typically $200 to $500 per cleaning event.
Professional roof pressure cleaning on the same 2,000 square foot home runs $350 to $600 for soft wash or $300 to $500 for standard pressure washing. Steep pitches add 25 to 40% to professional pricing. Heavy moss or lichen adds $100 to $300. Multi-story access adds $50 to $150.
The honest guidance: DIY is genuinely appropriate for single-story homes with accessible roof pitch and moderate contamination, provided you’re comfortable at height and willing to follow the PSI and chemical guidelines carefully. For two-story homes, steep roofs, significant lichen contamination, or shingles over 15 years old, the $300 to $600 professional service cost is excellent insurance against the $200 to $500 per granule-stripping mistake that experienced technicians simply don’t make.
The Mistakes That Cost Homeowners Every Year
Most roof pressure cleaning damage isn’t malicious it’s uninformed. These are the errors that show up most consistently:
Using too much pressure on asphalt. The granule loss from a single high-pressure session isn’t immediately obvious. It shows up three years later when your roof starts aging faster than it should. Set PSI conservatively and test in an inconspicuous area before cleaning your entire roof.
Spraying upward under shingles. Every instruction in this guide has said it because it bears repeating: the angle of your spray relative to shingle overlap direction is non-negotiable. Downward only.
Skipping the chemical pre-treatment. Mechanical removal of moss without biocide treatment is like mowing a weed it comes back faster because the roots survived. The chemistry is what makes the results last.
Forgetting about the landscaping. Sodium hypochlorite runoff is genuinely harmful to plants. Pre-wet everything, dilute continuously, and cover sensitive plants. It takes ten minutes and prevents a genuinely unpleasant outcome.
Working on a wet or windy day. Wet roofs and shifting pressure wand forces are a dangerous combination. If conditions aren’t right, reschedule. No clean roof is worth a fall.
How Long Will Your Clean Last?
This is the question that drives the whole maintenance conversation.
A proper soft wash with sodium hypochlorite and a post-clean biocide treatment typically keeps your roof clean for 2 to 4 years in moderate climates longer in drier regions, shorter in humid environments with heavy tree canopy. A pressure-wash-only clean without biocide typically needs retreatment within 12 to 18 months because the underlying biology wasn’t fully addressed.
The most cost-effective long-term strategy combines a professional or well-executed DIY soft wash every 2 to 3 years with zinc or copper ridge strips providing passive biological inhibition between treatments. Over a 10-year period, this approach costs roughly $800 to $2,000 in total roof cleaning investment fraction of the $8,000 to $20,000+ cost of premature roof replacement that unmanaged biological growth can necessitate.
Your Roof Doesn’t Ask for Much
Here’s the takeaway, stated simply: your roof works every hour of every day, in every weather condition, protecting everything and everyone inside your home. It asks for almost nothing in return a visual inspection twice a year, a cleaning every 2 to 3 years, and the occasional attention to gutters and flashings.
Roof pressure cleaning, done correctly with the right PSI settings, the right pressure washer roof cleaner chemicals, and basic technique discipline, is one of the most straightforward and high-value maintenance tasks available to any homeowner. It doesn’t require specialist skills. It doesn’t require expensive equipment. It requires knowing what you’re doing and respecting the material you’re working on.
Look up at your roof again. If what you see looks like it’s been a while, it probably has been. And now you know exactly what to do about it.
Frequently Asked Questions
Is roof pressure cleaning safe for asphalt shingles?
Yes, when done correctly. The key qualifiers are pressure (stay under 1,200 PSI, use a 40-degree nozzle) and direction (always spray downward along shingle direction, never upward). ARMA recommends soft washing at 50 to 150 PSI with diluted sodium hypochlorite as the preferred approach. High-pressure washing above 1,500 PSI strips granules, accelerates aging, and voids many manufacturer warranties.
What PSI should I use for roof pressure cleaning?
Match PSI to material: 500–1,200 PSI for asphalt shingles, 1,200–2,000 PSI for concrete and clay tile, 1,200–1,500 PSI for metal, and 500–800 PSI for cedar shake. When in doubt, start lower. A 40-degree nozzle at 12 to 18 inches of standoff distance provides gentler effective pressure than the machine’s rated output suggests.
How much does professional roof pressure cleaning cost?
Most residential homes run $250 to $600 professionally, depending on size, pitch, contamination level, and region. A standard 2,000 square foot home averages $350 to $600 for soft wash or $300 to $500 for straight pressure washing. Steep pitches, multi-story access, and heavy lichen add to the base price.
How often should I clean my roof?
Every 2 to 4 years for soft-washed roofs; every 12 to 18 months for pressure-only cleaning without biocide treatment. Humid climates, shaded roofs, and homes under heavy tree canopy may need annual attention. Zinc or copper ridge strips significantly extend the interval between required treatments.
What is the best chemical for roof pressure cleaning?
Sodium hypochlorite at 3 to 6% dilution mixed with a non-ionic surfactant is the professional and ARMA-recommended standard for removing algae, moss, and mold from residential roofs. For a no-rinse consumer option, Wet & Forget Outdoor is safe, effective, and simple to apply. Avoid muriatic acid, undiluted bleach, and cleaners formulated for concrete or decking.
Can I pressure clean my roof myself?
Yes, for single-story homes with accessible pitch and moderate contamination, DIY is fully feasible and saves $200 to $500 per clean. Two-story homes, steep pitches, heavy lichen, or shingles over 15 years old are best left to professionals. The primary DIY risks are falls, granule damage from excessive PSI, and landscape damage from chemical runoff, all manageable with preparation and correct technique.
Does roof pressure cleaning extend roof lifespan?
Significantly. Regular roof pressure cleaning extends shingle lifespan by 5 to 15 years by removing moss, algae, and lichen before they cause irreversible granule loss, moisture retention, and physical shingle lifting. Spending $300 to $600 every 2 to 3 years is a straightforward investment against the $8,000 to $20,000+ cost of a premature full replacement.
Get free roofing advice, cost guides, and seasonal maintenance tips.

Roofing content specialist with 5+ years researching U.S. residential and commercial roofing. Has documented 200+ projects covering installation costs, material selection, contractor vetting, and DIY guides for homeowners across all climate zones.
Leave A Comment