Installing Wood Shake Shingles: DIY Step-by-Step Guide
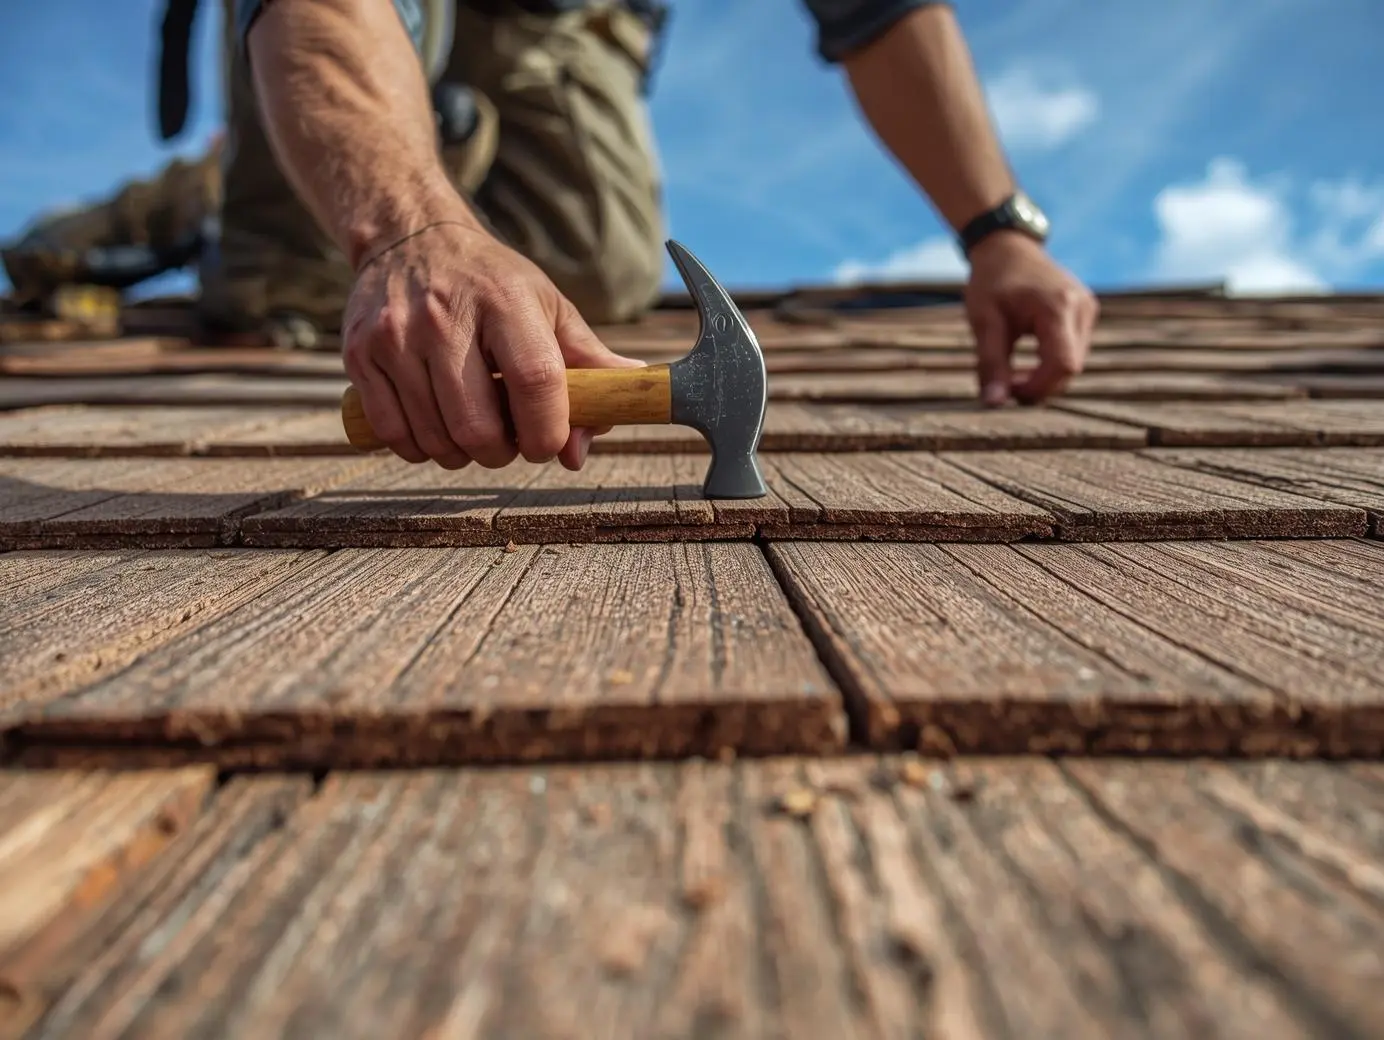
Installing wood shake shingles requires careful attention to exposure spacing, proper nailing techniques, and interlayer felt application that differs significantly from standard asphalt shingle installation. Cedar shake roofs deliver 30-50 year lifespans when installed correctly using hot-dipped galvanized nails, maintaining 1/4-inch spacing between shingles, and ensuring each course overlaps nails by 40mm for proper weather protection. This comprehensive DIY roof installation guide provides step-by-step instructions, detailed diagrams showing how to install roof shingles made from wood, and professional techniques enabling experienced DIYers to achieve contractor-quality results.
Wood shake installation differs from asphalt in critical ways each course requires 18-inch felt interlayers positioned to cover the top portion of shakes below, nail placement must sit 2 inches above the exposure line of the next course, and maintaining offset joints of at least 1.5 inches prevents water infiltration. While installing wood shake shingles demands more precision than asphalt, DIYers with roofing experience, proper safety equipment, and patience can successfully complete projects on low-to-moderate pitch roofs.
This guide covers essential preparation, required tools, detailed installation steps with visual diagrams, common mistakes to avoid, and when to call professionals for complex roof geometries.
Table of Contents
Is installing wood shake shingles a realistic DIY project?
Determining whether installing wood shake shingles suits DIY capabilities requires honest assessment of experience, physical ability, and roof complexity.
When DIY wood shake installation makes sense
Appropriate DIY scenarios:
- Previous roofing experience (at least basic shingle replacement or repair work)
- Simple roof geometry (basic gable or hip, no complex valleys or dormers)
- Low to moderate pitch (4:12 to 6:12 slopes manageable with proper safety equipment)
- Small to medium projects (sheds, garages, porches before attempting full home roofs)
- Access to experienced mentor who can guide first-time installation
- Adequate time commitment (wood shakes install 3-4 times slower than asphalt for beginners)
Required skills and experience:
- Comfortable working at heights with proper fall protection
- Ability to maintain consistent measurements and spacing
- Experience using pneumatic nailers or hammer with precision
- Understanding of roofing fundamentals (water drainage, flashing principles, ventilation)
- Physical stamina for repetitive overhead work in various weather conditions
When to hire professional cedar shake installers
Call professionals for:
- Steep roofs exceeding 7:12 pitch requiring specialized safety equipment
- Complex architectural features (multiple valleys, dormers, turrets, skylights)
- Three-story homes or roof heights exceeding 25 feet
- Full-house reroofs on your primary residence (insurance and warranty considerations)
- Intricate flashing requirements around chimneys, vent pipes, and roof penetrations
- No prior roofing experience (attempting cedar shake as first roofing project extremely risky)
Professional cedar shake installation costs $8-$15 per square foot installed—a significant investment justified by warranty protection, proper techniques, and avoiding costly water damage from DIY mistakes.
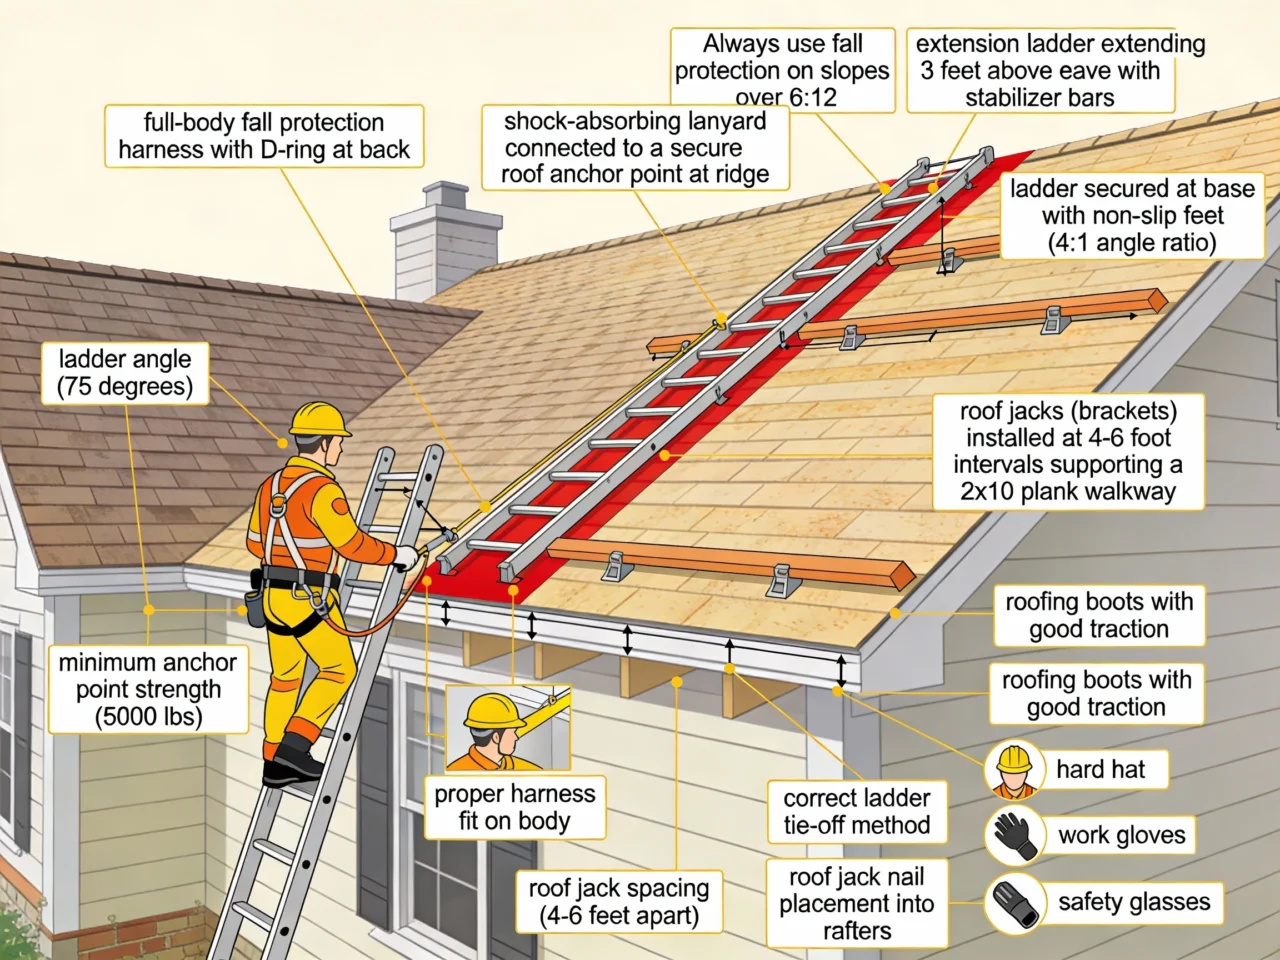
Safety considerations for DIY wood shake projects
Essential safety equipment:
- OSHA-compliant fall arrest system for roofs above 6 feet
- Proper ladder with stabilizers, secured at top and bottom
- Non-slip work boots with ankle support
- Safety glasses protecting against wood splinters and nail fragments
- Work gloves preventing hand injuries from rough cedar edges
- Hearing protection when using pneumatic nailers
Safety protocols:
- Never work alone—have someone nearby for emergencies
- Avoid roofing during wet, icy, or high-wind conditions
- Use roof jacks and planks on pitches exceeding 5:12 for stable work platform
- Keep work area clear of tools and materials preventing trip hazards
- Stay hydrated and take breaks—heat exhaustion common on roof surfaces
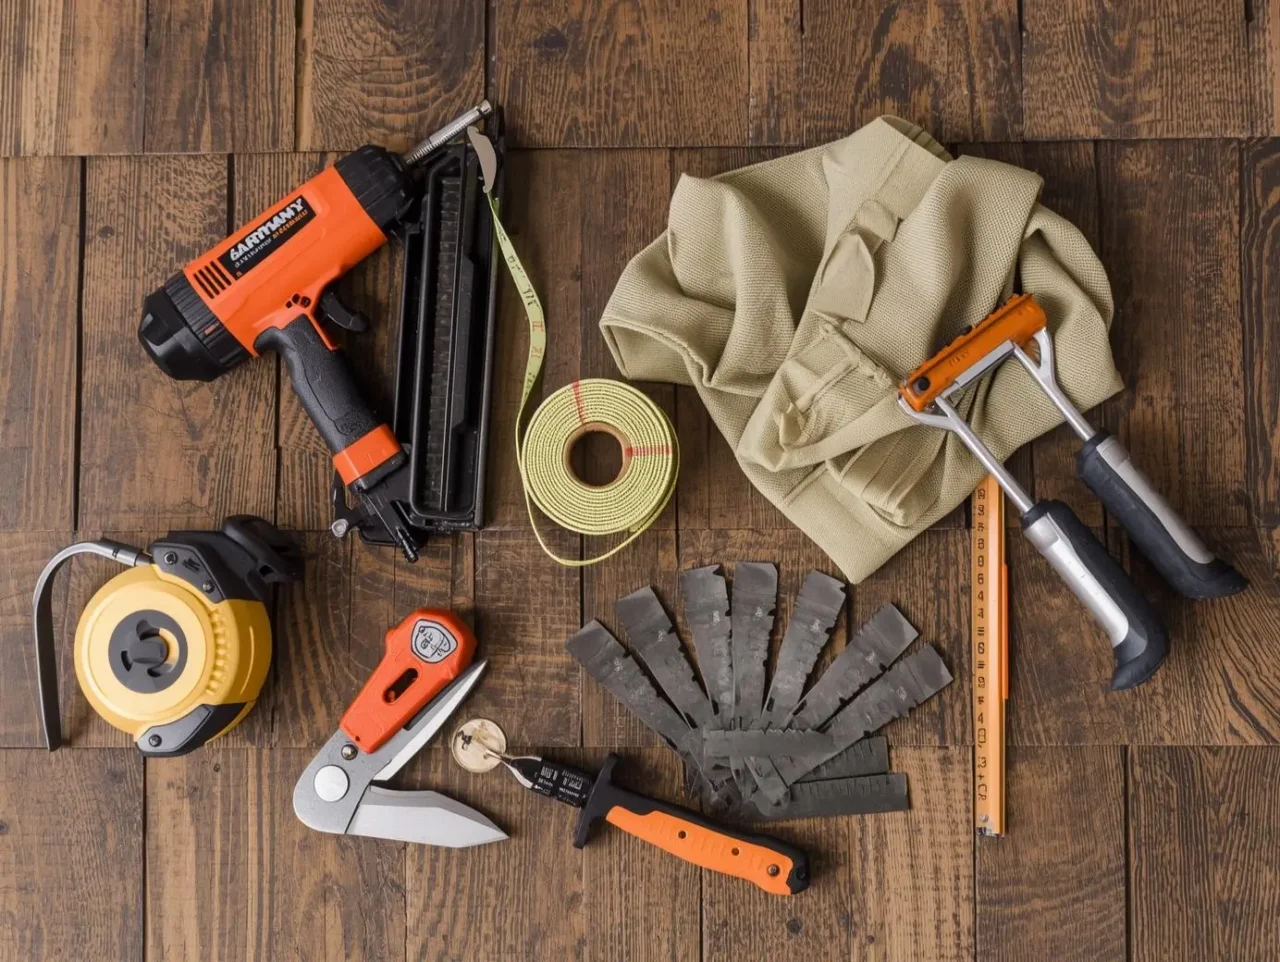
Tools and materials needed for installing wood shake shingles
Gathering correct tools and materials before starting prevents mid-project delays and ensures proper installation.
Essential tools for wood shake installation
Cutting and measuring tools:
- Tape measure (25-foot minimum for accurate layout)
- Chalk line for establishing straight coursing lines
- Utility knife with hooked blades for trimming felt underlayment
- Hand saw or circular saw for cutting shakes to length
- Hatchet for splitting shakes and making custom cuts
- Straight edge (6-8 feet) for aligning shake courses
Fastening tools:
- Hammer (if hand-nailing—16 oz framing hammer with smooth face)
- Pneumatic roofing nailer (dramatically speeds installation)
- Air compressor (if using pneumatic tools)
- Staple gun alternative (Paslode with ShingleFix staples for faster installation)
- Nail punch for countersinking exposed nails
Safety and positioning equipment:
- Roof jacks and planks for working platforms on steep pitches
- Extension ladder rated for your weight plus materials
- Fall protection harness and rope system
- Roof brackets for material staging
- Magnetic sweeper for cleanup (removes stray nails)
Required materials for wood shake roofs
Cedar shake shingles:
- Calculate coverage: 24-inch shakes at 10-inch exposure cover approximately 75-80 square feet per bundle
- Order 10% extra for waste, cutting, and future repairs
- Select appropriate grade: #1 “Blue Label” for roofing (highest quality, 100% edge grain)
- Verify shakes are kiln-dried to 12% moisture content preventing excessive shrinkage
Underlayment and felt:
- #30 asphalt-saturated felt (heavier than #15 used for asphalt shingles)
- 18-inch wide interlayer felt strips between shake courses
- 36-inch (1 meter) wide starter strip at eaves for complete protection
- Synthetic underlayment acceptable in some jurisdictions (check local codes)
Fasteners:
- Hot-dipped galvanized steel nails (minimum requirement for corrosion resistance)
- Stainless steel ring shank nails (premium choice—superior holding power and rust resistance)
- Size: 31mm x 1.8mm (approximately 1.25 inches long)
- Quantity: 2 nails per shake, calculate 240-280 nails per square
- Staples: 38mm crown staples if using pneumatic stapler
Starter course shingles:
- Narrower smooth-sawn shingles for starter course (not full shakes)
- Purpose: Creates uniform height for first full shake course
- Order separately—typically 1 bundle per 30 linear feet of eave
Flashing materials:
- Galvanized or stainless steel step flashing (not copper—reacts with cedar tannins)
- Valley flashing (if applicable)
- Drip edge for eaves and rakes
- Pipe flashing boots for vent penetrations
- Counter flashing for chimney installations
Ridge and hip caps:
- Factory-manufactured cedar ridge caps (pre-assembled for consistent appearance)
- Alternative: Site-cut ridge pieces from shake material
- Calculate linear feet of ridge and hip lines, order accordingly
Step-by-step guide to installing wood shake shingles
Following proper sequence and techniques ensures watertight, long-lasting wood shake roof installation.
Step 1: Roof deck preparation and inspection
Deck evaluation:
- Inspect plywood or OSB sheathing for soft spots, rot, or water damage
- Replace any compromised decking before proceeding
- Ensure solid nailable base—minimum 7/16-inch OSB or 1/2-inch plywood
- Verify proper ventilation (ridge vents, soffit vents) preventing moisture buildup
Surface preparation:
- Remove all debris, nails, and protrusions from deck surface
- Ensure deck is dry—never install wood shakes over wet substrate
- Check roof pitch meets minimum requirements (4:12 for standard installation, 3:12 minimum for heavy-duty applications)
Installing starter underlayment:
- Roll 36-inch (1 meter) strip of #30 felt along entire eave edge, keeping flush with bottom edge
- Use only enough nails to hold in place—avoid over-nailing
- Overlap horizontal seams 6 inches, vertical seams 4 inches
- This wide starter strip provides critical ice dam and wind-driven rain protection
Step 2: Installing drip edge and starter course
Drip edge installation:
- Install metal drip edge along eaves over underlayment
- Install drip edge along rakes under underlayment (different from eaves)
- Secure with roofing nails every 8-10 inches
- Overlap sections 2 inches, seal with roofing cement
Starter course application (double layer):
- Use smooth-sawn starter shingles (not full shakes) for first layer
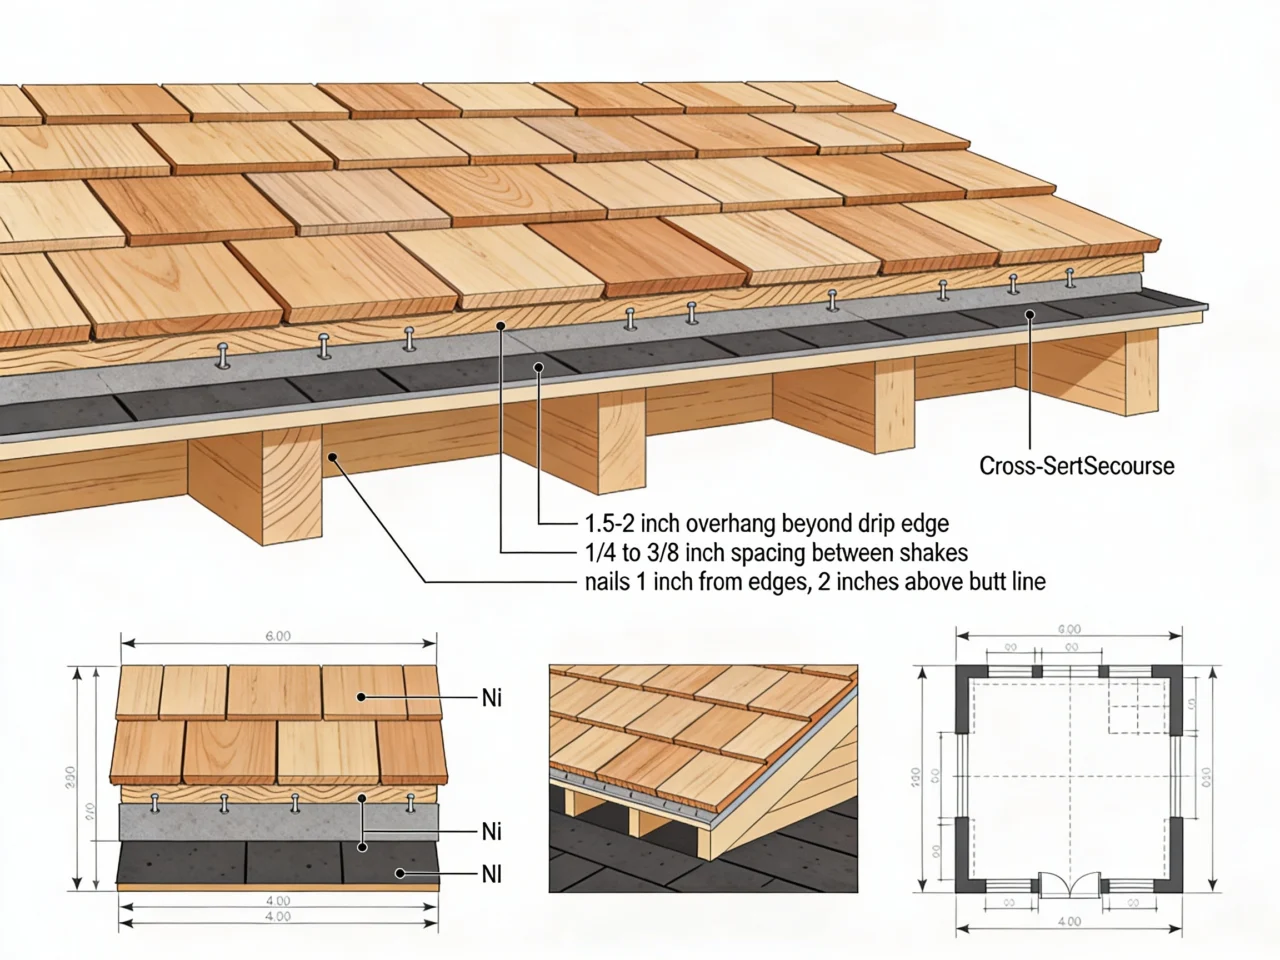
- Extend shingles 1.5 inches (40mm) beyond fascia for proper gutter drainage
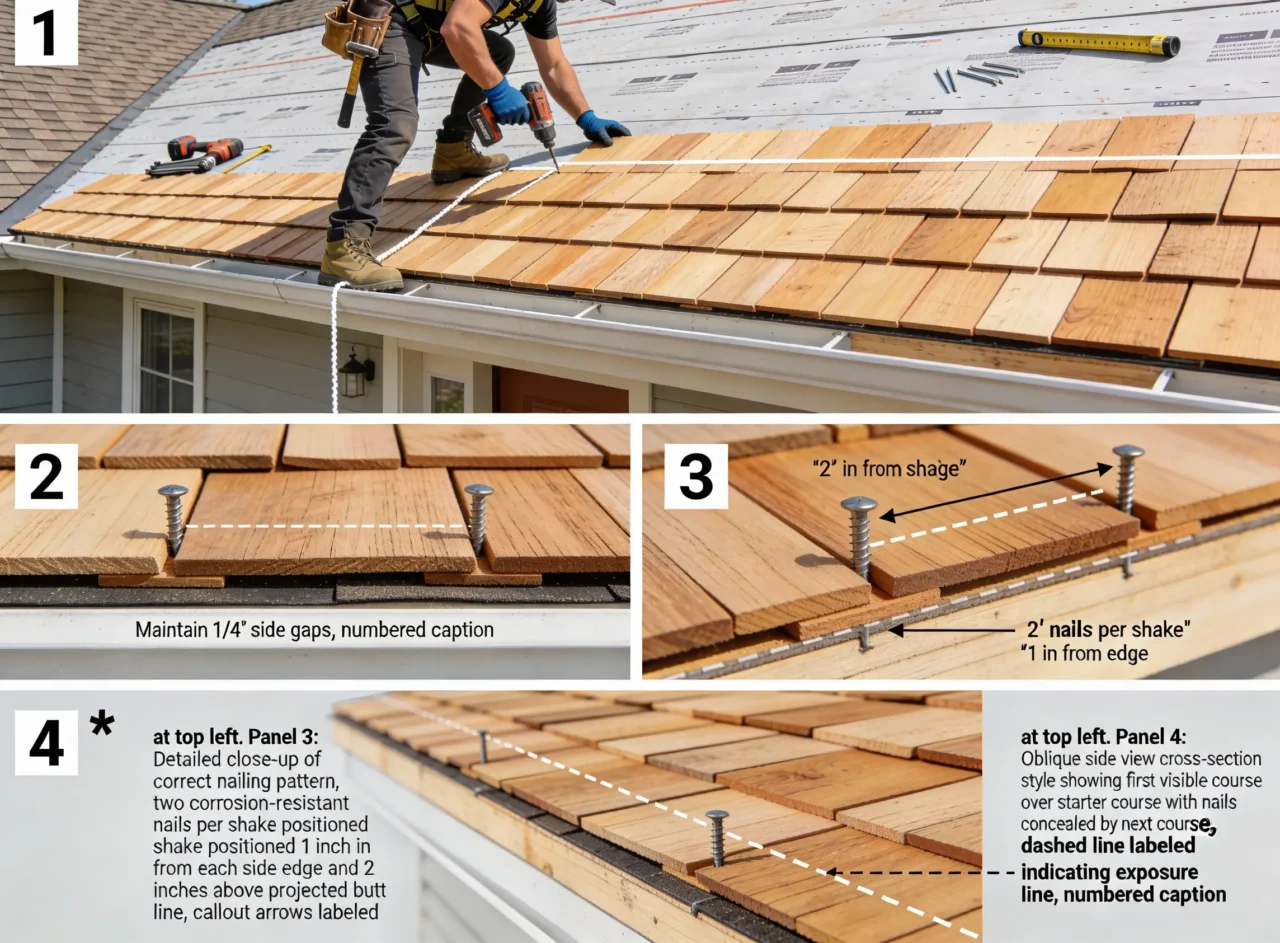
- Space starter shingles 1/4 inch apart (approximately 5-6mm)
- Nail 1 inch from each edge, 2 inches above butt line
- Apply second starter layer directly on top, offsetting joints minimum 1.5 inches
Purpose of double starter:
Creates uniform height for first full shake course while ensuring no gaps exist at vulnerable eave area.
Step 3: Establishing exposure and layout lines
Calculating proper exposure:
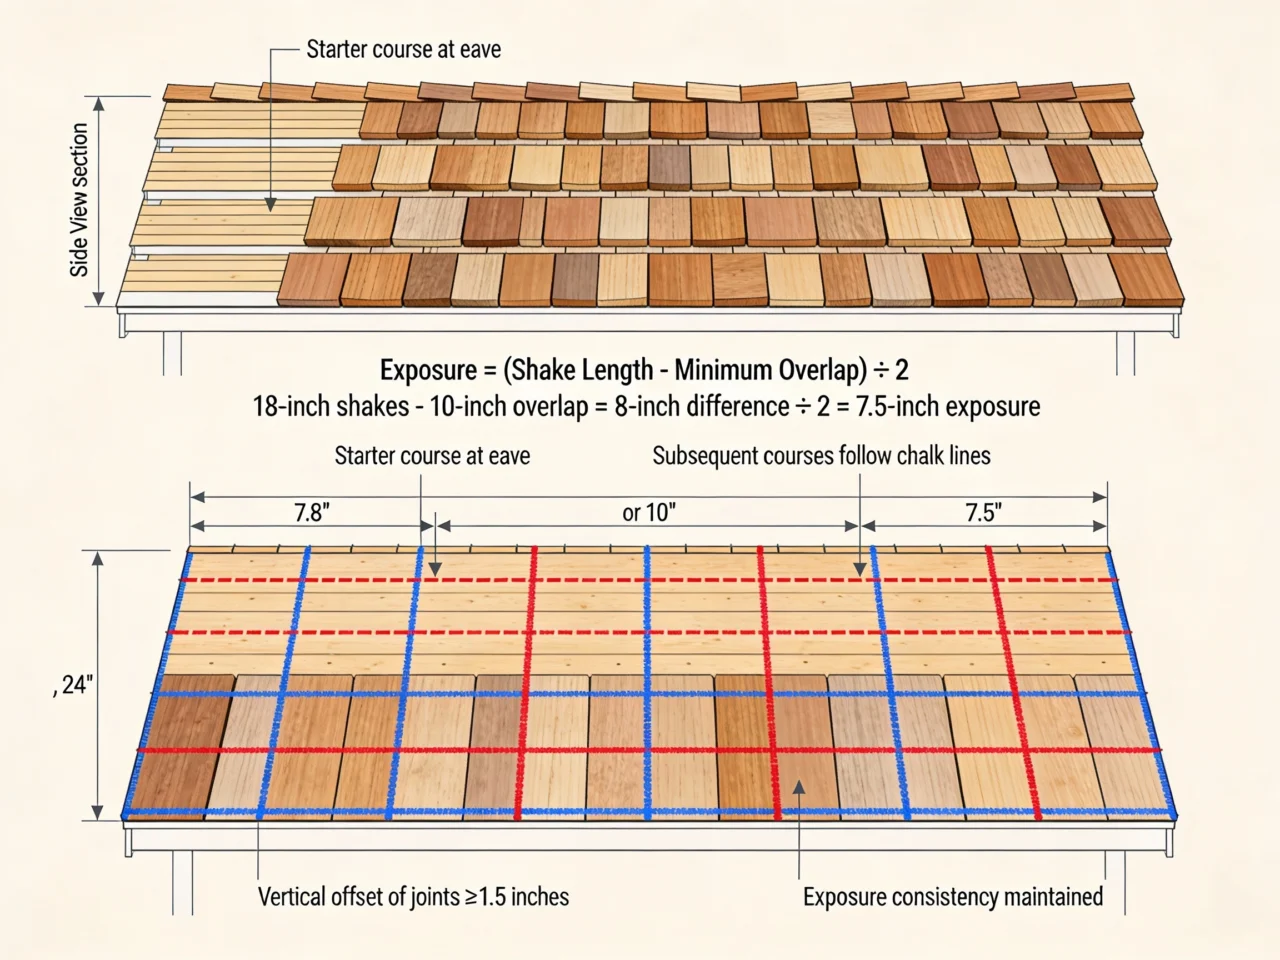
- 18-inch shakes: Maximum 7.5-inch exposure for standard double coverage
- 24-inch shakes: Maximum 10-inch exposure
- Formula: Shake length divided by 3, minus 1/2 inch = maximum exposure
- Conservative approach: Use 7-inch exposure for 18-inch, 8-9 inch for 24-inch shakes
Snapping chalk lines:
- Measure up from starter course butt line your chosen exposure distance
- Snap horizontal chalk line across entire roof width
- Repeat every 3-5 courses creating reference lines for alignment
- Vertical chalk lines every 4-6 feet help maintain straight vertical alignment
Planning for symmetry:
- Measure from eave to ridge, calculate number of courses
- Adjust exposure slightly if needed to avoid narrow course at ridge
- Plan hip and valley layouts ensuring shakes interweave properly
Step 4: Installing interlayer felt
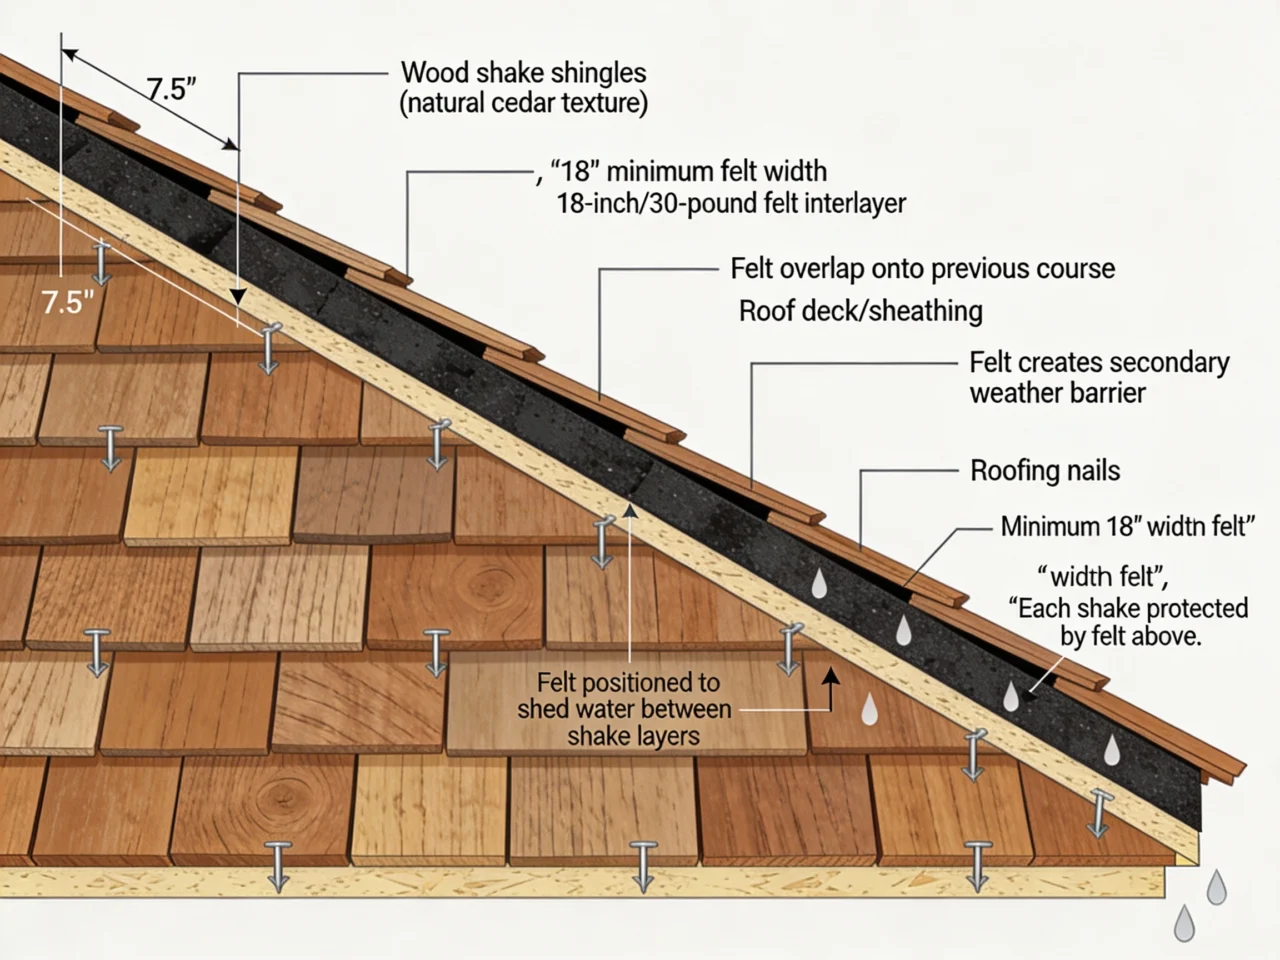
Critical difference from asphalt shingles:
Wood shakes require 18-inch felt interlayers between each course—this is not optional.
Interlayer felt application:
- Cut or purchase 18-inch wide strips of #30 felt
- Position bottom edge of felt strip at distance from shake butt equal to twice your exposure
- Example: With 7.5-inch exposure, place felt 15 inches above previous shake butt line
- This positions felt to cover top portion of shakes below while extending under shakes above
- Nail felt in place with large-head roofing nails—just enough to secure
- Overlap horizontal joints 6 inches, vertical joints 4 inches
Why interlayers matter:
Felt creates water barrier at joint lines where adjacent shake edges meet, preventing water infiltration if wind drives moisture upward.
Step 5: Installing first full shake course
Shake selection and placement:
- Select shakes with straight, sound edges for first course
- Begin at rake edge, allowing 1.5-inch overhang beyond rake trim
- Space shakes 1/4 to 3/8 inch apart (5-6mm) for expansion
- This gap accommodates moisture expansion preventing buckling
Ensuring joint offsets:
- Offset joints minimum 1.5 inches from joints in course below (including starter)
- Vertical joints should never align in three consecutive courses
- Pre-plan joint positions selecting shake widths accordingly
Nailing technique:
- Use 2 nails per shake regardless of width
- Position nails 3/4 inch (19-20mm) from each edge
- Place nails 1 to 2 inches above butt line of next course
- Drive nails flush—not overdriven (crushing wood) or underdriven (protruding)
- Angle nails slightly toward shake center if edges are thin
Alignment check:
- Use chalk line to verify course alignment every 2-3 rows
- Adjust slightly on subsequent courses if drift occurs
- Minor adjustments over several courses less noticeable than sudden corrections
Step 6: Continuing courses to ridge
Repetitive process for each course:
- Apply 18-inch interlayer felt positioned correctly above previous course
- Snap chalk line at proper exposure distance from previous course
- Select shakes ensuring minimum 1.5-inch joint offset from course below
- Install shakes with 1/4-inch spacing, proper overhang at rakes
- Nail each shake 2 inches above exposure line of next course, 3/4 inch from edges
- Check alignment every few courses, adjust gradually if needed
Maintaining consistent exposure:
- Measure periodically from multiple points ensuring uniform exposure
- Small variations (within 1/4 inch) acceptable and blend naturally
- Major inconsistencies (over 1/2 inch) become visually apparent
Working around roof penetrations:
- Install step flashing at wall intersections (one piece per shake course)
- Use manufactured pipe boots for vent pipes, trimming shakes to fit
- Cut shakes carefully around obstacles maintaining proper spacing
- Apply roofing cement under shake edges where they meet flashing
Valley treatment:
- Closed-cut valleys: Shakes from one side extend across valley, opposing side cut to fit
- Open valleys: Metal valley flashing 12-18 inches wide, shakes trimmed back 3-4 inches
- Weave valleys: Shakes interlace across valley (advanced technique, not recommended for DIYers)
Step 7: Ridge and hip cap installation
Final course preparation:
- Last shake course before ridge should maintain consistent exposure
- Trim shake tops as needed creating uniform ridge line
- Snap chalk line ensuring final course alignment perfect (most visible from ground)
Ridge cap installation:
- Use factory-manufactured cedar ridge caps (recommended for consistent appearance and weather protection)
- Alternative: Site-cut individual ridge pieces from shake material, cutting beveled edges forming ridge shape
- Install double starter course at ridge bottom (hip start)
- Work upward, each cap overlapping previous by half its length
- Nail caps on each side, positioning nails where next cap will cover
- Maintain straight line using chalk line on ridge center
Hip cap application:
- Begin at eave with double starter unit cut not to overlap onto second shake course
- Maintain straight alignment more critical on hips (visible from ground)
- Use chalk line on one side, watch opposite side for width variations
- Set aside narrow pieces for top ridge where less visible
Step 8: Final inspection and cleanup
Quality check:
- Walk entire roof inspecting for missed nails, improper spacing, or lifted shakes
- Verify all flashing properly installed and sealed
- Check rake and eave overhangs consistent along entire perimeter
- Ensure no exposed felt visible between shake courses
Cleanup procedures:
- Use magnetic sweeper removing all metal debris from roof and ground
- Sweep granular debris from roof surface (can stain shakes if left)
- Dispose of waste shakes and felt properly
- Clean gutters of installation debris
- Photograph completed installation for insurance records and future reference
Break-in period:
- New cedar shakes weather over first 6-12 months developing natural patina
- Some slight cupping and minor splitting normal as wood acclimates
- Color changes from reddish-brown to silver-gray over 1-3 years typical
- Monitor for any nails backing out during first season, re-drive as needed
Common mistakes when installing wood shake shingles
Avoiding typical errors ensures long-lasting, watertight wood shake roof performance.
Improper nail placement and technique
Nailing too low:
When nails sit below the butt line of the next course, they become exposed to weather and create leak points—nails must sit 1-2 inches above the exposure line ensuring next course covers them by minimum 40mm.
Nailing too close to edges:
Positioning nails less than 3/4 inch from shake edges causes splitting, especially as wood expands and contracts with moisture changes.
Overdriving nails:
Driving nails too deep crushes wood fibers, reducing holding power and potentially cracking shakes—nails should sit flush with shake surface, not countersunk.
Wrong nail type:
Using non-galvanized or aluminum nails results in premature corrosion, staining, and fastener failure—only hot-dipped galvanized or stainless steel fasteners acceptable.
Insufficient joint offset
Aligned vertical joints:
When joints in consecutive courses align within 1.5 inches, water channels straight through roof layers bypassing felt protection.
Three-course alignment:
Most critical mistake: vertical joints aligning through three consecutive courses creates direct water infiltration path compromising weathertightness.
Correction:
Pre-plan shake placement, selecting widths ensuring minimum 1.5-inch offset, ideally 3+ inches separation between course joints.
Omitting or incorrectly positioning interlayer felt
Skipping interlayers:
Some DIYers assume felt over entire deck sufficient like asphalt installation—wood shakes absolutely require 18-inch felt strips between each course.
Wrong felt positioning:
Placing felt too high or too low fails to provide proper coverage over top portion of shakes below while extending under shakes above.
Correct method:
Position bottom edge of 18-inch felt strip at distance from shake butt equal to twice your exposure, ensuring felt covers top 4 inches of shakes below.
Improper spacing between shakes
Tight spacing (no gap):
Installing shakes touching without 1/4-inch expansion gap causes buckling when wood swells during wet periods.
Excessive spacing:
Gaps wider than 3/8 inch allow excessive water penetration and visual appearance suffers.
Correct spacing:
Maintain consistent 1/4 to 3/8 inch (5-6mm) spacing between all shakes allowing natural expansion while preventing water infiltration.
Incorrect exposure
Excessive exposure:
Using exposure greater than shake length divided by 3 results in single coverage instead of double coverage, reducing weather protection to unacceptable levels.
Inconsistent exposure:
Varying exposure across roof creates wavy appearance and compromises weathertightness—maintain uniform exposure throughout.
Calculations:
- 18-inch shakes: Maximum 7.5 inches (conservative 7 inches recommended)
- 24-inch shakes: Maximum 10 inches (conservative 8-9 inches recommended)
Maintenance and longevity of wood shake roofs
Proper maintenance extends wood shake shingle lifespan to 30-50 years.
Expected lifespan
Factors affecting longevity:
- Installation quality (proper techniques add 10-15 years to lifespan)
- Wood quality (#1 grade cedar lasts longest)
- Climate (humid regions see 25-35 years, dry climates 40-50+ years)
- Maintenance frequency (annual inspections extend life significantly)
- Roof pitch (steeper pitch sheds water better, lasts longer)
Routine maintenance requirements
Annual inspections:
- Check for split, cracked, or loose shakes requiring replacement
- Inspect flashing around penetrations for deterioration
- Clear debris from valleys and gutters preventing water backup
- Examine ridge caps for wind damage or loosened fasteners
Cleaning recommendations:
- Remove moss, algae, and lichens annually with gentle brushing or low-pressure washing
- Trim overhanging branches preventing constant shade and moisture retention
- Clear accumulated needles and leaves from roof surface
Treatment options:
- Apply wood preservatives every 3-5 years in humid climates preventing rot
- Consider clear sealers maintaining natural appearance while enhancing water resistance
- Avoid oil-based treatments promoting mildew growth in some climates
When to replace individual shakes
Signs requiring replacement:
- Splits longer than 1/3 shake width
- Complete breakage or missing shakes
- Severe cupping preventing water shedding
- Rot or soft spots when pressed
- Widespread granular loss (in treated shakes)
Replacement technique:
- Split damaged shake with chisel, remove pieces
- Cut nails underneath with hacksaw blade or nail ripper
- Slide new shake into position, trimming if needed
- Nail top edge where next course covers (may need to lift slightly)
- Apply roofing cement under edges for temporary hold
Frequently asked questions about installing wood shake shingles
How difficult is installing wood shake shingles for DIYers?
Installing wood shake shingles requires intermediate-to-advanced roofing skills and takes 3-4 times longer than asphalt shingle installation due to interlayer felt requirements, precise spacing, and careful nail placement. DIYers with previous roofing experience can successfully complete simple structures like sheds and garages, but full house installations should be tackled only after gaining experience on smaller projects.
What’s the proper exposure for wood shake shingles?
Proper exposure for wood shake shingles depends on shake length: 18-inch shakes use maximum 7.5-inch exposure, while 24-inch shakes allow maximum 10-inch exposure, calculated as shake length divided by 3 to ensure double coverage protection. Conservative exposures of 7 inches (18-inch shakes) and 8-9 inches (24-inch shakes) provide enhanced weather resistance and longer roof life.
Do wood shakes require felt between each course?
Yes—wood shake installation absolutely requires 18-inch wide strips of #30 felt positioned between each shake course, with the bottom edge placed at a distance from the shake butt equal to twice the exposure, ensuring the felt covers the top portion of shakes below while extending under shakes above. This interlayer felt prevents water infiltration at shake joints and is critical for proper weatherproofing.
How far apart should wood shake shingles be spaced?
Wood shake shingles require 1/4 to 3/8 inch (5-6mm) spacing between adjacent shakes to accommodate natural wood expansion when wet without causing buckling. Spacing closer than 1/4 inch causes compression and buckling during expansion, while gaps exceeding 3/8 inch compromise water resistance.
What type of nails for installing wood shake shingles?
Use hot-dipped galvanized steel or stainless steel ring shank nails sized 31mm x 1.8mm (approximately 1.25 inches long), with 2 nails per shake positioned 3/4 inch from each edge and 1-2 inches above the butt line of the next course. Never use copper nails with cedar products as chemical reactions cause deterioration.
Can I install wood shakes directly over old asphalt shingles?
No—wood shake shingles require removal of existing roofing materials and installation over clean deck with proper underlayment and interlayer felt system. The specialized installation technique including felt interlayers between courses cannot be properly executed over existing roofing, and old materials trap moisture accelerating wood deterioration.
How long do wood shake shingles last?
Wood shake shingles last 30-50 years when properly installed with high-quality #1 grade cedar, correct nail placement, appropriate exposure, interlayer felt, and regular maintenance. Lifespan varies by climate, installation quality, and maintenance frequency, with humid regions seeing shorter lifespans (25-35 years) and dry climates exceeding 40 years.
What roof pitch is required for wood shake installation?
Minimum recommended pitch for hand-split wood shake shingles is 4:12 (4 inches of rise per 12 inches of horizontal run) for standard double coverage installation. Slopes between 3:12 and 4:12 require special installation techniques including double-roof systems with hot-mopped underlayment, while slopes below 3:12 are not suitable for wood shake application.
Achieving professional results with DIY wood shake installation
Installing wood shake shingles successfully requires mastering exposure calculations, interlayer felt positioning, proper nail placement 2 inches above exposure lines, and maintaining 1.5-inch minimum joint offsets between consecutive courses. This DIY roof installation technique differs significantly from asphalt shingle methods through mandatory 18-inch felt strips between each shake course, 1/4-inch spacing between shingles for expansion, and double starter courses creating uniform first-course height.
Following this comprehensive diagram how to install roof shingles guide enables experienced DIYers to achieve 30-50 year roof lifespans rivaling professional installations by using hot-dipped galvanized nails, calculating correct exposure (maximum shake length divided by 3), and positioning nails where next course provides minimum 40mm coverage. Wood shake roofs deliver unmatched natural beauty and durability when installation fundamentals are respected, though complex geometries, steep pitches, or first-time roofers should consider professional contractors ensuring proper techniques and warranty protection.
Ready to start installing wood shake shingles? Gather quality #1 grade cedar, hot-dipped galvanized nails, #30 felt, and proper safety equipment, practice techniques on small structures before tackling primary residences, and maintain consistent exposure and spacing throughout installation. Remember: patience and precision matter more than speed—properly installed wood shakes protect homes for decades while rushed installations fail within years.
Get free roofing advice, cost guides, and seasonal maintenance tips.

Roofing content specialist with 5+ years researching U.S. residential and commercial roofing. Has documented 200+ projects covering installation costs, material selection, contractor vetting, and DIY guides for homeowners across all climate zones.
Leave A Comment