Snap Lock Standing Seam Metal Roof: Installation Guide
Snap lock standing seam metal roof systems cost $8-$14 per square foot installed and feature factory-formed male and female edges that interlock over concealed clips without requiring expensive mechanical seamers, making them 30-40% faster to install than traditional field-seamed systems. Standard snap lock panels measure 12-19 inches wide with 1.5-2 inch raised seams, secured using floating clips spaced 12 inches on center at roof edges and 24 inches in field areas to accommodate thermal expansion. This snap-together design creates perfectly straight standing seams while allowing DIY installation, though minimum roof slope requirements of 3:12 pitch (versus 0.5:12 for mechanical seam) limit low-slope applications.
Table of Contents
Standing seam metal roofing systems dominate the residential and commercial roofing market, with snap lock variations accounting for approximately 60% of new installations due to simplified installation requirements and cost savings averaging $2-$4 per square foot compared to mechanically seamed alternatives. The snap lock mechanism eliminates the need for $3,000-$8,000 mechanical seaming equipment while producing consistent, factory-quality seams that contractors and DIY installers can achieve using basic hand tools.
This comprehensive guide covers snap lock standing seam panel specifications, complete installation procedures, clip spacing requirements, cost comparisons vs mechanical seam systems, tool requirements, common installation mistakes, and when snap lock makes sense versus traditional field-seamed metal roofing.
What is Snap Lock Standing Seam Metal Roof?
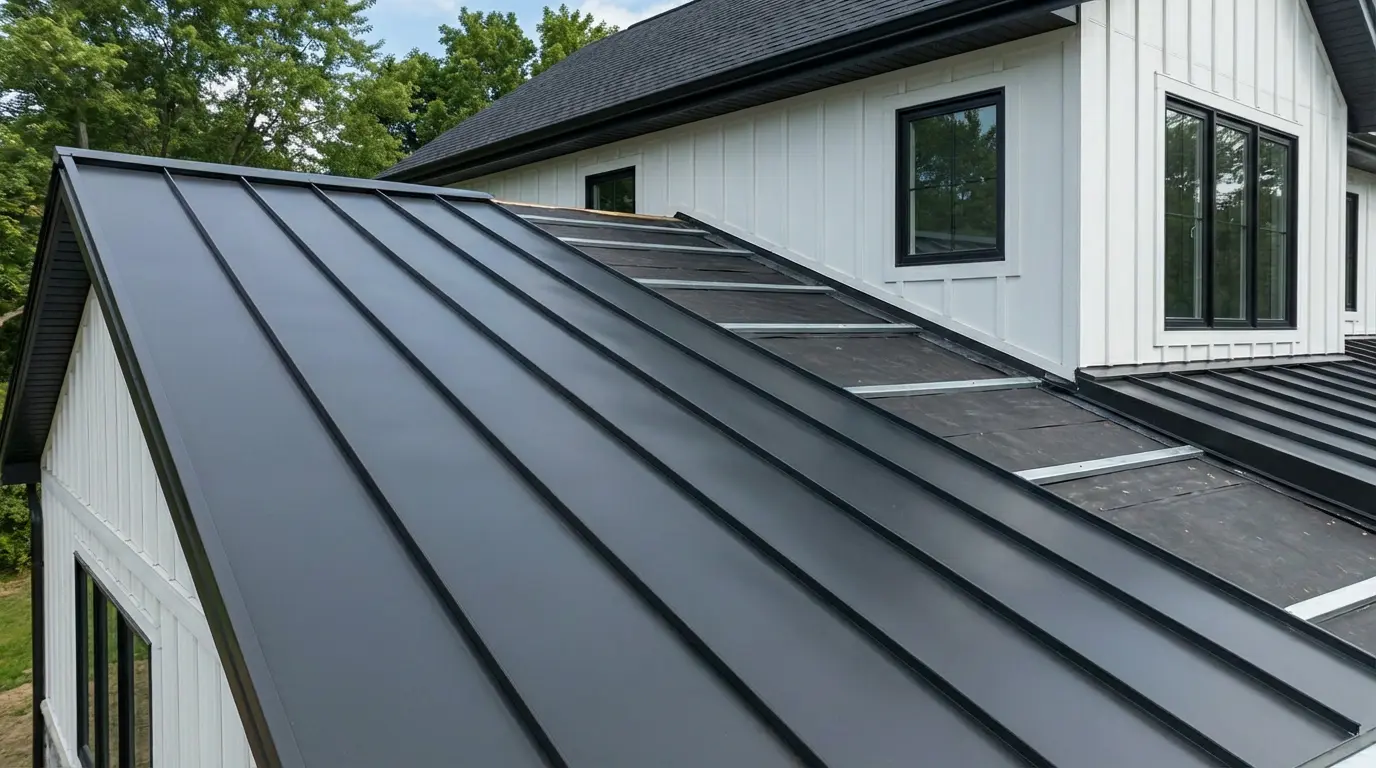
Snap lock standing seam metal roofing uses factory-bent panels with pre-formed interlocking edges one male edge and one female edge that snap together over concealed metal clips secured to the roof deck, creating continuous vertical seams without mechanical crimping tools. Each panel features a raised seam (typically 1.5-2 inches high) that runs perpendicular to the roof slope, with the snap-lock mechanism providing weather-tight connections through hand pressure, foot pressure, or light mallet taps.
Snap Lock vs Mechanical Seam Standing Seam
Field-Seamed (Mechanical) Standing Seam:
- Requires mechanical seaming tools ($3,000-$8,000 investment)
- Panels crimped together on-site using hand seamers or electric seamers
- Creates slight imperfections for traditional aesthetic
- Suitable for low-slope roofs (down to 0.5:12 pitch)
- Installation time: 8-12 hours per square (100 sq ft)
Snap Lock Standing Seam:
- No mechanical seamers required panels snap together by hand
- Factory-formed edges ensure perfectly straight seams
- Faster installation: 5-8 hours per square
- Minimum slope requirement: 3:12 pitch
- Cost savings: $2-$4 per square foot vs mechanical seam
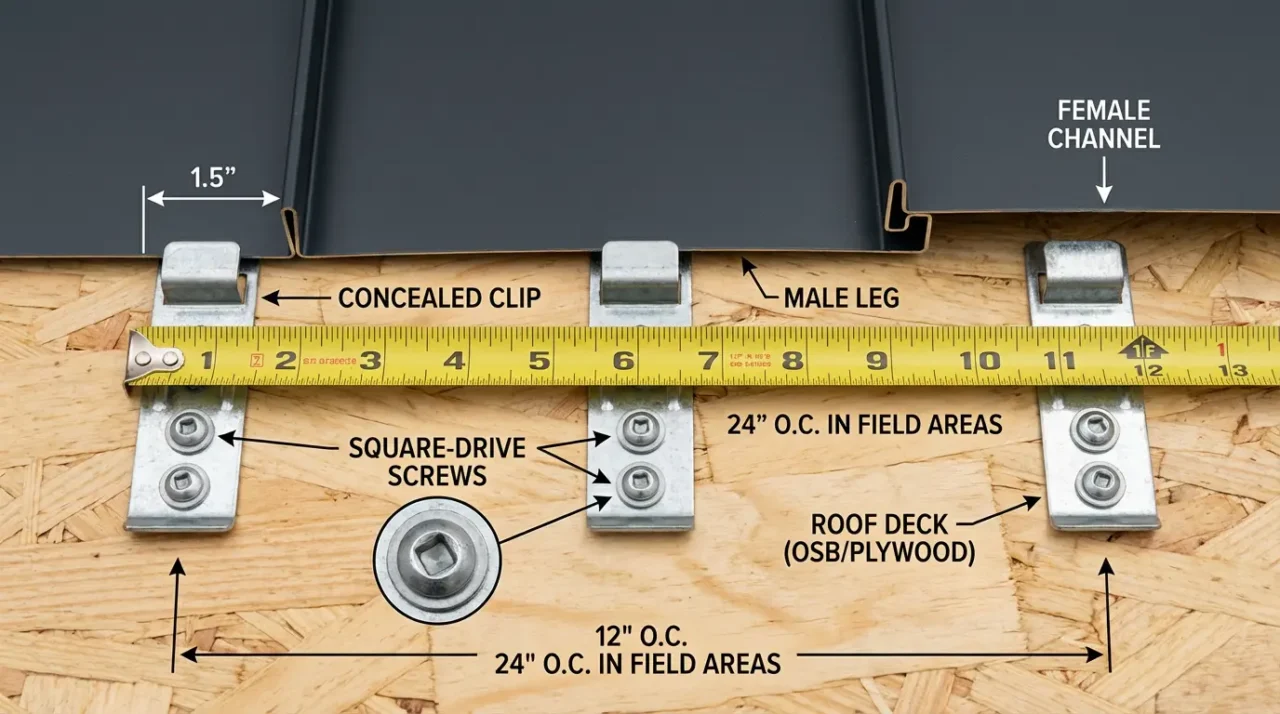
Key Components of Snap Lock Systems
Concealed Clips:
Aluminum or galvanized steel clips attach to roof deck with screws, hooking over panel edges to secure panels while allowing thermal movement. Clip spacing determines wind uplift resistance and panel stability.
Male Edge (Hook Edge):
Raised vertical leg with outward-facing hook that snaps over the clip and into the adjacent panel’s female edge.
Female Edge (Receiving Edge):
Inward-facing channel that receives the male edge from the adjacent panel, creating the interlock.
Floating Attachment:
Clips secure panels at seams only never through panel faces allowing metal to expand/contract 1/8 to 1/4 inch per 20 feet of length with temperature changes.
Snap Lock Standing Seam Metal Roof Cost (2026 Pricing)
Material costs, panel gauge, finish quality, and installation complexity determine total snap lock standing seam project expenses.
Cost Per Square Foot Breakdown
| Cost Component | DIY Material Cost | Professional Install Cost | Notes |
|---|---|---|---|
| Snap Lock Panels (24-26 gauge) | $3.50-$5.50/sf | $5.50-$8.50/sf | Painted steel finish |
| Snap Lock Panels (22 gauge premium) | $4.50-$6.50/sf | $6.50-$10.00/sf | Kynar 500/PVDF coating |
| Aluminum Snap Lock | $5.00-$7.50/sf | $7.50-$11.50/sf | .032-.040 thickness |
| Concealed Clips + Fasteners | $0.40-$0.70/sf | Included | 250-300 clips per square |
| Underlayment (synthetic high-perm) | $0.55-$0.85/sf | Included | Required for warranty |
| Trim/Flashing (eave, ridge, rake) | $8-$15/linear ft | Included | Custom-bent to match panels |
| Labor (professional installation) | N/A | $3.00-$5.50/sf | Varies by region/complexity |
| Total Installed Cost | $5.00-$8.00/sf | $8.00-$14.00/sf | Average residential project |
Project Cost Examples by Roof Size
1,200 SF Ranch Home (Simple Gable, 5:12 Pitch):
- DIY materials: $6,000-$9,600
- Professional installation: $9,600-$16,800
- Time to install (DIY): 4-6 days
- Time to install (professional crew): 2-3 days
2,400 SF Two-Story (Hip Roof, Multiple Dormers):
- DIY materials: $12,000-$19,200
- Professional installation: $19,200-$33,600
- Complexity adds 20-35% to baseline costs
3,500 SF Complex Roof (Multiple Valleys, Skylights, 8:12+ Pitch):
- Professional installation recommended: $28,000-$49,000
- Steep pitch adds 25-40% labor premium
- Includes skylight integration and complex flashing
Snap Lock Standing Seam Panel Specifications
Understanding panel dimensions, gauge options, and material choices ensures proper system selection for your application.
Standard Panel Dimensions
Panel Width (Coverage):
- 12 inches: Narrow profile for traditional look, more seams per roof
- 16 inches: Most common residential width, balances aesthetics and efficiency
- 17-18 inches: Popular commercial width
- 19 inches: Maximum coverage, fewer seams, modern appearance
Seam Height:
- 1.5 inches: Standard residential snap lock profile
- 2.0 inches: Enhanced profile for commercial or premium residential
- 2.5 inches: Maximum height for architectural emphasis
Panel Length:
- Custom-cut to roof measurement (typically 6-40 feet continuous)
- Panels run continuously from eave to ridge for single-piece installation
- No horizontal seams = superior weather protection
Material Gauge and Thickness
| Gauge | Thickness (inches) | Weight (lbs/sf) | Best Application | Durability Rating |
|---|---|---|---|---|
| 29 gauge | 0.0142″ | 0.60 | Budget residential, low-wind zones | 30-40 years |
| 26 gauge | 0.0179″ | 0.75 | Standard residential, most common | 40-50 years |
| 24 gauge | 0.0239″ | 0.95 | Premium residential, high-wind zones | 50-60 years |
| 22 gauge | 0.0299″ | 1.20 | Commercial, coastal applications | 60-70 years |
Aluminum Options:
- .032″ thickness: Equivalent to 26-27 gauge steel
- .040″ thickness: Equivalent to 24 gauge steel
- Benefits: Rust-proof, lighter weight (40% less than steel), higher cost ($1.50-$2.50/sf premium)
Paint and Finish Systems
Polyester Paint (Economy):
- Cost: Baseline pricing
- Warranty: 25-30 years fade/chalk resistance
- Best for: Budget projects, non-visible roofs
SMP (Silicone Modified Polyester):
- Cost: Add $0.30-$0.60/sf
- Warranty: 30-35 years
- Best for: Standard residential applications
PVDF/Kynar 500 (Premium):
- Cost: Add $0.80-$1.50/sf
- Warranty: 40+ years fade/chalk resistance
- Best for: Coastal, high-UV environments, premium homes
Color Selection Impact:
- Light colors (white, light gray, tan): Better heat reflection, lower cost
- Dark colors (black, dark bronze, dark gray): Heat absorption, +$0.20-$0.40/sf premium
- Custom colors: +$0.50-$1.00/sf, longer lead times
How to Install Snap Lock Standing Seam Metal Roof: Step-by-Step
Proper installation requires attention to layout, clip placement, and thermal expansion accommodation.
Pre-Installation Requirements
Roof Deck Preparation:
- Minimum 15/32″ plywood or 7/16″ OSB sheathing
- Rafters spaced maximum 24 inches on center
- Moisture content below 19% verified with moisture meter
- All damaged sections replaced, deck smooth and flat
Underlayment Installation:
- High-perm synthetic underlayment (30+ perms minimum) required
- Install horizontally from eave to ridge
- 6-inch side laps, 6-inch end laps
- Ice and water shield in valleys and first 24 inches at eaves (cold climates)
Minimum Slope Verification:
- Snap lock systems require 3:12 pitch minimum (3 inches rise per 12 inches run)
- Lower slopes risk water infiltration at snap connections
- Mechanical seam systems required for slopes under 3:12
Step 1: Install Eave Drip Edge and Trim
Begin at the eave (bottom edge) by installing drip edge trim under the underlayment to direct water away from fascia boards. The eave trim features a hemming channel that secures panel bottom edges while allowing thermal expansion panels hook into the 1-inch hem but can slide lengthwise as metal expands/contracts.
Eave Trim Installation:
- Position drip edge flush with fascia top
- Secure with pancake head screws every 12 inches
- Overlap trim pieces 2 inches minimum at joints
- Seal overlaps with butyl tape or approved sealant
Step 2: Install Rake Trim and Valley Flashing
Rake Trim (Gable Edges):
Install sub-panel flashing at rake edges before panels, creating a pocket that conceals trimmed panel edges for clean appearance. Secure every 12 inches with fasteners appropriate for substrate.
Valley Flashing:
- Use pre-bent valley metal or field-form from flat stock
- Minimum 24 inches wide (12 inches each side of valley center)
- Apply ice and water shield under valley metal
- Install joggle cleats every 12 inches along valley centerline for panel attachment
Step 3: Determine Panel Layout and Cut First Panel
Calculate panel layout to achieve symmetric appearance:
- Measure roof width at eaves and ridge
- Divide by panel coverage width (e.g., 16 inches)
- Adjust first and last panel widths for equal appearance
- Ensure standing seams align across valleys and on both sides of hips
Cutting First Panel:
- Trim width using tin snips or shears (cut from male edge side only)
- Cut panels 1/8 to 1/4 inch short of ridge to accommodate thermal expansion
- Notch vertical legs at eave end equal to hem depth (typically 1 inch)
- Use panel hemming tool to fold eave end 180 degrees over drip edge
Step 4: Install Concealed Clips
Clip spacing determines wind uplift resistance and must follow manufacturer specifications:
Edge Zone Clip Spacing (first 3 panels from each rake):
- 12 inches on center along entire seam length
- Higher wind loads at roof perimeter require closer spacing
Field Area Clip Spacing (interior panels):
- 6 inches from eave end (first clip)
- 12 inches from eave (second clip)
- 24 inches on center for remaining seam length
- 12 inches from ridge (final clip before ridge)
Clip Installation Technique:
- Position clip over panel male edge location
- Secure with flathead square-drive screws (never Phillips head)
- Use drill with clutch setting to prevent over-tightening (never impact drivers)
- Tighten until clip is snug but panel can still slide freely for thermal movement
- Verify panel slides 1/8 to 1/4 inch in both directions after all clips installed
Step 5: Install First Panel
Position the first panel with trimmed edge tucked into rake trim pocket:
- Align panel square to eave and ridge (critical for entire roof alignment)
- Hook hemmed bottom edge over eave drip edge
- Press panel down firmly to seat hem
- Verify panel coverage at ridge and eave (should match calculations)
- Check plumb alignment with level or straight edge
Critical: Have helpers at eave and ridge simultaneously verify panel position before proceeding first panel alignment determines squareness of entire installation.
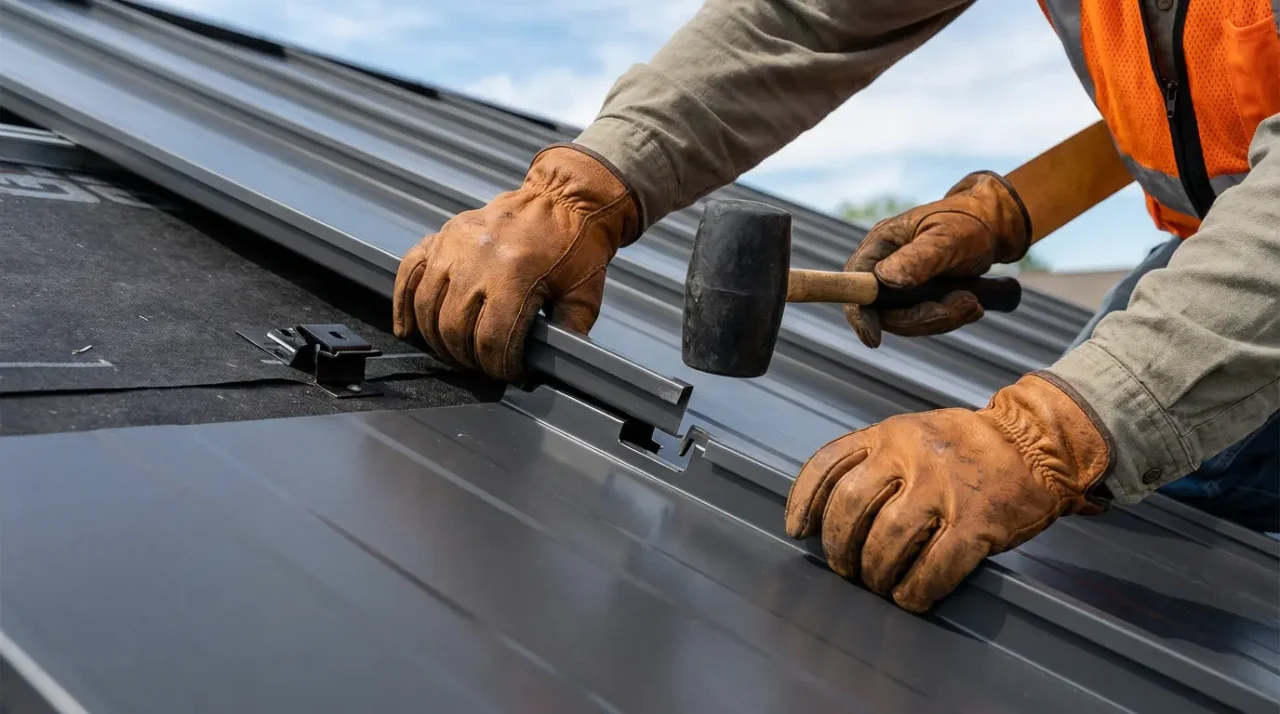
Step 6: Snap Subsequent Panels into Place
Each panel snaps over the clips and into the previous panel:
- Position panel male edge over installed clips
- Align female edge with previous panel’s male edge
- Starting at eave, press down firmly or tap with rubber mallet until snap is heard/felt
- Work from bottom to top, snapping entire seam length
- Verify seam is fully engaged no gaps visible
- Check that panel slides freely after snapping (confirms proper thermal movement)
Installation Speed:
Experienced installers snap 200-300 linear feet of seam per hour; beginners allow 100-150 feet per hour.
Step 7: Valley and Hip Transitions
Valley Panel Treatment:
- Install panels continuous across valley on both sides
- Field-cut valley panel to fit tight between panel ribs
- Mark panel for valley cut using chalk line
- Cut panels at 45-degree angle along valley centerline
- Hand-bend panel bottom edge to match valley slope angle
- Lock panel onto joggle cleat along valley before pushing tight
- Back panel off 1/8 inch from valley center to allow expansion
Hip Transitions:
Similar process to valleys but using hip clips and pre-bent hip cap trim that covers seam intersection.
Step 8: Ridge Cap Installation
Ridge Closure Process:
- Install panels continuous to ridge on both sides
- Field-cut Z-closure pieces to fit tight between panel ribs
- Apply 7/8-inch double-bead butyl tape to Z-closure base
- Install Z-closures onto panels at both sides of ridge
- Fasten Z-closures with appropriate screws (minimum 4 per piece, 12 inches maximum spacing)
- Install ridge cap trim over Z-closures
- Secure ridge cap per manufacturer specifications (typically exposed fasteners every 12 inches)
Vented Ridge Options:
Use ridge vent clips and perforated closure material to maintain attic ventilation while sealing ridge against weather infiltration.
Step 9: Penetration Flashing (Vents, Chimneys, Skylights)
Pipe Vent Flashing:
- Install panels continuous across vent location
- Apply 7/8-inch double-bead tape sealant to vent clip legs
- Install 2 vent clips toward top of panel (one fastener each, lower position only)
- Lift upper end of clips, tuck vent boot flange underneath
- Secure upper fasteners through boot flange into clips
- Apply additional sealant around boot base
Skylight Integration:
Use manufacturer-specific metal roof flashing kits (Velux, Fakro) designed for standing seam profiles these kits include step flashing that integrates with panel seams without penetrating roof deck.
Snap Lock Standing Seam Tools and Equipment
Required tools for DIY installation differ significantly from mechanical seam requirements.
Essential Tools (Required)
- Tin Snips/Aviation Shears: Left-cut, right-cut, and straight-cut for trimming panels ($15-$40 each)
- Rubber Mallet: For tapping panels into snap engagement without denting ($12-$25)
- Cordless Drill with Clutch: For installing clips never use impact drivers ($100-$300)
- Square-Drive Bit Set: Flathead square-drive bits prevent cam-out (#2 and #3 sizes, $8-$15)
- Measuring Tape (25-30 ft): For layout and panel measurement ($15-$30)
- Chalk Line: For marking cut lines and layout lines ($8-$15)
- Speed Square: For checking panel alignment and making angle cuts ($10-$20)
- Panel Hemming Tool: For creating eave hem ($40-$80)
- Level (4-6 ft): Verify first panel plumb alignment ($30-$60)
- Safety Equipment: Roof harness, non-slip shoes, gloves, safety glasses ($150-$400)
Helpful Tools (Recommended)
- Panel Cart/Dolly: Moves panels from delivery to roof without damage ($80-$200)
- Panel Lifter: Assists with positioning long panels ($50-$120)
- Bending Brake (48-60″): For custom flashing fabrication ($300-$800)
- Circular Saw with Metal Blade: Faster panel trimming than snips ($120-$250)
- Cordless Screwdriver: Fine-tuning clip tension ($60-$150)
Tools NOT Required (Snap Lock Advantage)
- ❌ Mechanical Seamer ($3,000-$8,000 savings)
- ❌ Electric Seaming Cart ($5,000-$12,000 savings)
- ❌ Seaming Pliers (manual crimper)
- ❌ Specialty bending tools for field seaming
Total Tool Investment:
- DIY snap lock: $500-$1,200
- Professional snap lock: $1,500-$3,000
- Mechanical seam professional: $8,000-$15,000
Common Snap Lock Standing Seam Installation Mistakes
Even experienced installers make errors that compromise performance and warranty coverage.
Mistake 1: Using Impact Drivers for Clip Installation
Problem: Impact drivers deliver sudden torque that over-tightens clips, preventing thermal movement and causing panel buckling or fastener stripping.
Solution: Use cordless drills with adjustable clutch settings. Set clutch to stop when clip is snug but panel still slides freely. Manufacturers specifically prohibit impact drivers in installation manuals.
Cost of Error: Warped panels, popped fasteners, voided warranty.
Mistake 2: Incorrect Clip Spacing
Problem: Spacing clips too far apart (over 24 inches in field, over 12 inches at edges) allows panels to flutter in wind, creating noise and accelerating fastener fatigue.
Solution: Follow manufacturer spacing requirements exactly:
- 12″ OC at roof edges (3 panels from rake/eave)
- First clip 6″ from eave, second at 12″, then 24″ OC in field
- 12″ from ridge for final clip
Cost of Error: Wind damage, noise complaints, expensive re-fastening.
Mistake 3: Inadequate Thermal Expansion Allowance
Problem: Installing panels too tight against ridge or in valleys without expansion gaps causes buckling when metal expands in summer heat (steel expands 1/8″ per 20 feet per 100°F temperature increase).
Solution:
- Cut panels 1/8 to 1/4 inch short of ridge
- Back valley panels off 1/8 inch from valley center after locking
- Verify all panels slide freely after clip installation
- Never use sealant or fasteners that restrict panel movement
Cost of Error: Buckled panels (“oil canning”), stress cracks at fasteners.
Mistake 4: First Panel Not Square
Problem: If first panel isn’t perfectly aligned perpendicular to eave and parallel to rake, every subsequent panel magnifies the error by the final panel, seams may be several inches out of alignment.
Solution:
- Measure from eave to ridge at both panel edges before securing
- Have helpers at eave and ridge verify alignment simultaneously
- Use string lines or laser level for long panels (over 30 feet)
- Don’t rush first panel take extra time to ensure perfection
Cost of Error: Entire roof out of square, obvious seam misalignment, complete re-installation required.
Mistake 5: Snapping Panels from Top to Bottom
Problem: Attempting to snap seams starting at ridge and working toward eave can trap air or create incomplete engagement at bottom.
Solution: Always snap from bottom (eave) to top (ridge). This ensures each section locks completely before proceeding upward, and gravity assists proper seating.
Mistake 6: Over-Tightening Ridge/Hip Fasteners
Problem: Fasteners that penetrate through panel faces (exposed fasteners at ridge, hip, and rake trim) must not over-compress metal, which prevents thermal movement and creates stress points.
Solution: Tighten exposed fasteners until washer just contacts panel surface visible gap of 1/32 inch is acceptable and preferred. Use clutch drill or hand-tighten final 1/4 turn.
Snap Lock vs Mechanical Seam: Which is Better?
Choosing between snap lock and field-seamed standing seam depends on slope, budget, aesthetics, and installation expertise.
When Snap Lock is Better
Low-Slope Roofs (3:12 to 5:12 pitch):
- Snap lock suitable for slopes 3:12 and above
- Faster installation saves labor costs
- Perfectly straight seams look cleaner than hand-crimped seams
DIY Installations:
- No expensive seaming tools required
- Snap mechanism intuitive for non-professionals
- Online tutorials widely available
- Mistakes easier to correct (unsnap and reposition vs uncrimp and re-crimp)
Budget-Conscious Projects:
- Saves $2-$4 per square foot in installation costs
- Tool investment under $1,200 vs $8,000+ for mechanical
- Faster installation reduces labor time by 30-40%
Modern Aesthetic Preference:
- Factory-formed seams perfectly straight and uniform
- Contemporary look suits modern architectural styles
When Mechanical Seam is Better
Very Low-Slope Applications (0.5:12 to 3:12 pitch):
- Mechanical seam approved down to 0.5:12 (1/2 inch per foot)
- Tighter crimp provides better weather seal at low slopes
- Many snap lock warranties void below 3:12
Traditional Aesthetic:
- Hand-crimped seams show slight irregularities valued in historic or rustic architecture
- Preferred for farmhouse, barn, or traditional styles
Extreme Wind Zones (150+ mph design):
- Double-lock mechanical seam provides superior wind uplift resistance
- Coastal hurricane zones often specify mechanical seam
- Some building codes require mechanical seam in high-wind areas
Commercial/Industrial Projects:
- Longer panel lengths (60+ feet) benefit from mechanical seam strength
- Wider panel coverage options available
- Enhanced structural performance for large roof areas
Performance Comparison Table
| Factor | Snap Lock | Mechanical Seam |
|---|---|---|
| Minimum Slope | 3:12 pitch | 0.5:12 pitch |
| Installation Cost | $8-$14/sf | $10-$18/sf |
| Installation Speed | 5-8 hrs/square | 8-12 hrs/square |
| Tool Investment (professional) | $1,500-$3,000 | $8,000-$15,000 |
| DIY Friendly | Yes | No (specialized skills) |
| Seam Appearance | Perfectly straight | Slight variations |
| Wind Uplift Rating | 90-150 psf | 100-180 psf |
| Thermal Movement | Excellent (floating clips) | Excellent (floating clips) |
| Warranty (typical) | 30-50 years | 30-50 years |
| Repair Difficulty | Moderate (unsnap/re-snap) | Difficult (uncrimp/re-crimp) |
Snap Lock Standing Seam Maintenance and Longevity
Proper maintenance extends roof life and maintains warranty coverage.
Annual Inspection Checklist
Visual Inspection from Ground:
- Look for loose or displaced panels
- Check for dents or damage from fallen branches
- Verify ridge cap and trim pieces secure
On-Roof Inspection (if safe):
- Walk panels carefully (step in panel flats between seams, never on seams)
- Check clip fasteners for backing out or looseness
- Inspect seams for disengagement or separation
- Verify thermal movement still possible (panels slide 1/8-1/4 inch)
- Examine flashing around penetrations for sealant failure
Valley and Transition Points:
- Clear debris from valleys that could trap water
- Verify valley metal secure and seams sealed
- Check ridge vent function if present
Maintenance Schedule
Every 6 Months:
- Clear roof of debris (leaves, branches)
- Clean gutters to prevent ice dam formation
Annually:
- Full roof inspection per checklist above
- Touch up scratched paint with manufacturer-approved touch-up paint
Every 3-5 Years:
- Inspect and re-seal penetration flashings if needed
- Check exposed fasteners (ridge, hip, rake trim) for corrosion
- Replace any deteriorated sealant
Every 10-15 Years:
- Professional inspection recommended
- Re-tighten any loose fasteners
- Evaluate coating condition (consider re-coating dark colors showing fade)
Expected Lifespan
Panel Longevity:
- 26 gauge steel with PVDF coating: 40-50 years
- 24 gauge steel with PVDF coating: 50-60 years
- Aluminum snap lock: 50-70 years (rust-proof advantage)
Component Lifespan:
- Fasteners (stainless or painted): 40-50 years
- Clips (aluminum or galvanized): 40-60 years
- Sealants at penetrations: 10-20 years (require maintenance)
- Underlayment (if high-quality synthetic): 40-50 years
Factors Reducing Lifespan:
- Salt air/coastal environments: Reduce lifespan 20-30%
- High UV exposure (desert climates): Coating degrades faster (fade/chalk)
- Improper installation (restricted thermal movement): Creates stress failures in 10-20 years
- Lack of maintenance: Reduces lifespan by 25-40%
Frequently Asked Questions
What is the difference between snap lock and standing seam?
Snap lock is a type of standing seam metal roofing that uses factory-formed interlocking edges that snap together over concealed clips without mechanical crimping tools, while traditional standing seam (field-seamed) requires panels be crimped together on-site using expensive seamers. Snap lock installs 30-40% faster and costs $2-$4 less per square foot but requires minimum 3:12 roof pitch, whereas mechanical seam works on slopes down to 0.5:12.
Can I install snap lock standing seam myself?
Yes, snap lock standing seam is DIY-friendly for homeowners with basic construction skills and comfort working on roofs. Required tool investment is $500-$1,200 versus $8,000+ for mechanical seam equipment, and panels snap together using hand pressure or rubber mallet taps. However, proper safety equipment, understanding of clip spacing (12 inches at edges, 24 inches in field), and attention to first panel alignment are critical for successful installation.
How much does snap lock metal roof cost per square foot?
Snap lock standing seam metal roof costs $8-$14 per square foot professionally installed or $5-$8/sf for DIY material costs. Pricing depends on material gauge (26 gauge standard, 24 gauge premium), finish type (polyester vs PVDF coating adds $0.80-$1.50/sf), panel width, and roof complexity. A typical 1,500 square foot residential roof costs $12,000-$21,000 installed.
What is the minimum slope for snap lock metal roof?
Snap lock standing seam requires minimum 3:12 pitch (3 inches of rise per 12 inches of horizontal run) per most manufacturer specifications and warranty requirements. Lower slopes risk water infiltration at snap connections roofs with slopes under 3:12 must use mechanical seam systems approved down to 0.5:12 pitch, which provide tighter weather sealing through crimped connections.
How far apart should clips be on snap lock panels?
Snap lock panel clips must be spaced 12 inches on center along the entire seam length for the first 3 panels from each roof edge (high wind-load areas), with field area panels requiring clips at 6 inches from eave, 12 inches from eave, then 24 inches on center for remaining seam length, and final clip 12 inches from ridge. Proper clip spacing ensures wind uplift resistance and prevents panel flutter.
Can snap lock standing seam be installed over shingles?
Snap lock standing seam should not be installed directly over existing shingles because the uneven surface prevents proper clip attachment and thermal movement, voiding manufacturer warranties. Remove old shingles and install over smooth roof deck with appropriate underlayment (minimum 15/32″ plywood or 7/16″ OSB), or install vertical furring strips over shingles to create flat plane for clip attachment (adds $1.50-$2.50/sf).
How long does snap lock metal roof last?
Snap lock standing seam metal roofs last 40-60 years depending on material gauge, coating type, and climate conditions. Premium systems with 24 gauge steel and PVDF/Kynar coatings reach 50-60 year lifespans, while standard 26 gauge with polyester coatings last 40-50 years. Aluminum snap lock panels are rust-proof and can exceed 70 years in optimal conditions with proper maintenance.
Do snap lock panels expand and contract?
Yes, snap lock panels expand and contract with temperature changes steel expands approximately 1/8 inch per 20 feet of length per 100°F temperature increase. The concealed clip system accommodates this movement by securing panels at seams only (never through panel faces), allowing panels to slide lengthwise within clips. Panels must be cut 1/8-1/4 inch short of ridge and backed off from valleys to prevent thermal buckling.
What tools do I need to install snap lock panels?
Essential tools for snap lock installation include tin snips ($15-$40), rubber mallet ($12-$25), cordless drill with clutch never impact driver ($100-$300), square-drive bits ($8-$15), measuring tape ($15-$30), chalk line ($8-$15), panel hemming tool ($40-$80), level ($30-$60), and safety equipment ($150-$400). Total tool investment is $500-$1,200 versus $8,000+ required for mechanical seam systems.
Can you walk on snap lock standing seam roof?
Yes, you can walk on snap lock standing seam roofs but only step in the flat panel areas between raised seams never step directly on seams, which can disengage snap locks or bend seam edges. Wear soft-soled shoes to prevent scratching paint finish, and avoid walking on roofs when panels are hot (above 120°F) as metal becomes more susceptible to denting. Use roof ladder or walkboards for steep pitches above 8:12.
Get free roofing advice, cost guides, and seasonal maintenance tips.

Roofing content specialist with 5+ years researching U.S. residential and commercial roofing. Has documented 200+ projects covering installation costs, material selection, contractor vetting, and DIY guides for homeowners across all climate zones.
Leave A Comment